
Related Manuals for Baehr Tec S2000


Summary of Contents for Baehr Tec S2000
- Page 1 Operating Manual BaehrTec S2000 BaehrTec S2000 Spray pedicure device with handpiece Operating Manual English– V101 – Status 07/2015 Page 1/52...
-
Page 2: Table Of Contents
Operating Manual BaehrTec S2000 Table of Contents Page Table of Contents ........................2 Users notice ........................... 3 Symbols ........................5 2.1.1 Symbols in these operating instructions ............5 2.1.2 Type label with output details ................. 5 2.1.3 Symbols on the packaging ................6 Foreword ........................ -
Page 3: Users Notice
Operating Manual BaehrTec S2000 Users notice This operating manual must be read through thoroughly before using the device for the first time and the contained instructions and rules must be precisely observed. These operating instructions form part of the device user agreement. By thoroughly reading them, you will be familiarised fully with the functioning and operation of the device and will therefore be able to recognise and avoid operating errors, dangers and damage. - Page 4 Operating Manual BaehrTec S2000 If the power cable / insulation shows signs of damage. If the device was exposed to moisture and / or wetness. If the device has been dropped and / or if the device housing is damaged. In the event of lighting strike and / or surge, the device may be damaged.
-
Page 5: Symbols
Operating Manual BaehrTec S2000 Symbols 2.1.1 Symbols in these operating instructions Attention! This symbol indicates a danger to humans or the device. This symbol must always be given the utmost attention. Read the corresponding sections especially carefully and adhere very strictly to the specifications. This symbol provides especially useful advice and gives additional information on operating the device. -
Page 6: Symbols On The Packaging
Operating Manual BaehrTec S2000 Electrical/electronic waste. Devices with this label must be disposed of properly and must not be put in household waste. This symbol indicates which fuse(s) is are used in the device. Protection class II This is a device of protection class II with functional earthing. ON (max) / OFF (min) Indicates how the device should be operated. -
Page 7: Foreword
Think about the environment and your wallet. With the BaehrTec S2000 you have the following convincing "Baehr" advantages: - very low weight... -
Page 8: General Product Description And Application Purpose
The manufacturer cannot be held responsible for any damage caused by improper use, unqualified staff or incorrect operating. Only the spray solution approved for the BaehrTec S2000 (Baehr spray solution for Baehr spray technology devices, Art-No. 22333) may be used for this purpose. - Page 9 Operating Manual BaehrTec S2000 • Only use high-quality rotating instruments with standardised shaft (diameter 2.35 mm) from the Baehr product range. • Please observe the specific instructions of rotating instruments when using them. Above all, observe the manufacturer's information on maximum speeds, cleaning, disinfection and sterilisation.
-
Page 10: Information On Electromagnetic Compatibility
Operating Manual BaehrTec S2000 2.3.3 Information on electromagnetic compatibility We would like to point out that due to EN 60601-1 on the electromagnetic compatibility of electromedical devices that: • medical, electric devices are subject to particular precautionary measures and so must be operated according to the requirements of these operating instructions. -
Page 11: Safety Notices
Operating Manual BaehrTec S2000 2.3.4 Safety notices The device is not authorised for operation in potentially explosive areas. Before every application, the operator must make sure of the functional safety and proper condition of the device. Improper handling, maintenance and care may lead to premature deterioration and malfunctions. -
Page 12: Before Using The Device For The First Time
Operating Manual BaehrTec S2000 Before using the device for the first time Scope of delivery Before first use, you should check that all items have been delivered. Items delivered: 1 x S2000 controller incl. handpiece (these are firmly connected to each other) 1 x operating instructions 1 x power cable with straight connector Art No. - Page 13 Operating Manual BaehrTec S2000 Never operate the device with a damaged power cable. Your device has a removable device connector plug mechanism (see section "rear view"). Please ensure that the device is positioned so that a disconnection is unlikely at all times. Do not work with the BaehrTec S2000 in rooms that are very humid, such as saunas or swimming complexes.
- Page 14 Operating Manual BaehrTec S2000 Warning – risk of injury! As shown in the illustration, you should avoid "pulling motions" during your work, as this may cause the instruments to slip out. Please take care not to exert too much pressure when using the instrument (burns on skin).
-
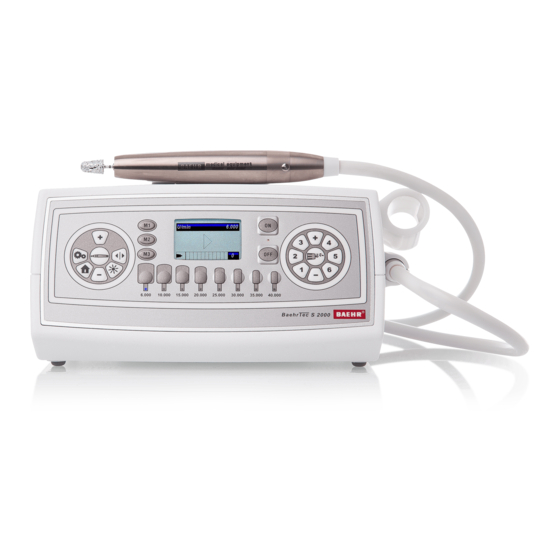
Page 15: Description Of Device
Operating Manual BaehrTec S2000 Description of device Description control device 4.1.1 Front view Fig. 4 (1) Controller housing (2) - (3) Main switch "ON" and "OFF" with respective LED (4) (5) – (12) Push buttons for instrument speeds (6,000 – 40,000 rpm) with respective LEDs (5a) –... -
Page 16: Side View With Handpiece Outlet And Handpiece Holder
Operating Manual BaehrTec S2000 4.1.2 Side view with handpiece outlet and handpiece holder Fig. 5 (33) Handpiece outlet (34) Protection from bending (35) Handpiece hose (36) Handpiece holder Page 16/52 English– V101 – Status 07/2015... -
Page 17: Rear View
Operating Manual BaehrTec S2000 4.1.3 Rear view Fig. 6 When working from the case, we recommend removing the storage tray from the case in order that the heat created by the device can escape from the case and to avoid potential head build-up. (37) Non-heating device connector Only connect the connection cable provided or one approved by the manufacturer. -
Page 18: Bottom View
Operating Manual BaehrTec S2000 4.1.4 Bottom view Fig. 7 (41) Housing screws Must only be unfastened by the manufacturer (42) Ventilation holes Please ensure that these ventilation holes are never covered. (43) Housing seal As soon as the housing seal is breached or removed, all guarantee claims shall expire. (44) Rubber feet Page 18/52 English–... -
Page 19: Top View With Closed Tank Lid
Operating Manual BaehrTec S2000 4.1.5 Top view with closed tank lid Fig. 8 (45) Tank lid (46) Membrane lid English– V101 – Status 07/2015 Page 19/52... -
Page 20: Top View (Open Tank Lid)
Operating Manual BaehrTec S2000 4.1.6 Top view (open tank lid) Fig. 9 (47) Fine filter (48) Filing level contacts (49) Return feed handpiece cooling Page 20/52 English– V101 – Status 07/2015... -
Page 21: Tank Lid (Inside)
Operating Manual BaehrTec S2000 4.1.7 Tank lid (inside) Fig. 10 (50) Ventilation holes for ventilation membrane (51) O-ring for tank lid (52) Screws English– V101 – Status 07/2015 Page 21/52... -
Page 22: Description Handpiece
Operating Manual BaehrTec S2000 Description handpiece Fig. 11 (34) Protection from bending (35) Handpiece feed line (52b) Handpiece button (53) Titanium handpiece housing with integrated air and water cooling (54) Handpiece Fig. 12 (55) Opening for DIN instrument with shank diameter 2.35 mm (for instruments with a maximum diameter of 12 mm) (55a) LEDs Page 22/52... -
Page 23: Description Non-Heating Device Connecting Cable
Operating Manual BaehrTec S2000 max. instrument diameter no greater than 12 mm Warning: Always observe the maximum permissible instrument diameter and the respective maximum permissible speed of the instrument manufacturer. Please ensure that this is never exceeded since it can result in serious injuries to the patient and the operator. -
Page 24: Description Spray System
Operating Manual BaehrTec S2000 Description spray system When developing the spray systems of the BaehrTec S2000 we placed great importance on operating safety and speed. So we would first like to provide you with an insight into the handling of the spray system. When the tank is filled for the first time or if it was completely empty (and you are now refilling it) or if the device was not in use for several hours, please switch the device to spray level 6 and let the device spray for a... - Page 25 Operating Manual BaehrTec S2000 The spray function is immediately switched on or off if you press the button (21) while the handpiece motor is running. The spray function is immediately switched on or remains switched off if you press the button (21) when you switch on the handpiece motor while the handpiece motor is not running.
-
Page 26: Colour Display
Operating Manual BaehrTec S2000 Colour display The BaehrTec S2000 has two operating modes that are indicated on the display: Work mode Adjustment mode (Options Menu) 4.5.1 Work mode As the name suggests, you can operate and work with your device in "Work mode". As soon as you turn on your device, you will automatically be in "Work mode". - Page 27 Operating Manual BaehrTec S2000 Spray level The selected spray level is shown here in writing and as a bar diagram. The bar diagram also shows you if the spray function is currently active or not. For more information, please refer to the previous section. Refill control Should the liquid tank be empty (as soon as the filling level is below the sensors) this will be indicated on the monitor with the filter control symbol.
-
Page 28: Adjustment Mode (Options Menu)
Operating Manual BaehrTec S2000 4.5.2 Adjustment mode (Options Menu) You can change settings and call up information on your device using the "Adjustment mode". As soon as you turn on your device, you will automatically be in "Work mode". In order to quit the work mode and enter the options menu, please press button (19). -
Page 29: Home Function (Button (18))
Operating Manual BaehrTec S2000 For reasons of operational safety, we recommend that you do not turn off the sounds! You cannot make any changes to the menu item "Information"! This item is for viewing purposes only. If you exceed the service interval, negative values will appear for "Service in", and the device will count the operating hours that have elapsed since the last service date. -
Page 30: Getting Started
(Baehr spray solution for Baehr spray technology devices, Art-No. 22333). Now close the tank lid tight by screwing it on. - Page 31 Operating Manual BaehrTec S2000 Take the handpiece in one hand and insert an instrument with a shank diameter 2.35 mm as deep as possible into the opening DIN instruments (55). The head of the instrument must not be larger than that shown on the front panel (max. 12 mm). Never use instruments with an oily, worn or bent shaft.
- Page 32 Operating Manual BaehrTec S2000 reminds you that a different maximum instrument diameter must be used. The instrument heads indicated on the front foil are intended to help you identify the maximum speed for your instruments. However, before you work with an instrument, be sure to follow the manufacturer’s instructions on the permitted maximum speed.
-
Page 33: Accessories
Operating Manual BaehrTec S2000 Please note that the light on the handpiece only lights up when the light is switched on and the handpiece motor is running. Should the light be on and the handpiece motor switched off then the light will go off automatically after approx. - Page 34 Therefore, set the maximum speed before you work with the instrument and check it each time you change instruments. Only the original Baehr foot pedal may be used with the BaehrTec S2000. Other foot pedal are not approved for use with the BaehrTec S2000.
-
Page 35: Servicing And Care
Never immerse the device in water or any other liquids, as this poses a risk of electric shock. Clean the handpiece daily. Use a small brush or a tooth brush and the Baehr wipes (Art-No. 11000). Take care to only fill the tank with approved spray solutions, otherwise the... -
Page 36: Cleaning And Disinfecting The Fine Filter
Cleaning and disinfecting the fine filter The BaehrTec S2000 is equipped with two fine filters (47). Please always ensure that you only fill the tank with spray solution approved for the device (Baehr spray solution for Baehr spray technology devices, Art-No. -
Page 37: Cleaning The Filling Level Contacts In The Liquid Tank
Operating Manual BaehrTec S2000 Using a small brush clean the fine filter under running tap water and make sure that you do not damage the filter grille. Replace the fine filters (in any order) and screw them back into place until stop. (Attention! fine filters only tighten gently). - Page 38 (see Fig. 19). Now pull out the clamping mechanism cleaner 2 from the opening. Only clean the clamping mechanism cleaner 2 with water, then with Baehr quick surface disinfectant (Art-No. 11015) and then with Baehr Alcohol (Art-No. 11032) to degrease the tool.
- Page 39 Operating Manual BaehrTec S2000 Fig. 17 Fig. 18 Fig. 19 You can also clean Easy-Clean in the event that cream, fat, oil or the like gets into the clamping mechanism. To do so proceed as follows. Turn off the device at the main switch and disconnect it from the power supply.
-
Page 40: Instrument Changing Aid (Insertion And Removal Aid For Very Small Instruments)
For hygiene reasons, please clean the instrument changing aid after use under running water and then with Baehr quick surface disinfectant (Art-No. 11015). The images are for illustrative purposes only. Subject to technical and optical changes. - Page 41 Operating Manual BaehrTec S2000 Inserting Insert the instrument shaft in the clamping mechanism on the handpiece. Fig. 20 Hold the instrument changing aid horizontally to the handpiece. Fig. 21 With the countersink on the head of the instrument changing aid, insert the instrument in the handpiece up to the stop.
- Page 42 Operating Manual BaehrTec S2000 Pull out Hold the instrument changing aid horizontally to the handpiece. Fig. 23 Position the instrument head behind the notch on the instrument changing aid. Place your thumb over the notch on the instrument changing aid, so that the instrument does not drop when removing.
-
Page 43: Cleaning And Disinfection Recommendation
1x daily or Cleaning and Manual cleaning Baehr quick after disinfecting device and wipe surface disinfectant contamination surfaces disinfection After each Handpiece, hose, Wipe with Baehr wipes for treatment Control panel disinfection cloth quick disinfection English– V101 – Status 07/2015 Page 43/52... -
Page 44: Guarantee
Operating Manual BaehrTec S2000 Guarantee The guarantee shall last 24 months. We do not accept any liability for defects and their consequences caused by natural wear, improper cleaning, care or servicing, non-observance of operating instructions, servicing, or connection, soiling in the spray supply, uncommon or inadmissible chemical or electrical influences insofar as the supplier is not responsible for them. -
Page 45: Self-Help In The Event Of Malfunctions
Operating Manual BaehrTec S2000 5.10 Self-help in the event of malfunctions Fault Cause Solution • • Main switch off Turn on main switch • • Control device not Connect device to power connected to power supply supply • • Connecting outlet without Connect the device to a power functional socket... - Page 46 Operating Manual BaehrTec S2000 Fault Cause Solution • • Instruments Maximum permitted speed Only work with the do not for instrument in use is maximum permissible hold exceeded speed for the instruments used • • Instrument shaft worn Check the instrument shaft and use a new instrument if necessary •...
-
Page 47: Change Fuse
Operating Manual BaehrTec S2000 5.10.1 Change fuse The fine fuses protect your device from damage caused by two high currents. Attention only there fuses may be used with the device S2000: 2x fine fuses 2A inert (Type H) Switch off your device at the main switch and disconnect the device from the mains. Use a screwdriver to open the fuse compartment on the device socket. -
Page 48: Technical Data
Operating Manual BaehrTec S2000 Technical Data BaehrTec S2000 Medical device Class 2A according to EU Directive 93/42 Medical devices EMC test Under EN 60601-1 Operating voltage 110 – 240 V AC voltage Frequency 50 – 60 Hz Micromotor speed range 6,000 –... - Page 49 Operating Manual BaehrTec S2000 Guidelines and MANUFACTURER statement – ELECTROMAGNETIC EMISSION The model BaehrTec S2000 is intended for use in the ELECTROMAGNETIC ENVIRONMENTS specified below. The customer or N11) user of the model BaehrTec S2000 should ensure that it is used in such an environment. Emission measurements Compliance ELECTROMAGNETIC ENVIRONMENT –...
- Page 50 Operating Manual BaehrTec S2000 Guidelines and MANUFACTURER statement – ELECTROMAGNETIC EMISSION The model BaehrTec S2000 is intended for use in the ELECTROMAGNETIC ENVIRONMENTS specified below. The N15) customer or user of the model BaehrTec S2000 should ensure that it is used in such an environment. STABILITY IEC 60601- COMPLIANCE...
-
Page 51: Spare Parts/Accessories
Fine filter S2000 Article-No.: 22000001 • Foot pedal for BaehrTec A2000/S2000 Art No.: 23000001 • Baehr spray solution for Baehr spray technology devices Art-No.: 22333 Contact address & manufacturer Gustav Baehr GmbH Max-Eyth-Str. 39 D-71332 Waiblingen Tel.: 07151 95 90 20 Fax: +49 7151 1 84 44 www.baehrshop.de... - Page 52 Operating Manual BaehrTec S2000 Gustav Baehr GmbH Max-Eyth-Str. 39 D-71332 Waiblingen Tel.: +49 7151 95 90 20 Fax: +49 7151 1 84 44 www.baehrshop.de Page 52/52 English– V101 – Status 07/2015...
Need help?
Do you have a question about the Tec S2000 and is the answer not in the manual?
Questions and answers