Table of Contents
Advertisement
Quick Links
Advertisement
Table of Contents

Related Manuals for AMI M8 Series

Summary of Contents for AMI M8 Series
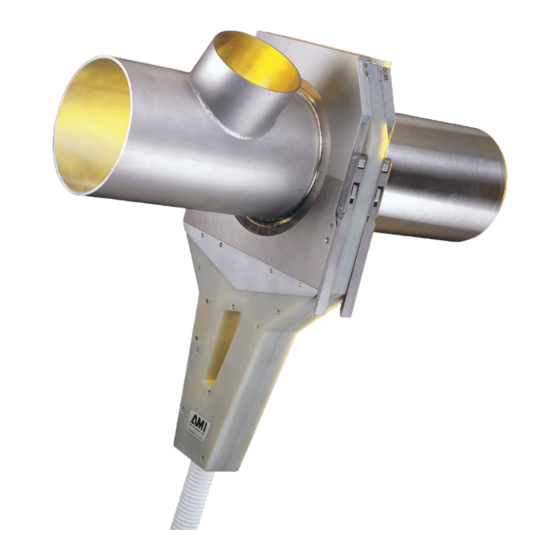
- Page 1 M8 SERIES WELD HEADS OPERATION MANUAL...
- Page 2 MODEL 8 SERIES WELD HEAD OPERATION MANUAL NOTICE This document and the information contained herein is the property of Arc Machines, Inc. It is proprietary and submitted and received in confidence. It shall be used only for the purpose for which it is submitted and shall not be copied in whole or in part without the prior expressed written permission of Arc Machines, Inc.
-
Page 3: Table Of Contents
MODEL 8 SERIES WELD HEAD OPERATION MANUAL Table of Contents Chapter Description Page Introduction………………..…………………3 Unpacking……………………………………3 Cable hook up……………………………… 3 Water Cooling………………………... 5 Rotation (speed) Auto-Calibration……….. 5 Rotation (speed) Manual Calibration……. 6 Clamp Insert Installation………………… 7 Electrode Geometry & Installation………. 9 Shielding Gas………………………………... -
Page 4: Introduction
MODEL 8 SERIES WELD HEAD OPERATION MANUAL 1.0 INTRODUCTION This manual covers set up and maintenance of the Model 8 series weld heads. The operator should have a working understanding of the power supply being used and should understand this manual before operating the weld head. 2.0 UNPACKING When unpacking the weld head use extreme caution in removing the plastic bag covering the cable connectors. - Page 5 MODEL 8 SERIES WELD HEAD OPERATION MANUAL 3.0 CABLE HOOK UP (Contd.) Fig. 2 To connect the male to female (chrome) gas fittings, unscrew the (4-40) socket head screw to allow the latch to open far enough to fully seat the two fittings. Lightly tighten this screw to prevent accidental disconnection of this fitting.
-
Page 6: Water Cooling
MODEL 8 SERIES WELD HEAD OPERATION MANUAL 3.0 CABLE HOOK UP (Contd.) Fig. 4 Slide the boots together securely to protect the connectors and fittings from dirt, and to prevent the power and ground connectors from coming in contact with each other. -
Page 7: Rotation (Speed) Manual Calibration
MODEL 8 SERIES WELD HEAD OPERATION MANUAL 5.0 ROTATION (SPEED) AUTO-CALIBRATION (Contd.) Rotation calibration potentiometer. Fig. 5 5.2 ROTATION (SPEED) MANUAL CALIBRATION Some power supplies do not have auto calibration software. In this case, the weld head motor is manually calibrated by creating a weld program that should rotate the electrode 360 degrees. -
Page 8: Clamp Insert Installation
MODEL 8 SERIES WELD HEAD OPERATION MANUAL ROTATION (SPEED) MANUAL CALIBRATION (cont’d.) 5.5 Be sure the power supply is in the “TEST” mode, and run the program. Should the electrode rotate too fast (traveling more than 360 degrees), stopping beyond the home position, slow it down by turning the potentiometer counter clockwise (CCW). - Page 9 MODEL 8 SERIES WELD HEAD OPERATION MANUAL 6.0 CLAMP INSERT & GAS SEAL INSTALLATION (Contd.) 6.2 Some fittings and components do not have enough straight/round surface for the weld head to grip with a clamp insert. However, orbital welding is still sometimes practical by manual tack welding the two components together first, and mounting a gas seal on the side of the weld head where this fitting is to be positioned.
-
Page 10: Electrode Geometry & Installation
MODEL 8 SERIES WELD HEAD OPERATION MANUAL 7.0 ELECTRODE GEOMETRY & INSTALLATION CAUTION To prevent the possibility of electrical shock, the power supply must be in the “TEST” mode before proceeding with electrode installation or removal. Take extreme care that fingers or foreign objects are clear of the rotor when jogging. The recommended electrode type is 2% Ceriated. - Page 11 MODEL 8 SERIES WELD HEAD OPERATION MANUAL 7.0 ELECTRODE GEOMETRY & INSTALLATION (cont’d.) Use this chart to determine the Rotor O.D. Model Rotor O.D. 8-2000 3.452” (87.68mm) 8-4000 5.310” (134.87mm) 8-6625 8.094” (205.59mm) Fig. 7 Use this chart to establish an appropriate Arc Gap and Electrode Tip diameter Tube/Pipe Wall Recommended Recommended Tip...
- Page 12 MODEL 8 SERIES WELD HEAD OPERATION MANUAL 7.0 ELECTRODE GEOMETRY & INSTALLATION (cont’d.) Use this chart to determine the electrode diameter. Tube/Pipe Electrode Wall thickness Diameter 0.020” – 0.035” (.50 – 1.0mm) 0.040” or 1/16” (1.0 or 1.6mm) 0.049” – 0.083” (1.2 – 2.1mm) 1/16”...
- Page 13 MODEL 8 SERIES WELD HEAD OPERATION MANUAL 7.0 ELECTRODE GEOMETRY & INSTALLATION (cont’d.) Fig. 12 Note: Be sure that the electrode mounting hole is free of foreign matter in order for the electrode to be properly seated against the electrode-stop roll pin. 7.3 Install the electrode from the rotor I.D.
-
Page 14: Shielding Gas
MODEL 8 SERIES WELD HEAD OPERATION MANUAL 7.0 ELECTRODE GEOMETRY & INSTALLATION (cont’d.) 7.4 Spare electrode set screws are located in the weld head housing near the cable attachment. See fig. 14. Fig. 14 Spare electrode set screws. 8.0 SHIELDING GAS The type of shielding gas used has a profound effect on the character of the arc and the depth of weld penetration. -
Page 15: Return-To-Home (Rotor) Position Adjustment
MODEL 8 SERIES WELD HEAD OPERATION MANUAL 8.0 SHIELDING GAS (cont’d.) 8.2 Prepurge time and post purge time are also a factor in minimizing weld oxidation and electrode life. Refer to chart below for recommended arc gas flow rates and minimum recommended pre & post purge times. Note: The chart below (fig. - Page 16 MODEL 8 SERIES WELD HEAD OPERATION MANUAL 9.0 RETURN-TO-HOME (ROTOR) POSITION ADJUSTMENT (cont’d.) Fig. 16 Should your Model 8 require return-to-home adjustment, follow these steps: 9.1 Be sure the power supply is either turned off or in the “TEST” mode. 9.2 Remove the access plate.
-
Page 17: Cleaning & Maintenance
MODEL 8 SERIES WELD HEAD OPERATION MANUAL 9.0 RETURN-TO-HOME (ROTOR) POSITION ADJUSTMENT (cont’d.) 9.5 Turn on the unit, and open a weld schedule. 9.6 Be sure the machine is in the “TEST” mode, and be sure the rotor is safe to rotate. No tools or fingers in the way. Touch “START”, then immediately touch “STOP”. -
Page 18: Storage
MODEL 8 SERIES WELD HEAD OPERATION MANUAL 11.0 STORAGE If the weld head has been used with water-cooling, and is to be stored for more than 1 month, the residual water or water/coolant mix should be purged from the hoses and weld head to minimize internal corrosion. This is also important if the weld head is to be stored where the temperature might fall below freezing, as trapped water can freeze and damage weld head and/or hose internals. - Page 19 MODEL 8 SERIES WELD HEAD OPERATION MANUAL 11.0 STORAGE (cont’d.) 11.2 Attach the dust cap to the electrical connector, and store the weld head in a clean, dust-free area. 11.3 Store the head with the clamp housing latches un-latched. Doc No. 740123...
Need help?
Do you have a question about the M8 Series and is the answer not in the manual?
Questions and answers