Advertisement
Quick Links
101 N. Alloy Dr.
Ph
(810) 714-5811
Fenton, MI 48430
Fax (810) 714-5711
techsupport@lmicorporation.com
Research, Development and Manufacturing of Precision Measuring Systems
Digital TruPosition Probe Technical Manual
Applies to: LMI TP101, LMI TP102,
LMI TP103, LMI TP104
Digital TruPosition Probe
Technical Manual
R:\Quality\Product Instructions\Product Manuals\CA 147 LMI TRUPOSITION PROBE
Form: CA 147
7/23/2021
Page 1 of 8
MANUAL
Advertisement

Related Manuals for LMI TP101


Summary of Contents for LMI TP101
- Page 1 Fenton, MI 48430 Fax (810) 714-5711 techsupport@lmicorporation.com Research, Development and Manufacturing of Precision Measuring Systems Digital TruPosition Probe Technical Manual Applies to: LMI TP101, LMI TP102, LMI TP103, LMI TP104 Digital TruPosition Probe Technical Manual R:\Quality\Product Instructions\Product Manuals\CA 147 LMI TRUPOSITION PROBE...
- Page 2 The dual displays on the Probe will report the “A” and “B” axis of the feature on your part. R:\Quality\Product Instructions\Product Manuals\CA 147 LMI TRUPOSITION PROBE Form: CA 147 7/23/2021...
- Page 3 (using the included plastic push-tool, or an allen wrench). Both displays must be powered on for correct operation of the TruPosition Probe. Insert the TruPosition Probe into the Zero Set Master: R:\Quality\Product Instructions\Product Manuals\CA 147 LMI TRUPOSITION PROBE Form: CA 147 7/23/2021...
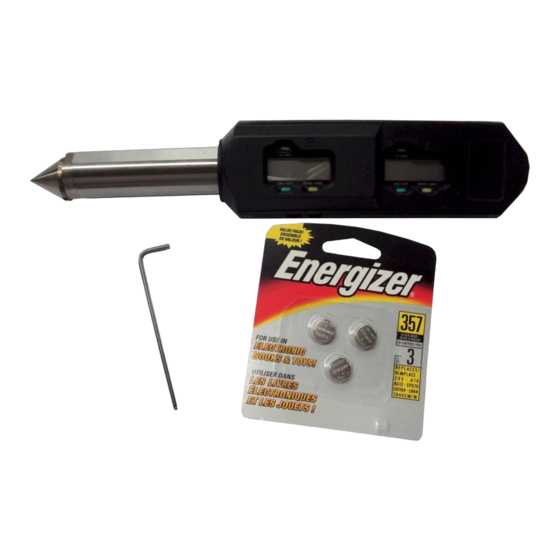
- Page 4 Your TruPosition Probe is now mastered. C: CHANGING THE BATTERIES: You Will Need: (2) #357 Batteries (1) 3/32" Hex Key Wrench (Hex / Allen / Inbus key) R:\Quality\Product Instructions\Product Manuals\CA 147 LMI TRUPOSITION PROBE Form: CA 147 7/23/2021 Page 4 of 8 MANUAL...
- Page 5 IMPORTANT: DO NOT REMOVE the screws highlighted with the red X marks! 3. Remove the front cover, to expose the indicator bodies: R:\Quality\Product Instructions\Product Manuals\CA 147 LMI TRUPOSITION PROBE Form: CA 147 7/23/2021 Page 5 of 8...
- Page 6 7. Install the front cover and tighten the four screws. IMPORTANT: Do not over-tighten the screws! Use light hand pressure only! 8. You will need to re-master your TruPosition Probe before using it again. R:\Quality\Product Instructions\Product Manuals\CA 147 LMI TRUPOSITION PROBE Form: CA 147 7/23/2021 Page 6 of 8...
- Page 7 TruPosition Probe! 5. Wipe all surfaces of the new tip. 6. Spin the new tip onto the TruPosition Probe and tighten using light hand pressure only. R:\Quality\Product Instructions\Product Manuals\CA 147 LMI TRUPOSITION PROBE Form: CA 147 7/23/2021 Page 7 of 8...
- Page 8 LMI CORPORATION 101 N. Alloy Dr. Fenton, MI 48430 R:\Quality\Product Instructions\Product Manuals\CA 147 LMI TRUPOSITION PROBE Form: CA 147 7/23/2021 Page 8 of 8 MANUAL...