Advertisement
Available languages
Available languages
Quick Links
Manual No.:
ENGE4501-DE-A0
Natural Gas Conversion Kit
OFG101
OFG103
OFG126
OFG127
!
IMPORTANT
INSTALLER:
Leave this manual with the appliance.
CONSUMER:
Retain this manual for future reference.
!
FIRE OR EXPLOSION HAZARD
If you smell gas:
• Shut off gas to the appliance.
• Extinguish any open flame.
• If odor continues, leave the area immediately.
• After leaving the area, call your gas supplier or
fire department.
Failure to follow these instructions could result in
fire or explosion,which could cause property
damage, personal injury, or death.
OCK45-NG01-DE
OFG104
OFG128
DANGER
OFG105
OFG110
OFG139
OFG145
!
This conversion kit shall be installed by a
qualified service agency in accordance with
the manufacturer's instructions and all
applicable codes and requirements of the
Authority Having Jurisdiction. If the
information in these instructions is not
followed exactly, a fire, explosion or
production of carbon monoxide may
result causing property damage, personal
injury or loss of life. The qualified service
agency is responsible for the proper
installation of this kit. The installation is not
proper and complete until the operation of
the converted appliance is checked as
specified in the manufacturer's instructions
supplied with the kit.
Contact Elementi for Technical Support.
OFG121
OFG147
WARNING
EN
Advertisement

Related Manuals for ELEMENTI OCK45-NG01-DE


Summary of Contents for ELEMENTI OCK45-NG01-DE
- Page 1 Failure to follow these instructions could result in specified in the manufacturer’s instructions fire or explosion,which could cause property supplied with the kit. damage, personal injury, or death. Contact Elementi for Technical Support.
-
Page 2: Table Of Contents
TABLE OF CONTENTS Conversion Warning ----------------------------------------------------------------------------------2 Specification --------------------------------------------------------------------------------------------3 Important Safety Information -----------------------------------------------------------------------4 Parts List ------------------------------------------------------------------------------------------------5 Natural Gas Conversion Instruction-------------------------------------------------------------- 6 Lighting Instructions ---------------------------------------------------------------------------------16 CONVERSION WARNING This appliance was converted on_______________________________ (DD/MM/YY) to Natural gas by ____________________________________________________ (Name and address of organization making this conversion) which accepts the responsibility that this conversion has been properly made. -
Page 3: Specification
SPECIFICATION Conversion Kit OCK45-NG01-DE Serial Number: Model No.: Manufacturer ELEMENTI INDUSTRIAL (XIAMEN) CO., LTD. I3B/P(30) I3B/P(50) I3+(28-30/37) Appliance Category G30 Butane and G30 Butane and G30 Butane G31 Propane G20 Natural gas Gas type/Gas Pressure G31 Propane at G31 Propane at... -
Page 4: Important Safety Information
IMPORTANT SAFETY INFORMATION WARNING FIRE TABLE IS FOR OUTDOOR USE ONLY IF YOU SMELL GAS • Shut off gas supply to the fire table. • Extinguish any open fame. • Do not try lighting any appliance. • Do not touch any electrical switch; do not use any phone in your building. •... -
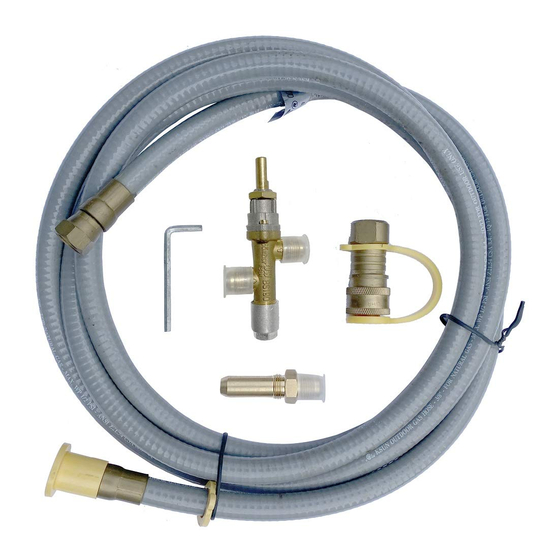
Page 5: Parts List
PARTS LIST Description & Quantity Description & Quantity NG Valve Brass Fitting A NG Orifice Spud 2.96 1 pc NG Valve & Brass Fitting A 1 set Brass Fitting B 1 pc Kette 1 Stck Hexagon screwdriver( for knob use) 1 pc Screws M4x10mm ( for valve use) 2 pcs... -
Page 6: Natural Gas Conversion Instruction
NATURAL GAS CONVERSION INSTRUCTION WARNING ENSURE THE UNIT IS OFF AND COMPLETELY COOL, AND THE GAS SUPPLY TO THE UNIT IS TURNED OFF. Disconnecting the Gas Tank Make sure the valve on the gas tank is OFF. Remove lava rock from burner pan area carefully. Fire Table Lay down blanket or cardboard to avoid damaging the finish, carefully tilt unit on... - Page 7 NATURAL GAS CONVERSION INSTRUCTION A) Find out the hole to the left of the knob, insert it with the hexagon wrench which provided in the conversion kit, rotate counterclockwise to loosen the knob from the LP safety valve. B) Then hold the knob with your hand, pull it forward, and remove the knob. C) Remove the screws on both sides of the knob with a screwdriver and take good care of them to avoid losing.
- Page 8 NATURAL GAS CONVERSION INSTRUCTION Remove the LP safety valve from the control panel, and disconnect the thermocouple and both 2 sides of bellows from the LP safety valve. Bellows LP Safety Valve Brass Fitting A BEFORE Thermocouple Bellows AFTER 8 / 36...
- Page 9 NATURAL GAS CONVERSION INSTRUCTION A) Find the NG safety valve from the conversion kit( which is labeled with "NATURAL GAS VALVE"). The brass fitting A has assembled on the NG safety valve. see FIG. A Labeled “Natural Gas Valve” Brass fitting A FIG.
- Page 10 NATURAL GAS CONVERSION INSTRUCTION Bellows LP Safety Valve Brass Fitting A BEFORE Thermocouple Bellows AFTER WARNING When connecting the bellows, please ONLY clockwise the brass joint on the bellows. Do not rotate the stainless steel tube. Excessive rotation of the stainless steel tube will cause the gas pipe to twist or break, causeing gas leaks.
- Page 11 NATURAL GAS CONVERSION INSTRUCTION A) Counterclockwise the brass joint to remove the bellows, see FIG. B WARNING ONLY counterclockwise the brass joint on the bellows when remove it. DO NOT rotate the stainless steel tube. Excessive rotation of the stainless steel tube will cause the gas pipe to twist or break, causeing gas leaks.
- Page 12 NATURAL GAS CONVERSION INSTRUCTION B) Screw the new NG orifice spud into the Venturi tube(Air mixer) FIG. E C) Re-attach bellows to the NG orifice spud. FIG. F A) Assemble the NG safety valve to the control panel, lock tightly with the screws. Screws B) Assemble the knob to the NG safety valve, lock tightly...
- Page 13 NATURAL GAS CONVERSION INSTRUCTION Disconnect the red hose and the regulator. Find the brass fitting B from the conversion kit and attach it to the red hose. Brass fitting B. 13 / 36...
- Page 14 NATURAL GAS CONVERSION INSTRUCTION Attach the natural gas hose (not included) to the brass fitting B. Natural gas hose 14 / 36...
- Page 15 For installations at elevations above 2000 ft. (610 m) contact your local dealer or gas supplier before installing as input rating should be reduced approximately 4% for each 1000 ft.(305 m) above sea level. Refer to the National Fuel Gas Code. Contact the ELEMENTI for more information. 15 / 36...
- Page 16 If any bubbles appear turn natural gas off, reconnectand re-test. If you continue to see bubbles after several attempts, disconnect natural gas source and contact ELEMENTI Natural Gas Hose Distributor at 905-761-8930 for assistance.
-
Page 17: Lighting Instructions
LIGHTING INSTRUCTIONS Using the Ignitor 1. Read instructions before lighting. 2. Burner control knob must be in the “OFF” position. 3. Connect natural gas source. 4. Open the natural gas supply to the unit. 5. Push and hold igniter but t urn to create sparks. 6. - Page 18 Anweisungen des Herstellers überprüft wurde, Die Nichtbeachtung dieser Anweisungen kann zu die mit dem Kit geliefert wurden. Bränden oder Explosionen führen, die zu Sachschäden, Verletzungen oder zum Tod führen können. Wenden Sie sich an Elementi, um technischen Support zu erhalten.
- Page 19 INHALTSVERZEICHNIS Konvertierungswarnung ------------------------------------------------------------------------------19 Spezifikation ---------------------------------------------------------------------------------------------20 Wichtige Sicherheitshinweise ---------------------------------------------------------------------- 21 Liste der Einzelteile ----------------------------------------------------------------------------------- 22 Anleitung zur Erdgasumwandlung ---------------------------------------------------------------- 23 Beleuchtungsanleitung ------------------------------------------------------------------------------- 33 KONVERTIERUNG WARNUNG Diese Appliance wurde am __________________________ (TT / MM / JJ) konvertiert. zu Erdgas durch ____________________________________________________ (Name und Adresse der Organisation, die diese Konvertierung vornimmt) die die Verantwortung dafür übernimmt, dass diese Konvertierung ordnungsgemäß...
- Page 20 SPEZIFIKATION Umbausatz Seriennummer: OCK45-NG01-DE Modell Nr.: Hersteller ELEMENTI INDUSTRIAL (XIAMEN) CO., LTD. I3B/P(30) I3B/P(50) I3+(28-30/37) Appliance-Kategorie G30 Butan und G30 Butan und G30 Butan G31 Propan G20 Erdgas Gastyp/Gasdruck G31 Propan bei G31 Propan bei bei 28-30mbar bei 37mbar bei 20mbar...
- Page 21 WICHTIGE SICHERHEITSHINWEISE WARNUNG FEUERTABELLE NUR FÜR DEN AUSSENBEREICH WENN SIE GAS RIECHEN • Unterbrechen Sie die Gaszufuhr zum Feuertisch. • Löschen Sie jeden offenen Ruhm. • Versuchen Sie nicht, ein Gerät anzuzünden. • Berühren Sie keinen elektrischen Schalter. Verwenden Sie kein Telefon in Ihrem Gebäude. •...
- Page 22 LISTE DER EINZELTEILE Beschreibung & Menge Beschreibung & Menge Erdgasventil Messingarmatur A Erdgasventil & Messingarmatur A 1 Satz Erdgasöffnung Spud 2,96mm 1 Stck Kette 1 Stck Messingbeschlag B 1 Stck Schrauben M4x10mm Sechskant-Schraubendreher (für Ventileinsatz) 2 Stück (für Knopfgebrauch) 1 Stück Gasdruck und Öffnungstafel 1 Stk.
- Page 23 ANLEITUNG ZUR UMWELTGASUMSETZUNG WARNUNG Stellen Sie sicher, dass das Gerät ausgeschaltet und vollständig kühl ist und die Gasversorgung des Geräts ausgeschaltet ist. Gastank abklemmen Stellen Sie sicher, dass das Ventil am Gastank ausgeschaltet ist. Lavastein vorsichtig aus dem Brennerpfannenbereich entfernen. Feuertisch Legen Sie eine Decke oder einen Karton ab, um eine Beschädigung der Oberfläche zu...
- Page 24 ANLEITUNG ZUR UMWELTGASUMSETZUNG A) Finden Sie das Loch links vom Knopf heraus, setzen Sie es mit dem im Umbausatz enthaltenen Sechskantschlüssel ein und drehen Sie es gegen den Uhrzeigersinn, um den Knopf vom LP-Sicherheitsventil zu lösen. B) Halten Sie dann den Knopf mit Ihrer Hand, ziehen Sie ihn nach vorne und entfernen Sie den Knopf.
- Page 25 ANLEITUNG ZUR UMWELTGASUMSETZUNG Entfernen Sie das LP-Sicherheitsventil vom Bedienfeld und trennen Sie das Thermoelement und beide Seiten des Balgs vom LP-Sicherheitsventil. Balg LP Sicherheitsventil Messingfitting A BEVOR Thermoelement Balg Nach 25 / 36...
- Page 26 ANLEITUNG ZUR UMWELTGASUMSETZUNG A) Suchen Sie das NG-Sicherheitsventil aus dem Umbausatz (der mit "ERDGASVENTIL" gekennzeichnet ist). Die Messingarmatur A wurde am NG-Sicherheitsventil montiert. siehe FIG. EIN Mit der Bezeichnung "Erdgasventil" Messingbeschlagung A FIG. A B) Schließen Sie den Balg wieder an das NG-Sicherheitsventil an und verriegeln Sie ihn fest.
- Page 27 ANLEITUNG ZUR UMWELTGASUMSETZUNG Balg LP Sicherheitsventil Messingfitting A BEVOR Thermoelement Balg Nach WARNUNG Bitte schließen Sie beim Anschließen des Balg NUR die Messingverbindung am Balg im Uhrzeigersinn an.Drehen Sie das Edelstahlrohr nicht.Eine übermäßige Drehung des Edelstahlrohrs führt dazu, dass sich das Gasrohr verdreht oder bricht, was zu Gaslecks führt.
- Page 28 ANLEITUNG ZUR UMWELTGASUMSETZUNG A) Gegen den Uhrzeigersinn die Messingverbindung, um den Balg zu entfernen, siehe BILD: B WARNUNG Bitte schließen Sie beim Anschließen des Balg NUR die Messingverbindung am Balg im Uhrzeigersinn an.Drehen Sie das Edelstahlrohr nicht.Eine übermäßige Drehung des Edelstahlrohrs führt dazu, dass sich das Gasrohr verdreht oder bricht, was zu Gaslecks führt.
- Page 29 ANLEITUNG ZUR UMWELTGASUMSETZUNG B) Schrauben Sie den neuen NG-Öffnungsspud in das Venturi-Rohr (Luftmischer). BILD: E C) Bringen Sie Balg wieder an der NG-Öffnung an. BILD: F A) Montieren Sie das NG-Sicherheitsventil am Bedienfeld und ziehen Sie es mit den Schrauben fest an. Screws B) Montieren Sie den Knopf am NG-Sicherheitsventil, verriegeln...
- Page 30 ANLEITUNG ZUR UMWELTGASUMSETZUNG Trennen Sie den roten Schlauch und den Regler. Suchen Sie die Messingarmatur B aus dem Umbausatz und befestigen Sie sie am roten Schlauch. Messingbeschlag B. 30 / 36...
- Page 31 ANLEITUNG ZUR UMWELTGASUMSETZUNG Befestigen Sie den Erdgasschlauch (nicht im Lieferumfang enthalten) an der Messingarmatur B. Erdgasschlauch 31 / 36...
- Page 32 Ihren Händler oder Gasversorger vor Ort, da die Eingangsleistung für jeweils 305 m (1000 Fuß) über dem Meeresspiegel um ca. 4% verringert werden sollte. Siehe den National Fuel Gas Code. Wenden Sie sich an ELEMENTI, um weitere Informationen zu erhalten.
- Page 33 Sie es wieder an und testen Sie es erneut. Wenn Sie nach mehreren Versuchen weiterhin Blasen sehen,Trennen Sie die Erdgasschlauch Erdgasquelle und wenden Sie sich an ELEMENTI, um (Nicht enthalten) Unterstützung zu erhalten. Wenn nach einer Minute Ausschalten der Quelle keine Blasen Überprüfen Sie diese Stellen...
- Page 34 BELEUCHTUNGSANLEITUNG Den Zünder benutzen 1. Lesen Sie die Anweisungen VOR der Beleuchtung. 2. Der Brennerknopf muss sich in der Position „OFF“ befinden. 3. Erdgasquelle anschließen. 4. Öffnen Sie die Erdgasversorgung des Geräts. 5. Den Zünder gedrückt halten, aber drehen, um Funken zu erzeugen. 6.
- Page 36 Ocean Rock USA INC. 692 Parkridge Ave Norco, CA 92860, USA www.elementifire.com...
Need help?
Do you have a question about the OCK45-NG01-DE and is the answer not in the manual?
Questions and answers