Vanguard Dynamics VAIL CAST User Manual
Hide thumbs
Also See for VAIL CAST:
- Quick start manual (3 pages) ,
- User manual (14 pages) ,
- Faq (5 pages)
Table of Contents
Advertisement
Quick Links
V AIL CAST
REGISTER TO GET ALL
SOFTWARE UPDATES
www.vanguarddynamics.com/vail-cast
OPTIONAL ITEMS
YOU MAY NEED
Cables: Audio Inputs and Outputs
(Audio Cables need a 3.5mm Stereo
plug to connect to the VAIL Cast)
Ethernet cable if not using Wi-Fi.
2 Gang Low Voltage
Mounting Bracket If you will be
using the wall mounting plate you
will need a to attach the VAIL Cast
Wall Mount Bracket to the Bracket.
Use a Ring/Bracket NOT a box.
#2 Philips Screwdriver
for attaching the VAIL Cast to the
Mounting Bracket
Pass-Through Wall Plate If you will
be mounting into the wall you may
want to purchase one to better
manage any wires that exit the wall.
SEE OUR INSTRUCTIONAL VIDEOS AT
www.vanguarddynamics.com/vail-cast
Phone : (866) 834-6321
Email: info@vanguarddynamics.com
Riverside, CA
www.vanguarddynamics.com
USER MANUAL
The VAIL Cast is a universal compact digital amplifier that
can seamlessly connect to all popular voice control plat-
forms, mobile devices, and computers. Once connected to
the speakers of your choice you can access the power and
flexibility of music and audio in one room or an entire home
through its ability to connect to Apple, Amazon, Google,
Spotify, and others. It can be placed on any flat surface or
be mounted into the wall in a standard double gang brack-
et with the included wall mount bracket.
*Note that some services may require separate subscriptions or fees
from the respective providers.
VA IL C AST SET U P
WHATʼS IN THE BOX
1 VAIL Cast
1 Wall Mount Bracket Kit
1 Power Supply
1 IR Receiver (3 volt)
NEEDED BUT NOT SUPPLIED
Speakers Vanguard Dynamics supplies an outstanding
assortment of architectural and outdoor speakers that will
work with the VAIL Cast. You may also decide to use cabi-
net speakers or your choice.
Speaker Wire Due to the countless configurations that may
be used we do not include speaker wire. The speaker con-
nectors on the VAIL Cast will fit up to most 14-gauge speak-
er wires with 16-gauge being ideal.
foot or less 18-guage wire is acceptable.
Wire Strippers/Cutters
Small Flat Head Screwdriver for attaching the speaker wire
(Necessary only for Wall Mounting)
For short runs of 20
Advertisement
Table of Contents

Related Manuals for Vanguard Dynamics VAIL CAST


Summary of Contents for Vanguard Dynamics VAIL CAST
- Page 1 Wall Mount Bracket to the Bracket. Use a Ring/Bracket NOT a box. assortment of architectural and outdoor speakers that will work with the VAIL Cast. You may also decide to use cabi- #2 Philips Screwdriver net speakers or your choice.
-
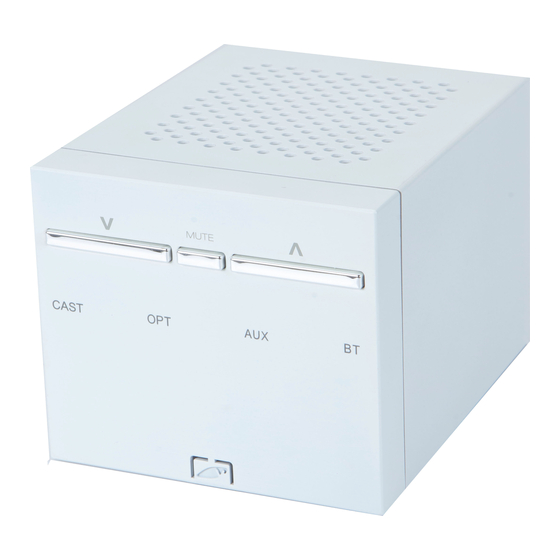
Page 2: Rear Connections
FRONT CONTR O LS & LI GHT S PLACEMENT Volume Up Mute Volume Down VAIL Cast can be mounted into the wall, simply placed on any flat surface or placed Bluetooth into a rack with the optional Source Light rack mount plate that will hold up to three. -
Page 3: Connect To Your Network
This will make it easier to select and name the correct device. First connect the included power supply to the DC IN location on the back of the VAIL Cast. Wait a few moments for it to power up. - Page 4 4. Wait and you will see a message “Setup Complete” and confirmation of the net- work it has joined. 5. Your VAIL Cast is now connected to your network via Wi-Fi and is ready to use via AirPlay2. Phone : (866) 834-6321 Email: info@vanguarddynamics.com...
-
Page 5: Bluetooth Connection
Cast and the name you gave it listed. Note it may take a moment for it to appear. 6. Select the VAIL Cast you want to Add to Apple Home. It will then ask the location of the VAIL Cast and will give you an opportunity to change the name. - Page 6 TV you will need to learn the IR commands from your TV remote into the VAIL Cast as described. Step 1. Connect your TV audio to the VAIL Cast. If it is an optical output on the TV, use an optical audio cable and connect to the OPTIC input on the VAIL Cast.
-
Page 7: Connecting Speakers
CONNECTING SPEAKERS The VAIL Cast can be connected to up to two pairs (4 total) of speakers. To connect the speaker wire first unplug the 4-connector speaker plug from the VAIL Cast. Strip the speaker wire you will be using just long enough to fit into the connector. - Page 8 PLEASE BE SURE THE AREA IS FREE OF OBSTRUCTIONS AND YOU CAN RUN WIRES FROM THE LOCATION TO SPEAKERS, POWER SUPPLY AND OTHER CONNECTIONS. 2) LOCATE THE TWO SCREWS AT THE BACK OF THE VAIL CAST. YOU WILL BE REMOVING THESE SCREWS AND THE RESECURING THEM WITH THE VAIL CAST BRACKET IN PLACE.
-
Page 9: Wire Management
USING THE VAIL CAST AS A SOURCE (AUDIO OUT) While the VAIL Cast has an excellent built-in amplifier, you may wish to use it as a source that can be connected to a larger amplifier or multi-zone amplifier. To do this connect the Out jack to an external amplifier. -
Page 10: Button Operations
Set-Up if you do this. Selecting Optical or Aux as a Source VAIL Cast will auto sense once the Optical or Line-In Source is operating and switch to that source overriding any sources currently playing. It will assume that you wish to listen to that source, for example TV, once it is playing. - Page 11 UNDERSTANDING THE SOURCE LIGHTS CAST GREEN Solid = Streaming Source is Playing Breathing = Streaming Source is Paused, or Volume is Muted Off = No Streaming Source is Playing or is Disconnected Slow Green Flash = Configure Network Solid = Wi-Fi is Disconnected. Flashing = If connected to Alexa this indicates you have notifications WHITE Fast Flash = IR is learning “Volume Down”...
- Page 12 V AIL CAST L+ L - R+ R - DC IN ETHERNET LINE IN OPTICAL 4ohms/8ohms IR RECEIVER LINE OUT Phone : (866) 834-6321 Email: info@vanguarddynamics.com www.vanguarddynamics.com...
- Page 13 2W when the device enters the network standby. Based on Vail Cast function design requirement, the wireless or Ethernet module (LS9X Module) must keep searching and working function on...
Need help?
Do you have a question about the VAIL CAST and is the answer not in the manual?
Questions and answers