Table of Contents
Advertisement
Quick Links
T
E
C
H
N
I
C
T
E
C
H
N
I
C
M
A
N
U
A
M
A
N
U
A
A
R
C
O
V
A
R
C
O
V
Manual Code:
201176-I-00-20.doc
Revision Date:
13 luglio 2010
A
L
M
A
N
U
A
L
M
A
N
U
L
E
T
E
C
N
I
L
E
T
E
C
N
I
I
S
3
0
0
0
I
S
3
0
0
0
A
L
A
L
C
O
C
O
S
/
R
S
/
R
TECHNICAL DATA
CARATTERISTICHE TECNICHE
INSTALLATION & ACCEPTANCE
INSTALLAZIONE E ACCETTAZIONE
REPLACEMENTS
SOSTITUZIONI
ADJUSTMENTS
REGOLAZIONI
FAULTS FINDING
RICERCA GUASTI
SERVICE INFORMATION
INFORMAZIONI PER L'ASSISTENZA
LISTA PARTI DI RICAMBIO
ELECTRICAL DRAWINGS
SCHEMI ELETTRICI
PLANNED MAINTENANCE
MANUTENZIONE PROGRAMMATA
ADDITIONAL INFORMATION
INFORMAZIONI ADDIZIONALI
1
201177-F-00-20.doc
****
2
201178-B-00-20.doc
3
201179-A-00-20.doc
4
201180-B-00-20.doc
5
201181-A-00-20.doc
6
201182-D-00-20.doc
7
PARTS LIST
201183-E-00-20.doc
8
201184-C-00-20.doc
9
201185-A-00-20.doc
10
Advertisement
Chapters
Table of Contents

Related Manuals for Villa ARCOVIS 3000 S


Summary of Contents for Villa ARCOVIS 3000 S
- Page 1 TECHNICAL DATA CARATTERISTICHE TECNICHE 201177-F-00-20.doc **** INSTALLATION & ACCEPTANCE INSTALLAZIONE E ACCETTAZIONE 201178-B-00-20.doc REPLACEMENTS SOSTITUZIONI 201179-A-00-20.doc ADJUSTMENTS REGOLAZIONI 201180-B-00-20.doc FAULTS FINDING RICERCA GUASTI 201181-A-00-20.doc SERVICE INFORMATION INFORMAZIONI PER L’ASSISTENZA 201182-D-00-20.doc PARTS LIST LISTA PARTI DI RICAMBIO 201183-E-00-20.doc ELECTRICAL DRAWINGS SCHEMI ELETTRICI 201184-C-00-20.doc PLANNED MAINTENANCE MANUTENZIONE PROGRAMMATA...
- Page 2 Villa Sistemi Medicali ARCOVIS 3000 S/R - Technical Data - 1 TECHNICAL DATA CARATTERISTICHE TECNICHE [File: 201177-F-00-20.doc]...
- Page 3 Technical Data - 1 - ARCOVIS 3000 S/R Villa Sistemi Medicali (This page is intentionally left blank) (Pagina intenzionalmente bianca) [File: 201177-F-00-20.doc]...
-
Page 4: Table Of Contents
Villa Sistemi Medicali ARCOVIS 3000 S/R - Technical Data - 1 TABLE OF CONTENTS / SOMMARIO ELECTRICAL AND RADIOLOGICAL DATA / CARATT. ELETTRICHE E RADIOLOGICHE ....2 1.1. Environmental conditions / Caratteristiche ambientali .................. 2 1.2. Electrical data /Dati elettrici........................... 2 1.3. -
Page 5: Environmental Conditions / Caratteristiche Ambientali
Technical Data - 1 - ARCOVIS 3000 S/R Villa Sistemi Medicali 1. ELECTRICAL AND RADIOLOGICAL DATA / CARATT. ELETTRICHE E RADIOLOGICHE 1.1. Environmental conditions / Caratteristiche ambientali Environmental Factor In normal use Warehouse and transport Fattore ambientale In normale uso... -
Page 6: Radiological Data / Caratteristiche Radiologiche
Villa Sistemi Medicali ARCOVIS 3000 S/R - Technical Data - 1 1.3. Radiological data / Caratteristiche radiologiche Description Fixed anode version Rotating anode version Descrizione Versione Anodo Fisso Versione Anodo Rotante Generator, power in DC current 2,5kW @100kV 2,5kW @100kV... - Page 7 Technical Data - 1 - ARCOVIS 3000 S/R Villa Sistemi Medicali Fixed anode version / Versione anodo fisso The values indicated in the graph refer to the I valori riportati nel grafico si riferiscono agli trends calculated from the software safety...
- Page 8 Villa Sistemi Medicali ARCOVIS 3000 S/R - Technical Data - 1 Fluoroscopy time (Rotating anode version) / Tempo di fluoroscopia versione anodo rotante The values indicated in the graph refer to the I valori riportati nel grafico si riferiscono agli...
-
Page 9: Collimator / Collimatore
Technical Data - 1 - ARCOVIS 3000 S/R Villa Sistemi Medicali 1.4. Collimator / Collimatore Description Data Descrizione Data Model With iris: Modello Con iride: mod. mod. R605/027A/DASM R605/027A/DASM With iris and parallel Con iride più lamelle shutter: parallele: mod. -
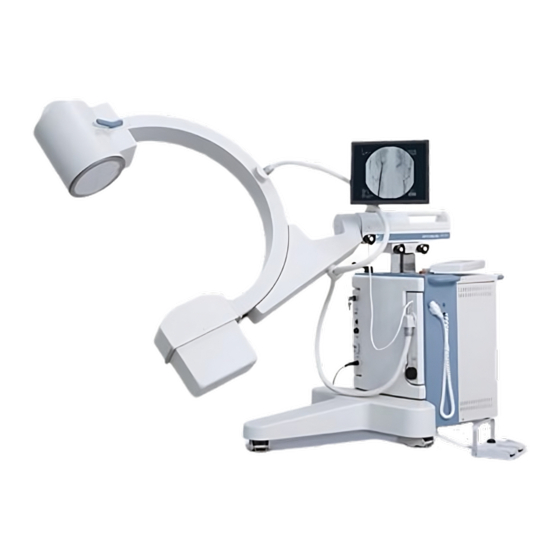
Page 10: X-Ray Group / Complesso Radiogeno
Villa Sistemi Medicali ARCOVIS 3000 S/R - Technical Data - 1 1.5. X-ray group / Complesso radiogeno X-ray housing data / Dati guaina radiogena Description Fixed Anode Version Rotating Anode Version Descrizione Versione Anodo Fisso Versione Anodo Rotante Monobloc model... - Page 11 Technical Data - 1 - ARCOVIS 3000 S/R Villa Sistemi Medicali X-Ray Monobloc RX I-40S 3,5 RF / Monoblocco RX I-40S 3,5 RF dimensions / dimensioni Page 8/40 - Rev.D [File: 201177-F-00-20.doc]...
- Page 12 Villa Sistemi Medicali ARCOVIS 3000 S/R - Technical Data - 1 Data of fixed anode x-ray insert / Dati inserto radiogeno anodo fisso X-RAY INSERT MODEL CEI OX/110-5 PHU 0,5/1,5 INSERTO RX MODELLO CEI OX/110-5 PHU 0,5/1,5 Max. peak voltage...
- Page 13 Technical Data - 1 - ARCOVIS 3000 S/R Villa Sistemi Medicali Mechanical dimensions Thermal anode feature Dimensioni meccaniche Caratteristica termica dell'anodo Load curves / Curve di carico ( - 3~) Page 10/40 - Rev.A [File: 201177-F-00-20.doc]...
- Page 14 Villa Sistemi Medicali ARCOVIS 3000 S/R - Technical Data - 1 X-Ray Monobloc RX I-40R 5 RF / Monoblocco RX I-40R 5 RF dimensions / dimensioni [File: 201177-F-00-20.doc] Rev.E - Page 11/40...
- Page 15 Technical Data - 1 - ARCOVIS 3000 S/R Villa Sistemi Medicali Data of the rotating anode x-ray insert / Dati inserto radiogeno anodo rotante X-RAY INSERT MODEL IAE X20P 0,3-0,6 INSERTO RX MODELLO IAE X20P 0,3-0,6 Max. peak voltage 130kVP Massima tensione di picco Max.
- Page 16 Villa Sistemi Medicali ARCOVIS 3000 S/R - Technical Data - 1 Mechanical dimensions Anode heating and cooling curves Dimensioni meccaniche Curve di riscaldamento e raffreddamento dell’anodo 0,3mm focus load curves 0,6mm focus load curves Curve di carico fuoco 0,3mm Curve di carico fuoco 0,6mm [File: 201177-F-00-20.doc]...
-
Page 17: Total Unit Half-Value Layer / Strato Emivalente Totale Unita
Technical Data - 1 - ARCOVIS 3000 S/R Villa Sistemi Medicali 1.6. Total unit half-value layer / Strato emivalente totale unita’ Rotating Anode Description Fixed Anode Version Version Descrizione Versione Anodo Fisso Versione Anodo Rotante Half-value layer @75kV 2,8mmAl 2,8 mmAl... -
Page 18: Exposure Mode: Fluoroscopy / Modalità Di Esposizione: Fluoroscopia
Villa Sistemi Medicali ARCOVIS 3000 S/R - Technical Data - 1 1.8. Exposure mode: fluoroscopy / Modalità di esposizione: fluoroscopia 1.8.1. CONTINUOUS FLUOROSCOPY / SCOPIA CONTINUA Description Fixed Anode Version Rotating Anode Version Descrizione Versione Anodo Fisso Versione Anodo Rotante... -
Page 19: Scopia Snapshot / Snapshot Fluoroscopy
Technical Data - 1 - ARCOVIS 3000 S/R Villa Sistemi Medicali 1.8.3. SCOPIA SNAPSHOT / SNAPSHOT FLUOROSCOPY Camera 0,5K Description Fixed Anode Version Rotating Anode Version Descrizione Versione Anodo Fisso Versione Anodo Rotante mA range 1÷10mA 1÷12mA Xr flash time <... -
Page 20: Apr Fluoroscopy / Scopia Apr
Villa Sistemi Medicali ARCOVIS 3000 S/R - Technical Data - 1 1.8.5. APR FLUOROSCOPY / SCOPIA APR Camera 0,5K Description Fixed Anode Version Rotating Anode Version Descrizione Versione Anodo Fisso Versione Anodo Rotante APR 1 (Fine anatomic parts or for... - Page 21 Technical Data - 1 - ARCOVIS 3000 S/R Villa Sistemi Medicali kV-mA Relationship with camera 0,5K / Relazioone kV-mA camera 0,5K mA (Fixed Anode Version / Versione Anodo Fisso) Standard mA(1/2) Snapshot 0.50 0.25 0.70 0.50 1.00 2.50 1.25 2.40 1.00...
-
Page 22: Exposure Mode: Radiography / Modalità Di Esposizione: Radiografia
Villa Sistemi Medicali ARCOVIS 3000 S/R - Technical Data - 1 1.9. Exposure mode: radiography / Modalità di esposizione: radiografia Two points technique, kV and mAs selection / Tecnica a due punti, selezione di kV e mAs Description Fixed Anode Version... -
Page 23: Image System / Sistema Immagine
Technical Data - 1 - ARCOVIS 3000 S/R Villa Sistemi Medicali 1.10. Image system / Sistema immagine 1.10.1. Image intensifier / Intensificatore d'immagine Description / Descrizione Triple 9/6/4” Brand Thales Marca Model TH 9428 HP2 H542 VR13 Modello Fields Number... -
Page 24: Tv Chain And Monitor / Catena Tv E Monitor
Villa Sistemi Medicali ARCOVIS 3000 S/R - Technical Data - 1 1.10.2. TV chain and monitor / Catena tv e monitor TV chain and Monitor with CCD 0,5K x 0,5K Description Data Descrizione Dati Camera Camera Camera technology Tecnologia camera CCD at low persistence of ½”... - Page 25 Technical Data - 1 - ARCOVIS 3000 S/R Villa Sistemi Medicali Monitors Monitor 17” 18” 19” B/W 19”Color Standard for unit with Standard for camera Standard per camera Standard for camera monitor aboard 0,5K , opzional for 0,5K , optional for...
-
Page 26: Digital Image Processor / Processore Di Immagini Digitale
Villa Sistemi Medicali ARCOVIS 3000 S/R - Technical Data - 1 1.11. Digital image processor / Processore di immagini digitale TV chain and Monitor with CCD 0,5K x 0,5 K SBFM MEMORIES SERIES / SERIE MEMORIE SBFM Features SBFM 76/330... - Page 27 Technical Data - 1 - ARCOVIS 3000 S/R Villa Sistemi Medicali DIP MEMORIES SERIES / SERIE MEMORIE DIP Features DIP3000 A Caratteristiche DIP3000 A DIP 3000 A DIP 3000 A Model Modello L.I.H.+192 image buffer ram L.I.H.+192 image buffer ram...
- Page 28 Villa Sistemi Medicali ARCOVIS 3000 S/R - Technical Data - 1 TV chain and Monitor with CCD 1K x 1K with HRC 1000 Features HRC 1000 type Caratteristiche HRC 1000 type 1024 x 1024 x 16 bit 1024 x 1024 x 16 bit...
- Page 29 Technical Data - 1 - ARCOVIS 3000 S/R Villa Sistemi Medicali Features HRP 2000 Caratteristiche HRP 2000 Acquirement Acquisizione From digital CCD 1024x1024 up to 12 bits Da telecamera digitale CCD 1024x1024 Images acquirement Acquisizione immagini Pulsed at high dose up to 12...
- Page 30 Villa Sistemi Medicali ARCOVIS 3000 S/R - Technical Data - 1 DICOM2, DICOM3 Digital Imaging and Communications in Medicine (Option) Description Data Descrizione Data ESIDIC2, ESIDIC3 ESIDIC2, ESIDIC3 Network connection Network connection features: features: Ethernet autosense 10/100 M Ethernet autosense 10/100 M...
-
Page 31: Accessories / Accessori
Technical Data - 1 - ARCOVIS 3000 S/R Villa Sistemi Medicali 1.12. Accessories / Accessori Description Descrizione Standard Opzionale X-ray handswitch with extensible Pulsante raggi con cavo estensibile • cable Fluoroscopy control by triple Comando fluoroscopia a triplo pedale •... - Page 32 Villa Sistemi Medicali ARCOVIS 3000 S/R - Technical Data - 1 Dose meter with ionizing chamber DIAMENTOR CM-T (DAPMeter) DIAMENTOR CM-T Misuratore di dose con camera di ionizzazione (DAPMeter) Description Data Measurement amplifier Measurement category Dose area product μGy m Measuring unit 0,01 μGy m...
- Page 33 Technical Data - 1 - ARCOVIS 3000 S/R Villa Sistemi Medicali Stampante Termica Sony UP970CE or UP990CE Thermal printer Sony UP970CE or UP990CE Description Data Descrizione Dati Thermal printer with multi image Stampante termica multimmagine Print method Metodo di picture...
- Page 34 Villa Sistemi Medicali ARCOVIS 3000 S/R - Technical Data - 1 Medical Image Capture Device MediCap USB200 Description Data MediCap USB200. Digital medical Image capture device. Model Saves digital images and video sources to a USB flash drive or USB hard drive.
- Page 35 Technical Data - 1 - ARCOVIS 3000 S/R Villa Sistemi Medicali Sony DVD Recorder DVO 1000MD Description Data General data: DVD recording, NTSC/PAL, Switchable Recording System Video: MPEG-2 compression Recording Format Audio: Dolby Digital Format DVD+RW ( 2,4x and 4x speed )
-
Page 36: Mechanical Data / Caratt. Meccaniche
Villa Sistemi Medicali ARCOVIS 3000 S/R - Technical Data - 1 2. MECHANICAL DATA / CARATT. MECCANICHE 2.1. C-arm unit dimensions with I.I. 9” / Dimensioni unità arco con tubo I.B. 9” 2.2. Axis and interventionist reference point / Asse e punto di riferimento... -
Page 37: Base Trolley" Monitor Trolley Dimensions / Dimensioni Carrello Portamonitor "Base Trolley
Technical Data - 1 - ARCOVIS 3000 S/R Villa Sistemi Medicali 2.3. “Base Trolley” monitor trolley dimensions / Dimensioni carrello portamonitor “Base trolley” Max. admissible weights on the single shelves: Peso massimo ammissibile sui singoli ripiani: 2 kg. 10 kg. -
Page 38: High Configuration" Monitor Trolley Dimensions / Dimensioni Carrello Portamonitor "High Configuration
Villa Sistemi Medicali ARCOVIS 3000 S/R - Technical Data - 1 2.4. “High Configuration” monitor trolley dimensions / Dimensioni carrello portamonitor “High Configuration” [File: 201177-F-00-20.doc] Rev.A - Page 35/40... -
Page 39: Mechanical Data, Dimensions And Weights / Dati Meccanici, Dimensioni E Pesi
Technical Data - 1 - ARCOVIS 3000 S/R Villa Sistemi Medicali 2.5. Mechanical data, dimensions and weights / Dati meccanici, dimensioni e pesi Monitor Trolley Monitor Trolley Description C-arm unit “Base Trolley” “High Configuration” 340 kg (unit with fixed 150Kg Weight “Low Profile”... - Page 40 Villa Sistemi Medicali ARCOVIS 3000 S/R - Technical Data - 1 Carrello Portamonitor Carrello Portamonitor Descrizione Unità Arco “Base trolley” “High configuration” 340 kg (unità con 150Kg Peso “Low Profile” “High Profile” anodo fisso) 749,57 lb 67kg 97 kg 330,69 lb...
-
Page 41: Unit Labels / Etichettatura
Technical Data - 1 - ARCOVIS 3000 S/R Villa Sistemi Medicali 3. UNIT LABELS / ETICHETTATURA 3.1. Unit & monitor trolley labels Pos. 1: s/n° label / Etichetta matricola Fixed Anode Version / Versione Anodo Fisso Fig. 1 Rotating Anode Version / Versione Anodo Rotante Fig. -
Page 42: Monobloc Labels /Etichetta Monoblocco
Villa Sistemi Medicali ARCOVIS 3000 S/R - Technical Data - 1 3.2. Monobloc labels /Etichetta monoblocco Pos. 1: S/N label Fixed Anode Version Fig. 4 Rotating Anode Version [File: 201177-F-00-20.doc] Rev.E - Page 39/40... -
Page 43: List Of The Standards For The Evaluation Of The Product Compliance / Elenco Norme Per La Valutazione Della Conformità Del Prodotto
CEI EN 60825-1 2nd edition Laser equipment safety ARCOVIS 3000 S/R with radio-protection according to the Standard CEI EN 60601-1-3 (1995) ARCOVIS 3000 S/R con radioprotezione secondo la Norma CEI EN 60601-1-3 (1995) Inverter-monobloc group (IN-9040-5 HF + I-40S 3,5 RF, IN-9040-5 HF + I-40R 5 RF) EN60601-2-7:1998... -
Page 44: Document Status
Document Status ARCOVIS 3000 S/R – Technical Data - 1 DOCUMENT STATUS Rev. Date Pages Modification description 30/10/07 Document approval / Approvazione documento General document revision. 28/04/08 Revisione generale del documento. DIP 3000 S technical data removed. 31/01/09 Eliminate caratteristiche tecniche DIP3000S... - Page 45 Villa Sistemi Medicali ARCOVIS 3000 S/R - Installation & Acceptance - 2 INSTALLATION & ACCEPTANCE INSTALLAZIONE E ACCETTAZIONE [File: 201178-B-00-20.doc]...
- Page 46 Installation & Acceptance - 2 - ARCOVIS 3000 S/R Villa Sistemi Medicali (This page is intentionally left blank) (Pagina intenzionalmente bianca) [File: 201178-B-00-20.doc]...
- Page 47 Villa Sistemi Medicali ARCOVIS 3000 S/R - Installation & Acceptance - 2 TABLE OF CONTENTS / SOMMARIO HOW TO PROCEED / COME PROCEDERE ..................2 PRELIMINARY INFORMATION / INFORMAZIONI PRELIMINARI ............3 UNIT UNPACKING / DISIMBALLO ....................... 4 3.1. Unpacking procedure / Procedura per il disimballo..................4 GROUPS ASSEMBLY / MONTAGGIO GRUPPI ................
-
Page 48: How To Proceed / Come Procedere
Installation & Acceptance - 2 - ARCOVIS 3000 S/R Villa Sistemi Medicali 1. HOW TO PROCEED / COME PROCEDERE For the proper and safe installation of the Per una corretta e sicura installazione dell’unità unit, please follow, step by step, the consigliamo di seguire, passo dopo passo, la INSTALLATION SHEET. -
Page 49: Preliminary Information / Informazioni Preliminari
Villa Sistemi Medicali ARCOVIS 3000 S/R - Installation & Acceptance - 2 2. PRELIMINARY INFORMATION / INFORMAZIONI PRELIMINARI This unit has been manufactured and Questa unità è stata costruita e controllata in checked in factory by following production fabbrica con metodi di produzione e di... -
Page 50: Unit Unpacking / Disimballo
Installation & Acceptance - 2 - ARCOVIS 3000 S/R Villa Sistemi Medicali 3. UNIT UNPACKING / DISIMBALLO 3.1. Unpacking procedure / Procedura per il disimballo Ref. Fig. 1 For the unpacking two operators are necessary. Il disimballo richiede l’intervento di due persone. - Page 51 Villa Sistemi Medicali ARCOVIS 3000 S/R - Installation & Acceptance - 2 Ref. Fig. 2 VERSION WITH WOODEN BOX VERSIONE CON CASSA IN LEGNO The sides of the box are fixed with screws for wood Le pareti della cassa sono fissate tra loro tramite...
- Page 52 Installation & Acceptance - 2 - ARCOVIS 3000 S/R Villa Sistemi Medicali The unit can appear completely assembled or L’unità può presentarsi completamente montata with disassembled monobloc and I.I.. o con monoblocco e IB smontati. Following figures are referred to the mounted...
- Page 53 Villa Sistemi Medicali ARCOVIS 3000 S/R - Installation & Acceptance - 2 Ref.Fig. 5 Lock all the brakes of the manual arm movements. Bloccare tutti i freni delle movimentazioni manuali Remove all the planks and the sides that compose the dell’arco.
- Page 54 Installation & Acceptance - 2 - ARCOVIS 3000 S/R Villa Sistemi Medicali Ref. Fig. 6 Fix the base to the monitor trolley by using the three Fissare la base al carrello portamonitor utilizzando TSPEI screws previously recovered (Fig. 5 Pos.A).
- Page 55 Villa Sistemi Medicali ARCOVIS 3000 S/R - Installation & Acceptance - 2 Ref. Fig. 8 Place the lifting lever under the rear unit part. Posizionare la leva di sollevamento sotto la parte posteriore dell’unità. Pull with care the lever in the direction...
- Page 56 Installation & Acceptance - 2 - ARCOVIS 3000 S/R Villa Sistemi Medicali Ref. Fig. 9 Move the arm in transport position: Portare l’arco in posizione di trasporto: • • Overview position 0° Posizione panoramica 0° • • Arm rotation 0°...
-
Page 57: Groups Assembly / Montaggio Gruppi
Villa Sistemi Medicali ARCOVIS 3000 S/R - Installation & Acceptance - 2 4. GROUPS ASSEMBLY / MONTAGGIO GRUPPI PREPARATION / PREPARAZIONE For the I.I. replacement two skilled and trained La sostituzione dell’intensificatore di brillanza engineers are necessary. (IB) richiede l’intervento di due tecnici informati e addestrati. - Page 58 Installation & Acceptance - 2 - ARCOVIS 3000 S/R Villa Sistemi Medicali 4.1. INTENSIFIER GROUP ASSEMBLY MONTAGGIO GRUPPO INTENSIFICATORE OBSERVE PRECAUTIONS FOR HANDLING ELECTROSTATIC SENSITIVE DEVICES BEFORE STARTING WITH THE INTENSIFIER PRIMA DI PASSARE AL MONTAGGIO DEL GROUP ASSEMBLY, CHECK UNIT BRAKES ARE...
- Page 59 Villa Sistemi Medicali ARCOVIS 3000 S/R - Installation & Acceptance - 2 Ref.Fig. 12 By a 2,5mm male hexagonal wrench, remove the chiave esagonale maschio 2,5mm, three TCEI M4x16 screws (pos. 1) that fix the I.I. rimuovere le tre viti TCEI M4x16 (pos. 1) che fissano cover (pos.
- Page 60 Installation & Acceptance - 2 - ARCOVIS 3000 S/R Villa Sistemi Medicali 4.2. MONOBLOC GROUP ASSEMBLY MONTAGGIO GRUPPO MONOBLOCCO OBSERVE PRECAUTIONS FOR HANDLING ELECTROSTATIC SENSITIVE DEVICES BEFORE STARTING WITH THE MONOBLOC PRIMA DI PASSARE AL MONTAGGIO DEL GROUP ASSEMBLY, CHECK UNIT BRAKES ARE GRUPPO MONOBLOCCO CONTROLLARE CHE I LOCKED.
- Page 61 Villa Sistemi Medicali ARCOVIS 3000 S/R - Installation & Acceptance - 2 Ref. Fig. 14 Connect to the monobloc the power supply and control Collegare al monoblocco i cavi di alimentazione e di cables : the connection is performed by tear terminals, for controllo: il collegamento è...
-
Page 62: Handles Assembly / Montaggio Delle Maniglie
Installation & Acceptance - 2 - ARCOVIS 3000 S/R Villa Sistemi Medicali 4.3. Handles assembly / Montaggio delle maniglie Standard supplied handles ref. Fig. 10 Maniglie fornite di serie rif Fig. 16 Assemble the standard supplied I.I. handle by using... -
Page 63: Monitors Assembly / Montaggio Dei Monitor
Villa Sistemi Medicali ARCOVIS 3000 S/R - Installation & Acceptance - 2 4.4. Monitors assembly / Montaggio dei monitor The unit is packed without the monitors that L’unità viene imballata senza i monitor, che are in their original boxes. vengono imballati nelle loro scatole originali. -
Page 64: Monitors Wiring / Cablaggio Dei Monitor
Installation & Acceptance - 2 - ARCOVIS 3000 S/R Villa Sistemi Medicali 4.5. Monitors wiring / Cablaggio dei monitor Connect the supply cable and the video Collegare il cavo di alimentazione e i cavi cables to every monitor. video ad ogni monitor. -
Page 65: Monitor On "High Configuration Trolley" / Monitor Su Carrello "High Configuration Trolley
Villa Sistemi Medicali ARCOVIS 3000 S/R - Installation & Acceptance - 2 4.5.3. Monitor on “High Configuration Trolley” / Monitor su carrello “High Configuration Trolley” 18”/19” LCD Monitor (nr. 2) HRP2000 version (back view) / (vista dal retro) Fig. 22 19”... -
Page 66: Installation Of Usb Printers / Installazione Di Stampanti Usb
Installation & Acceptance - 2 - ARCOVIS 3000 S/R Villa Sistemi Medicali 4.6. Installation of USB printers / Installazione di stampanti USB In order to install an USB printer to DICOM Per installare una stampante USB al device, it is necessary to proceed in the dispositivo DICOM è... -
Page 67: Packing And Content Description / Descrizione Dell'imballo E Del Contenuto
Villa Sistemi Medicali ARCOVIS 3000 S/R - Installation & Acceptance - 2 4.7. Packing and content description / Descrizione dell’imballo e del contenuto Note: The packing content can change Nota: il contenuto dell’imballo può variare a according to the chosen configuration; all... - Page 68 Installation & Acceptance - 2 - ARCOVIS 3000 S/R Villa Sistemi Medicali 63777/X (Manuals/ Manualistica) Q.ty Description Code User’s manuals (on paper) Manuali d’uso (su carta) Italian language / Lingua italiana 201175-0X-00 English language / Lingua inglese 201175-0X-01 French language / Lingua francese 201175-0X-02 User’s &...
-
Page 69: Sight Check Of The Unit Integrity / Verifica Visiva Integrità Unità
Villa Sistemi Medicali ARCOVIS 3000 S/R - Installation & Acceptance - 2 5. SIGHT CHECK OF THE UNIT INTEGRITY / VERIFICA VISIVA INTEGRITÀ UNITÀ After the unit unpacking, check the integrity Dopo l’apparecchiatura è stata of the following parts: disimballata, controllare l’integrità... -
Page 70: Mechanical Tests / Test Funzionalità Meccanica
Installation & Acceptance - 2 - ARCOVIS 3000 S/R Villa Sistemi Medicali 7. MECHANICAL TESTS / TEST FUNZIONALITÀ MECCANICA Standard unit version / unità versione Standard Pos. 1 Pos. 2 Pos. 3 Pos. 4 Fig. 25 Ref. Fig. 25 Loosen the arm rotation brake around the Allentare il freno della rotazione dell’arco... - Page 71 Villa Sistemi Medicali ARCOVIS 3000 S/R - Installation & Acceptance - 2 Pos.1 brake ON: Pos.1 freno inserito: move the lever in position of brake ON. portare la leva in posizione di freno attivato. Push with both hands and check that the Spingere con entrambe le mani e verificare unit does not move.
- Page 72 Installation & Acceptance - 2 - ARCOVIS 3000 S/R Villa Sistemi Medicali Ref. Fig. 27 Move the trolley straightly and in all the Muovere il carrello in modo rettilineo e in allowed directions. Check that tutte le direzioni consentite. Verificare che il...
-
Page 73: Unit Power Supply / Alimentazione Unità
Villa Sistemi Medicali ARCOVIS 3000 S/R - Installation & Acceptance - 2 8. UNIT POWER SUPPLY / ALIMENTAZIONE UNITÀ 8.1. Power supplies / Alimentazioni Before plugging in the mains system: Prima di inserire la spina di alimentazione nell’impianto di rete:... - Page 74 Installation & Acceptance - 2 - ARCOVIS 3000 S/R Villa Sistemi Medicali Transformer setting on HC trolley (if present) / Settaggio trasformatore su carrello HC (se presente) Component Drawing Pos. Set / Settaggio Main Line 230Vac VTC2 VTC1 220 V ~...
-
Page 75: Mains Connection / Connessione Alla Rete
Villa Sistemi Medicali ARCOVIS 3000 S/R - Installation & Acceptance - 2 The unit BCA 9 S/R PLUS has been L’unità BCA 9 S/R PLUS è stata progettata designed to adapt automatically to the mains per adeguarsi in modo automatico alla voltage and its performances don't change tensione di rete. -
Page 76: Electrical Tests / Test Funzionalità Elettriche
Installation & Acceptance - 2 - ARCOVIS 3000 S/R Villa Sistemi Medicali 9. ELECTRICAL TESTS / TEST FUNZIONALITÀ ELETTRICHE (no x-ray) / (non raggi) Don't perform any exposure in this In questa prima fase non comandare phase. It may be dangerous for the unit. -
Page 77: Unit Configuration / Configurazione Dell'unità
Villa Sistemi Medicali ARCOVIS 3000 S/R - Installation & Acceptance - 2 10. UNIT CONFIGURATION / CONFIGURAZIONE DELL’UNITÀ 10.1. Data Setup The user has to be aware of the different working È necessario che l’utilizzatore sia informato delle possibilities of the unit, thus to choose the most diverse possibilità... -
Page 78: Installation Date Setting / Impostazione Data Di Installazione
Installation & Acceptance - 2 - ARCOVIS 3000 S/R Villa Sistemi Medicali 10.2. Installation date setting / Impostazione data di installazione At the end of the installation proceed as Alla fine dell’installazione procedere come follows. segue. 10.2.1. Installation date setting in the software / Impostazione data installazione nel software At the end of the installation: Alla fine dell’installazione:... -
Page 79: Tube Seasoning / Formazione Del Tubo
Villa Sistemi Medicali ARCOVIS 3000 S/R - Installation & Acceptance - 2 11. TUBE SEASONING / FORMAZIONE DEL TUBO !!! WARNING !!! !!! ATTENZIONE !!! DURING THE OPERATIONS DESCRIBED LE OPERAZIONI DESCRITTE DI SEGUITO BELOW THERE IS X-RAY EMISSION. PREVEDONO L’EMISSIONE DI RAGGI-X. - Page 80 Installation & Acceptance - 2 - ARCOVIS 3000 S/R Villa Sistemi Medicali (This page is intentionally left blank) (Pagina intenzionalmente bianca) Page 34/34 - Rev.B [File: 201178-B-00-20.doc]...
-
Page 81: Document Status / Stato Del Documento
Document Status / Stato del documento ARCOVIS 3000 S/R Installation & Acceptance - 2 DOCUMENT STATUS / STATO DEL DOCUMENTO Date Pages Modification description Rev. Data Pagine Descrizione della modifica 20/01/08 Document approval / Approvazione documento General document revision / Revisione generale del... - Page 82 Villa Sistemi Medicali ARCOVIS 3000 S/R - Replacements / Sostituzioni -3 REPLACEMENTS SOSTITUZIONI [File: 201179-A-00-20.doc]...
- Page 83 Replacements / Sostituzioni -3 - ARCOVIS 3000 S/R Villa Sistemi Medicali (This page is intentionally left blank) (Pagina intenzionalmente bianca) [File: 201179-A-00-20.doc]...
- Page 84 Villa Sistemi Medicali ARCOVIS 3000 S/R - Replacements / Sostituzioni -3 TABLE OF CONTENTS / SOMMARIO INTRODUCTION / INTRODUZIONE ....................2 REMOVAL OF THE COVERS / RIMOZIONE DEI CARTER..............3 2.1. Preparation / Preparazione ........................... 3 2.2. Removal of the covers / Rimozione dei carter ....................3 2.2.1.
-
Page 85: Introduction / Introduzione
Replacements / Sostituzioni -3 - ARCOVIS 3000 S/R Villa Sistemi Medicali 1. INTRODUCTION / INTRODUZIONE This chapter describes necessary Questo capitolo descrive procedure procedures for the covers removal and the necessarie per la rimozione dei carter di replacement of electronic boards and other... -
Page 86: Removal Of The Covers / Rimozione Dei Carter
Villa Sistemi Medicali ARCOVIS 3000 S/R - Replacements / Sostituzioni -3 REMOVAL OF THE COVERS / RIMOZIONE DEI CARTER 2.1. Preparation / Preparazione In order to remove the covers, make the Per rimuovere i carter di copertura, seguire le following actions: seguenti precauzioni: •... -
Page 87: Rear Cover Disassembly / Smontaggio Carter Posteriore
Replacements / Sostituzioni -3 - ARCOVIS 3000 S/R Villa Sistemi Medicali 2.2.1. Rear cover disassembly / Smontaggio carter posteriore Ref. Fig. 2 • • Remove the plastic caps (pos. 1) that Rimuovere i tappi di plastica (pos. 1) che cover the covers fixing screws. -
Page 88: Front Cover Disassembly / Smontaggio Carter Anteriore
Villa Sistemi Medicali ARCOVIS 3000 S/R - Replacements / Sostituzioni -3 2.2.2. Front cover disassembly / Smontaggio carter anteriore Ref.Fig. 3 • • Remove the plastic caps (pos.1) that cover Rimuovere i tappi di plastica (pos. 1) che the fixing screws of the cover. -
Page 89: Lateral Covers Disassembly / Smontaggio Carter Laterali
Replacements / Sostituzioni -3 - ARCOVIS 3000 S/R Villa Sistemi Medicali 2.2.3. Lateral covers disassembly / Smontaggio carter laterali Ref. Fig. 4 • • The two lateral covers can be removed I due carter laterali possono essere rimossi without taking away the front cover, but it senza rimuovere il carter anteriore, ma è... -
Page 90: Accessibility To The Internal Parts / Accessibilita' Alle Parti Interne
Villa Sistemi Medicali ARCOVIS 3000 S/R - Replacements / Sostituzioni -3 ACCESSIBILITY TO THE INTERNAL PARTS / ACCESSIBILITA’ ALLE PARTI INTERNE 3.1. Boards support opening / Apertura supporto schede Ref. Fig. 5 • • Rotate clockwise or counterclockwise the Ruotare in senso orario o antiorario il lock plate of the boards supports. -
Page 91: Electrical Parts Replacement / Sostituzioni Parti Elettriche
Replacements / Sostituzioni -3 - ARCOVIS 3000 S/R Villa Sistemi Medicali 4. ELECTRICAL PARTS REPLACEMENT / SOSTITUZIONI PARTI ELETTRICHE Should a fault or a malfunction be detected, it In caso di guasto o malfunzionamento si is advisable to replace the boards (and not to consiglia di sostituire le schede anziché... -
Page 92: Replacement Of The Key Selector / Sostituzione Del Selettore Chiave
Villa Sistemi Medicali ARCOVIS 3000 S/R - Replacements / Sostituzioni -3 4.1. Replacement of the key selector / Sostituzione del selettore chiave • • Disconnect the unit from the mains. Sconnettere l’unità dalla rete. • • Remove the front cover of the unit (§2.2.1). -
Page 93: Replacement Of The X-Ray Handswitch / Sostituzione Pulsante Rx
Replacements / Sostituzioni -3 - ARCOVIS 3000 S/R Villa Sistemi Medicali 4.2. Replacement of the x-ray handswitch / Sostituzione pulsante RX Ref.: Fig. 9 • • Disconnect the unit from the mains. Sconnettere l’unità dalla rete. • • Remove the rear cover of the unit (§2.2.1). -
Page 94: Replacement Of The Stop Push-Button / Sostituz. Del Pulsante Di Stop
Villa Sistemi Medicali ARCOVIS 3000 S/R - Replacements / Sostituzioni -3 4.3. Replacement of the Stop push-button / Sostituz. del pulsante di Stop Ref.: Fig. 10 • • Disconnect the unit from the mains. Sconnettere l’unità dalla rete. • •... -
Page 95: Control Panel Replacement / Sostituzione Della Tastiera
Replacements / Sostituzioni -3 - ARCOVIS 3000 S/R Villa Sistemi Medicali 4.4. Control panel replacement / Sostituzione della tastiera OBSERVE PRECAUTIONS FOR HANDLING ELECTROSTATIC SENSITIVE DEVICES • • Disconnect the unit from the mains. Sconnettere l’unità dalla rete. • •... - Page 96 Villa Sistemi Medicali ARCOVIS 3000 S/R - Replacements / Sostituzioni -3 Ref. Fig. 13 • • With a male hexagonal wrench 3mm, Con una chiave esagonale maschio 3mm, remove the twelve screws TSPEI M3x10 rimuovere le dodici viti TSPEI M3x10 (pos.
-
Page 97: Replacement Of The Control Panel Display And The Boards / Sostituzione Del Display E Delle Schede Della
Replacements / Sostituzioni -3 - ARCOVIS 3000 S/R Villa Sistemi Medicali 4.5. Replacement of the control panel display and the boards / Sostituzione del display e delle schede della tastiera OBSERVE PRECAUTIONS FOR HANDLING ELECTROSTATIC SENSITIVE DEVICES Ref. Fig. 14 Fig. - Page 98 Villa Sistemi Medicali ARCOVIS 3000 S/R - Replacements / Sostituzioni -3 Ref. Fig. 15 Fig. 15 Ref. Fig. 16 Fig. 16 Ref. Fig. 17 Fig. 17 [File: 201179-A-00-20.doc] Rev.A - Page 15/68...
-
Page 99: Replacement Of The Electronic Boards / Sostituzione Delle Schede Elettroniche
Replacements / Sostituzioni -3 - ARCOVIS 3000 S/R Villa Sistemi Medicali 4.6. Replacement of the electronic boards / Sostituzione delle schede elettroniche Should a fault or a malfunction be detected, it In caso di guasto o malfunzionamento si is advisable to replace the boards (and not to consiglia di sostituire le schede anziché... -
Page 100: B1 Board Replacement / Sostituzione Della Scheda B1
Villa Sistemi Medicali ARCOVIS 3000 S/R - Replacements / Sostituzioni -3 4.6.1. B1 board replacement / Sostituzione della scheda B1 OBSERVE PRECAUTIONS FOR HANDLING ELECTROSTATIC SENSITIVE DEVICES • • Disconnect the unit from the mains. Sconnettere l’unità dalla rete. •... - Page 101 Replacements / Sostituzioni -3 - ARCOVIS 3000 S/R Villa Sistemi Medicali Before installing the new board, check the Prima installare nuova scheda correct positioning of the jumpers in verificare il corretto posizionamento dei respect of the old board. jumper rispetto alla scheda vecchia.
-
Page 102: B4 Board Replacement / Sostituzione Della Scheda B4
Villa Sistemi Medicali ARCOVIS 3000 S/R - Replacements / Sostituzioni -3 4.6.2. B4 board replacement / Sostituzione della scheda B4 OBSERVE PRECAUTIONS FOR HANDLING ELECTROSTATIC SENSITIVE DEVICES • • Disconnect the unit from the mains. Sconnettere l’unità dalla rete. •... - Page 103 Replacements / Sostituzioni -3 - ARCOVIS 3000 S/R Villa Sistemi Medicali Ref. Fig. 21 • • With a male hexagonal wrench 3mm Con una chiave maschio esagonale 3mm unscrew the four screws M4x10 (pos. 1). svitare le quattro viti M4x10 (pos. 1).
-
Page 104: B5 Board Replacement / Sostituzione Della Scheda B5
Villa Sistemi Medicali ARCOVIS 3000 S/R - Replacements / Sostituzioni -3 4.6.3. B5 board replacement / Sostituzione della scheda B5 OBSERVE PRECAUTIONS FOR HANDLING ELECTROSTATIC SENSITIVE DEVICES • • Disconnect the unit from the mains. Sconnettere l’unità dalla rete. •... - Page 105 Replacements / Sostituzioni -3 - ARCOVIS 3000 S/R Villa Sistemi Medicali Before installing the new board check the Prima installare nuova scheda correct jumpers positioning in respect of verificare il corretto posizionamento dei the old board. jumper rispetto alla scheda vecchia.
-
Page 106: B7 Board Replacement / Sostituzione Della Scheda B7
Villa Sistemi Medicali ARCOVIS 3000 S/R - Replacements / Sostituzioni -3 4.6.4. B7 board replacement / Sostituzione della scheda B7 OBSERVE PRECAUTIONS FOR HANDLING ELECTROSTATIC SENSITIVE DEVICES • • Disconnect the unit from the mains. Sconnettere l’unità dalla rete. •... - Page 107 Replacements / Sostituzioni -3 - ARCOVIS 3000 S/R Villa Sistemi Medicali Before installing the new board check the Prima installare nuova scheda correct jumpers positioning in respect of verificare il corretto posizionamento dei the old board. jumper rispetto alla scheda vecchia.
-
Page 108: B8 Board Replacement / Sostituzione Della Scheda B8
Villa Sistemi Medicali ARCOVIS 3000 S/R - Replacements / Sostituzioni -3 4.6.5. B8 board replacement / Sostituzione della scheda B8 OBSERVE PRECAUTIONS FOR HANDLING ELECTROSTATIC SENSITIVE DEVICES • • Disconnect the unit from the mains. Sconnettere l’unità dalla rete. •... - Page 109 Replacements / Sostituzioni -3 - ARCOVIS 3000 S/R Villa Sistemi Medicali Before installing the new board check the Prima installare nuova scheda correct jumpers positioning in respect of verificare il corretto posizionamento dei the old board. jumper rispetto alla scheda vecchia.
-
Page 110: B9 Board Replacement / Sostituzione Della Scheda B9
Villa Sistemi Medicali ARCOVIS 3000 S/R - Replacements / Sostituzioni -3 4.6.6. B9 board replacement / Sostituzione della scheda B9 OBSERVE PRECAUTIONS FOR HANDLING ELECTROSTATIC SENSITIVE DEVICES • • Disconnect the unit from the mains. Sconnettere l’unità dalla rete. •... - Page 111 Replacements / Sostituzioni -3 - ARCOVIS 3000 S/R Villa Sistemi Medicali Before installing the new board check the Prima installare nuova scheda correct jumpers positioning in respect of verificare il corretto posizionamento dei the old board. jumper rispetto alla scheda vecchia.
-
Page 112: S1 Power Supply Replacement / Sostituzione Dell'alimentatore S1
Villa Sistemi Medicali ARCOVIS 3000 S/R - Replacements / Sostituzioni -3 4.6.7. S1 Power Supply replacement / Sostituzione dell’alimentatore S1 OBSERVE PRECAUTIONS FOR HANDLING ELECTROSTATIC SENSITIVE DEVICES • • Disconnect the unit from the mains. Sconnettere l’unità dalla rete. •... - Page 113 Replacements / Sostituzioni -3 - ARCOVIS 3000 S/R Villa Sistemi Medicali Before installing the new board check the Prima installare nuova scheda correct jumpers positioning in respect of verificare il corretto posizionamento dei the old board. jumper rispetto alla scheda vecchia.
-
Page 114: Replacement Of The Inverter Board / Sostituzione Della Scheda Dell'inverter
Villa Sistemi Medicali ARCOVIS 3000 S/R - Replacements / Sostituzioni -3 4.7. Replacement of the inverter board / Sostituzione della scheda dell’inverter OBSERVE PRECAUTIONS FOR HANDLING ELECTROSTATIC SENSITIVE DEVICES • • Disconnect the unit from the mains. Sconnettere l’unità dalla rete. - Page 115 Replacements / Sostituzioni -3 - ARCOVIS 3000 S/R Villa Sistemi Medicali Before installing the new board check the Prima installare nuova scheda correct jumpers positioning in respect of verificare il corretto posizionamento dei the old board. jumper rispetto alla scheda vecchia.
-
Page 116: Replacement Of The Inverter / Sostituzione Dell'inverter
Villa Sistemi Medicali ARCOVIS 3000 S/R - Replacements / Sostituzioni -3 4.8. Replacement of the inverter / Sostituzione dell’inverter OBSERVE PRECAUTIONS FOR HANDLING ELECTROSTATIC SENSITIVE DEVICES • • Disconnect the unit from the mains. Sconnettere l’unità dalla rete. • •... - Page 117 Replacements / Sostituzioni -3 - ARCOVIS 3000 S/R Villa Sistemi Medicali Ref.Fig. 35 • • Unloose the four fixing screws of the Allentare le quattro viti di fissaggio del inverter support without removing them. supporto dell’inverter senza toglierle. • •...
-
Page 118: Replacement Of The Video Camera / Sostituzione Della Camera Video
Villa Sistemi Medicali ARCOVIS 3000 S/R - Replacements / Sostituzioni -3 4.9. Replacement of the video camera / Sostituzione della camera video OBSERVE PRECAUTIONS FOR HANDLING ELECTROSTATIC SENSITIVE DEVICES Ref. Fig. 36 • • Place the unit in a flat and safe site. -
Page 119: Video System 0,5 K / Sistema Video 0,5 K
Replacements / Sostituzioni -3 - ARCOVIS 3000 S/R Villa Sistemi Medicali 4.9.1. Video system 0,5 K / Sistema video 0,5 OBSERVE PRECAUTIONS FOR HANDLING ELECTROSTATIC SENSITIVE DEVICES Ref. Fig. 37 • • With a male hexagonal wrench 2,5mm, chiave esagonale... - Page 120 Villa Sistemi Medicali ARCOVIS 3000 S/R - Replacements / Sostituzioni -3 4.9.2. Video system 1 K / Sistema video 1 OBSERVE PRECAUTIONS FOR HANDLING ELECTROSTATIC SENSITIVE DEVICES Ref. Fig. 38 • • With a male hexagonal wrench 2,5mm, chiave esagonale...
-
Page 121: Grid Replacement / Sostituzione Della Griglia
Replacements / Sostituzioni -3 - ARCOVIS 3000 S/R Villa Sistemi Medicali 4.10. Grid replacement / Sostituzione della griglia Ref. Fig. 36 • • Place the unit in a flat and safe site. Portare l’unità in luogo piano e sicuro. •... -
Page 122: Replacement / Sostituzione Dell'i.b
Villa Sistemi Medicali ARCOVIS 3000 S/R - Replacements / Sostituzioni -3 4.11. I.I. replacement / Sostituzione dell’I.B. OBSERVE PRECAUTIONS FOR HANDLING ELECTROSTATIC SENSITIVE DEVICES Ref. Fig. 41 For the I.I. replacement two skilled and sostituzione dell’intensificatore trained engineers are necessary. - Page 123 Replacements / Sostituzioni -3 - ARCOVIS 3000 S/R Villa Sistemi Medicali Ref. Fig. 43 • • With a male hexagonal wrench 3mm, Con una chiave esagonale maschio 3mm, remove the six screws TCEI M4x16 (pos. rimuovere le sei viti TCEI M4x16 (pos. 1) 1) and the plain washer and grower that fix più...
-
Page 124: Replacement Of I.i. Power Supply / Sostituzione Dell'alimentatore I.b
Villa Sistemi Medicali ARCOVIS 3000 S/R - Replacements / Sostituzioni -3 4.12. Replacement of I.I. power supply / Sostituzione dell’alimentatore I.B. OBSERVE PRECAUTIONS FOR HANDLING ELECTROSTATIC SENSITIVE DEVICES Ref. Fig. 44 • • Place the unit in a flat and safe site. - Page 125 Replacements / Sostituzioni -3 - ARCOVIS 3000 S/R Villa Sistemi Medicali Ref. Fig. 45 • • Disassemble the small cover (pos.2) by Smontare piccolo carter (pos.2) removing the 4 screws TBEI M3x10 rimuovendo le 4 viti TBEI M3x10 (pos.1) e (pos.1) and the relative washers.
-
Page 126: Mechanical Parts Replacement / Sostituzioni Parti Meccaniche
Villa Sistemi Medicali ARCOVIS 3000 S/R - Replacements / Sostituzioni -3 5. MECHANICAL PARTS REPLACEMENT / SOSTITUZIONI PARTI MECCANICHE 5.1. Leg cover (long version) / Carter gamba (versione lunga) Ref. Fig. 46 • • In order to disassemble the leg cover, it is Per smontare il carter della gamba, è... -
Page 127: Leg Cover (Short Version) / Carter Gamba (Versione Corta)
Replacements / Sostituzioni -3 - ARCOVIS 3000 S/R Villa Sistemi Medicali 5.2. Leg cover (short version) / Carter gamba (versione corta) Ref. Fig. 47 • • In order to disassemble the leg cover, it is Per smontare il carter della gamba, è... -
Page 128: Handle / Maniglia Dell'ib
Villa Sistemi Medicali ARCOVIS 3000 S/R - Replacements / Sostituzioni -3 5.3. I.I. handle / Maniglia dell’IB Ref. Fig. 48 • • In order to replace the I.I. handle, it is sostituire maniglia dell’IB, è necessary to unloose and remove the four... -
Page 129: Arm Rotation Handle / Maniglia Rotazione Arco
Replacements / Sostituzioni -3 - ARCOVIS 3000 S/R Villa Sistemi Medicali 5.4. Arm rotation handle / Maniglia rotazione arco Ref. Fig. 49 • • In order to replace the arm rotation handle, Per sostituire una maniglia di rotazione it is necessary to unloose and remove the dell’arco, è... -
Page 130: Transport Handle / Maniglia Di Trasporto
Villa Sistemi Medicali ARCOVIS 3000 S/R - Replacements / Sostituzioni -3 5.5. Transport handle / Maniglia di trasporto Ref. Fig. 50 • • In order to replace the transport handle, Per sostituire la maniglia di trasporto, è it is necessary to remove the rear cover necessario togliere il carter posteriore (§... -
Page 131: Lateral Handle / Maniglia Laterale
Replacements / Sostituzioni -3 - ARCOVIS 3000 S/R Villa Sistemi Medicali 5.6. Lateral handle / Maniglia laterale Ref. Fig. 51 • • In order to replace the lateral handle, it is Per sostituire una maniglia laterale, è necessary to remove the front cover necessario togliere il carter anteriore (§2.2.2). -
Page 132: Driving Handle Replacement / Sostituzione Della Maniglia Di Guida
Villa Sistemi Medicali ARCOVIS 3000 S/R - Replacements / Sostituzioni -3 5.7. Driving handle replacement / Sostituzione della maniglia di guida Ref. Fig. 53 • • With a male hexagonal wrench 4mm, Con una chiave esagonale maschio 4mm, remove the screw TCEI M5x16 (pos. 2) rimuovere la vite TCEI M5x16 (pos. -
Page 133: Wheels Replacement / Sostituzione Ruote
Replacements / Sostituzioni -3 - ARCOVIS 3000 S/R Villa Sistemi Medicali 5.8. Wheels replacement / Sostituzione ruote 5.8.1. Cable pusher / Spingicavo Ref. Fig. 54 • • The procedure for the cable pusher procedura sostituzione dello replacement is the same for all the wheels, spingicavo è... -
Page 134: Front Wheel / Ruota Anteriore
Villa Sistemi Medicali ARCOVIS 3000 S/R - Replacements / Sostituzioni -3 5.8.2. Front wheel / Ruota anteriore Ref. Fig. 55 • • Unit brake ON. Attivare il freno dell’unità. • • Remove the cover of the front leg (§5.1). Togliere il carter della gamba anteriore (§5.1). -
Page 135: Rear Wheel / Ruota Posteriore
Replacements / Sostituzioni -3 - ARCOVIS 3000 S/R Villa Sistemi Medicali Ref. Fig. 56 • • Remove the wheel by operating on the Rimuovere la ruota agendo sulle quattro four fixing screws TCEI M6x16 (pos. 1). viti di fissaggio TCEI M6x16 (pos. 1). - Page 136 Villa Sistemi Medicali ARCOVIS 3000 S/R - Replacements / Sostituzioni -3 Ref. Fig. 58 • • Remove the plastic caps that cover the Togliere i tappi di plastica che coprono le cable pusher fixing screws (pos. 1). viti di fissaggio dello spingicavo (pos. 1).
- Page 137 Replacements / Sostituzioni -3 - ARCOVIS 3000 S/R Villa Sistemi Medicali Ref.Fig. 59 • • When the wheels are remounted, pay Quando rimontano ruote, fare attention to the position of the shoulder attenzione alla posizione delle rondelle di washers. spallamento.
-
Page 138: Monobloc Cover / Carter Del Monoblocco
Villa Sistemi Medicali ARCOVIS 3000 S/R - Replacements / Sostituzioni -3 5.9. Monobloc cover / Carter del monoblocco Ref. Fig. 60 • • Unscrew the five screws TBEI M3x10 (pos. Svitare le cinque viti TBEI M3x10 (pos. 1) 1) that fix the cover to the structure. -
Page 139: Dap Camera / Camera Dap
Replacements / Sostituzioni -3 - ARCOVIS 3000 S/R Villa Sistemi Medicali 5.10. DAP Camera / Camera DAP Ref. Fig. 61 • • Disconnect the unit from the mains. Sconnettere l’unità dalla rete. • • Disassemble the monobloc cover (§5.9). Smontare il carter del monoblocco (§5.9). - Page 140 Villa Sistemi Medicali ARCOVIS 3000 S/R - Replacements / Sostituzioni -3 Ref. Fig. 62 • • Unscrew the four screws TC M3x10 and Svitare le quattro viti TC M3x10 più plain washer (pos. 1) that fix the camera to rondella piana (pos. 1) che fissano la the structure (pos.
-
Page 141: Collimator / Collimatore
Replacements / Sostituzioni -3 - ARCOVIS 3000 S/R Villa Sistemi Medicali 5.11. Collimator / Collimatore Ref.Fig. 63 • • Disconnect the unit from the mains. Sconnettere l’unità dalla rete. • • Disassemble the monobloc cover (§5.9). Smontare il carter del monoblocco (§5.9). -
Page 142: Monobloc / Monoblocco
Villa Sistemi Medicali ARCOVIS 3000 S/R - Replacements / Sostituzioni -3 5.12. Monobloc / Monoblocco • • Move the unit in a flat and safe site. Portare l’unità in luogo piano e sicuro. • • Disconnect the unit from the mains. - Page 143 Replacements / Sostituzioni -3 - ARCOVIS 3000 S/R Villa Sistemi Medicali Ref. Fig. 66 • • Put the arm in horizontal position. Portare l’arco in posizione orizzontale. Fig. 66 Ref. Fig. 67 Before proceeding with monobloc Prima di procedere alla sostituzione del...
-
Page 144: Wig-Wag Movement Bush Replacement / Sostituzione Bussola Movim. Wig-Wag
Villa Sistemi Medicali ARCOVIS 3000 S/R - Replacements / Sostituzioni -3 5.13. Wig-Wag movement bush replacement / Sostituzione bussola movim. Wig- • • With the unit ON, lift the column and Ad unità accesa, sollevare la colonna e position the whole slide forwards. - Page 145 Replacements / Sostituzioni -3 - ARCOVIS 3000 S/R Villa Sistemi Medicali • • Svitare e rimuovere il grano della bussola Unscrew and remove the dowel of the con chiave maschio esagonale 2,5mm (Fig. bush with male hexagonal wrench 2,5mm 72).
- Page 146 Villa Sistemi Medicali ARCOVIS 3000 S/R - Replacements / Sostituzioni -3 • • Screw down and tighten the dowel with a Avvitare e serrare il grano con chiave male hexagonal wrench 2,5mm (Fig. 76) so maschio esagonale 2,5mm (Fig. 76) in that the bush remains locked in position.
-
Page 147: Monitor Trolley / Carrello Portamonitor
Replacements / Sostituzioni -3 - ARCOVIS 3000 S/R Villa Sistemi Medicali 6. MONITOR TROLLEY / CARRELLO PORTAMONITOR 6.1. Boards lay-out / Disposizione schede K System Video Ref. Fig. 80 CCU UNIT SBFM MEMORY B14 - VIDEO SUPERVISOR BOARD Fig. 80 K System Video Ref. -
Page 148: X-Ray Lamp Replacement / Sostituzione Lampada Rx
Villa Sistemi Medicali ARCOVIS 3000 S/R - Replacements / Sostituzioni -3 6.2. X-ray lamp replacement / Sostituzione lampada Rx Compact Version Ref. Fig. 82 • • The x-ray signal lamp is on the unit (pos. La lampada di segnalazione raggi si trova sull’unità... - Page 149 Replacements / Sostituzioni -3 - ARCOVIS 3000 S/R Villa Sistemi Medicali Ref. Fig. 83 • • With a male hexagonal wrench 2,5mm, chiave esagonale maschio remove the two screws TCEI M3x10 (pos. 2,5mm, rimuovere le due viti TCEI M3x10 1) that fix the cover (pos. 2).
- Page 150 Villa Sistemi Medicali ARCOVIS 3000 S/R - Replacements / Sostituzioni -3 LP Trolley, HP Trolley / Carrello LP, Carrello HP Ref. Fig. 84 • • x-ray signal lamp La lampada di segnalazione raggi si trova trolley(pos.1). sul carrello (pos. 1) Ref.
- Page 151 Replacements / Sostituzioni -3 - ARCOVIS 3000 S/R Villa Sistemi Medicali (This page is intentionally left blank) (Pagina intenzionalmente bianca) Page 68/68 - Rev.A [File: 201179-A-00-20.doc]...
-
Page 152: Document Status / Stato Del Documento
Document Status / Stato del documento ARCOVIS 3000 S/R – Replacements / Sostituzioni -3 DOCUMENT STATUS / STATO DEL DOCUMENTO Rev. Date Pages Modification description 30/10/07 Document approval / Approvazione documento General document revision / Revisione generale del 28/04/08 documento [File: 201179-A-00-20.doc]... - Page 153 Villa Sistemi Medicali ARCOVIS 30000 S/R – Adjustments / Regolazioni - 4 ADJUSTMENTS REGOLAZIONI [File: 201180-B-00-20.doc]...
- Page 154 Adjustments / Regolazioni - 4 - ARCOVIS 30000 S/R Villa Sistemi Medicali (This page is intentionally left blank) (Pagina intenzionalmente bianca) [File: 201180-B-00-20.doc]...
- Page 155 Villa Sistemi Medicali ARCOVIS 30000 S/R – Adjustments / Regolazioni - 4 TABLE OF CONTENTS / SOMMARIO ELECTRICAL ADJUSTMENTS / REGOLAZIONI ELETTRICHE ............2 1.1. Trimmers / Potenziometri ..........................2 X-RAY SYSTEM ADJUST. / REGOLAZIONI SISTEMA RX ..............3 2.1.
-
Page 156: Electrical Adjustments / Regolazioni Elettriche
Adjustments / Regolazioni - 4 - ARCOVIS 30000 S/R Villa Sistemi Medicali 1. ELECTRICAL ADJUSTMENTS / REGOLAZIONI ELETTRICHE The most important electrical adjustments are tarature elettriche più importanti performed through the SERVICE MODE (see eseguono tramite la MODALITÁ SERVICE chap. “Service Information- 6 §6). In this way, it (vedi cap. -
Page 157: X-Ray System Adjust. / Regolazioni Sistema Rx
Villa Sistemi Medicali ARCOVIS 30000 S/R – Adjustments / Regolazioni - 4 2. X-RAY SYSTEM ADJUST. / REGOLAZIONI SISTEMA RX 2.1. Adjustment of the filament current / Regolazione della corrente di filamento This adjustment is normally performed in Questa regolazione viene normalmente factory, so it is not necessary to perform eseguita in fabbrica, non è... -
Page 158: Adjustments Of Stationary / Rotating Anode Unit / Regolazioni Unità Anodo Fisso / Rotante
Adjustments / Regolazioni - 4 - ARCOVIS 30000 S/R Villa Sistemi Medicali 2.2. Adjustments of stationary / rotating anode unit / Regolazioni unità anodo fisso / rotante !!! WARNING !!! !!! ATTENZIONE !!! IONIZING RADIATION EMISSION DURING THE LE OPERAZIONI DESCRITTE DI SEGUITO OPERATIONS DESCRIBED BELOW. - Page 159 Villa Sistemi Medicali ARCOVIS 30000 S/R – Adjustments / Regolazioni - 4 Select Automatic Fluoroscopy, set the kV Selezionare Scopia Automatica, impostare i values reported in the “kV” column of the table valori di kV riportati nella colonna “kV” della 1 and select Manual Fluoroscopy to keep the tab.
- Page 160 Adjustments / Regolazioni - 4 - ARCOVIS 30000 S/R Villa Sistemi Medicali Choose the available APR programs and Scegliere i programmi APR disponibili e ripetere repeat the measurement of the mA values for le rilevazioni dei valori di mA per ogni decade di every kV decade.
- Page 161 Villa Sistemi Medicali ARCOVIS 30000 S/R – Adjustments / Regolazioni - 4 2.2.2. Tube calibration in radiography / Calibrazione del tubo in grafia Place the oscilloscope on the board PSM18: Posizionare l’oscilloscopio sulla scheda PSM18: channel A: probe Tp13 (format 1V = 10mA) –...
- Page 162 Adjustments / Regolazioni - 4 - ARCOVIS 30000 S/R Villa Sistemi Medicali 3. 0,5K VIDEO SYSTEM ADJUSTMENTS / REGOLAZIONI VIDEO SISTEMA 0,5K 3.1. Image magnification image geometry Ingrandimento dell’immagine e geometria immagine 3.1.1. Magnification adjustment / Regolazione ingrandimento The calibration of the magnification must be La taratura dell’ingrandimento deve essere...
- Page 163 Villa Sistemi Medicali ARCOVIS 30000 S/R – Adjustments / Regolazioni - 4 Fig. 2 Fig. 3 Select Automatic Fluoroscopy and control x- Selezionare Scopia automatica e comandare rays, measure the cross on the monitor. Rx, misurare la croce sul monitor.
- Page 164 Adjustments / Regolazioni - 4 - ARCOVIS 30000 S/R Villa Sistemi Medicali 3.1.2. Image geometry / Geometria immagine SBFM memory Memoria SBFM: Press at the same time the rotation keys on the Premere contemporaneamente tasti control panel and wait for some seconds till the rotazione sul pannello di comando e attendere reference cross appears on monitor “A”...
-
Page 165: Monobloc - Cross Hair Plate" Centering / Centratura "Monoblocco - Cross Hair Plate
Villa Sistemi Medicali ARCOVIS 30000 S/R – Adjustments / Regolazioni - 4 3.2. “Monobloc - Cross hair plate” centering / Centratura “Monoblocco - Cross hair plate” Ref.Fig. 6 Place the ID M60 centering tool. Posizionare l’attrezzo di centratura ID M60. -
Page 166: Collimator Adjustment / Regolazione Del Collimatore
Adjustments / Regolazioni - 4 - ARCOVIS 30000 S/R Villa Sistemi Medicali 3.3. Collimator adjustment / Regolazione del collimatore Disassemble the ID E40 centering tool. Smontare l’attrezzo di centratura ID E40. Unloose the three hexagons present on the Allentare i tre esagoni presenti sulla parte lower part of the collimator. -
Page 167: Dimension Of Automatic Kv Control Area / Dimensione Area Di Controllo Kv Automatici
Villa Sistemi Medicali ARCOVIS 30000 S/R – Adjustments / Regolazioni - 4 3.3.3. Collimator fields adjustment / Regolazione campi collimatore Enter Service Mode, set the password “1001” to Entrare in modalità Service Mode, impostare la calibrate the collimator positions. Adjust the password “1001”... -
Page 168: White & Black Levels Adjustment / Regolazione Livelli Di Bianco E Nero
Adjustments / Regolazioni - 4 - ARCOVIS 30000 S/R Villa Sistemi Medicali 3.5. White & Black levels adjustment / Regolazione livelli di bianco e nero Ref. Fig. 8, Fig. 9 Connect the oscilloscope between the analog Collegare l’oscilloscopio tra l’uscita analogica output of the BNC signal of the CCU and GND. -
Page 169: Dose Adjustment / Regolazione Dose
Villa Sistemi Medicali ARCOVIS 30000 S/R – Adjustments / Regolazioni - 4 3.6. Dose adjustment / Regolazione dose Ref. Fig. 10, Fig. 11 Place the filter 1mmAL on the collimator + Posizionare filtro 1mmAL sul collimatore + camera dosimeter chamber (if required) + monobloc cover... -
Page 170: Image Uniformity Adjustment (Shading) / Regolazione Uniformità D'immagine
Adjustments / Regolazioni - 4 - ARCOVIS 30000 S/R Villa Sistemi Medicali 3.7. Image uniformity adjustment (shading) / Regolazione uniformità d’immagine Ref. Fig. 12, Fig. 13 Connect the oscilloscope to the connector of Collegare l’oscilloscopio sul connettore del the video signal in output from the CCU. -
Page 171: Video Signal Calibration / Taratura Segnale Video
Villa Sistemi Medicali ARCOVIS 30000 S/R – Adjustments / Regolazioni - 4 3.8. Video signal calibration / Taratura segnale video 3.8.1. SBFM Memory / Memoria SBFM Video Input / Ingresso Video Ref. Fig. 14 Place the PHILIPS PHANTOM at the input of Posizionare il PHANTOM PHILIPS all’ingresso... - Page 172 Adjustments / Regolazioni - 4 - ARCOVIS 30000 S/R Villa Sistemi Medicali Video Output / Uscita Video Ref. Fig. 15 Fig. 15 Fig. 16 Place the PHILIPS PHANTOM at the input of Posizionare il PHANTOM PHILIPS all’ingresso the I.I. tube, connect the probe of the del tubo IB, collegare la sonda dell’oscilloscopio...
-
Page 173: Checks On The Image Quality / Verifiche Sulla Qualità Dell'immagine
Villa Sistemi Medicali ARCOVIS 30000 S/R – Adjustments / Regolazioni - 4 BNC1 Input signal / Segnale di ingresso BNC2 Printer / Stampante Note: on the printer output the closing cap 75ohm must be present / Nota: sull’uscita stampante deve essere presente il tappo di chiusura da 75ohm. -
Page 174: Video System Adjustment / Regolazione Sistema Video 1K
Adjustments / Regolazioni - 4 - ARCOVIS 30000 S/R Villa Sistemi Medicali 4. 1K VIDEO SYSTEM ADJUSTMENT / REGOLAZIONE SISTEMA VIDEO 1K 4.1. Camera assembly / Montaggio della camera 4.1.1. Camera assembly / Montaggio della camera Ref. Fig. 18, Fig. 19, Fig. 20 Put the ID E85 disk on the I.I. - Page 175 Villa Sistemi Medicali ARCOVIS 30000 S/R – Adjustments / Regolazioni - 4 4.1.2. Image centring / Centratura dell’immagine The camera is supplied already prearranged for La camera viene fornita già predisposta per il the I.I. assembly. montaggio sull’IB. Unloose the three fixing screws of the camera Allentare le tre viti di fissaggio della camera (Fig.
-
Page 176: Monobloc - Cross Hair Plate" Centring / Centratura "Monoblocco - Cross Hair Plate
Adjustments / Regolazioni - 4 - ARCOVIS 30000 S/R Villa Sistemi Medicali 4.2. “Monobloc - Cross hair plate” centring / Centratura “Monoblocco - Cross hair plate” Perform the procedure of monobloc-cross hair Eseguire procedura centratura plate centering as indicated in §3.2 monoblocco come riportata in §3.2... -
Page 177: Dimension Of The Automatic Kv Reading Area / Dimensione Area Di Lettura Kv Automatici
Villa Sistemi Medicali ARCOVIS 30000 S/R – Adjustments / Regolazioni - 4 4.4. Dimension of the automatic kV reading area / Dimensione area di lettura kV automatici Only for HRC1000 / Solo per HRC1000 Set the four DP dip-switches that are placed on... -
Page 178: Dose Adjustment / Regolazione Dose
Adjustments / Regolazioni - 4 - ARCOVIS 30000 S/R Villa Sistemi Medicali 4.5. Dose adjustment / Regolazione dose Ref. Fig. 23 Put the arm with monobloc in low position. Portare l’arco con monoblocco in posizione Place the filter 1mmAL on the collimator + bassa. - Page 179 Villa Sistemi Medicali ARCOVIS 30000 S/R – Adjustments / Regolazioni - 4 4.5.1. Iris calibration/ Taratura dell’iride (for fixed anode version with HRC 1000 memory/ per versione anodo fisso con memoria HRC 1000) with Board B5 cod.01791/X: con scheda B5 cod.01791/X:...
- Page 180 Adjustments / Regolazioni - 4 - ARCOVIS 30000 S/R Villa Sistemi Medicali Place a digital multimeter between B11-Tp2 (+) Posizionare un multimetro digitale tra B11-Tp2 and B11-Tp6 (GND). (+) e B11-Tp6 (GND). Control Snapshot and check that the voltage Comandare Snapshot e verificare che la read on the multimeter is 800mV (-0 +50mV).
- Page 181 Villa Sistemi Medicali ARCOVIS 30000 S/R – Adjustments / Regolazioni - 4 (for rotating anode version with HRC 1000 memory/ per versione anodo rotante con memoria HRC 1000) with cod.01791/A board and 30mA curve: con scheda cod.01791/A e curva 30mA:...
- Page 182 Adjustments / Regolazioni - 4 - ARCOVIS 30000 S/R Villa Sistemi Medicali Always by the digital multimeter placed between Sempre con il multimetro digitale posizionato B5-Tp21 (+) and B5-Tp4 (GND). tra B5-Tp21 (+) e B5-Tp4 (GND). Select automatic fluoroscopy with standard...
- Page 183 Villa Sistemi Medicali ARCOVIS 30000 S/R – Adjustments / Regolazioni - 4 (for HRP 2000 memory version/ per versione con memoria HRP 2000) Place the OFC01 board jumpers in the Posizionare i jumper della scheda OFC01 nel following way: seguente modo: JP1 - pos.
- Page 184 Adjustments / Regolazioni - 4 - ARCOVIS 30000 S/R Villa Sistemi Medicali 4.5.2. Check of the kV balance / Verifica della bilancia kV. HRC 1000 memory version Versione con memoria HRC 1000 Remove the filters previously placed at the Togliere i filtri precedentemente posizionati output of the collimator by leaving only all’uscita del collimatore, lasciando solo 1mmAL...
-
Page 185: Max. Dose In Output From The Monobloc / Massima Dose In Uscita Dal Monoblocco
Villa Sistemi Medicali ARCOVIS 30000 S/R – Adjustments / Regolazioni - 4 4.6. Max. dose in output from the monobloc / Massima dose in uscita dal monoblocco Ref. Fig. 26 Place the filter 1mmAL on the collimator + Posizionare filtro 1mmAL sul collimatore +... -
Page 186: Checks On The Image Quality / Verifiche Sulla Qualità Dell'immagine
Adjustments / Regolazioni - 4 - ARCOVIS 30000 S/R Villa Sistemi Medicali 4.7. Checks on the image quality / Verifiche sulla qualità dell’immagine 4.7.1. Image focusing adjustment / Regolazione messa a fuoco immagine Ref. Fig. 27 Place the test TYP18 of the University in Posizionare il test TYP18 dell'Università... -
Page 187: Monitors Adjustment / Regolaz. Dei Monitor
Villa Sistemi Medicali ARCOVIS 30000 S/R – Adjustments / Regolazioni - 4 5. MONITORS ADJUSTMENT / REGOLAZ. DEI MONITOR Normally the monitors are adjusted within the Normalmente i monitor vengono regolati in factory and don’t need further adjustments, fabbrica necessitano... -
Page 188: 18" Monitor / Monitor 18
Adjustments / Regolazioni - 4 - ARCOVIS 30000 S/R Villa Sistemi Medicali 5.2. 18” Monitor / Monitor 18” mod. IVL-I855IM With the monitor ON (lit green led), press Con il monitor acceso (led verde acceso), “Control Dial” to enter the personalization menu premere “Control Dial”... -
Page 189: 19" Monitor / Monitor 19
Villa Sistemi Medicali ARCOVIS 30000 S/R – Adjustments / Regolazioni - 4 5.3. 19” Monitor / Monitor 19” mod. EM19TFTI/M-C II Brightness and contrast are adjusted by the Luminosità e contrasto si regolano con i tasti keys on the front of the monitor. - Page 190 Adjustments / Regolazioni - 4 - ARCOVIS 30000 S/R Villa Sistemi Medicali Menu geometry: Menu geometry: SBFM memory DIP memory picture size full screen Fill aspect phase frequency h position v position autoadjust not to be used not to be used...
- Page 191 Villa Sistemi Medicali ARCOVIS 30000 S/R – Adjustments / Regolazioni - 4 mod. PI950LMI With the monitor ON (lit green led), press Con il monitor acceso (led verde acceso), “Control Dial” to enter the personalization premere “Control Dial” per accedere al menu di menu (OSD).
-
Page 192: Mechanical Adjustments / Regolaz. Meccaniche
Adjustments / Regolazioni - 4 - ARCOVIS 30000 S/R Villa Sistemi Medicali 6. MECHANICAL ADJUSTMENTS / REGOLAZ. MECCANICHE 6.1. Arm UP & DOWN / Salita - discesa arco The position of plates and micro of the limit La posizione delle piastre e dei micro di fine... - Page 193 Villa Sistemi Medicali ARCOVIS 30000 S/R – Adjustments / Regolazioni - 4 According to the unit configuration, there is the In base alla configurazione dell’unità, sussiste il collision hazard between monobloc and front pericolo di collisione tra monoblocco e gamba...
- Page 194 Adjustments / Regolazioni - 4 - ARCOVIS 30000 S/R Villa Sistemi Medicali (This page is intentionally left blank) (Pagina intenzionalmente bianca) Page 40/40 - Rev.B [File: 201180-B-00-20.doc]...
-
Page 195: Document Status / Stato Del Documento
Document Status / Stato del documento ARCOVIS 30000 S/R – Adjustments / Regolazioni - 4 DOCUMENT STATUS / STATO DEL DOCUMENTO Rev. Date Pages Modification description / Descrizione Modifica 30/10/07 Document approval / Approvazione documento General document revision / Revisione generale del 28/04/08 documento Updated general document / Aggiornamento generale... - Page 196 Villa Sistemi Medicali ARCOVIS 3000 S/R – Faults Finding - 5 FAULTS FINDING RICERCA GUASTI [File: 201181-A-00-20.doc]...
- Page 197 Faults Finding - 5 - ARCOVIS 3000 S/R Villa Sistemi Medicali (This page is intentionally left blank) (Pagina intenzionalmente bianca) [File: 201181-00-20.doc]...
- Page 198 Villa Sistemi Medicali ARCOVIS 3000 S/R – Faults Finding - 5 TABLE OF CONTENTS / SOMMARIO BOARDS POSITION / POSIZIONE SCHEDE ..................2 TROUBLESHOOTING GUIDE / GUIDA ALLA RIMOZIONE GUASTI ..........5 2.1. NON-DISPLAYED FAULTS / GUASTI NON SEGNALATI SUL DISPLAY ............5 2.2.
-
Page 199: Boards Position / Posizione Schede
Faults Finding - 5 - ARCOVIS 3000 S/R Villa Sistemi Medicali 1. BOARDS POSITION / POSIZIONE SCHEDE Position of the boards inside the unit: Posizione delle schede all’interno dell’unità: S1 - 24V POWER SUPPLY B8 – FILAMENT B15 – RS232... - Page 200 Villa Sistemi Medicali ARCOVIS 3000 S/R – Faults Finding - 5 Position of the boards inside the control Posizione delle schede all’interno del pannello panel: di controllo: B3 - X-RAY & ALARM B10 – CONNECTORS BOARD INTERFACE LCD DISPLAY GROUP B2 –...
- Page 201 Faults Finding - 5 - ARCOVIS 3000 S/R Villa Sistemi Medicali Position of the boards inside the HC monitor Posizione delle schede all’interno del carrello trolley: portamonitor HC: B19 - MEMORY SYSTEM CONTROL MEMORY SYSTEM B22 - GENERAL PURPOSE DSP B20 –...
-
Page 202: Troubleshooting Guide / Guida Alla Rimozione Guasti
Villa Sistemi Medicali ARCOVIS 3000 S/R – Faults Finding - 5 2. TROUBLESHOOTING GUIDE / GUIDA ALLA RIMOZIONE GUASTI In case of fault or malfunction, it is In caso di guasto o malfunzionamento è advisable to replace the boards (and not to consigliabile sostituire le schede anziché... -
Page 203: Displayed Faults / Guasti Segnalati Sul Display
Faults Finding - 5 - ARCOVIS 3000 S/R Villa Sistemi Medicali 2.2. DISPLAYED FAULTS / GUASTI SEGNALATI SUL DISPLAY The table indicates how to proceed in case La tabella indica come procedere nel caso of faults and anomalies. siano segnalati guasti ed anomalie. - Page 204 Villa Sistemi Medicali ARCOVIS 3000 S/R – Faults Finding - 5 Point to Check Message on Display Meaning Solution Punti da Messaggio sul Display Significato Intervento controllare EXHAUSTED THERMAL The temperature of the monobloc Switch the unit OFF and wait for UNIT has reached the max.
- Page 205 Faults Finding - 5 - ARCOVIS 3000 S/R Villa Sistemi Medicali Point to Check Message on Display Meaning Solution Punti da Messaggio sul Display Significato Intervento controllare Error about the high voltage management. It can be generated -the difference between...
- Page 206 Villa Sistemi Medicali ARCOVIS 3000 S/R – Faults Finding - 5 Point to Check Message on Display Meaning Solution Punti da Messaggio sul Display Significato Intervento controllare THERMIC ALARM The temperature of the monobloc Switch the unit OFF and wait TERMICO MONOBLOCCO has reached the max.
- Page 207 Faults Finding - 5 - ARCOVIS 3000 S/R Villa Sistemi Medicali Point to Check Message on Display Meaning Solution Punti da Messaggio sul Display Significato Intervento controllare EMERGENCY UP/DOWN Pressed UP/DOWN emergency Reset the correct working of the PUSHED push-button.
- Page 208 Villa Sistemi Medicali ARCOVIS 3000 S/R – Faults Finding - 5 Point to Check Message on Display Meaning Solution Punti da Messaggio sul Display Significato Intervento controllare Switch off and on again the unit, repeat the operation and if the...
- Page 209 Faults Finding - 5 - ARCOVIS 3000 S/R Villa Sistemi Medicali Point to Check Message on Display Meaning Solution Punti da Messaggio sul Display Significato Intervento controllare Switch off the unit, wait for some seconds and switch on again. Connections...
- Page 210 Villa Sistemi Medicali ARCOVIS 3000 S/R – Faults Finding - 5 Point to Check Message on Display Meaning Solution Punti da Messaggio sul Display Significato Intervento controllare MANUAL X-RAY STOP The x-ray handswitch has been Press “ALARM RESET” key to...
-
Page 211: Diagnostics Of The Boards / Diagnostica Delle Schede
Faults Finding - 5 - ARCOVIS 3000 S/R Villa Sistemi Medicali 3. DIAGNOSTICS OF THE BOARDS / DIAGNOSTICA DELLE SCHEDE Even if the mains plug is disconnected, inside the Anche con spina d’alimentazione disinserita, unit a dangerous voltage could be present. - Page 212 Villa Sistemi Medicali ARCOVIS 3000 S/R – Faults Finding - 5 3.1.2. Leds / Leds In the drawing below the position of leds is indicated Nel topografico seguente è evidenziata la posizione on the board. dei Leds sulla scheda. Green led = G...
- Page 213 Faults Finding - 5 - ARCOVIS 3000 S/R Villa Sistemi Medicali 3.1.3. Test points In the drawing below the position of Test Points is Nel topografico seguente è evidenziata la posizione indicated on the board. dei “Test Point” sulla scheda.
- Page 214 Villa Sistemi Medicali ARCOVIS 3000 S/R – Faults Finding - 5 3.1.4. Jumpers In the drawing below the position of Jumpers is Nel topografico seguente è evidenziata la posizione indicated on the board. dei Jumpers sulla scheda. In working conditions every Jumper (JP) has to be In condizioni di lavoro tutti i Jumper (JP) devono set in position “a-c”.
- Page 215 Faults Finding - 5 - ARCOVIS 3000 S/R Villa Sistemi Medicali 3.1.5. Signals & Connectors / Segnali e Connettori In the drawing below the position of connectors is Nel topografico seguente è evidenziata la posizione indicated on the board. dei connettori sulla scheda.
- Page 216 Villa Sistemi Medicali ARCOVIS 3000 S/R – Faults Finding - 5 3.1.6. Relays / Relè In the drawing below the position of relays is Nel topografico seguente è evidenziata la posizione indicated on the board. dei relè sulla scheda. Board Relay Ref.
-
Page 217: B2- Speaker Board / B2 - Scheda Altoparlante
Faults Finding - 5 - ARCOVIS 3000 S/R Villa Sistemi Medicali 3.2. B2- SPEAKER BOARD / B2 – SCHEDA ALTOPARLANTE 3.2.1. Fuses / Fusibili In the drawing below the position of fuses is Nel topografico seguente è evidenziata la posizione indicated on the board. - Page 218 Villa Sistemi Medicali ARCOVIS 3000 S/R – Faults Finding - 5 3.2.2. Signals & Connectors / Segnali e Connettori In the drawing below the position of connectors is Nel topografico seguente è evidenziata la posizione indicated on the board. dei connettori sulla scheda.
-
Page 219: B3 - X-Ray & Alarm Board / B3 - Scheda Allarmi E X-Ray
Faults Finding - 5 - ARCOVIS 3000 S/R Villa Sistemi Medicali 3.3. B3 - X-RAY & ALARM BOARD / B3 - SCHEDA ALLARMI E X-RAY 3.3.1. Test points In the drawing below the position of Test Points is Nel topografico seguente è evidenziata la posizione indicated on the board. - Page 220 Villa Sistemi Medicali ARCOVIS 3000 S/R – Faults Finding - 5 3.3.2. Connectors & Signals / Segnali e Connettori In the drawing below the position of connectors is Nel topografico seguente è evidenziata la posizione indicated on the board. dei connettori sulla scheda.
-
Page 221: B4 Board - Central System Controller (Csc) / Scheda B4 - Central Sytem Control (Csc)
Faults Finding - 5 - ARCOVIS 3000 S/R Villa Sistemi Medicali 3.4. B4 BOARD – CENTRAL SYSTEM CONTROLLER (CSC) / SCHEDA B4 – CENTRAL SYTEM CONTROL (CSC) 3.4.1. Fuses / Fusibili In the drawing below the position of fuses is indicated on Nel topografico seguente è... - Page 222 Villa Sistemi Medicali ARCOVIS 3000 S/R – Faults Finding - 5 3.4.2. Jumpers In the drawing below the position of Jumpers is indicated Nel topografico seguente è evidenziata la on the board. posizione dei Jumpers sulla scheda. In working conditions every Jumper (JP) has to be set in In condizioni di lavoro tutti i Jumper (JP) devono position “a-c”.
- Page 223 Faults Finding - 5 - ARCOVIS 3000 S/R Villa Sistemi Medicali 3.4.3. Signals & Connectors / Segnali e Connettori In the drawing below the position of connectors is Nel topografico seguente è evidenziata la posizione indicated on the board. dei connettori sulla scheda.
-
Page 224: B5 Board - Fluo/Rad Generator (Gsc) / Scheda B5 - Fluo/Rad (Gsc)
Villa Sistemi Medicali ARCOVIS 3000 S/R – Faults Finding - 5 3.5. B5 BOARD – FLUO/RAD GENERATOR (GSC) / SCHEDA B5 – FLUO/RAD (GSC) 3.5.1. Fuses / Fusibili In the drawing below the position of fuses is Nel topografico seguente è evidenziata la posizione indicated on the board. - Page 225 Faults Finding - 5 - ARCOVIS 3000 S/R Villa Sistemi Medicali 3.5.2. Leds / Leds In the drawing below the position of leds is indicated Nel topografico seguente è evidenziata la posizione on the board. dei Leds sulla scheda. Green led = G In the normal functioning they have to be ON.
- Page 226 Villa Sistemi Medicali ARCOVIS 3000 S/R – Faults Finding - 5 3.5.3. Test points In the drawing below the position of Test Points is Nel topografico seguente è evidenziata la posizione indicated on the board. dei “Test Point” sulla scheda.
- Page 227 Faults Finding - 5 - ARCOVIS 3000 S/R Villa Sistemi Medicali Board Ref. Description Ref. to Right Format Range value 1V=↓ Tp19 Dac out SET FIL Tp4 (0V-gnd) 0…3,5V 100mA Tp20 Dac out SET kV “ 0…6V 20kV 112D, Tp21...
- Page 228 Villa Sistemi Medicali ARCOVIS 3000 S/R – Faults Finding - 5 3.5.4. Jumpers In the drawing below the position of Jumpers is Nel topografico seguente è evidenziata la posizione indicated on the board. dei Jumpers sulla scheda. In working conditions every Jumper (JP) has to be In condizioni di lavoro tutti i Jumper (JP) devono set in position “a-c”.
- Page 229 Faults Finding - 5 - ARCOVIS 3000 S/R Villa Sistemi Medicali 3.5.5. Connectors & Signals / Segnali e Connettori In the drawing below the position of connectors is Nel topografico seguente è evidenziata la posizione indicated on the board. dei connettori sulla scheda.
- Page 230 Villa Sistemi Medicali ARCOVIS 3000 S/R – Faults Finding - 5 Board Connector Ref. Signal Destination 83B, CM17 n.u. 133B CM18 161B RS232 (n.u.) CM19 164B TXD RXD B6-CM5 112C, 122C, CM20 Memo_XR_Pulse; X-Ray Dose Control; FS-Control; 142C, 152C CM23...
- Page 231 Faults Finding - 5 - ARCOVIS 3000 S/R Villa Sistemi Medicali 3.5.6. Relays / Relè In the drawing below the position of relays is Nel topografico seguente è evidenziata la posizione indicated on the board. dei relè sulla scheda. Board Relay Ref.
-
Page 232: B6 Board - General Purpose (Dsp) / Scheda B6 - General Purpose (Dsp)
Villa Sistemi Medicali ARCOVIS 3000 S/R – Faults Finding - 5 3.6. B6 BOARD – GENERAL PURPOSE (DSP) / SCHEDA B6 – GENERAL PURPOSE (DSP) 3.6.1. Fuses / Fusibili In the drawing below the position of fuses is indicated on Nel topografico seguente è... - Page 233 Faults Finding - 5 - ARCOVIS 3000 S/R Villa Sistemi Medicali 3.6.2. Leds / Leds In the drawing below the position of leds is indicated Nel topografico seguente è evidenziata la posizione on the board. dei Leds sulla scheda. Green led = G In the normal functioning they have to be Nel funzionamento normale devono essere accesi.
- Page 234 Villa Sistemi Medicali ARCOVIS 3000 S/R – Faults Finding - 5 Board Color Ref. Function with led on Funzione (quando ON) FS FLUORO FS PULSE FS BOOST FS MEMO HS PRE HS RAD COM RX (Safety) THERMIC PULS DOS 91C,...
- Page 235 Faults Finding - 5 - ARCOVIS 3000 S/R Villa Sistemi Medicali Board Color Ref. Function with led on Funzione (quando ON) Ld33 SML FOCUS SML FOCUS 91B, Ld34 101B, XR LAMP XR LAMP 141A Ld35 STR ENABLE STR ENABLE 91A,...
- Page 236 Villa Sistemi Medicali ARCOVIS 3000 S/R – Faults Finding - 5 3.6.3. Test points In the drawing below the position of Test Points is Nel topografico seguente è evidenziata la posizione indicated on the board. dei “Test Point” sulla scheda.
- Page 237 Faults Finding - 5 - ARCOVIS 3000 S/R Villa Sistemi Medicali 3.6.4. Connectors & Signals / Segnali e Connettori In the drawing below the position of connectors is Nel topografico seguente è evidenziata la posizione indicated on the board. dei connettori sulla scheda.
-
Page 238: B7 Board - Up/Down Motor - Laser / Scheda B7 - Up/Down Motor Laser
Villa Sistemi Medicali ARCOVIS 3000 S/R – Faults Finding - 5 3.7. B7 BOARD – UP/DOWN MOTOR - LASER / SCHEDA B7 – UP/DOWN MOTOR LASER 3.7.1. Fuses / Fusibili In the drawing below the position of fuses is Nel topografico seguente è evidenziata la posizione indicated on the board. - Page 239 Faults Finding - 5 - ARCOVIS 3000 S/R Villa Sistemi Medicali 3.7.2. Leds / Leds In the drawing below the position of leds is indicated Nel topografico seguente è evidenziata la posizione on the board. dei Leds sulla scheda. Green led = G In the normal functioning they have to be ON.
- Page 240 Villa Sistemi Medicali ARCOVIS 3000 S/R – Faults Finding - 5 3.7.3. Test points In the drawing below the position of Test Points is Nel topografico seguente è evidenziata la posizione dei indicated on the board. “Test Point” sulla scheda.
- Page 241 Faults Finding - 5 - ARCOVIS 3000 S/R Villa Sistemi Medicali 3.7.4. Signals & Connectors / Segnali e Connettori In the drawing below the position of connectors is Nel topografico seguente è evidenziata la posizione indicated on the board. dei connettori sulla scheda.
- Page 242 Villa Sistemi Medicali ARCOVIS 3000 S/R – Faults Finding - 5 3.7.5. Relays / Relè In the drawing below the position of relays is Nel topografico seguente è evidenziata la posizione indicated on the board. dei relè sulla scheda. Board Relay Ref.
-
Page 243: B8 Board - Filament / Scheda B8 - Filamento
Faults Finding - 5 - ARCOVIS 3000 S/R Villa Sistemi Medicali 3.8. B8 BOARD – FILAMENT / SCHEDA B8 – FILAMENTO 3.8.1. Fuses / Fusibili In the drawing below the position of fuses is indicated on Nel topografico seguente è evidenziata la the board. - Page 244 Villa Sistemi Medicali ARCOVIS 3000 S/R – Faults Finding - 5 3.8.2. Test points In the drawing below the position of Test Points is Nel topografico seguente è evidenziata la posizione indicated on the board. dei “Test Point” sulla scheda.
- Page 245 Faults Finding - 5 - ARCOVIS 3000 S/R Villa Sistemi Medicali 3.8.3. Trimmers / Potenziometri In the drawing below the position of Trimmer Points Nel topografico seguente è evidenziata la posizione is indicated on the board. dei potenziometri sulla scheda.
- Page 246 Villa Sistemi Medicali ARCOVIS 3000 S/R – Faults Finding - 5 3.8.4. Jumpers In the drawing below the position of Jumpers is Nel topografico seguente è evidenziata la posizione indicated on the board. dei Jumpers sulla scheda. In working conditions every Jumper (JP) has to be In condizioni di lavoro tutti i Jumper (JP) devono set in position “a-c”.
- Page 247 Faults Finding - 5 - ARCOVIS 3000 S/R Villa Sistemi Medicali 3.8.5. Signals & Connectors / Segnali e Connettori In the drawing below the position of connectors is Nel topografico seguente è evidenziata la posizione indicated on the board. dei connettori sulla scheda.
- Page 248 Villa Sistemi Medicali ARCOVIS 3000 S/R – Faults Finding - 5 3.8.6. Relays / Relè In the drawing below the position of relays is Nel topografico seguente è evidenziata la posizione indicated on the board. dei relè sulla scheda. Board Relay Ref.
-
Page 249: B9 Board - Starter / Scheda B9 - Starter
Faults Finding - 5 - ARCOVIS 3000 S/R Villa Sistemi Medicali 3.9. B9 BOARD – STARTER / SCHEDA B9 – STARTER 3.9.1. Fuses / Fusibili In the drawing below the position of fuses is Nel topografico seguente è evidenziata la posizione indicated on the board. - Page 250 Villa Sistemi Medicali ARCOVIS 3000 S/R – Faults Finding - 5 3.9.2. Leds / Leds In the drawing below the position of leds is indicated on Nel topografico seguente è evidenziata la the board. posizione dei Leds sulla scheda. Green led = G In the normal functioning they have to be Nel funzionamento normale devono essere accesi.
- Page 251 Faults Finding - 5 - ARCOVIS 3000 S/R Villa Sistemi Medicali 3.9.3. Test points In the drawing below the position of Test Points is Nel topografico seguente è evidenziata la posizione indicated on the board. dei “Test Point” sulla scheda.
- Page 252 Villa Sistemi Medicali ARCOVIS 3000 S/R – Faults Finding - 5 3.9.4. Jumpers In the drawing below the position of Jumpers is Nel topografico seguente è evidenziata la posizione indicated on the board. dei Jumpers sulla scheda. In working conditions every Jumper (JP) has to be In condizioni di lavoro tutti i Jumper (JP) devono set in position “a-c”.
- Page 253 Faults Finding - 5 - ARCOVIS 3000 S/R Villa Sistemi Medicali 3.9.5. Signals & Connectors / Segnali e Connettori In the drawing below the position of connectors is Nel topografico seguente è evidenziata la posizione indicated on the board. dei connettori sulla scheda.
- Page 254 Villa Sistemi Medicali ARCOVIS 3000 S/R – Faults Finding - 5 3.9.6. Relays / Relè In the drawing below the position of relays is Nel topografico seguente è evidenziata la posizione indicated on the board. dei relè sulla scheda. Board Relay Ref.
-
Page 255: B10 Board - Connectors Interface / Scheda B10 - Connectors Interface
Faults Finding - 5 - ARCOVIS 3000 S/R Villa Sistemi Medicali 3.10. B10 BOARD – CONNECTORS INTERFACE SCHEDA – CONNECTORS INTERFACE 3.10.1. Signals & Connectors / Segnali e Connettori In the drawing below the position of connectors is Nel topografico seguente è evidenziata la posizione indicated on the board. -
Page 256: B11 Board - Memory System Control (Msc) / Scheda B11 - Controllo Sistema Memoria (Msc)
Villa Sistemi Medicali ARCOVIS 3000 S/R – Faults Finding - 5 3.11. B11 BOARD – MEMORY SYSTEM CONTROL (MSC) / SCHEDA B11 – CONTROLLO SISTEMA MEMORIA (MSC) 3.11.1. Fuses / Fusibili In the drawing below the position of fuses is Nel topografico seguente è... - Page 257 Faults Finding - 5 - ARCOVIS 3000 S/R Villa Sistemi Medicali 3.11.2. Leds / Leds In the drawing below the position of leds is indicated Nel topografico seguente è evidenziata la posizione on the board. dei Leds sulla scheda. Green led = G In the normal functioning they have to be ON.
- Page 258 Villa Sistemi Medicali ARCOVIS 3000 S/R – Faults Finding - 5 3.11.3. Test points In the drawing below the position of Test Points is Nel topografico seguente è evidenziata la posizione indicated on the board. dei “Test Point” sulla scheda.
- Page 259 Faults Finding - 5 - ARCOVIS 3000 S/R Villa Sistemi Medicali 3.11.4. Jumpers In the drawing below the position of Jumpers is Nel topografico seguente è evidenziata la posizione indicated on the board. dei Jumpers sulla scheda. In working conditions every Jumper (JP) has to be set In condizioni di lavoro tutti i Jumper (JP) devono in position “a-c”.
- Page 260 Villa Sistemi Medicali ARCOVIS 3000 S/R – Faults Finding - 5 3.11.5. Signals & Connectors / Segnali e Connettori In the drawing below the position of connectors is Nel topografico seguente è evidenziata la posizione indicated on the board. dei connettori sulla scheda.
- Page 261 Faults Finding - 5 - ARCOVIS 3000 S/R Villa Sistemi Medicali 3.11.6. Relays / Relè In the drawing below the position of relays is Nel topografico seguente è evidenziata la posizione indicated on the board. dei relè sulla scheda. Board Relay Ref.
-
Page 262: B12 Board - Cpu Dsp / Scheda B12 - Cpu Dsp
Villa Sistemi Medicali ARCOVIS 3000 S/R – Faults Finding - 5 3.12. B12 BOARD – CPU DSP / SCHEDA B12 – CPU DSP 3.12.1. Test points In the drawing below the position of Test Points is Nel topografico seguente è evidenziata la posizione indicated on the board. - Page 263 Faults Finding - 5 - ARCOVIS 3000 S/R Villa Sistemi Medicali 3.12.2. Signals & Connectors / Segnali e Connettori In the drawing below the position of connectors is Nel topografico seguente è evidenziata la indicated on the board. posizione dei connettori sulla scheda.
- Page 264 Villa Sistemi Medicali ARCOVIS 3000 S/R – Faults Finding - 5 3.13. B14 BOARD VIDEO SUPERVISOR/ SCHEDA – VIDEO SUPERVISOR 3.13.1. Leds / Leds In the drawing below the position of leds is indicated on Nel topografico seguente è evidenziata la posizione dei the board.
- Page 265 Faults Finding - 5 - ARCOVIS 3000 S/R Villa Sistemi Medicali 3.13.2. Test points In the drawing below the position of Test Points is Nel topografico seguente è evidenziata la posizione indicated on the board. dei “Test Point” sulla scheda.
- Page 266 Villa Sistemi Medicali ARCOVIS 3000 S/R – Faults Finding - 5 3.13.3. Jumpers In the drawing below the position of Jumpers is Nel topografico seguente è evidenziata la posizione indicated on the board. dei Jumpers sulla scheda. In working conditions every Jumper (JP) has to be In condizioni di lavoro tutti i Jumper (JP) devono essere set in position “a-c”.
- Page 267 Faults Finding - 5 - ARCOVIS 3000 S/R Villa Sistemi Medicali 3.13.4. Signals & Connectors / Segnali e Connettori In the drawing below the position of connectors is Nel topografico seguente è evidenziata la posizione indicated on the board. dei connettori sulla scheda.
- Page 268 Villa Sistemi Medicali ARCOVIS 3000 S/R – Faults Finding - 5 3.14. B15 BOARD – RS232 INTERFACE PANEL/ SCHEDA B15 – RS232 PANNELLO INTERFACCIA 3.14.1. Signals & Connectors / Segnali e Connettori In the drawing below the position of connectors is Nel topografico seguente è...
-
Page 269: B16 Board - Printer Connector/ Scheda B16 - Connettore Stampante
Faults Finding - 5 - ARCOVIS 3000 S/R Villa Sistemi Medicali 3.15. B16 BOARD – PRINTER CONNECTOR/ SCHEDA B16 – CONNETTORE STAMPANTE 3.15.1. Signals & Connectors / Segnali e Connettori In the drawing below the position of connectors is Nel topografico seguente è evidenziata la posizione indicated on the board. -
Page 270: Psm 18 Inverter Control Board / Scheda Psm18 Controllo Inverter
Villa Sistemi Medicali ARCOVIS 3000 S/R – Faults Finding - 5 3.16. PSM 18 INVERTER CONTROL BOARD / SCHEDA PSM18 CONTROLLO INVERTER 3.16.1. Fuses / Fusibili In the drawing below the position of fuses is indicated Nel topografico seguente è evidenziata la posizione on the board. - Page 271 Faults Finding - 5 - ARCOVIS 3000 S/R Villa Sistemi Medicali 3.16.2. Leds / Leds In the drawing below the position of leds is indicated Nel topografico seguente è evidenziata la posizione on the board. dei Leds sulla scheda. Green led = G In the normal functioning they have to be ON.
- Page 272 Villa Sistemi Medicali ARCOVIS 3000 S/R – Faults Finding - 5 Board Color Ref. Function with led on Funzione (quando ON) +24V Presenza alimentazione +24V ± 15V Presenza alimentazione ±15v START n.u. n.u. HV>85% Intervento sicurezza HV>85% mA RX MAX Intervento sicurezza mA RX MAX HV>110%...
- Page 273 Faults Finding - 5 - ARCOVIS 3000 S/R Villa Sistemi Medicali 3.16.3. Test points In the drawing below the position of Test Points is Nel topografico seguente è evidenziata la posizione dei indicated on the board. “Test Point” sulla scheda.
- Page 274 Villa Sistemi Medicali ARCOVIS 3000 S/R – Faults Finding - 5 Board Ref. Description Ref. to Format Right Range value 1V=↓ n.u. ±0,2 +15V +15V ±0,3 +24V +24Vcc ±0,2 -15V -15Vcc COM PWM ±1kHz INV FREQ 40kHz COM. “1” COM. “2”...
- Page 275 Faults Finding - 5 - ARCOVIS 3000 S/R Villa Sistemi Medicali 3.16.4. Jumpers The jumpers are bump contacts to solder on the board I jumper sono piazzole a saldare sul lato stampato della printed side. scheda. Board Label Status Ref.
- Page 276 Villa Sistemi Medicali ARCOVIS 3000 S/R – Faults Finding - 5 3.16.5. Trimmers / Potenziometri In the drawing below the position of Trimmer Points Nel topografico seguente è evidenziata la posizione is indicated on the board. dei potenziometri sulla scheda.
- Page 277 Faults Finding - 5 - ARCOVIS 3000 S/R Villa Sistemi Medicali Board Trimmer Ref. Value Test Point Function / Funzione n.u. DO NOT TOUCH 40kHz ±1 NON TOCCARE PSM18 Adjustment possible only factory Regolazione possibile solo in fabbrica. 0Vcc Tp17 mA offset Page 80/100 - Rev.0...
- Page 278 Villa Sistemi Medicali ARCOVIS 3000 S/R – Faults Finding - 5 3.16.6. Signals & Connectors / Segnali e Connettori In the drawing below the position of connectors is Nel topografico seguente è evidenziata la posizione indicated on the board. dei connettori sulla scheda.
- Page 279 Faults Finding - 5 - ARCOVIS 3000 S/R Villa Sistemi Medicali 3.16.7. Relays / Relè In the drawing below the position of relays is indicated Nel topografico seguente è evidenziata la on the board. posizione dei relè sulla scheda. Board Relay Ref.
-
Page 280: B19 Board Memory System Control (Hc Trolley) / Scheda B19 Memory System Control (Carrello Hc)
Villa Sistemi Medicali ARCOVIS 3000 S/R – Faults Finding - 5 3.17. B19 BOARD MEMORY SYSTEM CONTROL (HC TROLLEY) / SCHEDA B19 MEMORY SYSTEM CONTROL (CARRELLO HC) 3.17.1. Fuses / Fusibili In the drawing below the position of fuses is Nel topografico seguente è... - Page 281 Faults Finding - 5 - ARCOVIS 3000 S/R Villa Sistemi Medicali 3.17.2. Leds / Leds In the drawing below the position of leds is indicated Nel topografico seguente è evidenziata la posizione on the board. dei Leds sulla scheda. Green led = G In the normal functioning they have to be ON.
- Page 282 Villa Sistemi Medicali ARCOVIS 3000 S/R – Faults Finding - 5 3.17.3. Test points In the drawing below the position of Test Points is Nel topografico seguente è evidenziata la posizione indicated on the board. dei “Test Point” sulla scheda.
- Page 283 Faults Finding - 5 - ARCOVIS 3000 S/R Villa Sistemi Medicali 3.17.4. Jumpers In the drawing below the position of Jumpers is Nel topografico seguente è evidenziata la posizione indicated on the board. dei Jumpers sulla scheda. In working conditions every Jumper (JP) has to be set In condizioni di lavoro tutti i Jumper (JP) devono in position “a-c”.
- Page 284 Villa Sistemi Medicali ARCOVIS 3000 S/R – Faults Finding - 5 3.17.5. Signals & Connectors / Segnali e Connettori In the drawing below the position of connectors is Nel topografico seguente è evidenziata la posizione indicated on the board. dei connettori sulla scheda.
- Page 285 Faults Finding - 5 - ARCOVIS 3000 S/R Villa Sistemi Medicali 3.17.6. Relays and Dip Switch / Relè e Dip Switch In the drawing below the position of relays and dip- Nel topografico seguente è evidenziata la posizione switch is indicated on the board.
-
Page 286: B20 „Power Board" (Hc Trolley) / Scheda B20 „Power Board" (Carrello Hc)
Villa Sistemi Medicali ARCOVIS 3000 S/R – Faults Finding - 5 3.18. B20 „POWER BOARD“ (HC TROLLEY) / SCHEDA B20 „POWER BOARD“ (CARRELLO HC) 3.18.1. Fuses / Fusibili In the drawing below the position of fuses is Nel topografico seguente è evidenziata la posizione indicated on the board. - Page 287 Faults Finding - 5 - ARCOVIS 3000 S/R Villa Sistemi Medicali 3.18.2. Leds / Leds In the drawing below the position of leds is indicated Nel topografico seguente è evidenziata la posizione on the board. dei Leds sulla scheda. Green led = G In the normal functioning they have to be ON.
- Page 288 Villa Sistemi Medicali ARCOVIS 3000 S/R – Faults Finding - 5 3.18.3. Test points In the drawing below the position of Test Points is Nel topografico seguente è evidenziata la posizione indicated on the board. dei “Test Point” sulla scheda.
- Page 289 Faults Finding - 5 - ARCOVIS 3000 S/R Villa Sistemi Medicali 3.18.4. Signals & Connectors / Segnali e Connettori In the drawing below the position of connectors is Nel topografico seguente è evidenziata la posizione indicated on the board. dei connettori sulla scheda.
- Page 290 Villa Sistemi Medicali ARCOVIS 3000 S/R – Faults Finding - 5 3.18.5. Relays / Relè In the drawing below the position of relays is Nel topografico seguente è evidenziata la posizione indicated on the board. dei relè sulla scheda. Board Relay Ref.
- Page 291 Faults Finding - 5 - ARCOVIS 3000 S/R Villa Sistemi Medicali 3.19. B22 BOARD GENERAL PURPOSE DSP (HC TROLLEY) – SCHEDA B22 GENERAL PURPOSE DSP (CARRELLO HC) 3.19.1. Fuses / Fusibili In the drawing below the position of fuses is Nel topografico seguente è...
- Page 292 Villa Sistemi Medicali ARCOVIS 3000 S/R – Faults Finding - 5 3.19.2. Leds / Led In the drawing below the position of leds is indicated Nel topografico seguente è evidenziata la posizione on the board. dei Led sulla scheda. Green led = G In the normal functioning they have to be ON.
- Page 293 Faults Finding - 5 - ARCOVIS 3000 S/R Villa Sistemi Medicali Board Color Ref. Function with led on Funzione (quando ON) n.u. n.u. n.u. n.u. PS_ON n.u. n.u. ANGIO_MODE MEMO_XR_PULSE Ld10 MEMO_XR_ORDER Ld11 n.u. Ld12 117B VIDEO_SYNC Segnali di sincronismo dell’immagine Ld13 n.u.
- Page 294 Villa Sistemi Medicali ARCOVIS 3000 S/R – Faults Finding - 5 Board Color Ref. Function with led on Funzione (quando ON) Ld33 114A ROT_CW Rotazione oraria dell’immagine Ld34 114A ROT_CCW Rotazione antioraria dell’immagine Ld35 114A INV-H Inversione verticale dell’immagine Ld36...
- Page 295 Faults Finding - 5 - ARCOVIS 3000 S/R Villa Sistemi Medicali 3.19.3. Test points In the drawing below the position of Test Points is Nel topografico seguente è evidenziata la posizione indicated on the board. dei “Test Point” sulla scheda.
- Page 296 Villa Sistemi Medicali ARCOVIS 3000 S/R – Faults Finding - 5 3.19.4. Signals & Connectors / Segnali e Connettori In the drawing below the position of Connectors is Nel topografico seguente è evidenziata la posizione indicated on the board. dei connettori sulla scheda.
- Page 297 Faults Finding - 5 - ARCOVIS 3000 S/R Villa Sistemi Medicali (This page is intentionally left blank) (Pagina intenzionalmente bianca) Page 100/100 - Rev.0 [File: 201181-00-20.doc]...
-
Page 298: Document Status / Stato Del Documento
Document Status ARCOVIS 3000 S/R – Faults Finding - 5 DOCUMENT STATUS / STATO DEL DOCUMENTO Rev. Date Pages Modification description / Descrizione della modifica 22.04.08 Document approval / Approvazione del documento Introduction of the CAN-BUS alarm Introduction of B19-SW1 dip-switch position. - Page 299 Villa Sistemi Medicali ARCOVIS 3000 S/R – Service Information - 6 SERVICE INFORMATION INFORMAZIONI PER L’ASSISTENZA [File: 201182-D-00-20.doc]...
- Page 300 Service Information - 6 - ARCOVIS 3000 S/R Villa Sistemi Medicali (This page is intentionally left blank) (Pagina intenzionalmente bianca) [File: 201182-D-00-20.doc]...
- Page 301 Villa Sistemi Medicali ARCOVIS 3000 S/R – Service Information - 6 TABLE OF CONTENTS / SOMMARIO SERVICE INFORMATION CHECKLIST ....................2 SERVICE TOOLS / ATTREZZI PER L’ASSISTENZA................4 2.1. Required tools for Repair & Planned Maintenance / Attrezzatura per la riparazione e la manutenzione programmata .................................
-
Page 302: Service Information Checklist
Service Information - 6 - ARCOVIS 3000 S/R Villa Sistemi Medicali 1. SERVICE INFORMATION CHECKLIST The following two tables are useful for Service, Di seguito sono allegate 2 tabelle utili per il so that all the information about modifications personale che effettua il Service, lo scopo di and technical interventions during the life time queste tabelle è... - Page 303 Villa Sistemi Medicali ARCOVIS 3000 S/R – Service Information - 6 Performed by N-Sheet Nr. Remarks Service- Information Nr. Date Signature At the end of every technical intervention, fill in Alla fine di ogni intervento tecnico, completare the “SERVICE INTERVENTION” label with...
-
Page 304: Service Tools / Attrezzi Per L'assistenza
Service Information - 6 - ARCOVIS 3000 S/R Villa Sistemi Medicali 2. SERVICE TOOLS / ATTREZZI PER L’ASSISTENZA 2.1. Required tools for Repair & Planned Maintenance / Attrezzatura per la riparazione e la manutenzione programmata 2.1.1. Mechanical Tools / Attrezzi meccanici... -
Page 305: Special Tools / Attrezzi Speciali
Villa Sistemi Medicali ARCOVIS 3000 S/R – Service Information - 6 2.2. Special tools / Attrezzi speciali Q.ty Tool Description / Descrizione attrezzo TX Code OEM Code Lever for unpacking / Leva per disimballo 50364 Wooden stock / Stock di legno... -
Page 306: Description Of The Control Panel / Descrizione Della Tastiera
Service Information - 6 - ARCOVIS 3000 S/R Villa Sistemi Medicali 3. DESCRIPTION OF THE CONTROL PANEL / DESCRIZIONE DELLA TASTIERA Note: The color and the graphics of the control N.B.: Il colore e la grafica della tastiera panel can change according to the unit possono variare a seconda della versione version. - Page 307 Villa Sistemi Medicali ARCOVIS 3000 S/R – Service Information - 6 Keys function / Funzione dei tasti Digital image rotation / Rotazione Shutters diaphragm rotation / Rotazione digitale dell’immagine diaframma a lamelle Image enlargement / Shutters diaphragm closing/opening Ingrandimento Chiusura / Apertura diaframma a lamelle...
-
Page 308: Light Signals / Segnali Luminosi
Service Information - 6 - ARCOVIS 3000 S/R Villa Sistemi Medicali 3.1. Light signals / Segnali luminosi Here is the list of the light signals present on Ecco l’elenco delle segnalazioni luminose the unit: presenti sull’unità: POWER Green led is lit when the unit is supplied Il led verde acceso indica che l’unità... -
Page 309: Start Up / Start Up
Villa Sistemi Medicali ARCOVIS 3000 S/R – Service Information - 6 4. START UP / START UP The Start up is the phase between the unit È chiamata Start fase turning ON and the “READY” message display. dall’accensione dell’unità alla visualizzazione In this phase diagnostic and functioning tests del messaggio “READY”... - Page 310 Service Information - 6 - ARCOVIS 3000 S/R Villa Sistemi Medicali After the phase of initial tests and unit Dopo la fase di test iniziali e di inizializzazione initialization, the display shows the following dell’unità, display mostra seguenti info: informazioni: 5.
-
Page 311: Utility Mode / Modalità Utility
Villa Sistemi Medicali ARCOVIS 3000 S/R – Service Information - 6 5. UTILITY MODE / MODALITÀ UTILITY Utility Mode is a particular use mode that Utility Mode è un particolare modo di utilizzo allows to set some unit parameters and it is... - Page 312 Service Information - 6 - ARCOVIS 3000 S/R Villa Sistemi Medicali Area reserved to service SERVICE Area riservata a personale di service. Page with firmware parameters, serial numbers and data for service. REPORT Pagina di visualizzazione dei parametri firmware, serial number e dati per il service.
-
Page 313: Service Mode / Modalità Service
Villa Sistemi Medicali ARCOVIS 3000 S/R – Service Information - 6 6. SERVICE MODE / MODALITÀ SERVICE 6.1. What is the SERVICE MODE? / Cos’è la MODALITA’ SERVICE? The SERVICE MODE (SM) is a special menu MODALITÁ SERVICE (SM) è... -
Page 314: Collimator Positions Set / Set Posizioni Del Collimatore
Service Information - 6 - ARCOVIS 3000 S/R Villa Sistemi Medicali 6.3. Collimator positions set / Set posizioni del collimatore The password to enter this function is: La password per accedere a questa funzione è “1001” “1001” After inserting and confirming it, the Automatic Dopo averla digitata e confermata, ricompare Fluoroscopy screen reappears. -
Page 315: Unit Data Set / Set Dati Macchina
Villa Sistemi Medicali ARCOVIS 3000 S/R – Service Information - 6 6.4. Unit data set / Set dati macchina The password to enter this function is La password per accedere a questa funzione è “5798” “5798” After inserting and confirming it, the following... - Page 316 Service Information - 6 - ARCOVIS 3000 S/R Villa Sistemi Medicali The modifiable data are: I dati modificabili sono: 1 - ABC reference The reference level that, compared with the Livello di riferimento che, comparato al segnale ABC Control signal, determinates the Balance...
- Page 317 Villa Sistemi Medicali ARCOVIS 3000 S/R – Service Information - 6 7 – kV Start kV value for the unit prearrangement at the Valore di kV al quale si desidera che si switching-ON. predisponga la macchina all’accensione. Default Limit Description min value = 40 40 ÷...
- Page 318 Service Information - 6 - ARCOVIS 3000 S/R Villa Sistemi Medicali 14 – Adj Iris Pos. Snapshot Correction coefficient of the Snapshot curve Coefficiente di correzione della curva Snapshot (only for 1K camera). (solo per camera 1K Default Limit Description Adj.
-
Page 319: Software Release / Versione Software
Villa Sistemi Medicali ARCOVIS 3000 S/R – Service Information - 6 6.5. Software release / Versione software Reading key of software versions: Chiave di lettura delle versioni software: YYY V.MM.RR AAA YYY alphabetic, it identifies the board where YYY alfabetico, identifica la scheda su cui the software is loaded. -
Page 320: C-Arm Manager" Terminal / Terminale "C-Arm Manager
Service Information - 6 - ARCOVIS 3000 S/R Villa Sistemi Medicali 6.7. “C-Arm Manager” Terminal / Terminale “C-Arm Manager” Ref. Fig. 2 “C-Arm Manager” is a software utility that “C-Arm Manager” è un’utility software che allows to load and/or modify the set-up unit... -
Page 321: Program
Villa Sistemi Medicali ARCOVIS 3000 S/R – Service Information - 6 Ref. Fig. 3 Connect the Pc through the serial cable to the Collegare il Pc tramite il cavo seriale al connector for the dosimeter printer that is connettore per la stampante del dosimetro che placed on the right unit side (Fig. -
Page 322: Dca Download Software
Service Information - 6 - ARCOVIS 3000 S/R Villa Sistemi Medicali 6.7.1. Program Ref. Fig. 4 Connect the Pc through the serial cable to the Collegare il Pc tramite il cavo seriale al connector for the dosimeter printer that is on connettore per la stampante del dosimetro che the right unit side (Fig. - Page 323 Villa Sistemi Medicali ARCOVIS 3000 S/R – Service Information - 6 6.7.2. DCA Download software Connect the Pc through the serial cable to the Collegare il Pc tramite il cavo seriale al connector for the dosimeter printer that is on connettore per la stampante del dosimetro che the right unit side (Fig.
- Page 324 Service Information - 6 - ARCOVIS 3000 S/R Villa Sistemi Medicali 6.7.3. CSC Download software Connect the Pc through the serial cable to the Collegare il Pc tramite il cavo seriale al connector for the dosimeter printer that is on connettore per la stampante del dosimetro che the right unit side (Fig.
-
Page 325: Gsc / Msc Download Software
Villa Sistemi Medicali ARCOVIS 3000 S/R – Service Information - 6 6.7.4. GSC / MSC Download software This session allows to update the software of Questa sessione permette di aggiornare il the board GSC and the board MSC. The software della scheda GSC e della scheda software loading procedure is the same. - Page 326 Service Information - 6 - ARCOVIS 3000 S/R Villa Sistemi Medicali GSC Board – USB version Connect the Pc through the serial cable to the Collegare il Pc tramite il cavo USB al CM24 connector of the B5 board (GSC Board - connettore CM24 della scheda B5 (GSC Board USB version).
- Page 327 Villa Sistemi Medicali ARCOVIS 3000 S/R – Service Information - 6 MSC Software on “BASE TROLLEY HIGH PROFILE” Disassemble the rear cover of the “BASE Smontare il carter posteriore del “BASE TROLLEY HIGH PROFILE” (Chapt. TROLLEY HIGH PROFILE” (Cap. Sostituzioni Replacements §...
- Page 328 Service Information - 6 - ARCOVIS 3000 S/R Villa Sistemi Medicali MSC Software on “HIGH CONFIGURATION TROLLEY” Disassemble the rear cover of the “HIGH Smontare il carter posteriore del “HIGH CONFIGURATION TROLLEY”. CONFIGURATION TROLLEY”. B19 – MSC HCT HIGH CONFIGURATION TROLLEY...
- Page 329 Villa Sistemi Medicali ARCOVIS 3000 S/R – Service Information - 6 Switch the unit ON. Accendere l’unità. Start on the Pc the utility “C-Arm Manager”. Avviare sul Pc l’utility “C-Arm Manager”. Select the window “Generator Firmware”. Selezionare la finestra “Generator Firmware”.
-
Page 330: Data Setup
Service Information - 6 - ARCOVIS 3000 S/R Villa Sistemi Medicali 6.7.5. Data Setup Connect the Pc through the serial cable to the Collegare il Pc tramite il cavo seriale al connector for the dosimeter printer that is on connettore per la stampante del dosimetro che the right unit side (Fig. -
Page 331: Errors
Villa Sistemi Medicali ARCOVIS 3000 S/R – Service Information - 6 6.7.6. Errors This session allows to download the list of Questa sessione permette di scaricare l’elenco alarms appeared on the unit. degli allarmi intervenuti sull’unità. “Load from machine”: it loads and displays “Load from machine”: carica e visualizza... -
Page 332: Setup Menu: Unit Setup / Menu Setup: Impostazione Dell'unità
Service Information - 6 - ARCOVIS 3000 S/R Villa Sistemi Medicali 6.8. SETUP Menu: unit setup / Menu SETUP: impostazione dell’unità 6.8.1. TUBE CALIBRATION / CALIBRAZIONE DEL TUBO The anodic current (mA) that checks the intensity La corrente anodica (mA), che controlla l’intensità... - Page 333 Villa Sistemi Medicali ARCOVIS 3000 S/R – Service Information - 6 The reading of the anodic current (anodic mA) La lettura della corrente anodica (mA anodici) is performed with a double channel storage va effettuata con oscilloscopio due tracce con oscilloscope.
-
Page 334: Accessories And Optionals / Accessori Eoptionals
Service Information - 6 - ARCOVIS 3000 S/R Villa Sistemi Medicali 7. ACCESSORIES AND OPTIONALS / ACCESSORI E OPTIONALS 7.1. External interlocks/ Interblocchi esterni ARCOVIS 3000 S/R is prearranged to work in ARCOVIS 3000 S/R è predisposto per lavorare fixed position conditions. - Page 335 Villa Sistemi Medicali ARCOVIS 3000 S/R – Service Information - 6 CM200 Male Connector (screw view) CM200A Connector pin description / descrizione technical data / dati tecnici 1-2 UNIT ON LAMP 115/230Vac 60 Wmax 3-4 X-RAY LAMP 115/230Vac 60 Wmax 5-6 DOOR N.O.
-
Page 336: Dapmeter (Optional) / Dapmeter (Optional)
Service Information - 6 - ARCOVIS 3000 S/R Villa Sistemi Medicali 7.2. DAPMeter (optional) / DAPMeter (optional) The chamber that can be installed on the unit La camera installabile sull’unità ARCOVIS ARCOVIS 3000 S/R is type DIAMENTOR CM- 3000 S/R è del tipo DIAMENTOR CM-T. -
Page 337: Dap Meter Printer / Stampante Per Dap Meter (Optional)
Villa Sistemi Medicali ARCOVIS 3000 S/R – Service Information - 6 7.3. DAP Meter Printer / Stampante per DAP Meter (optional) The unit is prearranged to be interfaced with L’unità è predisposta per interfacciarsi con una an external printer (non-standard) for the data stampante (non standard) esterna per la printing of the dose transmitted to the patient. -
Page 338: Installation Of The Device / Installazione Del Dispositivo
Service Information - 6 - ARCOVIS 3000 S/R Villa Sistemi Medicali 7.3.2. Installation of the device / Installazione del dispositivo Ref. Fig. 6 Assembly the printer support on the right unit Montare il supporto della stampante sul lato side (pos.2) by using two screws. -
Page 339: Use / Uso
Villa Sistemi Medicali ARCOVIS 3000 S/R – Service Information - 6 7.3.3. Use / Uso If the DAP meter is installed and it works Se il misuratore DAP è installato e funziona correctly, by pressing the printer push-button it correttamente, premendo il tasto di stampa è... -
Page 340: Laser / Laser (Optional)
Service Information - 6 - ARCOVIS 3000 S/R Villa Sistemi Medicali 7.4. Laser / Laser (optional) The unit is prearranged to assemble an L’unità è predisposta montare accessory of laser targeting device on the accessorio puntamento laser image intensifier. sull’intensificatore d’immagine. -
Page 341: Installation Of The Device / Installazione Del Dispositivo
Villa Sistemi Medicali ARCOVIS 3000 S/R – Service Information - 6 7.4.2. Installation of the device / Installazione del dispositivo Required equipment Attrezzatura necessaria • • Chiave a brugola 2 Allen wrench 2 • • Chiave a brugola 2.5 Allen wrench 2.5 The unit has already been prearranged for the L’unità... - Page 342 Service Information - 6 - ARCOVIS 3000 S/R Villa Sistemi Medicali Procedure / Procedimento Disassemble the cover from the laser Smontare il carter dall’accessorio laser (pos. B accessory (pos. B Fig. 8). Fig. 8). Eliminate the three caps (pos. A Fig. 9).
- Page 343 Villa Sistemi Medicali ARCOVIS 3000 S/R – Service Information - 6 Stick by adhesive tape, a d.2mm washer on Incollare con del nastro adesivo, una rondella the I.I. center (pos. A Fig. 12). d.2mm sul centro dell’IB (pos. A Fig. 12).
- Page 344 Service Information - 6 - ARCOVIS 3000 S/R Villa Sistemi Medicali Interpose radio dull material (dimensions Interporre del materiale radio opaco 1x1mm) at a distance of 25cm from the I.I. (dimensioni 1x1mm) ad una distanza di 25cm input surface (pos. C Fig. 14).
- Page 345 Villa Sistemi Medicali ARCOVIS 3000 S/R – Service Information - 6 Fig. 15 90° Fig. 16 Fig. 17 Reassemble covers of the laser emitters Rimontare i carter di copertura degli emettitori covering. laser. Stick warning labels laser Incollare etichette avvertenza accessory.
-
Page 346: Use / Uso
Service Information - 6 - ARCOVIS 3000 S/R Villa Sistemi Medicali 7.4.3. Use / Uso WARNING! LASER EMISSION ATTENZIONE! EMISSIONE LASER Don’t fix the beam with naked eye and Non fissare il fascio ad occhio nudo né don’t look through optical instruments. -
Page 347: Functional Check / Verifica Funzionale
Villa Sistemi Medicali ARCOVIS 3000 S/R – Service Information - 6 7.4.4. Functional check / Verifica funzionale Place a washer on the I.I. center. Posizionare una rondella sul centro dell’IB. Interpose an object with known center Interporre un oggetto con centro noto tra between monobloc and I.I., at 25cm from the... -
Page 348: Technical Data / Caratteristiche Tecniche
Service Information - 6 - ARCOVIS 3000 S/R Villa Sistemi Medicali 7.4.5. Technical data / Caratteristiche tecniche General specifications Cross generator with 2 Laser modules External power supply: Support mechanics: already available Laser cable length: 50 cm Laser targeting device... -
Page 349: Restoration Of The Esidic System / Ripristino Del Sistema Esidic
Villa Sistemi Medicali ARCOVIS 3000 S/R – Service Information - 6 RESTORATION OF THE ESIDIC SYSTEM / RIPRISTINO DEL SISTEMA ESIDIC With ESIDIC systems a use licence Norton Con i sistemi ESIDIC vengono forniti una Ghost 2003 and a Cd “Image of the operative licenza d’uso Norton Ghost 2003 e un Cd... -
Page 351: Document Status
Document Status ARCOVIS 3000 S/R – Service Information - 6 DOCUMENT STATUS Rev. Date Pages Modification description 30/10/07 Document approval / Approvazione del documento General document revision / Revisione generale del 28/04/08 documento Updating of the software loading procedures / Aggiornate procedure caricamento software. - Page 352 Villa Sistemi Medicali ARCOVIS 3000 S/R – Parts List - 7 PARTS LIST [File: 201183-E-00-20.doc]...
- Page 353 Parts List - 7 - ARCOVIS 3000 S/R Villa Sistemi Medicali (This page is intentionally left blank) [File: 201183-E-00-20.doc]...
- Page 354 Document Status ARCOVIS 3000 S/R – Parts List - 7 DOCUMENT STATUS Rev. Date Pages Modification description 13/03/08 Document approval General document revision / Revisione generale del 28/04/08 documento Introduction of the boards software updating kit, slide cover for compact unit, supply cable 8mt, unit connecting cable trolley and fuses kit.
- Page 355 - Part list 1-201183 Code Dal S.N. OEM code Pos. Description REAR COVER 200477 200200-V16 CABLE HOLDER CONTROL PANEL CONSOLE WITH ROTATION 200473 64143 KEYBOARD ROTATION GROUP 200069-Vxx CENTRAL HANDLE 200112-Vxx LATERAL HANDLE 200469 BRAKE CONTROL LEVER 71873 7.01 BLACK HANDLE ELESA ELC110-A12 200590-V16 SLIDE COVER 201227/1...
- Page 356 - Part list 2-201183 OEM code Code Dal S.N. Pos. Description 63017 PIVOT ASSEMBLY FOR ARM BRAKE 63823 UPPER ARM BEARINGS SUPPORT 200986 LOWER ARM BEARINGS SUPPORT 200596 BRAKE KNOB FOR THE SADDLE ROTATION HANDLE BRAKE COLUMN 200600/A 200601 SLIDE BRAKE KNOB BUSH FOR BRAKE ADJUSTMENT 53729/B 200579...
- Page 357 - Part list 3-201183 OEM code Code Dal S.N. Pos. Description 01790 POWER BOARD 01793 FILAMENT BOARD 01794/1/1 STARTER BOARD + SOFTWARE 01792/1/1 MOTOR UP/DW BOARD + SOFTWARE AC/DC POWER SUPPLY 24V 4A XP TYPE ECM100US24 12983 11478 POLYESTER CAPACITOR 30uF/400VMLR25 PRL X-RAY HANDSWITCH 05341 200769...
- Page 358 - Part list 3-201183 OEM code Code Dal S.N. Pos. Description 11851 ROLLER MICROSWITCH NATIONAL AM1704K TRIPLE FOOTSWITCH IPX8 TYPE MKF 21SD1S/1S-MED GP24 12908 06198 UNIT CM1 CABLE LOW PROFILE 05K 201698 UNIT CABLE CM1 HIGH PROFILE...
- Page 359 - Part list 4-201183 OEM code Code Dal S.N. Pos. Description 200246-V16 SUPPORT FOR KEYBOARD - WHITE RAL 9002 200245-V39 HANDLE - DRYLAC METALLIC GREY 200252-V16 TROLLEY SHELF - WHITE RAL 9002 201578 MEMORY SHELF OF MONITOR TROLLEY 4.01 SHELF FOR MEMORIES 200883-V16 201568 DICOM SHELF FOR MONITOR TROLLEY...
- Page 360 - Part list 5-201183 OEM code Code Dal S.N. Pos. Description 200142 ORANGE LAMP COVER 11691 FILAMENT LAMP 24V-3C 17x54 200544 LAMP HOLDER D.25 2W RAFIP/N 1.610004.0990000 01803/1/1 SUPERVISOR VIDEO BOARD + SOFTWARE SYSTEM MEMORY CONTROL BOARD 01804 01766/1/1 CPU BOARD + LP TROLLEY SOFTWARE UNIT-MONITOR TROLLEY CONNECTING CABLE LOW PROFILE 0.5K 06199 12903...
- Page 361 - Part list 6-201183 OEM code Code Dal S.N. Pos. Description 201525-V39 LATERAL HANDLE 201897 LATERAL COVER OF MODULAR TROLLEY 201790 ANTISTATIC MAXIMA CASTOR SERIES T + BRAKE D.125x32 201791 ANTISTATIC MAXIMA CASTOR SERIES T D.125x32 REAR COVER OF THE MODULARIZEDTROLLEY 201896 53744-V16 5.01...
- Page 362 - Part list 7-201183 OEM code Code Dal S.N. Pos. Description 200142 ORANGE LAMP COVER 11691 FILAMENT LAMP 24V-3C 17x54 200544 LAMP HOLDER D.25 2W RAFIP/N 1.610004.0990000 12915 MULTISTANDARD MED. MONOCHROME18" LCD MONITOR HIGH BRIGHTN. 200967 MULTISTANDARD COLOR 19" LCD MONITOR 202881 REMOTE TROLLEY KEYBOARD 59152...
- Page 363 - Part list 8-201183 OEM code Code Dal S.N. Pos. Description 200265 ALPHANUMERIC MEMBRANE KEYBOARDPS2 IMB 201579 EXTRACTABLE KEYBOARD SUPPORT 12935 THERMAL TABLE PRINTER S'PRINT-S, LIGHT GREY COLOR 12936 3.20 150 ADHESIVE LABELS ROLL OF THERMIC PAPER 54X58mm VIDEOPRINTER SONY UP 970 AD 12988 12989 VIDEOPRINTER SONY UP 990 AD...
- Page 364 K 5 , S I V C I F I T A I T P a F . i t t e l l i m a i p a r i t t e l I T P ° N V E R R P .
- Page 365 SPARE PARTS KIT SPARE PARTS KIT SPARE PARTS KIT FOR ARM ROTATION BRAKE FOR ARM BEARINGS FOR SLIDE BRAKE DRAW CHECKED APPROVED REV-MOD REVISION - MODIFICATION DESCRIPTION SPARE PARTS KIT FOR Sostituzione maniglia frenatura movimentazione panoramica pos.5 R.Trapletti P.Facoetti W.Breda SPARE PARTS KIT SADDLE ROTATION DATE...
- Page 366 10.1 10.2 10.3 10.4 12.01 21.01 DRAW CHECKED APPROVED REV-MOD REVISION - MODIFICATION DESCRIPTION R.Trapletti R.Trapletti P.Facoetti DATE DATE DATE 13/03/2008 13/03/2008 13/03/2008 DESCRIPTION DRAW N° 201183 ELECTRICAL SPARE PARTS - SHEET 03 SCALE REV. PROJ. REV. MOD.
- Page 367 4.01 4.01 DRAW CHECKED APPROVED REV-MOD REVISION - MODIFICATION DESCRIPTION R.Trapletti R.Trapletti P.Facoetti DATE DATE DATE 05/03/2008 05/03/2008 05/03/2008 DESCRIPTION DRAW N° 201183 BASE TROLLEY - MECHANICAL SPARE PARTS - SHEET 04 SCALE REV. PROJ. REV. MOD.
- Page 368 DRAW CHECKED APPROVED REV-MOD REVISION - MODIFICATION DESCRIPTION 9.01 Aggiornamento disegno R.Trapletti P.Facoetti W.Breda DATE DATE DATE 19/03/2008 19/03/2008 19/03/2008 DESCRIPTION DRAW N° 201183 BASE TROLLEY - ELECTRICAL SPARE PARTS - SHEET 05 SCALE REV. PROJ. REV. MOD.
- Page 369 DRAW CHECKED APPROVED REV-MOD REVISION - MODIFICATION DESCRIPTION R.Trapletti P.Facoetti Breda W. DATE DATE DATE 13/05/2008 13/05/2008 13/05/2008 DESCRIPTION DRAW N° 201183 HC TROLLEY - MECHANICAL PARTS - SHEET 06 SCALE REV. PROJ. REV. MOD.
- Page 370 11.1 HC TROLLEY WITH HRP2000 DRAW CHECKED APPROVED REV-MOD REVISION - MODIFICATION DESCRIPTION Aggiornamento generale disegno R.Trapletti P. Facoetti W.Breda HC TROLLEY WITH DIP3000 + DICOM DATE DATE DATE 04/02/2009 04/02/2009 04/02/2009 DESCRIPTION DRAW N° 201183 HC TROLLEY - ELECTRICAL SPARE PARTS - SHEET 07 SCALE REV.
- Page 371 12.1 13.1 DRAW CHECKED APPROVED REV-MOD REVISION - MODIFICATION DESCRIPTION Rev.1 Introduzione nuovi ricambi R.Trapletti P.Facoetti W.Breda Rev.2 Introduzione nuovo kit laser DATE DATE DATE 10/11/2008 10/11/2008 10/11/2008 DESCRIPTION DRAW N° 201183 ACCESSORIES & KITS SPARE PARTS - SHEET 08 SCALE REV.
- Page 372 Villa Sistemi Medicali ARCOVIS 3000 S/R – Electrical drawings / Schemi elettrici -8 ELECTRICAL DRAWINGS SCHEMI ELETTRICI [File: 201184-C-00-20.doc]...
- Page 373 Electrical drawings / Schemi elettrici -8 - ARCOVIS 3000 S/R Villa Sistemi Medicali (This page is intentionally left blank) (Pagina intenzionalmente bianca) [File:201184-B-00-20.doc]...
- Page 374 Villa Sistemi Medicali ARCOVIS 3000 S/R – Electrical drawings / Schemi elettrici -8 TABLE OF CONTENTS / INDICE ELECTRICAL DRAWINGS / SCHEMI ELETTRICI ................2 COMPONENTS INITIALS / SIGLE COMPONENTI ................4 ASSEMBLY VIEW / VISTA D’ASSIEME ....................5 DOCUMENT STATUS / STATO DEL DOCUMENTO..................I [File:201184-B-00-20.doc]...
-
Page 375: Electrical Drawings / Schemi Elettrici
Electrical drawings / Schemi elettrici -8 - ARCOVIS 3000 S/R Villa Sistemi Medicali 1. ELECTRICAL DRAWINGS / SCHEMI ELETTRICI Functional Drawings / Schemi Funzionali Description Code Revision 201184 UNIT BLOCK DIAGRAM SBFM WITHOUT 200310 TROLLEY UNIT BLOCK DIAGRAM SBFM WITH TROLLEY... - Page 376 Villa Sistemi Medicali ARCOVIS 3000 S/R – Electrical drawings / Schemi elettrici -8 Topographic Boards / Topografici Schede Code Revision Label Description 201184 Power Board 01790 Speaker board 01800 x-ray/alarm board (16 out SPI) 01801 Central System Controller 01755 Fluo/Rad Generator Controller...
-
Page 377: Components Initials / Sigle Componenti
Electrical drawings / Schemi elettrici -8 - ARCOVIS 3000 S/R Villa Sistemi Medicali 2. COMPONENTS INITIALS / SIGLE COMPONENTI Code Descriptin Descrizione Absorber core (shield bead) Nucleo magnetico (nucleo dissipativo) Switching power supply Alimentatore switching Automatic Voltage Switch Selettore automatico tensione... -
Page 378: Assembly View / Vista D'assieme
Villa Sistemi Medicali ARCOVIS 3000 S/R – Electrical drawings / Schemi elettrici -8 3. ASSEMBLY VIEW / VISTA D’ASSIEME overview shows unit La vista d’insieme raffigura l’unità nella sua configuration configurazione massima. [File:201184-B-00-20.doc] Rev.B - Page 5/6... - Page 379 Electrical drawings / Schemi elettrici -8 - ARCOVIS 3000 S/R Villa Sistemi Medicali (This page is intentionally left blank) (Pagina intenzionalmente bianca) Page 6/26 - Rev.B [File: AF3005_B00.doc]...
-
Page 380: Document Status / Stato Del Documento
Villa Sistemi Medicali ARCOVIS 3000 S/R – Electrical drawings / Schemi elettrici -8 DOCUMENT STATUS / STATO DEL DOCUMENTO Rev. Date Page/s Description / Descrizione 30/10/07 Document approval / Approvazione del documento 24/01/08 Modified B5 board/ Modificata scheda B5 Inserted functional and topographic drawings of the HC... - Page 424 "...
- Page 425 Villa Sistemi Medicali ARCOVIS 3000 S/R – Planned Maintenance - 9 PLANNED MAINTENANCE MANUTENZIONE PROGRAMMATA [File: 201185-A-00-20.doc]...
- Page 426 Planned Maintenance - 9 - ARCOVIS 3000 S/R Villa Sistemi Medicali (This page is intentionally left blank) (Pagina intenzionalmente bianco) [File: 201185-A-00-20.doc]...
- Page 427 Villa Sistemi Medicali ARCOVIS 3000 S/R – Planned Maintenance - 9 TABLE OF CONTENTS / SOMMARIO Notes / Notes ............................2 PLANNED MAINTENANCE SHEET / SCHEDA DI MANUTENZIONE PROGRAMMATA....3 DOCUMENT STATUS / STATO DEL DOCUMENTO..................I [File: 201185-A-00-20.doc] Rev.A - Page 1/4...
- Page 428 Planned Maintenance - 9 - ARCOVIS 3000 S/R Villa Sistemi Medicali 1. Notes / Notes • • After eleven months from the installation Trascorsi undici mesi dalla data date or the last performed planned d’installazione o dalla data dell’ultima maintenance...
- Page 429 Villa Sistemi Medicali ARCOVIS 3000 S/R – Planned Maintenance - 9 2. PLANNED MAINTENANCE SHEET / SCHEDA DI MANUTENZIONE PROGRAMMATA Unit type: ARCOVIS 3000 S/R S/N: Modello unità: Place of installation: Date of installation: Data d’installazione: Luogo d’installazione: Dept: Date of maintenance:...
- Page 430 Planned Maintenance - 9 - ARCOVIS 3000 S/R Villa Sistemi Medicali X-ray checks / Controlli radiologici Reference X-ray data check in fluoroscopy Chapt.4 §2 Controllo dei dati radiologici in fluoroscopia X-ray data check in radiography Chapt.4 §2 Controllo dei dati in radiologici in grafia...
- Page 431 Document Status ARCOVIS 3000 S/R – Planned Maintenance - 9 DOCUMENT STATUS / STATO DEL DOCUMENTO Rev. Date Pages Modification description 30/10/07 Document approval / Approvazione documento. 28/04/08 General document revision / Revisione generale del documento [File: 201185-A-00-20.doc] Pag. I/I...
Need help?
Do you have a question about the ARCOVIS 3000 S and is the answer not in the manual?
Questions and answers