Table of Contents
Advertisement
Quick Links
CA-HM-UNI-EVO.006
KIT INSTALLATION 1 DIN réglable POUR
SPH-EVO93DAB
Cage 1 DIN
Cache connecteur
Habillage écran
Habillage 1 DIN
Mount the locking tabs (bulge up) onto the unit support
Install the side support with a wrench n°7 (not included)
1
3
Installation manual CA-HM-UNI-EVO.006 | Version 1.0
Install the sliding mecha with the supplied hardware
Once finalised, mount the complete bracket to the silver box
using the supplied hex screws
Fixation écran
Support écran
Pièces d'ajustement
Pattes métalliques
2
4
Advertisement
Table of Contents

Related Manuals for Pioneer CA-HM-UNI-EVO.006


Summary of Contents for Pioneer CA-HM-UNI-EVO.006
- Page 1 Mount the locking tabs (bulge up) onto the unit support Install the sliding mecha with the supplied hardware Install the side support with a wrench n°7 (not included) Once finalised, mount the complete bracket to the silver box using the supplied hex screws Installation manual CA-HM-UNI-EVO.006 | Version 1.0...
- Page 2 By using the two top screws, mount the screen holder to the screen Put the screen holder on and fix only the top two screws install the metal holder - you can adjust height and angle by using different positions Installation manual CA-HM-UNI-EVO.006 | Version 1.0...
- Page 3 If the bottom cover collides with the metal bracket, install the bottom cover you need to break off some strips Slide the screen into the support and secure with two screws Verify the necessary lenght of the neck cover Installation manual CA-HM-UNI-EVO.006 | Version 1.0...
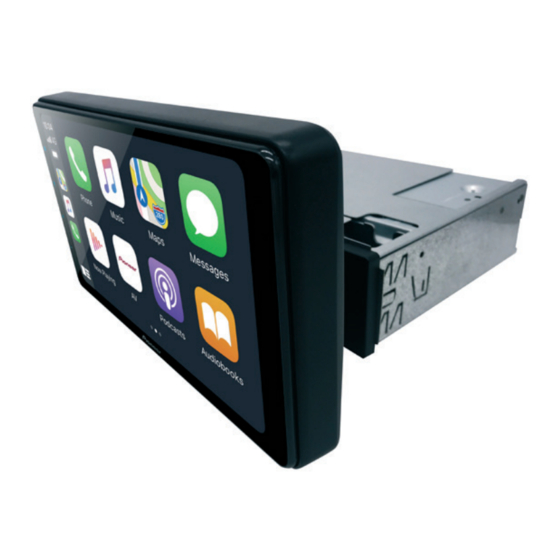
- Page 4 Install the neck cover onto the screen and fix the screws Slide the cover onto the screen and fix the screw Put the screw cover over it Final product image Installation manual CA-HM-UNI-EVO.006 | Version 1.0...
Need help?
Do you have a question about the CA-HM-UNI-EVO.006 and is the answer not in the manual?
Questions and answers