Advertisement
Quick Links
Advertisement

Related Manuals for Minolta MN4KP1


Summary of Contents for Minolta MN4KP1
-
Page 2: Federal Communications Commission Interference Statement
About this Manual Congratulations on purchasing the Minolta MN4KP1 HD Camcorder! The contents of this manual are subject to change without notice. Note that the example screens and product illustrations shown in this User’s Guide may differ somewhat from the screens and configuration of the actual camera. - Page 3 1. About Your Camcorder be provided with antenna installation instructions and transmitter operating conditions for satisfying RF exposure compliance. FCC: SAR standard Value: 1.6 W/Kg, Maximal Measure: 0.4 W/kg CE Mark Warning This is a Class B product, in a domestic environment, this product may cause radio interference, in which case the user may be required to take adequate measures.
-
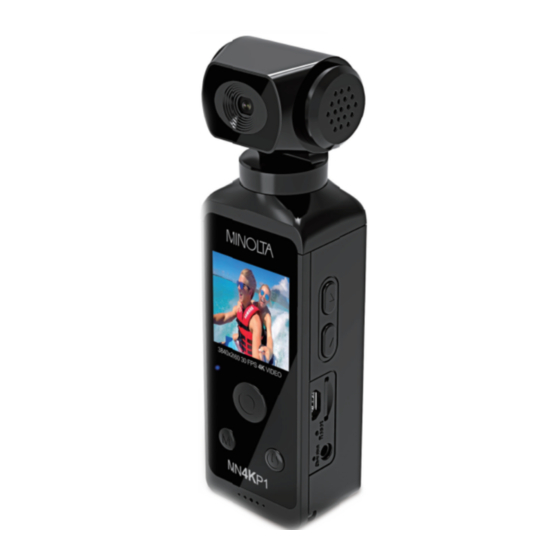
Page 4: Camcorder Interface
Camcorder Interface 1. Speaker 2. Lens 3. LCD Screen 4. Up / WiFi 5. Down 6. Memory Card Slot 7. Micro USB Port 8. Reset Pinhole 9. Mic In 10. Charging LED 11. Mic 12. Power 13. Mode 14. OK / Record 15. - Page 5 1.2 Button Function Description Function Description Press and hold for 3 seconds to power on or off. Power Tap once to turn off or on the LCD screen. Press to cycle between Video, Photo, Slow Motion, Mode Playback and Setup modes. Press to enter sub menus and to select menu options In Video: Press to start and stop recording video.
-
Page 6: First Use
2. First Use 2.1 Inserting the Memory Card Insert the included Micro SD memory card to record and store your videos and photos. When the battery is low, media stored on the memory card will not be erased. Please insert the SD memory card by following the steps below: 1. - Page 7 2.4 Switching Modes Press the MODE button to cycle between Video, Photo, Slow Motion, Playback and Setup Modes. The corresponding mode will be displayed in the top left corner of the screen. 2.5 Connecting to a Computer Your camcorder can connect to a computer to transfer photo and video files for viewing and editing.
- Page 8 2.8 Video Mode Press the MODE button to switch to Video Mode. The meaning of each icon within Video Mode is explained in the table below: 1) Video Mode 5) Battery Level 2) Video Size (Resolution) 6) Sound Recording 3) Memory Card Inserted 7) Current Date and Time 4) WiFi Indicator 2.9 Photo Mode...
- Page 9 2.10 Slow Motion Mode Press the MODE button to switch to Video Mode. The meaning of each icon within Slow Motion Mode is explained in the table below: 1) Slow Motion Mode 5) Battery Level 2) Video Size (Resolution) 6) Sound Recording 3) Memory Card Inserted 7) Current Date and Time 4) WiFi Indicator...
- Page 10 Using the Camcorder 3.1 Video Recording Power the camcorder on and it will be in video recording mode, press the OK button to start recording. Press the OK button again to stop recording. You may press the MODE button to switch to another mode. A camcorder icon will appear in the top left-hand corner of the screen when you are in Video mode.
- Page 11 3. Select ‘Time-Lapse’ using the UP or DOWN buttons and press the OK button to enter the ‘Time-Lapse’ submenu. 4. Press the UP or DOWN buttons to navigate the menu, and press the OK button to confirm your selected setting (Off, Interval of 0.5 Seconds, 1 Second, 2 Seconds, 5 Seconds, 10 Seconds, 30 Seconds, 60 Seconds).
- Page 12 3.2 Photo Shooting Power the camcorder on and press the MODE button to switch to Photo mode. 1. Line up your shot by looking at the LCD screen to see what is in the shot. 2. Hold the camera steady and press the OK button to capture a photo. 3.
- Page 13 button to confirm your selected option (Off, 3 Seconds, 5 Seconds, 10 Seconds, 15 Seconds, 20 Seconds, 30 Seconds) Note: By selecting 10 Seconds, the camcorder will capture a single photo every 10 seconds. Each photo will be saved as a separate file on the memory card.
- Page 14 Slow Motion Recording Power the camcorder on and it will be in video recording mode, press the MODE button twice to switch to Slow Motion Mode. Press the OK button to start recording. Press the OK button again to stop recording. You may press the MODE button to switch to another mode.
- Page 15 Options Menu Basic options can be changed in the Options menu. These include exposure, white balance and frequency. Power the camera on and press the MODE button to switch to Option mode. 3.4.1 Exposure This function adjusts the frame brightness in your photograph. 1.
- Page 16 3.4.4 Image Rotation This option will flip the recorded videos and images 180 degrees. 1. Press the MODE button until you enter the Options Mode. 2. Press the OK button to enter Options mode. 3. Press the MODE button twice to enter Options Setup Mode. 4.
- Page 17 3.4.8 Auto Screensaver This function sets the duration of time in which the camcorder will wait with no user input before automatically turning the LCD screen off. 1. Press the MODE button until you enter the Options Mode. 2. Press the OK button to enter Options mode. 3.
- Page 18 Settings Mode Basic settings can be changed in the settings menu. These include date & time, language and format. Power the camera on and press the MODE button to switch to Option mode. 3.5.1 Language This function allows you to set the camcorder’s interface language. 1.
- Page 19 3.5.4 Reset to Factory Settings Factory default settings can be restored in this menu. This function will not delete the media stored on the memory card, and will only restore all of the menu’s setting back to factory default settings. 1.
- Page 20 Playback Mode Videos and photos captured on your camcorder can be easily played back. Power the camcorder on and press the MODE button three to switch to Playback Mode. 1. Press the UP or DOWN buttons to cycle through the captured videos and photos stored on the memory card.
-
Page 21: Wifi Connectivity
WiFi Connectivity 3.7.1 Connecting to the XDV App To wirelessly operate the MN4KP1 camcorder you will need to install the “XDV” app on your Android or iOS device. Scan the QR Code below with your smartphone to download the app. - Page 22 The directions below are for iOS smartphones and tablets. The process for connecting your MN4KP1 to an Android smartphones and tablets is similar to the processes outlined below. Power the camcorder on and press the UP button once to enable the camcorder’s WiFi network.
- Page 23 App”. This will allow the app to communicate with your MN4KP1 and will allow the app to work properly. The app will not connect to your MN4KP1 if you select "Don’t Allow”. As part of the iOS operating system, your smartphone’s Location Settings must be enabled in order to allow proper...
- Page 24 When launching the app, if you selected “Allow While Using App”, then MN4KP1 should show under the “Connected” menu. If you selected “Don’t Allow”, you will see “2G/3G/4G” under the “Connected” menu. Pressing “2G/3G/4G” will pop-up the error message shown in the image...
- Page 25 Now, go back to your smartphone’s WiFi network settings menu and make sure that “MN4KP1” is selected connected. Next, launch the “XDV” app and you should see “MN4KP1” shown under the “Connected” menu. Press “MN4KP1” and the app should now connect to your camcorder...
- Page 26 3.7.2 Operating the XDV App Your MN4KP1 can now integrate with your smartphone. Upon launching the app, it will initially default to the video recording function. Follow the steps below to select modes. To enter Video mode, tap the Video icon on the left side in the middle of your smartphone screen.
- Page 27 To enter Photo mode, tap the Camera icon in the middle of your smartphone screen. Photo Mode...
- Page 28 To enter Slow Motion mode, tap the Video icon on the left side in the middle of your smartphone screen. Slow Motion Mode...
- Page 29 1. To start recording a video, tap the Video icon on your smartphone screen. While a video is recording remotely, the operating indicator light at the back of your MN4KP1 will flash blue. 2. The Video Recording mode can be changed by selecting one of the options shown below.
- Page 30 3.7.2.2 Taking Photos Remotely 1. Switch to Photo mode by tapping the Camera icon on your smartphone screen. To capture a photo, tap the Camera icon again. 2. The Photo mode can be changed by selecting one of the options shown below.
- Page 31 3.7.2.3 Viewing Media on the App To view your photos and videos on the app, tap the Media icon in the bottom middle of your smartphone screen. Then select Device at the top of your screen to show the media on the camcorder. Tap the photo or video file you wish to view.
- Page 32 To download media to your smartphone or to delete media from the MN4KP1, tap the down arrow at the top right corner of the smartphone screen. Then select Download or Delete. Select the media you wish to download or delete and tap the confirm button on the bottom right corner of your smartphone screen.
- Page 33 3.7.2.4 Changing Camcorder Settings on the App Camcorder settings can also be accessed through the app. Tap the Settings icon in the bottom right-hand corner of the screen to launch the Settings menu. From here, all of the camcorder settings can be adjusted.
- Page 34 4.1 Technical Specifications Model Number Minolta MN4KP1 Lens Fixed Focus • f=39mm • F/5.5 • 170° Field of View Zoom 4X Digital Zoom Image Sensor 8MP CMOS Sensor Pixels (photo) JPEG: 16 MP • 12 MP • 8 MP • 5 MP • 2 MP H.264: 4K UHD 3840x2160 30fps •...
- Page 35 Minolta is a registered trademark of JMM Lee Properties, LLC and is used in the United States by Elite Brands Inc. under license. 40 Wall Street, 61st Floor, New York, NY 10005 USA • Tel: 800-441-1100 www.minoltadigital.com • www.elitebrands.com Copyright © 2021 Elite Brands Inc.
Need help?
Do you have a question about the MN4KP1 and is the answer not in the manual?
Questions and answers
its saying no detectable tf card, but the card is in there.
If your Minolta MN4KP1 camera shows "no detectable TF card" even though the card is inserted, try the following steps:
1. Remove the TF (microSD) card and reinsert it securely.
2. Make sure the card is inserted in the correct orientation.
3. Try using a different TF card to rule out a faulty card.
4. Ensure the card is properly formatted (preferably FAT32 or exFAT).
5. Check that the card capacity is supported by the camera (e.g., 16GB is known to work).
6. Power off and restart the camera after inserting the card.
If the problem continues, the card slot or the card may be defective.
This answer is automatically generated
when i take a picture or try to record it is saying it says no detectable tf card