Table of Contents
Advertisement
Quick Links
Advertisement
Table of Contents

Related Manuals for Zanussi ZCG43050WA


Summary of Contents for Zanussi ZCG43050WA
- Page 1 User Manual GETTING STARTED? EASY. ZCG43050WA EN User Manual Cooker...
-
Page 2: Safety Information
VISIT OUR WEBSITE TO: Get usage advice, brochures, trouble shooter, service and repair information: www.zanussi.com/support SAFETY INFORMATION Before the installation and use of the appliance, carefully read the supplied instructions. The manufacturer is not responsible for any injuries or damage that are the result of incorrect installation or usage. - Page 3 This appliance is not intended to be used on ships, boats or • vessels. Do not install the appliance behind a decorative door in order • to avoid overheating. Do not install the appliance on a platform. • Do not operate the appliance by means of an external timer or •...
-
Page 4: Safety Instructions
WARNING: Use only hob guards designed by the • manufacturer of the cooking appliance or indicated by the manufacturer of the appliance in the instructions for use as suitable or hob guards incorporated in the appliance. The use of inappropriate guards can cause accidents. SAFETY INSTRUCTIONS •... -
Page 5: Care And Cleaning
• This appliance is not connected to a device, – do not put water directly into the hot which evacuates the products of combustion. appliance. Make sure to connect the appliance according – do not keep moist dishes and food in the to current installation regulations. -
Page 6: Internal Lighting
• Clean regularly the appliance to prevent the to signal information about the operational deterioration of the surface material. status of the appliance. They are not intended to • Make sure the cavity and the door are wiped dry be used in other applications and are not after each use. -
Page 7: Gas Burners
1. Measure down 180 mm from the appliance top surface, then measure right 30 mm. Dimension 2. Mark the position of the wall and this gives anchor point for the stability chain. less than 400 LEVELLING OF THE APPLIANCE 180 mm 30 mm OTHER TECHNICAL DATA WARNING! These instructions are... -
Page 8: Pressure Test
WARNING! Only a qualified and Dimension competent person can do the gas installation. Before you connect te gas, disconnect the appliance from the electricity supply or switch off the fuse in the fuse box. Close the primary valve of the gas supply. Supply piping should not be less than R3/8. -
Page 9: Product Description
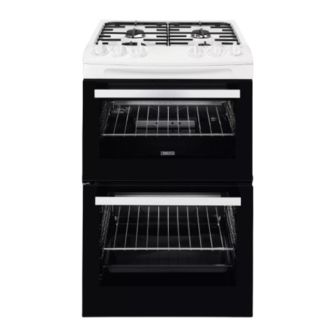
The spark generator is active all the time if the phases are not connected correctly. WARNING! The power cable must not touch the part of the appliance shaded in the illustration. PRODUCT DESCRIPTION GENERAL OVERVIEW Control panel and hob Air vents for the cooling fan Grill Lamp Shelf support, removable... -
Page 10: Before First Use
COOKER CONTROL PANEL Knob for the top oven Knobs for the hob Knob for the main oven ACCESSORIES For roasting and grilling. • Wire shelf Use the trivet only with the Grill- / For cookware, cake tins, roasts. roasting pan. •... -
Page 11: Hob - Hints And Tips
If the burner accidentally goes out, The spark generator can start turn the knob to the off position and try automatically when you switch on the to light the burner again after minimum mains, after installation or a power cut. 1 minute. -
Page 12: Hob - Care And Cleaning
DIAMETERS OF COOKWARE CAUTION! Make sure that the pots are placed centrally on the burner in WARNING! Use cookware with order to get the maximum stability and diameters applicable to the size of a lower gas consumption. burners. WARNING! Do not use vessels that have rim based or convex-based Diameter of cookware Burner... -
Page 13: Top Oven Functions
TOP OVEN FUNCTIONS Oven function Application Off position The oven is off. Full Grill To grill flat food and to toast bread. When the function is active, the lamp turns on. Heat settings Heat settings for Conventional Cooking. 1 - 8 Ignition To activate the top oven. - Page 14 CAUTION! In the absence of electricity you can ignite the oven burner without an electrical device. In this case open the oven door, put the flame near the hole in the bottom of the oven cavity, turn the knob to the spark position and push it down.
-
Page 15: Oven - Hints And Tips
2. Put the deep pan into the oven on the You can use the trivet to grill flat dishes in large necessary shelf position. quantities and to toast. 1. Put the trivet into the deep pan so that the supports of the wire shelf point down. OVEN - HINTS AND TIPS food. - Page 16 Baking results Possible cause Remedy The cake is too dry. The oven temperature is too Next time set higher oven tempera- low. ture. The baking time is too long. Next time set shorter baking time. The cake bakes unevenly. The oven temperature is too Next time set a longer baking time high and the baking time is and lower oven temperature.
- Page 17 Preheating Food Heat setting Time (min) Shelf position Accessories time (min) Flaky Pastry 30 - 40 Tin on wire shelf Ginger bread 85 - 100 2 square tins on wire shelf Pizza Preheating Food Heat setting Time (min) Shelf position Accessories time (min) Quiche Lor-...
- Page 18 Preheating Food Heat setting Time (min) Shelf position Accessories time (min) Baked Pota- 60 - 90 Tray on wire toes shelf Rice pudding 55 - 70 Tray on wire shelf Large York- 25 - 40 Tray on wire shire Pud- shelf dings Individual...
-
Page 19: Grilling In General
Preheating Food Heat setting Time (min) Shelf position Accessories time (min) Pheasant 65 - 75 Trivet in Grill-/Roast- ing pan Rabbit 120 - 140 Trivet in Grill-/Roast- ing pan GRILLING IN GENERAL • Grill only flat pieces of meat or fish. WARNING! Always grill with the oven door closed. -
Page 20: Information For Test Institutes
Preheating Grilling time Shelf posi- Food Accessories time (min) (min) tion Sausages 20 - 30 Trivet in Grill-/ Roasting pan Steak Rare 10 - 20 Trivet in Grill-/ Roasting pan Steak Medium 15 - 25 Trivet in Grill-/ Roasting pan Steak Well done 20 - 30 Trivet in Grill-/... -
Page 21: Notes On Cleaning
NOTES ON CLEANING Clean the front of the oven with a soft cloth with warm water and a mild detergent. Use a cleaning solution to clean metal surfaces. Clean stains with a mild detergent. Cleaning Agents Clean the cavity after each use. Fat accumulation or other residue may cause fire. Do not store the food in the oven for longer than 20 minutes. -
Page 22: Replacing The Lamp
2. Pull up the trim. 3. Remove the glass panels. To replace the glass panels, do the same steps in reverse. Before you lower the trim, attach the A trim part to the door. Refer to the image. REPLACING THE LAMP WARNING! Risk of electric shock. -
Page 23: Service Data
WHAT TO DO IF... Problem Possible cause Remedy You cannot activate the appli- The appliance is not connected Check if the appliance is cor- ance. to an electrical supply or it is rectly connected to the electri- connected incorrectly. cal supply. You cannot activate the appli- The fuse is blown. -
Page 24: Energy Efficiency
......... Serial number (S.N.) ......... ENERGY EFFICIENCY PRODUCT INFORMATION SHEET ACCORDING TO UK ECODESIGN REGULATION Model identification ZCG43050WA Type of hob Hob inside Freestanding Cooker Number of gas burners Energy efficiency per gas burner Left Front - Rapid 55.0 %... -
Page 25: Environmental Concerns
Top oven: 1.35 kWh/cycle Energy consumption with a standard load, conventional 4.86 MJ/cycle mode Main oven: 1.80 kWh/cycle 6.46 MJ/cycle Number of cavities Heat source Electricity and Gas - Top oven Gas - Main oven Top oven: 36 l Volume Main oven: 83 l Type of oven Oven inside Freestanding Cooker... - Page 28 WWW.ZANUSSI.COM/SHOP...
Need help?
Do you have a question about the ZCG43050WA and is the answer not in the manual?
Questions and answers