Advertisement
Quick Links
Advertisement

Related Manuals for Gram 20KPI 674


Summary of Contents for Gram 20KPI 674
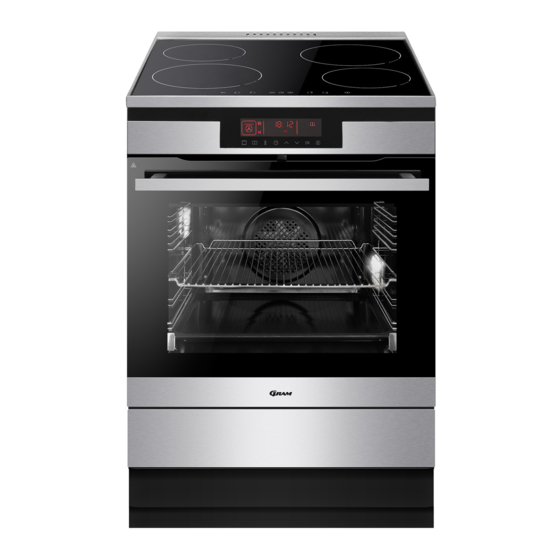
- Page 1 Type 20KPI 674 20KPI 674 X INSTRUCTION MANUAL...
- Page 2 DEAR CUSTOMER, The cooker is exceptionally easy to use and extremely efficient. After reading the instruction manual, operating the cooker will be easy. Before being packaged and leaving the manufacturer, the cooker was thoroughly checked with regard to safety and functionality. Before using the appliance, please read the instruction manual carefully.
-
Page 3: Table Of Contents
TABLE OF CONTENTS Safety instructions ......................4 Description of the appliance ..................... 9 Installation ......................... 12 Operation ........................... 14 Baking in the oven – practical hints ................34 Test dishes..........................37 Cleaning and maintenance ....................39 Technical data ........................45... -
Page 4: Safety Instructions
SAFETY INSTRUCTIONS Warning: The appliance and its accessible parts become hot during use. Care should be taken to avoid touching heating elements. Children less than 8 years of age shall be kept away unless continuously supervised. This appliance can be used by children aged from 8 years and above and persons with reduced physical, sensory or mental capabilities or lack of experience and knowledge if they have been given supervision or instruction concerning... - Page 5 SAFETY INSTRUCTIONS to avoid touching heating elements inside the oven. Warning: Accessible parts may become hot during use. Young children should be kept away. Do not use harsh abrasive cleaners or sharp metal scrapers to clean the oven door glass since they can scratch the sur- face, which may result in shattering of the glass.
- Page 6 SAFETY INSTRUCTIONS Always keep children away from the cooker. While in operation direct contact with the cooker may cause burns! Ensure that small items of household equipment, including connection leads, do not touch the hot oven or the hob as the insulation material of this equipment is usually not resistant to high temperatures.
- Page 7 HOW TO SAVE ENERGY Using energy in a respon- Make use of residual heat from the sible way not only saves oven. money but also helps the If the cooking time is greater than 40 minutes environment. So let’s save switch off the oven 10 minutes before the energy! And this is how you end time.
- Page 8 DISPOSAL OF THE APPLIANCE UNPACKING During transportation, protec- Old appliances should not sim- tive packaging was used to ply be disposed of with normal protect the appliance against household waste, but should any damage. After unpack- be delivered to a collection and ing, please dispose of all recycling centre for electric and elements of packaging in a...
-
Page 9: Description Of The Appliance
DESCRIPTION OF THE APPLIANCE 1 Control Panel 2 On / off switch 3 Oven door handle 4 Drawer... - Page 10 DESCRIPTION OF THE APPLIANCE Booster induction cooking zone (rear right) Booster induction cooking zone (rear left) Booster induction cooking zone(front left) Booster induction cooking zone (front right) Control Panel On/off sensor Higher heat setting selector Cooking zone indicator Lower heat setting selector Cooking zone selection sensor Timer sensor Child lock sensor...
- Page 11 SPECIFICATIONS OF THE APPLIANCE Cooker fittings: Grill grate (drying rack) Baking tray Roasting tray Sideracks...
-
Page 12: Installation
INSTALLATION Mounting the overturning prevention Installing the cooker bracket. The kitchen should be dry and airy and The bracket is mounted to prevent overtur- have effective ventilation according to the ning of the cooker. When the overturning existing technical provisions. prevention bracket is installed, a child who climbs on the oven door will not overturn the ... - Page 13 INSTALLATION Connecting the cooker to the mains Installation must only be carried out by an authorised electrician. This will ensure that the applicable regulations in the “Heavy Current Regulation” are complied with. The installation must comply with any special requirements issued by the local electricity supply company.
-
Page 14: Operation
OPERATION Child safety lock Before first use Oven door features a child safety lock de- • Remove all packaging elements, par- vice that prevents children from opening of ticularly those protecting the interior of the oven chamber during transport. the door. The appliance is supplied by the •... - Page 15 OPERATION Control Panel The Electronic programmer is equipped with an LED display and 8 touch sensors (the sen- sors are not illuminated): Sensors Description Sensors Description On / off switch (Standby mode) Clock setting Oven functions Plus / up [+] Pre-set programmes minus / down [–] Temperature of the setting...
- Page 16 OPERATION Active functions* door is locked for any other reason), the oven will start the cooling and door opening proce- dure before you can set the time. Meat probe connected Set the current time Lighting on When you connect the appliance to the pow- AutoDoor Open (unavailable) er supply, the minutes flash on the dis-...
- Page 17 OPERATION any function is activated. The cooling fan Oven functions operates as long as the oven cavity tem- perature exceeds 80°C. Below this tem- When the appliance is on, touch to access perature, the cooling fan turns off. the oven functions menu – the oven function marked “1”...
- Page 18 OPERATION Pizza √ √ √ √ Roasting √ √ Defrosting √ √ Steam Cleaning* √ Pyrolytic cleaning* √ * depending on model Note: When use do not use any sensors in oven function menu for 10 seconds, the appliance will exit the menu and any unconfirmed settings will be lost. Child Lock When and oven function is active.
- Page 19 OPERATION any sensor to mute the beeping. the display. Touch the sensor again, the display will show the symbol. Now you can: Preview and modify settings during oven operation to set the duration and touch confirm. Touch once to check the temperature inside to adjust the time settings.
- Page 20 OPERATION will hear beeping. Touch any sensor to mute most suitable for a given dish. When the ap- the beeping. When the beeping is muted the pliance is on, touch to access the pre-set appliance enters the operation mode. programmes menu – the pre-set programme “P01”...
- Page 21 OPERATION All pre-set programmes can be freely modi- the active settings are unaffected. For safety fied – you can adjust temperature or duration. reasons, after this time, the oven enters the To do this, follow the relevant instructions standby mode (all settings are cleared). (“Preview and modify settings during oven operation”...
- Page 22 OPERATION Active SmellCatalyst will disappear from the display). • You cannot change the duration of py- The catalyst largely removes the odours rolytic cleaning already in progress. emitted from the oven during baking or • Touch to abort the pyrolytic cleaning. cleaning.
- Page 23 OPERATION Before using the appliance for the first time ● thoroughly clean your induction hob first. The induction hob should be treated with the same care as a glass surface. ● switch on the ventilation in the room or open a window, as the appliance could emit an unpleasant smell during first use.
- Page 24 OPERATION The protective device: If the hob has been installed correctly and is used properly, any protective devices are rarely required. Fan: protects and cools controls and power components. It can operate at two different speeds and is activated automatically. Fan runs until the electronic system has sufficiently cooled down regardless of the appliance or the cooking zones being turned on or off.
- Page 25 OPERATION The high-quality cookware is an essential condition for efficient induction cooking. Select cookware for induction cooking Cookware characteristics. ● Always use high quality cookware, with perfectly flat base. This prevents the formation of local hot spots, where food might stick.Pots and pans with thick steel walls provide superior heat distribution.
- Page 26 OPERATION For induction cooking us only ferromagnetic base materials such as: ●enamelled steel ● cast iron ● special stainless steel cookware designed for induction cooking. Marking of kitchen Check for marking indicating that the cookware cookware is suitable for induction cooking.
- Page 27 OPERATION Control Panel ● Immediately after the appliance is connected to electrical mains, all displays will light up briefly. Your induction hob is then ready for use. ● The induction hob is equipped with electronic touch control sensor fields, which are operated by touching with a finger for at least 1 second.
- Page 28 OPERATION Switch off cooking zones ● A given cooking zone must be active. Heat setting display pulsates. ● To switch off a cooking zone touch the on/off sensor field or touch the sensor (5) for 3 seconds. Switch off the appliance ●...
- Page 29 OPERATION Booster function control Depending on the model, the cooking zones are paired vertically or crosswise. Total power is shared within the paired cooking zones. If you attempt to enable the Booster function for both cooking zones simul- taneously, the maximum power available would be exceeded. In that case the heat setting of the first activated cooking zone will be reduced to the highest level available.
- Page 30 OPERATION Limiting the operating time In order to increase efficiency, the induction Cooking heat Maximum op- hob is fitted with a operating time limiter for setting erating time (hours) each of the cooking zones. The maximum operating time is set according to the last heat setting selected.
- Page 31 OPERATION Timer Timer function makes cooking easier by making it possible to set Duration. It can also be used as a Kitchen Timer. Set the Timer Timer function makes cooking easier by making it possible to set Duration. It can also be used as a Kitchen Timer.
- Page 32 OPERATION Stop the Timer When the set time has elapsed an acoustic signal is sounded, which can be muted by touch- ing any sensor field. If no sensor field is touched, the acoustic signal will stop automatically after 2 minutes. To stop the timer countdown before the set Duration has elapsed: ●...
- Page 33 OPERATION Keeping food warm Keep warm function allows for keeping food warm on a cooking zone. The selected cooking zone operates at a low heat setting. Cooking zone's heat setting is automatically adjusted so that food temperature is kept at a temperature of about 65°C. Thanks to this, ready to serve, warm food retains its taste and does not stick to the pot's bottom.
-
Page 34: Baking In The Oven - Practical Hints
BAKING IN THE OVEN – PRACTICAL HINTS Baking we recommend using the baking trays which were provided with your cooker; it is also possible to bake in cake tins and trays bought elsewhere which should be put on the drying rack; for baking it is better to use black trays which conduct heat better and shorten the baking time;... - Page 35 BAKING IN THE OVEN – PRACTICAL HINTS ECO Heating ECO Heating an optimised heating function designed to save energy when preparing food. You cannot reduce the cooking time by setting a higher temperature; preheating the oven is not recommended. Do not change the temperature setting and do not open the oven door during ...
- Page 36 BAKING IN THE OVEN – PRACTICAL HINTS Oven with automatic air circulation (including a fan and ring heater) Type of Type Temperature ( Level Time dish of heating (min.) Sponge cake 160 - 200 2 - 3 30 - 50 Yeast cake/ 160 - 170 25 - 40...
-
Page 37: Test Dishes
TEST DISHES. According to standard EN 60350-1. Baking Type of dish Accessory Level Type Temperature Baking of heating time (min.) Baking tray 29 - 32 Baking tray 31 - 34 Baking tray 34 - 37 Small cakes 2 + 4 Baking tray 2 - baking tray 40 - 43... - Page 38 TEST DISHES. According to standard EN 60350-1. Grilling Type of dish Accessory Level Type Temperature Time of heating (min.) White bread Wire rack 3 - 7 toast Wire rack + 4 - wire rack roasting tray 1st side 13 - 18 Beef burgers 3 - roasting (to gather...
-
Page 39: Cleaning And Maintenance
CLEANING AND MAINTENANCE Oven By ensuring proper cleaning and mainte- nance of your cooker you can have a sig- nificant influence on the continuing fault-free ● The oven should be cleaned after every operation of your appliance. use. When cleaning the oven the lighting should be switched on to enable you to Before you start cleaning, the cooker must see the surfaces better. - Page 40 CLEANING AND MAINTENANCE The pyrolytic cleaning process: Pyrolytic cleaning • Close the oven door. Oven pyrolytic self-cleaning. The oven heats up to a temperature of about 480°C. Grilling • Follow the instructions in the Pyrolytic or baking residue is burnt into an easy to re- cleaning section.
- Page 41 CLEANING AND MAINTENANCE Replacing the halogen bulb in the oven The runners should be taken out and washed along with the side racks. Before putting Before replacing the halogen bulb, make trays on the telescopic runners they should sure the appliance is disconnected from be pulled out (if the oven is warmed up the the electric mains to avoid a possible runners should be pulled out by hooking the...
- Page 42 CLEANING AND MAINTENANCE Removing the inner panel Door removal 1. Using a cross-head screwdriver undo the screws in the upper door slat (fig. B). In order to obtain easier access to the oven 2. Using a flat screwdriver remove the up- chamber for cleaning, it is possible to remove per door slat, prying it gently on the sides the door.
- Page 43 CLEANING AND MAINTENANCE 3. Pull the inner glass panel from its seat Regular inspections (in the lower section of the door). Important! Risk of damage to glass Besides keeping the cooker clean, you panel mounting. Do not lift the glass should: panel up but pull it out.
- Page 44 call the service centre some minor faults can be fixed by referring to the instructions given in the table below. Before calling the customer support centre or the GRAM service centre check the following points that are presented in the table.
- Page 45 OPERATION IN CASE OF EMERGENCY PROBLEM POSSIBLE CAUSE REMEDY 8.Residual heat indicator - a power outage or the - residual heat indicator will extinguished even though appliance has been discon- be shown again the next the cooking zones are hot nected time the appliance is turned on and off again...
-
Page 46: Technical Data
TECHNICAL DATA Voltage rating 230/400V~50 Hz Power rating max. 11,0 kW Cooker dimensions H/W/D 90 / 60 / 60,5 cm Basic Information: The product meets the requirements of European standards EN 60335- 1; EN60335-2-6. The data on the energy labels of electric ovens is given according to standard EN 60350-1 / IEC 60350-1. - Page 48 Gram A/S Gram A/S Gram A/S Tel.: 22 07 26 30 Tel.: 040 38 08 40 Tel.: 020 7756 350 www.gram.no www.gram.se www.gram.fi Gram A/S Gejlhavegård 2B DK-6000 Kolding +45 73 20 10 00 www.gram.dk IO-CFS-2084 / 8512458 (03.2021 V1)
Need help?
Do you have a question about the 20KPI 674 and is the answer not in the manual?
Questions and answers