
Subscribe to Our Youtube Channel
Related Manuals for Verasys ZEC510


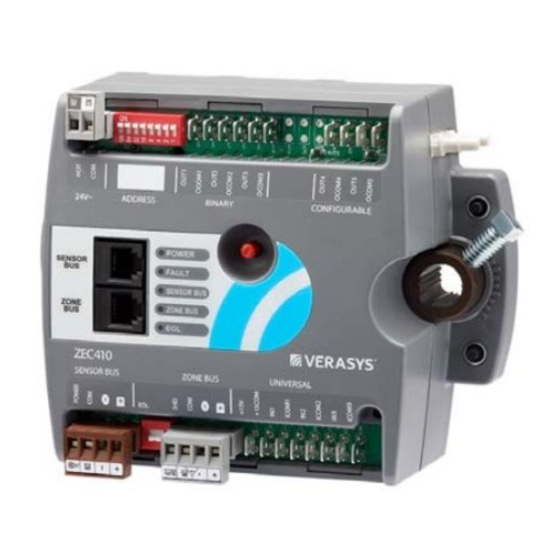
Summary of Contents for Verasys ZEC510
- Page 1 Verasys ZEC510 VAV Controllers Installation Guide LC-ZEC510-3 Building Technologies & Solutions Part No. 24-10143-01485 www.johnsoncontrols.com Rev. B 2021-04-08 *241014301485B* (barcode for factory use only)
- Page 2 Verasys ZEC510 VAV Controllers Installation Guide...
-
Page 3: Table Of Contents
Supply power terminal block........................12 Wiring diagrams..........................13 ZEC510-1 controller - VAV with staged reheat control wiring example..........13 ZEC510-2 controller - VAV with incremental reheat control wiring example........15 ZEC510-3 controller - Multizone unit VAV with proportional reheat control wiring example.............................. - Page 4 North American emissions compliance..................... 31 United States............................31 Canada..............................32 Product warranty............................32 Software terms............................. 32 Single point of contact..........................32 Contact information............................. 33 Verasys ZEC510 VAV Controllers Installation Guide...
-
Page 5: Applications
Accessories for additional sensor information. Use the Verasys Smart Building Hub (SBH) to configure the ZEC510 controller. Use the SBH or the VAV Balancing Thermostat to commission the controller. Important: Use this ZEC510 VAV controller only as an operating control. Where failure or... -
Page 6: Mounting
• Ensure that the mounting surface can support the ZEC510 and any user-supplied enclosure. • Mount the ZEC510 on a hard, even surface. • Use shims or washers to mount the ZEC510 securely and evenly on the mounting surface if necessary. - Page 7 Place the ZEC510 on the actuator shaft so that the wiring connections are easily accessible. Ensure that the ZEC510 base is parallel to the VAV box, perpendicular to the damper shaft. If necessary, use a spacer to offset tipping of the ZEC510 caused by the shaft bushings.
- Page 8 For 45° and 60° boxes, you must provide hard stops at both full-closed and full-open damper positions. If you install the ZEC510 at the full-open position, it provides the open stop for 45° and 60° boxes. The closed damper seal provides the full-closed stop.
-
Page 9: Wiring
Setting the ZEC510 device address. If the ZEC510 is at the end or beginning of the line, set the EOL switch to the ON position. Connect the ZEC510 to 24 VAC, Class 2 power. Verasys ZEC510 VAV Controllers Installation Guide... -
Page 10: Input And Output Terminals
The sensor bus terminal block is a brown, removable, 4-terminal plug that fits only into the brown, board-mounted sensor bus jack. Wire the removable sensor bus terminal block plugs on the ZEC510 and other field devices in a daisy-chain configuration using 4-wire twisted, shielded cable as shown in Figure 3 and Figure 4. -
Page 11: Modular Ports
VZC100. Modular ports The modular sensor and zone bus ports on the front of the ZEC510 are RJ12, six-position, modular jacks. The modular sensor bus ports provide a connection for the VAV Balancing Tool. The zone bus port is not used in ZEC510 installations. The following figure shows the pin number assignments on the modular port. -
Page 12: Supply Power Terminal Block
Figure 8: Supply power terminal block wiring Table 5: Supply power terminal block wiring Supply power terminal block jack Supply power terminal block plug Wires from Johnson Controls 90 VAC to 24 VAC, Class 2, power transformer Verasys ZEC510 VAV Controllers Installation Guide... -
Page 13: Wiring Diagrams
You may damage the controller by sharing power with other devices. Wiring diagrams ZEC510-1 controller - VAV with staged reheat control wiring example Figure 9: ZEC510-1 - flow diagrams Figure 10: ZEC510-1 - controller wiring diagram... - Page 14 Table 6: ZEC510-1 - controller wiring diagram Name on the Verasys user Terminal Number Description interface label Object name Signal type 24 V HOT power transformer 24 V COM power transformer Electric heat safeties Optional. Heating stage command 1 HEATING STAGE...
-
Page 15: Zec510-2 Controller - Vav With Incremental Reheat Control Wiring Example
ZEC510-2 controller - VAV with incremental reheat control wiring example Figure 11: ZEC510-2 - flow diagrams Figure 12: ZEC510-2 - wiring diagram Verasys ZEC510 VAV Controllers Installation Guide... - Page 16 Net sensors, in addition to the 24 VAC power for the controller, you must also supply 24 VAC power the HOT and COM terminals. Piping details for valve configurations See the valve schedule for the specific configuration. Verasys ZEC510 VAV Controllers Installation Guide...
-
Page 17: Zec510-3 Controller - Multizone Unit Vav With Proportional Reheat Control Wiring Example
Figure 13: Piping details ZEC510-3 controller - Multizone unit VAV with proportional reheat control wiring example Figure 14: ZEC510-3 - Flow diagrams Verasys ZEC510 VAV Controllers Installation Guide... - Page 18 Figure 15: ZEC510-3 - Wiring diagram Table 8: ZEC510-3 - Wiring diagram Name on the Verasys user Terminal Number Description interface label Object name Signal type 24 V HOT power transformer 24 V COM power transformer Optional. Supplemental heating SUPPLEMENTAL...
-
Page 19: Zec510 Terminal Functions, Ratings, Requirements, And Wiring Guidelines
ZEC510 terminal functions, ratings, requirements, and wiring guidelines Input and output wiring guidelines Use the following guidelines to wire the ZEC510 inputs and outputs. See Table 9 for more information about the functions, ratings, and requirements for the ZEC510 input and output terminals. - Page 20 • Use shielded cables for all system and zone bus cables. • Refer to the Verasys BACnet MS/TP Communications Technical Bulletin (LIT-12012362) for detailed information about wire size and cable length requirements for the zone bus. Table 9: ZEC510 wiring details...
- Page 21 24~ HOT, see Figure 12. OCOM5 Provides a BO connection for supplemental heating See guideline C in Table 10 Close. Note: This common is isolated from all other commons, so jumper 24~ COM terminal if in use. Verasys ZEC510 VAV Controllers Installation Guide...
- Page 22 1,000 ft maximum 24 VAC power AC input supply 20 VAC to 30 VAC (nominal 24 VAC) 0.8 mm to 1.5 mm(20 AWG to 16 AWG) 2-wire 24 VAC power common Verasys ZEC510 VAV Controllers Installation Guide...
- Page 23 To select wire size and gauge, To determine cable length, see Figure 16. see Figure 16. Use stranded copper wire. Use twisted wire cable. Figure 16: Maximum wire length by current and wire size Verasys ZEC510 VAV Controllers Installation Guide...
-
Page 24: Sequence Of Operation
Note: • One exception to the above staging procedure is if the ZEC510 controls hot water valves and the Control Application Type is set to Incremental. The system assumes that there is an incremental water valve and you can set Dual Max Enable to Enable. This option can provide tighter control of air exiting the box. -
Page 25: Demand Control Ventilation (Optional)
On (closed) Off (open) Off (open) On (closed) On (closed) On (closed) Off (open) Off (open) On (closed) Off (open) On (closed) On (closed) On (closed) Off (open) On (closed) On (closed) On (closed) Verasys ZEC510 VAV Controllers Installation Guide... -
Page 26: Setup And Adjustments
Setup and adjustments Setting the ZEC510 device address Before you apply power or operate the ZEC510, you must set a valid and unique device address for the controller on the bus. Ensure that your system meets the following prerequisite configuration and complete the addressing steps. -
Page 27: Accessories
The controllers do not need to be physically connected on the bus in their numerical device address order. Note: The ZEC510 uses a single 8-way DIP switch to set the address. The switch is binary weighted, so you can set addresses from 4 to 127. The DIP switch block has eight switches numbered 128, 64, 32, 16, 8, 4, 2, and 1. -
Page 28: Troubleshooting
Sensor, Nickel (1k ohm), flange (VAV) mounting style, 4 in. (102 mm) probe length Troubleshooting Use the following information to troubleshoot the ZEC510 controller. Status LEDs The following table provides a description of the LED modes. Verasys ZEC510 VAV Controllers Installation Guide... -
Page 29: Communication Bus Problems
One of the following factors can influence the behavior of the zone communication bus and cause communication problems. Input and output wiring problems If you wire the ZEC510 incorrectly, communication problems can occur. Invalid address The VAV controller must have the address switch set to a range between 4 - 127. -
Page 30: Correcting Physical Communication Bus Problems
• (-) to COM must be within 1.5 VDC to 2.54 VDC • (+) to (-) must be within 0.3 VDC to 1.0 VDC Note: Values can fluctuate due to ongoing communications; this operation is normal when the voltage is within the defined range. Verasys ZEC510 VAV Controllers Installation Guide... -
Page 31: Repair Information
Repair information If the ZEC510 controller fails to operate according to its specifications, replace the unit. For a replacement unit, contact the nearest Verasys representative. Technical specifications Table 17: ZEC510 VAV Controller technical specifications LC-ZEC510-x Product code number Power supply requirement 20 VAC to 30 VAC at 50 Hz to 60 Hz, Class 2 power supply or safety... -
Page 32: Canada
NA/SA JOHNSON CONTROLS JOHNSON CONTROLS JOHNSON CONTROLS C/O CONTROLS PRODUCT MANAGEMENT WESTENDHOF 3 507 E MICHIGAN ST NO. 32 CHANGJIJANG RD NEW DISTRICT 45143 ESSEN MILWAUKEE WI 53202 WUXI JIANGSU PROVINCE 214028 GERMANY CHINA Verasys ZEC510 VAV Controllers Installation Guide... -
Page 33: Contact Information
Contact information Contact your local branch office: www.johnsoncontrols.com/locations Contact Johnson Controls: www.johnsoncontrols.com/contact-us Verasys ZEC510 VAV Controllers Installation Guide... - Page 34 © 2021 Johnson Controls. All rights reserved. All specifications and other information shown were current as of document revision and are subject to change without notice.
Need help?
Do you have a question about the ZEC510 and is the answer not in the manual?
Questions and answers