Table of Contents
Advertisement
Quick Links
Advertisement
Table of Contents

Related Manuals for Eaton ET5040


Summary of Contents for Eaton ET5040
-
Page 2: Table Of Contents
Tooling editor Product/operational updates User input crimp database Machine settings Calibration procedure Maintenance ET5040 dies and kits Standard die part numbers Large bore die part numbers 430 “U” series die part numbers Accessories EATON ET5040 Operator´s Manual E-EQCR-TT002-E1 July 2015... -
Page 3: Safety Instructions
The use of Eaton fittings on hose supplied by other manufacturers and/or the use of Eaton hose with Please note that ET5040 is not a field serviceable machine. fittings supplied by other manufacturers may result in the For issues beyond the preventive maintenance described production of unreliable and unsafe hose assemblies and below, customers are instructed to contact Eaton. -
Page 4: Safety Decal Explanations
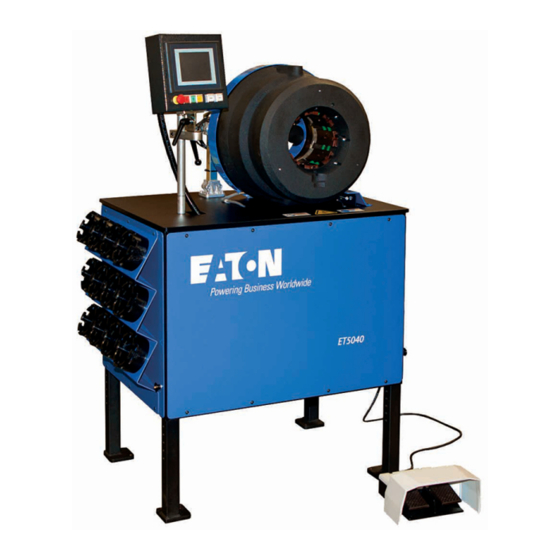
Legs fully extended: 52" (1321 mm) high Legs fully retracted: 36" (914 mm) high (center line of crimp head) Note: Minimum of 36" of perimeter clearance is recommended for safety and maintenance. 25” 36” EATON ET5040 Operator´s Manual E-EQCR-TT002-E1 July 2015... -
Page 5: Specifications
7 . Confirm all legs are evenly extended and the ball detent pins Figure 1 are secured before lowering the machine with the forklift. Caution Never get underneath the machine and keep the load low during transport. EATON ET5040 Operator´s Manual E-EQCR-TT002-E1 July 2015... -
Page 6: Filling Hydraulic Fluid Reservoir
4. Upon completion, leave the crimp head in the fully retracted position. Note: Always cycle the hydraulic system under a no load condition after filling or changing the hydraulic oil before use. Figure 5 EATON ET5040 Operator´s Manual E-EQCR-TT002-E1 July 2015... -
Page 7: Control Symbols Overview
Crimp tooling diameter. (Size) Displays current tooling Offset to crimp target. Select the number of pieces position. to be produced. (Manual operation only) Target is the die change position. EATON ET5040 Operator´s Manual E-EQCR-TT002-E1 July 2015... -
Page 8: Tooling - Installation (Qdc)
No space should be visible between the dies and base gradually jog - close the crimp head while confirming all dies. Then press the check button to acknowledge installation eight pins are aligned. of correct tooling for application. EATON ET5040 Operator´s Manual E-EQCR-TT002-E1 July 2015... -
Page 9: Tooling - Removal (Qdc)
Place the crimp dies into the storage rack, rotate the QDC to die holding pins have completely disengaged from the the left, (counter clockwise) this locks the die segments into intermediate dies. the storage rack. EATON ET5040 Operator´s Manual E-EQCR-TT002-E1 July 2015... -
Page 10: Tooling - Installation/Removal (Die-Key)
Attention: Always insert a full set of matching dies. Attention: When crimping with base dies only, the uncrimped coupling diameter cannot exceed crimp range (6"/160mm). EATON ET5040 Operator´s Manual E-EQCR-TT002-E1 July 2015... -
Page 11: Operating Instructions Crimp Selections - Auto Mode
B. Touch filter box on the left, key pad will pop up, type in Weatherhead • desired hose series and press check mark. Synflex • Note: Favorites icon provides direct selection of commonly used crimp selections. EATON ET5040 Operator´s Manual E-EQCR-TT002-E1 July 2015... - Page 12 Eaton PowerSource for compatibility. If crimp specifications and die part number information is available for hose series and hose dash size on PowerSource for ET5040, please use manual mode (page 16) to perform the crimping operation. Step 7...
- Page 13 (See figure 24). the crimp tooling or you can press the retract foot pedal. (See figure 25). EATON ET5040 Operator´s Manual E-EQCR-TT002-E1 July 2015...
- Page 14 Note: Product assembly information is displayed in box on right side of screen. Additional information (Such as photos, See figure 28 & 29) are available by pressing the question mark icon. (See figure 27). EATON ET5040 Operator´s Manual E-EQCR-TT002-E1 July 2015...
- Page 15 Opening Diameter. The tool Displays product Returns you to Home Displays the next screen. automatically retracts to information. screen. set opening diameter after crimp when green icon is displayed. (Touch to set). Current Tooling Position EATON ET5040 Operator´s Manual E-EQCR-TT002-E1 July 2015...
-
Page 16: Operating Instructions Crimp Selections - Manual Operation
Manual Operation Screen is shown in figure 31. To save manually entered crimp specification, press the save See explanation of all icon on page 18. data to user input database icon. (See figure 32). EATON ET5040 Operator´s Manual E-EQCR-TT002-E1 July 2015... - Page 17 4.75" (120 mm) Note: Optional back stop aids in positioning the hose and fitting between the crimp tooling and your hands during the assembly before crimping. (See figure 35). crimping process. EATON ET5040 Operator´s Manual E-EQCR-TT002-E1 July 2015...
- Page 18 Select number of pieces to Displays total number of Displays current position of crimp. pieces crimped so far. crimp tooling/pressure of crimp. Note: Not required to crimp. “0” selection will allow unlimited crimps. EATON ET5040 Operator´s Manual E-EQCR-TT002-E1 July 2015...
-
Page 19: Adjusting The Switching Point Of The Crimp Machine
10. If achieved crimp is larger or smaller than acceptable range, enter the needed numerical correction in the offset field (+/-). 11. Save the crimp setting under a user specified name (if desired). EATON ET5040 Operator´s Manual E-EQCR-TT002-E1 July 2015... -
Page 20: Settings Menus
(See figure 35). Language Select desired language by selecting “Flag” icon. (See figure 38). Displays the language selected. (See figure 36) Press forward arrows to display the next “Settings Menu” . Figure 38 EATON ET5040 Operator´s Manual E-EQCR-TT002-E1 July 2015... -
Page 21: Display Units Of Measurement
“MM” or “Inches” . Software version Return to previous setting (Back) Proceed to next setting (Forward) Figure 40 Settings screen displays current software version loaded. (See figure 40). No user adjustment or selection is needed. EATON ET5040 Operator´s Manual E-EQCR-TT002-E1 July 2015... -
Page 22: User Administration
(Administrator or the list, if available. Set-up staff). Selects the previous user. Adds user to the list. Delete a user from the list. Displays the previous screen. Displays the next screen. Exits settings menu. EATON ET5040 Operator´s Manual E-EQCR-TT002-E1 July 2015... -
Page 23: Tooling Editor
#4 Tooling editor Note: When the machine is delivered, the tooling editor contains all of the Eaton die sets. Remove the dies not purchased with the machine to direct the machine to the available dies. (See figure 42). Figure 42 Dies displayed by nominal size. -
Page 24: Product/Operational Updates
Select the press the download icon. and machine to machine check mark to acknowledge. (See figure 43 & 44). transfer. If no updates are being loaded, step to next setting field via. EATON ET5040 Operator´s Manual E-EQCR-TT002-E1 July 2015... -
Page 25: User Input Crimp Database
Review user input database and related crimp specifications. (See figure 45). Delete any unneeded specifications. Displays the previous setting Displays the next setting Delete the highlighted Exit the settings menu. (back). (forward). specification. EATON ET5040 Operator´s Manual E-EQCR-TT002-E1 July 2015... -
Page 26: Machine Settings
No user adjustment. after crimping. (Power saver machine cycles (life of the machine. No user function). Adjustable by machine). adjustment. customer. Displays the previous setting Displays the next setting Exit settings menu. (back). (forward). EATON ET5040 Operator´s Manual E-EQCR-TT002-E1 July 2015... -
Page 27: Calibration Procedure
(See figure 51). Fully retract head (See figure 50). and remove calibration tool and press the enter button. Retract Advance Keep Hands Clear. EATON ET5040 Operator´s Manual E-EQCR-TT002-E1 July 2015... -
Page 28: Maintenance
Warning Warning Failure to follow Eaton process and product instructions and Please note that ET5040 is not a field serviceable machine. Power down the machine and lock out the main breaker prior For issues beyond the preventive maintenance described to performing maintenance. Appropriate safety gear such as below, customers are instructed to contact Eaton. -
Page 29: Et5040 Dies And Kits
82,0 3.23 79,0 3.11 88,0 3.46 *Included in the ET5040-0023 standard die kit. ††Supplied with all ET5040 crimp machines and required for calibration. Require ET5040C-0001 adapter die. Each set includes 8 individual dies. EATON ET5040 Operator´s Manual E-EQCR-TT002-E1 July 2015... -
Page 30: Large Bore Die Part Numbers
ET5040 dies and kits continued Note: Please note that ET5040 shares dies crimp components and accessories with the ET5040. ET5040C-0001 adapter dies Eaton adapter dies are supplied with all ET5040 base machines and are required for use with Eaton standard ET5040DC style dies. -
Page 31: 430 "U" Series Die Part Numbers
ET5040 dies and kits continued Note: Please note that ET5040 shares dies crimp components and accessories with the ET5040. 430 “U” series die part numbers Capable of crimping Weatherhead 430 "U" series fittings ranging from -08 (1/2") through -32 (2"). -
Page 32: Accessories
Calibration tool simplifies the improved visibility in low light dies. (See figure 56). calibration process to ensure the conditions. (See figure 55). ET5040 crimp machine is achieving consistent and accurate crimp diameters. (See figure 57). EATON ET5040 Operator´s Manual E-EQCR-TT002-E1 July 2015... - Page 33 (See figure 58). viewing angles to assist in correct die change out capability for all alignment of crimp position. standard, and 430"U" style dies. (See figure 59). (See figure 60). EATON ET5040 Operator´s Manual E-EQCR-TT002-E1 July 2015...
- Page 34 EATON ET5040 Operator´s Manual E-EQCR-TT002-E1 July 2015...
- Page 35 EATON ET5040 Operator´s Manual E-EQCR-TT002-E1 July 2015...
- Page 36 Shanghai 200335 Fax: 952-294-7722 Fax: +41 (0) 21 811 4601 China Tel: (+86 21) 5200 0099 Fax: (+86 21) 2230 7240 © 2015 Eaton Assembly Equipment All Rights Reserved Technical Support | Service | Spare Parts Printed in USA www.EatonCrimperSupport.com Document No.
Need help?
Do you have a question about the ET5040 and is the answer not in the manual?
Questions and answers