Garmin GNS 530 Quick Reference
Garmin gns 530: quick reference
Hide thumbs
Also See for GNS 530:
- Pilot's manual & reference (289 pages) ,
- Pilot's manual and reference (282 pages) ,
- Installation manual (115 pages)
Table of Contents
Advertisement
Quick Links
Advertisement
Table of Contents

Related Manuals for Garmin GNS 530


Summary of Contents for Garmin GNS 530
- Page 1 GNS 530 Quick Reference...
-
Page 2: Left-Hand Keys And Knobs
The enter key is used to approve an operation or complete data entry. It is also used to confirm information, such as the Database Page during power on. The large right knob (GPS) is used to select between the various page groups: NAV, WPT, AUX or NRST. With the on-screen cursor enabled, the large right knob allows you to move the cursor about the page. - Page 3 Press ENT to acknowledge the Database Confirmation Page and proceed to the Instrument Panel Self-Test Page. 4. The Instrument Panel Self-Test Page allows you to verify that the GNS 530 is communicating properly with in-panel instruments. Compare on-screen indications with the information depicted on connected instruments, such as CDI, HSI, RMI and/or external annunciators.
-
Page 4: Frequency Selection
Each unique screen of information is referred to as a “page”. Pages are typically selected using the small and large right knobs—with the cursor removed from the GPS window. See page 5 for arrangement of the GNS 530’s main pages. Cursors There are two separate cursors: a tuning cursor and a GPS window cursor. -
Page 5: Aux Group
Nearest NDB Selection of any main page is performed using the large and small right knobs. When the GPS window cursor is off, the large right knob selects the page group: NAV, WPT, AUX or NRST. The small right knob selects the desired page within a group. To quickly select the Default NAV Page, press and hold CLR. - Page 6 As you spell the facility name or city, the GNS 530’s Spell’N’Find feature will select the first entry in the database based upon the characters you have entered up to that point.
- Page 7 4. Use the small and large right knobs to enter the facility name or city location of the desired airport. As you spell the facility name or city, the GNS 530’s Spell’N’Find feature will select the first entry in the database based upon the characters you have entered up to that point.
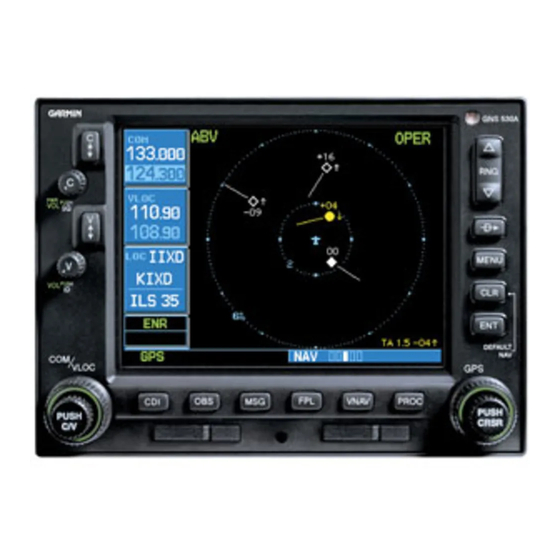
- Page 8 Default NAV Page Active Leg of Flight Plan, or Direct-to Destination To/From Flag The following symbols are used —directly above the graphic CDI—to depict the “active leg” of a flight plan or direct-to: Course to a Waypoint, or Desired Course between Two Waypoints Direct-To a Waypoint Left Procedure Turn DME Arc to the left...
- Page 9 Map Page Map Display Map Scale The following symbols are used to depict the various airports and navaids on the Map Page: Airport with Hard surface runway(s); Primary runway shown Airport with Soft surface runway(s) only Private Airfield VOR/DME Localizer To Select a Map Scale 1.
- Page 10 Integrity Failure (INTEG) or Position Frequency Warning (WARN) Annunciator (RAIM protection limit failure) Navigation Source: GPS or VLOC CDI/RAIM Mode: Approach (APR), Terminal (TERM), Enroute (ENR) or “0.30” (for VOR or localizer-based approaches) Message Annunciator: Flashing (new message), On, or blank (no message)
- Page 11 To View a List of the Nearest Airports 1. From any page, press and hold CLR to select the Default NAV Page. (You may skip this step if you are already viewing any of the main pages.) 2. Rotate the large right knob to select the NRST page group.
- Page 12 To Create a New Flight Plan 1. Press FPL and rotate the small right knob to display the Flight Plan Catalog. 2. Press MENU to display the Flight Plan Catalog Options. 3. Rotate the large right knob to highlight “Create New Flight Plan?” and press ENT.
- Page 13 To confirm this reminder, highlight “Yes?” and press ENT. Not all approaches in the database are approved for GPS use. As you select an approach, a “GPS” designation to the right of the procedure name indicates the procedure can be flown using the GPS receiver. Some procedures will not have this designation, meaning the GPS receiver may be used for supplemental navigation guidance only.
-
Page 14: Activating An Approach
Keep the following guidelines in mind while flying the approach: • The GNS 530 is designed to complement your printed approach plates and vastly improve situational awareness throughout the approach. However, you must always fly an approach as it appears on the approach plate •... -
Page 15: Flying The Missed Approach
30° of the inbound course). This allows you to use standard timing (typically one minute) to fly the inbound and outbound legs of the hold. 4. The GNS 530 will provide course guidance only on the inbound side of the holding pattern. When leaving the holding pattern to re-fly the approach (or another approach) press the PROC key to “Select Approach?”... - Page 16 © 2001 GARMIN Corporation GARMIN International, Inc. 1200 East 151 Street, Olathe, Kansas 66062, U.S.A. GARMIN (Europe) Ltd. Unit 5, The Quadrangle, Abbey Park Industrial Estate, Romsey, SO51 9AQ, U.K. GARMIN Corporation No. 68, Jangshu 2 Road, Shijr, Taipei County, Taiwan www.garmin.com...
Need help?
Do you have a question about the GNS 530 and is the answer not in the manual?
Questions and answers