Table of Contents
Advertisement
Quick Links
readings.
Do not expose the receiver or transmitter to direct heat or surface.
Do not use stainless steel probe in microwave oven.
Cleaning
Always wear heat resistant glove to touch the stainless steel probe sensor or
wire during or just after cooking. Do not touch with bare hands.
Keep the stainless steel probe sensor and wire away from children.
Wash the metal probe tip with hot soapy water and dry thoroughly. Do not
immerse the probe in water while cleaning.
Wipe the transmitter and receiver with damp cloth. Do not immerse either in
water.
FCC Statement
1. This device complies with Part 15 of the FCC Rules. Operation is subject to
following two conditions:
(1) This device may not cause harmful interference.
(2) This device must accept any interference received, including interference
that may cause undesired operation.
2. Changes or modifications not expressly approved by the party responsible
for compliance could void the user's authority to operate the equipment.
LIMITED 90 DAYS WARRANTY
ThermoPro warrants this product to be free of defects in parts, materials and
workmanship for a period of 90 days, from date of purchase.
Should any repairs or servicing under this warranty be required, contact Customer
Service by phone or email for instructions on how to pack and ship the product
to ThermoPro.
This warranty gives you specific legal rights and you may also have other rights
which vary from state to state.
CUSTOMER SERVICE
Telephone: 1-877-515-7797 (US&CA only)
Email: service@buythermopro.com
Hours: Weekdays 9:00 AM- 5:00 PM EST
-8-
EN
Introduction
Congratulations on your purchase of the Professional Remote Cooking Thermometer,
a programmable radio frequency food thermometer. You will now be able to remotely
monitor the time and temperature of food cooking on your grill, smoker or oven.
Components
1. 1 - receiver unit.
2. 1 - transmitter unit.
3. 1 - detachable stainless steel probe sensor.
4. 2 - 2*AAA batteries.
the
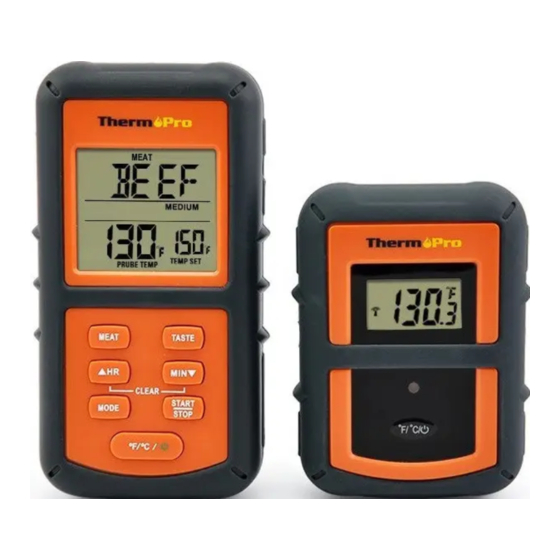
Receiver Features
MEAT
HR
MODE
LCD (Liquid Crystal Display) – Displays all icons, temperature and timer. The
backlight will flash Blue once the temperature increases by 10 ºF from when
cooking starts, then it will change to Green when the temperature is within
15 ºF of the set temperature and then it will turn Red when it reaches the set
temperature. See LCD diagram for detailed information.
Belt Clip/Stand – Battery compartment clip allows you to be mobile. Clip the
receiver unit to belt. Swings out and allow you to stand the receiver on tabletop
as well.
Battery compartment – Holds 2 AAA batteries.
Remote Food Thermometer
Model No. TP-07
LCD dlsplay
Battery
Compartment
Soft rubber sleeve
Belt Clip
TASTE
MIN
START/STOP
ºF/ºC/
-1-
Advertisement
Table of Contents

Related Manuals for ThermoPro TP-07


Summary of Contents for ThermoPro TP-07
- Page 1 Soft rubber sleeve Belt Clip LIMITED 90 DAYS WARRANTY MEAT TASTE ThermoPro warrants this product to be free of defects in parts, materials and workmanship for a period of 90 days, from date of purchase. MODE START/STOP ºF/ºC/ Should any repairs or servicing under this warranty be required, contact Customer Service by phone or email for instructions on how to pack and ship the product to ThermoPro.
- Page 2 Buttons Transmitter Features 1. MODE – Press to select thermometer or timer mode. Press and hold for 2 seconds to enter Synchronization/Pairing mode. Wire Stand Soft rubber sleeve 2. HR – In timer mode, press once to set hour. Press and hold for 2 seconds, the hours will increase by 10 hours per second.
- Page 3 Option 1: Measure meat temperature to USDA doneness temperature range a. Insert the stainless steel probe into the plug in of the transmitter. b. Open the battery compartment of transmitter and insert two “AAA” batteries. The 1. Press MODE to select thermometer mode. The upper display will show a small transmitter will show the current temperature on its LCD display and automatically MEAT and a meat type such as BEEF.
- Page 4 closed cover or under the cover. The transmitter is not waterproof. DO NOT use in 4. Press HR & MIN buttons together to clear the setting back to 0:00. the rain. Note: The minimum setting for the timer is 1 minute. When the timer counts down 7.
Need help?
Do you have a question about the TP-07 and is the answer not in the manual?
Questions and answers