Advertisement
Quick Links
Before using this product please read the instructions carefully.
After reading the instruction manual, please keep it for reference.
Table of Contents
Caution
・・・・・・・・・・・・・・・・・・・・・・・・・・・・・・・・・・・・・・・・・・・・・・・・・・・・・・・・・・・
Included
・・・・・・・・・・・・・・・・・・・・・・・・・・・・・・・・・・・・・・・・・・・・・・・・・・・・・・・・・
Platform
・・・・・・・・・・・・・・・・・・・・・・・・・・・・・・・・・・・・・・・・・・・・・・・・・・・・・・・・・・
Layout
・・・・・・・・・・・・・・・・・・・・・・・・・・・・・・・・・・・・・・・・・・・・・・・・・・・・・・・・・・・・
How to Connect
Motion Aim Function
・What is Motion Aim?
・How to set up Motion Aim
・Motion Aim Sensitivity
・Quick Motion Aim
Adjustable analog stick sensitivity
・Snipe Mode
・Quick Mode
Turbo Functions
・How to use the Turbo Functions
・How to change Turbo Speed
・Quick Turbo
Assign Mode
Headphone/Mic Jack
Volume Controls
Mic On/Off
Download App
Main Features
Instruction Manual
Thank you for purchasing this product.
・・・・・・・・・・・・・・・・・・・・・・・・・・・・・・・・・・・・・・・・・・・・・・・・
・・・・・・・・・・・・・・・・・・・・・・・・・・・・・・・・・・・・・・・・・
・・・・・・・・・・・・・・・・・・・・・・・・・・・・・・・・・・・・・・・・・・・・・・
・・・・・・・・・・・・・・・・・・・・・・・・・・・・・・・・・・・・・・・・・・・・・・
・・・・・・・・・・・・・・・・・・・・・・・・・・・・・・・・・・・・・・・・・・・・・・
・・・・・・・・・・・・・・・・・・・・・・・・・・・・・・・・・・・・・・・・・・・・・
・・・・・・・・・・・・・・・・・・・・・・・・・・・・・・・・・・・・・・・・・・・・・・・・・・・
・・・・・・・・・・・・・・・・・・・・・・・・・・・・・・・・・・・・・・・・
・・・・・・・・・・・・・・・・・・・・・・・・・・・・・・・・・・・・・・・・・・・・・・
・・・・・・・・・・・・・・・・・・・・・・・・・・・・・・・・・・・・・・・・・・・・・・・・・・・・・
・・・・・・・・・・・・・・・・・・・・・・・・・・・・・・・・・・・・・・・・・・・・・・・・・
・・・・・・・・・・・・・・・・・・・・・・・・・・・・・・・・・・・・・・・・・・・・・・・・・
・・・・・・・・・・・・・・・・・・・・・・・・・・・・・・・・・・・
・・・・・・・・・・・・・・・・・・・・・・・・・・・・
・・・・・・・・・・・・・・・・・・・・・・・・・・・・・・・・・
・・・・・・・・・・・・・・・・・・・・・・・・・・・・・・・・・・・・・・・
・・・・・・・・・・・・・・・・・・・・・・・・
・・・・・・・・・・・・・・・・・・・・・
・・・・・・・・・・・・・・・・・・・
2
3
3
4
5
6
6
7
8
9
12
12
13
14
14
15
15
16
18
18
19
19
19
1
Advertisement

Related Manuals for HORI NSW-326


Summary of Contents for HORI NSW-326
- Page 1 Instruction Manual Thank you for purchasing this product. Before using this product please read the instructions carefully. After reading the instruction manual, please keep it for reference. Table of Contents Caution ・・・・・・・・・・・・・・・・・・・・・・・・・・・・・・・・・・・・・・・・・・・・・・・・・・・・・・・・・・・ Included ・・・・・・・・・・・・・・・・・・・・・・・・・・・・・・・・・・・・・・・・・・・・・・・・・・・・・・・・・ Platform ・・・・・・・・・・・・・・・・・・・・・・・・・・・・・・・・・・・・・・・・・・・・・・・・・・・・・・・・・・ Layout ・・・・・・・・・・・・・・・・・・・・・・・・・・・・・・・・・・・・・・・・・・・・・・・・・・・・・・・・・・・・ How to Connect ・・・・・・・・・・・・・・・・・・・・・・・・・・・・・・・・・・・・・・・・・・・・・・・・ Motion Aim Function ・・・・・・・・・・・・・・・・・・・・・・・・・・・・・・・・・・・・・・・・・ ・What is Motion Aim? ・・・・・・・・・・・・・・・・・・・・・・・・・・・・・・・・・・・ ・How to set up Motion Aim ・・・・・・・・・・・・・・・・・・・・・・・・・・・・ ・Motion Aim Sensitivity ・・・・・・・・・・・・・・・・・・・・・・・・・・・・・・・・・ ・Quick Motion Aim ・・・・・・・・・・・・・・・・・・・・・・・・・・・・・・・・・・・・・・・ Adjustable analog stick sensitivity ・・・・・・・・・・・・・・・・・・・・・ ・Snipe Mode ・・・・・・・・・・・・・・・・・・・・・・・・・・・・・・・・・・・・・・・・・・・・・・ ・Quick Mode ・・・・・・・・・・・・・・・・・・・・・・・・・・・・・・・・・・・・・・・・・・・・・・ Turbo Functions ・・・・・・・・・・・・・・・・・・・・・・・・・・・・・・・・・・・・・・・・・・・・・・ ・How to use the Turbo Functions ・・・・・・・・・・・・・・・・・・・ ・How to change Turbo Speed ・・・・・・・・・・・・・・・・・・・・・・・・ ・Quick Turbo ・・・・・・・・・・・・・・・・・・・・・・・・・・・・・・・・・・・・・・・・・・・・・ Assign Mode ・・・・・・・・・・・・・・・・・・・・・・・・・・・・・・・・・・・・・・・・・・・・・・・・・・・...
- Page 2 Caution * Please check that your Nintendo Switch™ is updated to the latest system firmware. * This product does not support the following features. ・Gyroscope ・Accelerometer・IR Motion Camera・Player LED・HD Rumble ・HOME Button Notification LED・NFC Parents/Guardians: Caution Please read the following information carefully. ● This product contains small parts. Keep away from children under 3 years old. ● Keep this product away from small children or infants. Seek medical attention immediately if any small parts are swallowed. ● Long cord. Strangulation hazard. ● Keep the product away from dusty or humid areas. ● Do not use this product if it has been damaged or modified. ● Do not get this product wet. This may cause an electric shock or malfunction. ● Do not place this product near heat sources or leave under direct sunlight for an extended period. Overheating may cause malfunction. ● Do not touch the metal parts of the USB plug. ● Do not apply strong impact or weight on the product. ● Do not pull roughly or bend the cable of the product. ● Do not disassemble, modify or attempt to repair this product. ● If product needs cleaning, use only a soft dry cloth. Do not use any chemical agents like benzene or thinner. ● Do not use this product for anything other than its intended purpose. We are not responsible for any accidents or damages in the event of use other than the intended purpose.
- Page 3 Included Controller ×1 Platform Nintendo Switch Before using this product with the Nintendo Switch, please read Important the following instructions carefully. Please check that your Nintendo Switch™ is updated to the latest system firmware. * An internet connection is required to update the Nintendo Switch™ system firmware. * A PC and internet connection is required to download and use the companion app. PC (XInput) Windows Supported OS ® XInput Input Standard USB Port(Type-A), Internet Connection System requirements * Functions as PC controller through XInput. This product does not support DirectInput. Compatible Headsets The headphone jack cannot be used when using this product with a PC. Nintendo Switch...
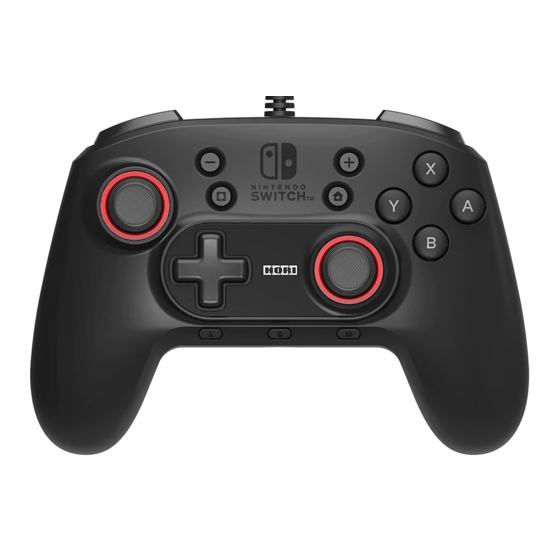
- Page 4 Layout USB Connector USB Cable + Button −Button Capture Button Home Button X Button Left Analog Stick A Button (Functions as the Left Analog Stick B Button Button when Y Button pressed down.) Right Analog Stick D-Pad (Functions as the Right Analog Stick Turbo Button Button when pressed down.) Mic On/Off Button Function Button Turbo LED Motion Aim LED Mic Mute LED Function LED ZL Button ZR Button L Button R Button Headphone/Mic Jack Motion Aim Switch FR Button FL Button (Quick Button) (Snipe Button)...
- Page 5 How to Connect Insert the USB connector of the controller to the USB port of the Nintendo Switch Dock. To Nintendo Switch Dock USB port * Do not touch the Left Analog Stick / Right Analog Stick or any other button when connecting the USB plug. In-game settings The Motion Aim function is different from the gyro sensor / acceleration sensor on the Joy-Con™ and Nintendo Switch Pro controller. This product may not operate properly if the gyro setting in game is turned ON. Turn OFF the gyro setting in game before using this product with a game that supports the gyro function. Operation Settings Operating the Gyro * Image for illustrative purposes only.
- Page 6 Motion Aim 〇 What is Motion Aim? Motion Aim allows the Right Analog Stick input to be controlled by tilting the controller. Use the Motion Aim function to fine tune precise aiming and movements. * The Motion Aim function is different from the gyro sensor/ acceleration sensor on the Joy-Con™ and Nintendo Switch Pro controller. * It is possible to assign functions to the Left Analog Stick by using the companion App. Go to the next page for set up instructions.
- Page 7 【Motion Aim Function Settings】 There are two modes for Motion Aim control. One is for tilting left or right when the controller is held vertically, the other is for tilting left and right when the controller is held horizontally. Position of the Motion Aim LED Status Settings Switch Motion Aim Function ① Motion Aim LED Up & Down Left & Right (Blue) Right Stick Right Stick LED On Motion Aim Function ② Left & Right Right Stick LED On The up and down motions are operated the same in both modes, by tilting the controller forward and backward. Disable the Motion Aim function. LED Off *1 The Motion Aim LED (blue) will be lit when in use.
- Page 8 ◆ Motion Aim Sensitivity Motion Aim sensitivity can be adjusted to three levels. * By default, the Motion Aim sensitivity is set to Level 2 (Normal). Fast Level 3 (Quick Mode) Sensitivity Level 3 Sensitivity Level 2 (Quick Mode) Highest sensitivity (Normal Mode) Effective for quick aiming and movements, such as for short-range aiming. Level 2 (Normal) Sensitivity Level 1 Input (Snipe Mode) This is the default sensitivity. Level 1 (Snipe Mode) Lowest sensitivity. Allows precise aiming and movement for long Controller Tilt range aiming. Slow Operation LED Status Settings Function LED Motion Aim LED Start Settings (Red) (Blue) ① * While setting functions, all buttons on the controller Push and hold will not respond. for 3 Seconds Slow Blinking LED Off Move the Left Analog Stick up or down to ...
- Page 9 Quick Motion Aim Function If one of the butons is set as Quick Motion Aim, the Motion Aim Function will be active during that button usage even if the Motion Aim Function is turned off. * The Motion Aim Function and Quick Motion Aim Function cannot be used simultaneously. While pressing Configurable Buttons L Button / R Button / ZL Button / ZR Button / FL Button / FR Button * If you set the Quick Motion Aim Function on a button, the button will be used in combination with the original function. If you want to use only the Quick Motion Aim Function with the set button and not the original function, use the Assign function (p. 16) to assign the original function to NC (button does not respond). * The Quick Motion Aim Function cannot be set to multiple buttons. Quick Motion Aim Function will be set only to the last selected button. See the following page for set up instructions.
- Page 10 【How to set up Quick Motion Aim】 Operation LED Status Settings Function LED Motion Aim LED (red) (Blue) ① Disable the Motion Aim function. Motion Aim Switch OFF LED Off LED Off Start Settings ② * When setting Motion Aim sensitivity, all buttons on Push and hold the controller will not Slow LED Off for 3 Seconds respond. Blinking There are two modes for Motion Aim control. One is for tilting left or right when the controller is held vertically, the other is for tilting left and right when the controller is held horizontally. Left & Right Up & Down Right Stick Press Again Slow Slow Blinking Blinking Right Stick ③ Left & Right Right Stick The up and down ...
- Page 11 【How to Disable the Quick Motion Aim Function】 Operation LED Status Settings Function LED Motion Aim LED The Quick Motion Aim (Red) (Blue) ① Function is set to one of the buttons. Motion Aim Switch LED On LED On OFF ② Push and hold Slow LED Off for 3 Seconds Blinking Start Settings * While setting functions, all buttons on the controller will not respond. ③ Slow Slow Press Again Blinking Blinking Press the button that is assigned as the ④ Quick Motion Aim Function. Settings complete LED Off LED Off Press the HOME button. *1 The Quick Motion Aim Function can only be disabled when the Motion Aim Switch is OFF.
- Page 12 Adjustable analog stick sensitivity Snipe Mode While pressing the FL Button (Snipe Button), the sensitivity of the Right Analog Stick will decrease. This is useful for precise long-range aiming or making precise movements. * While pressing the Snipe Button, even if the Right Analog Stick is titled to the max, the controller will not input more than the set sensitivity. * It is possible to assign functions to the Left Analog Stick by using the companion App. Default Image: Long-Range Aiming When using Snipe Mode Input Only while the FL Button Right Stick Tilt (Snipe Button) is pushed ◆ Snipe Mode Sensitivity Adjust the sensitivity of the Right Analog Stick by pressing the FL Button (Snipe Button) and selecting one of the three levels listed below. * By default, the sensitivity is set to Level 2. Stick Sensitivity Level 3 Fast Default (Max. Output 100%) (Max. Output 85%) Sensitivity Level 3 Slightly lowered sensitivity. (Max. Output 85%) Sensitivity Level 2 (Max. Output 70%) Stick Sensitivity Level 2 Sensitivity Level 1 Input (Max. Output 70%) (Max. Output 50%) Moderately lowered sensitivity. This sensitivity level is set by default. Stick Sensitivity Level 1 Right Stick Tilt (Max. Output 50%) Slow...
- Page 13 Operation LED Status Settings Turbo LED Function LED Start Settings (Green) (Red) ① * While setting functions, all buttons on the Push and hold controller will not for 3 Seconds respond. LED Off Slow Blinking Move the Right Analog Stick up or down to change the sensitivity by one level. Stick Sensitivity 3 (Max Input 85%) 3 Blinks Slow Blinking ② Stick Sensitivity 2 (Max Input 70%) * This sensitivity level is set Move the Right Analog Stick 2 Blinks Slow Blinking by default. up or down Stick Sensitivity 1 (Max Input 50%) Slow Blinking 1 Blink ③ Settings complete LED Off LED Off Push *1 The Right Analog Stick must be returned to the neutral position before changing the setting again.
- Page 14 Turbo Functions How to use the Turbo Functions The Turbo Hold function allows continuous rapid fire without having to hold the button. The Turbo and Turbo Hold Function can be set to multiple buttons. The following buttons can be set to Turbo or Turbo Hold mode: A Button / B Button / X Button / Y Button / D-Pad (Up/Down/Left/Right) / L Button / R Button / ZL Button / ZR Button / LSB Button / RSB Button * If the above button functions are assigned to the FL or FR Button, the Turbo function can be assigned to the FL or FR buttons. * The D-Pad directions are not compatible with the Turbo Hold mode, and can only be set to Turbo Mode. * Turbo Function may not function as desired for all software titles. * If the game is exited by pressing the HOME button, the Turbo Function will be disabled. It will need to be reset when the game is reopened. 【How to set up Turbo Function】 Operation LED Status Settings TURBO LED Turbo Mode : (Green) + Button is set to continuously activate the button function LED On Hold down the Turbo button (Flashes while the as long as you press and then press the button that button is pressed.) the button. you want to set to Turbo mode Turbo Hold: Continuously activates + the button function without pressing the Flashing button. (Lights up while the Hold Down ...
- Page 15 ◆ How to change Turbo Speed You can adjust the Turbo mode to 3 different speeds. * Turbo speed is set to 10 times/second by default. Operation LED Status Settings TURBO LED (Green) times/ times/ times/ second second second The Turbo LED will While holding down the Turbo Button, Hold Down the Push the + or ‒ Button flash at a rate press the + Button to increase the speed Turbo Button corresponding to by one level or press the ‒ Button to the Turbo speed decrease the speed by one level. for 2 seconds. * The selected Turbo speed is the same for Turbo Mode, Turbo Hold, and Quick Turbo. * Settings will be saved even if the controller is unplugged. Quick Turbo While pushing the Quick Turbo Button and any of the following buttons, it will activate the button function continuously. Quick Turbo is useful when needing to use continuous button function in specific game situations. The following buttons can be set to Turbo or Turbo Hold mode: A Button / B Button / X Button / Y Button / D-Pad/ L Button / R Button / ZL Button / ZR Button / LSB Button / RSB Button * If the above button functions are assigned to the FL or FR Button, the Turbo function can be assigned to the FL or FR buttons. *1 Quick Turbo is not assigned to any button by default. To assign the ...
-
Page 16: Assign Mode
Assign Mode The assignable buttons can be assigned to following assignable functions. Assignable Buttons A Button / B Button / X Button / Y Button / D-Pad (Up/Down/Left/Right) / L Button / R Button / ZL Button / ZR Button / LSB Button / RSB Button / - Button / + Button / FL Button / FR Button Assignable Functions A Button / B Button / X Button / Y Button / D-Pad (Up/Down/Left/Right) / L Button / R Button / ZL Button / ZR Button / LSB Button / RSB Button / - Button / + Button / FL Button / FR Button / Quick Turbo Button / NC (Button stops responding) 【How to Assign Button Functions】 Operation LED Status Settings Function LED (Red) Start Settings ① * While setting functions, all buttons on the controller Push and hold will not respond. for 3 Seconds Slow Blinking The button of the ② function you want to change is selected. Flashes Quickly Press the button you want to assign a function to. The function is assigned to the button To assign the function, pressed in ②, or it is ③ press the button of the function set to NC (button stops you want to assign to in ②. LED On responding) and the ... - Page 17 Return One Button Function to Default Operation LED Status Settings Function LED Start Settings (Red) ① * When setting Motion Aim sensitivity, all buttons on Push and hold the controller will not for 3 Seconds respond. Slow Blinking The button function ② is set to default and LED Off the setting function Press the button you would like to close. return to default twice *1 The Function LED (Red) will remain lit if there are other buttons that are still assigned functions different from their default function. * If 4 seconds have passed without pressing any buttons in ①, the Function LED (Red) will automatically turn off and the setting functions will close. * Settings will be saved even if the controller is unplugged. 【Return all Buttons to Default】 Operation LED Status Settings Function LED (Red) Start Settings ① * When in Setting mode, all Push and hold buttons on the controller will for 3 Seconds not respond.
-
Page 18: Volume Controls
Headphone/Mic Jack Headphones and headsets can be connected by the Headphone/Mic audio jack. Before connecting a headset, be sure to turn down the volume on the Nintendo Switch and/or TV, as the sudden high volume may hurt your ears. Do not use high volume settings for an extended period of time to avoid hearing loss. * When in use, please disconnect headphones or headsets from the Nintendo Switch or dock. If a USB-connected device, such as a headset, headphone, or speaker is connected, sound will only come from the previously connected device. * When using a headset with this product, there will be no sound coming from the TV or Nintendo Switch. * When using the product on a PC, the Headphone/Mic audio jack cannot be used. * Some software titles do no support microphones. Please check the instruction manual of the software title before using this product. Volume Controls The volume of the headset that is connected can be adjusted. * The volume cannot be adjusted for the Nintendo Switch or TV with this function. Operation Settings Decrease Volume Hold down the microphone ON/ OFF button and press the - button Increase Volume Hold down the microphone ON/ OFF button and press the + button ♪ A sound will be heard when the minimum / maximum volume is reached. -
Page 19: Download App
Mic On/Off The connected headset mic can be turned ON / OFF. Set up instructions Operation LED Status Settings Mic Mute LED (Orange) Mic OFF LED On Push Mic ON LED Off Download App By using the HORI Device Manager, all functions of this product can be adjusted. 『HORI Device Manager for Nintendo Switch』 Supported OS Windows ® Please download and install the HORI Device Manager for Nintendo Switch from this product's website using your PC. URL:https://stores.horiusa.com/horipad-for-nintendo-switch-1/ Main Features External Dimensions : (W)150mm × (D)105mm × (H)60mm Weight : 250g Cable Length : 3.0m... - Page 20 The normal function of the product may be disturbed by strong electro-magnetic interference. If so, simply reset the product to resume normal operation by following the instruction manual (How to connect). In case the function does not resume, please relocate to an area which does not have electro-magnetic interference to use the product. The wires are not to be inserted into socket-outlets. The packaging must be retained since it contains important information. PRODUCT DISPOSAL INFORMATION Where you see this symbol on any of our electrical products or packaging, it indicates that the relevant electrical product or battery should not be disposed of as general household waste in Europe. To ensure the correct waste treatment of the product and battery, please dispose of them in accordance with any applicable local laws or requirements for disposal of electrical equipment or batteries. In so doing, you will help to conserve natural resources and improve standards of environmental protection in treatment and disposal of electrical waste. Applicable to EU countries and Turkey only. THE FCC WANTS YOU TO KNOW This device complies with part 15 of the FCC Rules. Operation is subject to the following two conditions: (1) This device may not cause harmful interference, and (2) this device must accept any interference received, including interference that may cause undesired operation. NOTE: This equipment has been tested and found to comply with the limits for a Class B digital device, pursuant to part 15 of the FCC Rules. These limits are designed to provide reasonable protection against harmful interference in a residential installation. This equipment generates, uses and can radiate radio frequency energy and, if not installed and used in accordance with the instructions, may cause harmful interference to radio communications. However, there is no guarantee that interference will not occur in a particular installation. If this equipment does cause harmful interference to radio or television reception, which can be determined by turning the equipment off and on, the user is encouraged to try to correct the interference by one or more of the following measures: - Reorient or relocate the receiving antenna. - Increase the separation between the equipment and receiver. - Connect the equipment into an outlet on a circuit different from that to which the receiver is connected. - Consult the dealer or an experienced radio/TV technician for help. EU and Turkey only...
- Page 21 Warranty HORI warrants to the original purchaser that the product purchased new in its original packaging shall be free of any defects in material and workmanship for a period of 90 days from the original date of purchase. If the warranty claim cannot be processed through the original retailer, please address directly to HORI at info@horiusa.com. Please visit http://stores.horiusa.com/policies/ for warranty details. Warranty For all warranty claims made within the first 30 days after purchase, please check with the retailer where the original purchase was made for details. If the warranty claim cannot be processed through the original retailer or for any other inquiries pertaining to our products, please address directly to HORI at info@horuk.com. Simplified Declaration of Conformity Hereby, HORI declares that this product is in compliance with Directive 2014/53/EU. The full text of the EU declaration of conformity is available at the following internet address: https://hori.co.uk/consumer-information/ For UK: Hereby, HORI declares that this product is in compliance with the relevant statutory requirements. The full text of the declaration of conformity is available at the following internet address: https://hori.co.uk/consumer-information/ ● The image on the package may differ from the actual product. ● The manufacturer reserves the right to change the product design or specifications without notice. ● Nintendo Switch is a trademark of Nintendo. © 2021 Nintendo. Licensed by Nintendo. ● HORI & HORI logo are registered trademarks of HORI. ● All other trademarks are the property of their respective owners. Ages 6+...
Need help?
Do you have a question about the NSW-326 and is the answer not in the manual?
Questions and answers