Forte 450 Series User Manual
24 inch built-in bottom freezer refrigerator
Hide thumbs
Also See for 450 Series:
- Installation manual (90 pages) ,
- User's operation manual (25 pages)

Subscribe to Our Youtube Channel
Related Manuals for Forte 450 Series


Summary of Contents for Forte 450 Series
- Page 1 USER MANUAL 450 Series 24 Inch Built-In Bottom Freezer Refrigerator in Panel Ready F9BFRESC450PR...
-
Page 2: Table Of Contents
CONTENTS IMPORTANT NOTICES--------------------------------------------------------------------------------------------------------------------------2 APPLIANCE COMPONENTS--------------------------------------------------------------------------------------------------------------------3 INSTALLATION AND OPERATING CONDITIONS OF THE APPLIANCE ----------------------------------------------------------------4 INSTALLATION INSTRUCTIONS ---------------------------------------------------------------------------------------------------------------6 DOOR REVERSAL--------------------------------------------------------------------------------------------------------------------------------11 BEFORE FIRST USE------------------------------------------------------------------------------------------------------------------------------12 STORAGE INSTRUCTIONS---------------------------------------------------------------------------------------------------------------------13 CONTROLS----------------------------------------------------------------------------------------------------------------------------------------15 DE-FROSTING------------------------------------------------------------------------------------------------------------------------------------16 CARE AND CLEANING--------------------------------------------------------------------------------------------------------------------------17 TROUBLESHOOTING---------------------------------------------------------------------------------------------------------------------------18 WARRANTY--------------------------------------------------------------------------------------------------------------------------------------19... -
Page 3: Important Notices
IMPORTANT NOTICES Some provisions in this user manual apply to refrigerating products of different types e.g. (for a refrigerator, refrigerator-freezer or freezer). The Manufacturer shall not be held liable for damage arising from the failure to observe the instructions contained in this manual. The appliance operates properly at the ambient temperature 61℉... -
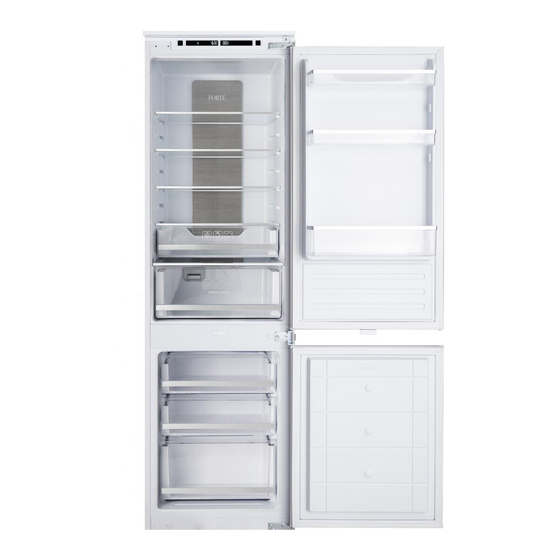
Page 4: Appliance Components
APPLIANCE COMPONENTS 1 Control panel 2 Rear panel cover 3 Glass shelves 4 Crispers 5 Fresh zone 6 Drawers 7 Door bins... -
Page 5: Installation And Operating Conditions Of The Appliance
INSTALLATION AND OPERATING CONDITIONS OF THE APPLIANCE Connect to the power supply • This appliance should be connected to AC 115V/60Hz supply socket. • It is a legal requirement that the appliance is properly grounded. The manufacturer will not be held liable for any damage or injury which may result from the failure to fulfil this requirement. - Page 6 INSTALLATION AND OPERATING CONDITIONS OF THE APPLIANCE Placement of the Refrigerator in cabinetry • This shows the placement of the refrigerator in a row of cabinets - demonstrates the flow of air through the entire cabinet, the platform base that the refrigerator sits on, as well as the cabinet doors as they overlay the refrigerator doors.
-
Page 7: Installation Instructions
INSTALLATION INSTRUCTIONS Ventilation is the main consideration when installing any refrigeration unit into a custom kitchen. The heat removed from the cooling and/or freezing compartments needs to be dissipated into the atmosphere. Incorrect ventilation can lead to premature compressor failure, excessive power consumption, moisture buildup and mold, total system failure and will likely invalidate the warranty provided with the appliance. - Page 8 INSTALLATION INSTRUCTIONS Unit and Cavity Dimensions This built-in appliance is completely enclosed by a kitchen cabinet. The cabinet surrounding the appliance must be designed in accordance with the specified dimensions and must allow sufficient air circulation to ensure correct operation of the appliance. Unit Cavity Width...
- Page 9 INSTALLATION INSTRUCTIONS Definition of the Door Panel Heights The freezer door height is 25-1/4"(642mm). In order to cover the lower part of the appliance increase the height of the panel to 26- 5/8"(675mm). To cover the face side of the floorboard (a) add the thickness of the floor board (usually 3/4"(19mm). Thus, the minimum height of the freezer door panel is: 26-5/8"+3/4"=27-3/8"...
- Page 10 INSTALLATION INSTRUCTIONS With the help of another individual, or two, maneuvre the appliance into the cabinet. There are two metal plates at the base of the appliance. Fit the supplied white spacers to these plates. Ensure that the lips of the spacers are level with the lip of the cabinet base. Secure the top of the appliance to the top of the cabinet through the metal trim screw holes marked ‘T’.
- Page 11 INSTALLATION INSTRUCTIONS Ensure that there is a gap of 0.16in (3 to 4mm) between the non-hinged side and the cabinet wall. Locate the slider in the bracket and fix the slider to the fascia door 0.8in (20 to 22mm) from the edge of the fascia as shown in following pic., ensuring that the slider is positioned centrally and horizontally within the bracket.
-
Page 12: Door Reversal
DOOR REVERSAL Carefully prise off the cover cap for the top hinge and unscrew the screws fixing the top hinge to the appliance, you should support the upper door whilst doing this. Carefully remove the upper door and place it somewhere safe. Note that there are spacers between the door and the hinge;... -
Page 13: Before First Use
BEFORE FIRST USE Allow the fridge to settle for at least 24 hours after transport prior to switching the power on. Clean the interior of the appliance prior to first use, using a solution of baking soda (sodium bicarbonate) and warm water and then thoroughly drying the interior. Note: The fridge may have an odor to it at first. -
Page 14: Storage Instructions
STORAGE INSTRUCTIONS The fridge section is for short term food storage. Although low temperatures can be maintained, extended periods of food storage is not recommended. As the cold air circulates within the fridge, the temperature can vary between the different sections. As such, foods should be stored in different sections according to type. 1. - Page 15 STORAGE INSTRUCTIONS Fresh zone Temperature ranges of fresh zone 27 ℉ (-3℃) to 37 ℉ (3℃ ). The fresh zone means that you can control the temp. inside the fresh zone independently. The fresh zone is designed to make it easier to handle ingredients in a short period of time when you have to ...
-
Page 16: Controls
CONTROLS at settings: 41 ℉ (5℃) for fridge, 32 ℉ (0℃) for Fresh zone and 0 ℉ (-18℃) for freezer. If you want First time switching on the appliance or re-supply after power failure, the appliance always works to adjust the temperature or functions manually, press any button to activate the control panel, then operations can be conducted. -
Page 17: Frosting
DEFROSTING The product has a no frost system which is designed to prevent the heavy build up of ice. Under normal use, there should be no need to regularly defrost the freezer system. Note: If you are regularly finding a heavy build up of ice, or pools of water, in the freezer section then it is likely that the door is not sealing properly. -
Page 18: Care And Cleaning
CARE AND CLEANING Always disconnect the appliance from the power supply before any maintenance. The fridge and freezer sections should be cleaned using a solution of baking soda and lukewarm water. Do not use abrasive products or detergents. After washing, rinse and dry thoroughly. Clean the shelves and door bins separately by hand with a solution of mild dish detergent and water. -
Page 19: Troubleshooting
TROUBLE-SHOOTING Should you have any problems with your appliance, check this troubleshooting guide prior to calling Customer Care. If the appliance is not working, check: That there is power to the appliance. The house fuses are intact and the fuse in the plug has not blown. The fridge has not been turned off. -
Page 20: Warranty
Refrigerator Warranty Your REFRIGERATOR has been inspected and tested and is warranted subject to following for a period to 24 months from the date of purchase against defects in workmanship and materials. During this period, we undertake to repair or replace any defective part which was originally defective in our opinion.
Need help?
Do you have a question about the 450 Series and is the answer not in the manual?
Questions and answers