Elo TouchSystems I Series User Manual
4.0 value backpack
Hide thumbs
Also See for I Series:
- User manual (46 pages) ,
- Quick installation manual (2 pages) ,
- User manual (37 pages)
Table of Contents
Advertisement
Quick Links
Advertisement
Table of Contents

Related Manuals for Elo TouchSystems I Series


Summary of Contents for Elo TouchSystems I Series
- Page 1 USER MANUAL Elo Touch Solutions I-Series 4.0 Value Backpack...
- Page 2 Copyright © 2021 Elo Touch Solutions, Inc. All Rights Reserved. No part of this publication may be reproduced, transmitted, transcribed, stored in a retrieval system, or translated into any language or computer language, in any form or by any means, including, but not limited to, electronic, magnetic, optical, chemical, manual, or otherwise without prior written permission of Elo Touch Solutions, Inc.
-
Page 3: Table Of Contents
Contents Section 1: Introduction ............................................6 Product Description ............................................................7 Overview – Specifications ..........................................................7 Features: I-Series 4.0 value backpack ......................................................8 Section 2: Getting Started ............................................9 Unpacking ................................................................. 10 Connecting to an Elo Touch Monitor......................................................10 Power Button ..............................................................10 Power LED Status .............................................................. - Page 4 Location ................................................................43 Security................................................................44 Accounts ................................................................47 Accessibility ............................................................... 48 Digitial Wellbeing & parental controls ......................................................50 System ................................................................51 Reset options ..............................................................54 Multiple users ..............................................................54 To switch users ..............................................................54 To add user ................................................................ 54 To delete guest from the device ........................................................55 To rename Admin Profile info ..........................................................
- Page 5 Radio Equipment Directive ..........................................................69 Agency Certifications ............................................................70 Waste Electrical & Electronic Equipment Directive (WEEE) ................................................ 71 Section 7: Warranty Information ........................................... 72 User Manual –I-Series 4.0 Backpack UM600694 Rev A page 5 of 73...
-
Page 6: Section 1: Introduction
Section 1 Introduction User Manual –I-Series 4.0 Backpack UM600694 Rev A page 6 of 73... -
Page 7: Product Description
Product Description Your new Elo Backpack 4.0 system provides the reliable performance from Elo that can be paired with an external monitor. This creates a natural flow of information between a user and the Elo Backpack. Overview – Specifications Feature Specification Operating System Android... -
Page 8: Features: I-Series 4.0 Value Backpack
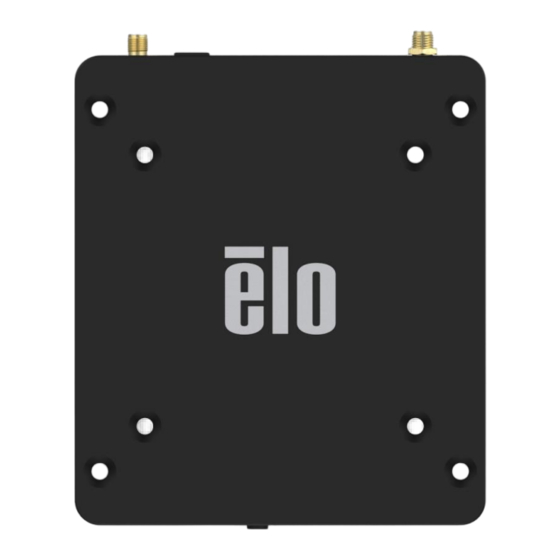
Features: I-Series 4.0 value backpack DC In Type C HDMI Ethernet USB 3.0 Wi-Fi Wi-Fi USB 3.0 microSD GPIO Home Antenna and BT Power Antenna Rear IO Front IO User Manual –I-Series 4.0 Backpack UM600694 Rev A page 8 of 73... -
Page 9: Section 2: Getting Started
Section 2 Getting Started User Manual –I-Series 4.0 Backpack UM600694 Rev A page 9 of 73... -
Page 10: Unpacking
Unpacking Verify that the box contains: • Elo I-Series 4.0 Backpack • Power Brick • Region Specific power cable • Quick Install Guide Remove all protective materials from the device. Inspect the device for damage. Report immediately if system has damage and/or missing items as listed above. Connecting to an Elo Touch Monitor If using an HDMI monitor, connect the HDMI cable from the Elo Backpack to the HDMI port on the monitor. -
Page 11: Power Led Status
Power LED Status POWER LED STATUS DESCRIPTION Solid White Power ON Solid Orange Power OFF Blinking White Idle Mode User Manual –I-Series 4.0 Backpack UM600694 Rev A page 11 of 73... - Page 12 Power / Function Buttons Features and Gestures Power button On-Screen display menu If the power button is pressed for more than 2 seconds, a pop-up screen menu will appear. Android Home Eloview For shutting down the system For shutting down the system For rebooting the system For rebooting the system For Bug Report...
- Page 13 Out of Box Experience (OOBE) Step 1: Step 2: Step 3: • • • Connect to Wi-Fi or tap “Set Tap anywhere to proceed Choose the following set up up offline” to skip Wi-Fi set with set up. method. • Follow on-screen instruction •...
-
Page 14: Elo Hub Home Screen - Enroll With Eloview
Elo Hub Home Screen – Enroll with Eloview Refer to ELOVIEW SUPPORT PAGE on www.elotouch.com for Eloview information The Elo Hub Home Screen is the starting point for navigating of the device. You can place your favorite apps and widgets here. Note: The images below may appear different from the actual device. - Page 15 Elo Hub Quick Settings To access the Quick Settings, tap 3 lines menu from Elo Hub Home Screen. Located on the upper right side. Exit Settings: ❖ Wi-Fi ❖ Bluetooth ❖ Battery • Brightness Tap an Icon once to enable ❖...
-
Page 16: Lock And Home Screens - Gms
Lock and Home Screens – GMS Note: The images below may appear different from the actual system. Lock Screen Home Screen Notifications Status Bar Lock Feature Time & Date Shortcut Icon Google apps (Bundle) Search Bar Navigation Bar Home Screen is the starting point for navigating the I-Series device. - Page 17 Notification Panel The notification panel allows for quick access to setting shortcuts and notification alerts. Note: The images below may appear different from the actual device. Quick Settings Bar Notification Setting Notifications Navigation Bar To open the Notification Panel • From the Home Screen, swipe down from the top of the touch screen.
- Page 18 Quick Access Panel Access Panel allows for quick access frequently used settings, Brightness, and a shortcut to Android System Settings Note: The images below may appear different from the actual computer. Brightness Quick Access Panel ❖ Move the slider bar left or ❖...
- Page 19 Application Drawer & Google Application The application drawer is a menu containing all of the applications installed on the device including System Settings. This is different from the Home Screen, as it contains every installed app and cannot be customized. Note: The images below may appear different from the actual computer.
- Page 20 Customize and add a shortcut to the Home Screen. Note: The images below may appear different from the actual computer. • From the Application drawer, press and hold an app or (Icon) then drag the Icon to move the app to the Home Screen. •...
-
Page 21: Section 3:System Setting
Section 3 System Settings The System Settings menu allows you to control most aspects of your device - everything from establishing a new Wi-Fi or Bluetooth connection, to installing a third-party onscreen keyboard, to adjusting system sounds and screen brightness. User Manual –I-Series 4.0 Backpack UM600694 Rev A page 21 of 73... -
Page 22: Network & Internet
Network & Internet The Network & Internet application allows you to access Wi-Fi, Airplane Mode, Mobile plan, Hotspot, Tethering and Advanced settings of Data Saver, VPN and DNS. To set up Network and Internet, enter Settings → Network & Internet → Wi-Fi •... -
Page 23: Wi-Fi Hotspot
Disconnecting a connected Wireless Network • setting of the connected device. • (FORGET) icon to disconnect. Ethernet Note: To connect the I-Series 4.0 to Ethernet, When available, the I-Series 4.0 will automatically prioritize the ethernet connection. If the I-Series 4.0 does not, please follow the steps below. •... - Page 24 This feature is for sharing internet network connection to another device using Bluetooth. Note: The Bluetooth must be paired first from I-Series 4.0 to another device or PC. See Connected devices → Bluetooth on this user manual. • Tap Hotspot and tethering. •...
-
Page 25: Connected Devices
Connected devices The Connected devices application allows you to pair Bluetooth devices, NFC, and USB (Tethering File transfer MDI and PTP) To setup, enter Settings → Connected devices → Note: To activate the USB settings, connect the USB cable from the I-Series 4.0 to another device or PC. Once the I-Series detects the external computer, it will become available in the USB preference settings. - Page 26 • If the pairing requests a PIN, enter the PIN. • Tap PAIR, to connect. • When the Bluetooth device is successfully connected to I-Series 4.0, the connection will show as Active or Connected. Unpair a paired Bluetooth Device • Navigate back to ‘Connected devices’...
- Page 27 • 3-dots menu. • Tap Enable wireless display to begin scanning for compatible displays. • From the list, tap a wireless display (e.g. TV). From the Wireless Display device (TV), if promoted tap Allow. Disconnect and forget a connected wireless display •...
- Page 28 Printing Note: Make sure I-Series 4.0 and printer are connected to the same network. • Tap Connection preferences. • Tap Printing. • Tap Default Print Service. • Tap toggle switch to ON • 3-dots menu. • Tap Add printer. To add a printer using Wi-Fi printer: •...
-
Page 29: Apps & Notifications
Apps & Notifications App & Notification settings are to streamline app alerts by changing which apps send notifications and how the notifications alert you. To manage App & Notification, enter Settings → App & Notification Setting notifications • In the Recently opened apps, tap SEE ALL APPS or App info. •... - Page 30 • To allow a permission to an application, tap an app from DENIED menu. • To deny a permission to an application, tap an app from ALLOWED menu. Setting notifications in the lock screen • To set up notification in the lock screen from Apps and notification screen, tap Notifications. •...
- Page 31 • To deny a permission to an application, tap an app from ALLOWED menu. Setting Emergency alerts • Tap Advanced from the Apps and notifications screen. • Tap Emergency alerts. • From the menu of alerts, tap a feature (e.g. AMBER alerts) to enable or disable. •...
-
Page 32: Display
Display When connected to an Elo Touch monitor, the Display application manages the screen’s display settings. To modify Display settings, enter Settings →Display → Auto Idle mode • Tap Auto idle mode to enable or disable • When enabled, the backlight will turn off between the hours of 00:00 and 06:00 daily. Brightness Level •... -
Page 33: Screen Timeout
• Tap OK to execute. To disable the time schedule • Tap Schedule. • Tap None. Wallpaper • Tap Wallpaper. • Select a wallpaper from the following options. Live Wallpapers ❖ Snapdragon Gallery → Download – Picture – Screenshot ❖ •... -
Page 34: Display Size
• Tap Font size. • Move the slider bar left or right to adjust the text size. Display size • Tap Display size. • Move the slider bar to left or right to adjust the screen size. Screen saver • Tap Screen saver. - Page 35 External Screen Orientation • Tap External Screen Orientation to change the orientation of the second screen. • Select the orientation from the following option. • Tap to save. Screen Orientation • Tap Screen Orientation. • Select the orientation from the following option. •...
- Page 36 Supported Elo Monitors: The first two digits represent the monitor size. The second two digits represent the monitor family. • 07/10/13/15/19/20/22/24/27 XX-02L Monitors • 19/22/24/27 XX-03L Monitors • 10/15/ XX-93L Open Frames • 20/22/24/27 XX-94L Open Frames • XX-95L Open Frames •...
-
Page 37: Sound
Sound The sound application is to manage audio, vibration and Do not Disturb features. To modify settings, enter Settings → Sound → Volumes • To decrease or increase the following sound volume, drag slider left or right. Do not Disturb •... - Page 38 Shortcut to Prevent Ringing • Tap Shortcut to prevent ringing. • Tap toggle switch to enable. • Select from the following options. • To disable , tap toggle switch. Default Notification Sound • Tap Default notification sound. • Select a sound from the list (e.g. Pixie Dust) and tap OK to save. Default Alarm Sound •...
- Page 39 Audio Policy • Select to audio output port. • Default is Auto User Manual –I-Series 4.0 Backpack UM600694 Rev A page 39 of 73...
- Page 40 Advanced • To enable or disable on the following features below, tap a feature. User Manual –I-Series 4.0 Backpack UM600694 Rev A page 40 of 73...
-
Page 41: Storage
Storage To manage Storage, enter Settings → Storage → Internal Shared Storage • To check the status of internal memory storage, tap Internal Shared storage. Storage Manager This feature is to help free up storage space, storage manager removes backed up photos and video from the device. •... -
Page 42: Privacy
Privacy The Privacy application is to give you control over what permissions of applications can have. To manage permission, enter Settings → Privacy → Permission Manger This is to grant permission of an App that uses storage, phone, and location. •... -
Page 43: Location
Location To modify Locations settings, enter Settings → Location • Tap Location. • To enable or disable, tap Use location • For apps have requested location recently, tap See all. • To update permission, tap App permission. • To scan for Wi-Fi networks and Bluetooth, tap Wi-Fi and Bluetooth scanning, Note: This feature allows apps and services to scan for Wi-fi networks and Bluetooth anytime. -
Page 44: Security
Security To change Security settings, enter Settings → Security → Security Status Google Play Protect • Scans all apps to find any viruses. Find My Device • Once an account is associated with the device, it can be found if the device is misplaced. Security Update •... - Page 45 Pin Security • Tap PIN • Tap YES. • Enter a PIN number must be at least 4 digits minimum and tap NEXT. • Re-enter PIN numbers and tap CONFIRM. • Follow on-screen instruction and tap DONE. User Manual –I-Series 4.0 Backpack UM600694 Rev A page 45 of 73...
- Page 46 Password Security • Tap Password. • Tap YES. • Enter a password, must be at least 4 characters minimum and tap NEXT. • Re-enter password and tap CONFIRM. • Follow on-screen instruction and tap DONE. Remove Screen Lock • To remove screen lock, tap Screen lock. •...
-
Page 47: Accounts
Accounts To add an account, enter Settings → Accounts • To set up an account, tap Account. • Tap + Add account. • Enter an email account. • Enter an Account type you want to add (PERSONAL - POP3 or PERSONAL – IAMP). •... -
Page 48: Accessibility
Accessibility The Accessibility is a large on-screen menu to control the Elo I-Series device. You can control display, audio & on-screen text and more. To modify settings, enter Settings → Accessibility • From the menu, select a feature to change the setting. •... - Page 49 • To enable or disable , tap the feature. • To adjust slide bar, drag slider right or left. • For other settings, tap the feature and follow the on-screen instruction to complete the setup. User Manual –I-Series 4.0 Backpack UM600694 Rev A page 49 of 73...
-
Page 50: Digitial Wellbeing & Parental Controls
Digitial Wellbeing & parental controls • Digital Wellbeing and Parental controls are available here. User Manual –I-Series 4.0 Backpack UM600694 Rev A page 50 of 73... -
Page 51: System
System To modify settings, enter Settings → System → Languages & input • To change language, tap Languages & input. • Tap Language. • Tap + Add a language, then choose from the list of languages to add (e.g. Espanol). •... - Page 52 Gestures • Tap Gestures. For camera gesture • Tap Jump to camera. • Tap Jump to camera to enable or disable When set to enable, pressing power button twice will activate, the digital camera. ❖ For notification volume gesture • Tap Preventing ringing •...
- Page 53 Date & Time The recommended setting for “Date and Time” is to use, “USE network provided time”. Note: And for Time zone when is set to “USE network provided zone”, you need a sim card to work. For manual settings: •...
-
Page 54: Reset Options
Advanced Reset options • To select a following option to reset, tap Reset options. • From the list, select an item to reset then tap to execute and follow on-screen instruction. Multiple users • Tap Multiple users. • Tap toggle switch to To switch users •... -
Page 55: To Delete Guest From The Device
To delete guest from the device • 3-dot menu from Multiple Users screen. • Tap Delete Guest from this device. To rename Admin Profile info • admin • Enter the name. • Tap OK to save. Developer (Accessing developer option menu) •... -
Page 56: About Tablet
About tablet For viewing specific information of I-Series device. Settings → About phone To view and modify settings, enter Tap once to change the device name. Tap once to view add, and update emergency information. Tap once to view. Tap once to view Model, Hardware and Serial number information. Attestation key and certification information Elo I-Series Model and Hardware description. -
Page 57: Section 4: Operational
Section 4 Operational User Manual – Elo I-Series 4.0 Backpack UM600694 Rev A, page 57 of 73... -
Page 58: About Camera App
About Camera App Connecting a USB camera to the Elo Backpack will allow access to the camera features. Camera Options Shutter Release icon Switch to video mode Switch - A switch between Camera to Video. Shutter Release - For taking picture. All other option available by clicking the gearhead icon are listed in the table below. -
Page 59: Take A Picture And Record Video
Take a Picture and Record Video • camera app to access the Digital camera. • To change camera and video settings, see features. • From the switch, located on bottom left side of the I-Series 4.0 select one from the following options. For Video recording, tap Video Icon. -
Page 60: Take A Screenshot
Take a Screenshot For capturing an image of the screen. The device will automatically save the image in the File folder application. • Press the power button for more than 2 seconds and a pop-up screen menu will appear then tap screenshot. - Page 61 • To copy or move files into new location press and hold an item from the folders above or tap 3 dots menu to select all items in the folder. • 3 dots menu again and choose “Copy to” or “Move to”. •...
-
Page 62: General-Purpose Input/Output (Gpio) Support
General-purpose Input/Output (GPIO) Support The I-Series 4.0 supports a GPIO which can be used to connect to peripherals such as a motion sensor. Elo has an optional GPIO cable (PN: E211544) with flying leads so that it is easy for users to connect their own peripherals. -
Page 63: About Android Debug Bridge (Adb) Control
About Android Debug Bridge (ADB) control Elo I-Series 4.0 Backpack supports debugging via Wi-Fi/Ethernet or using the USB Type-c to type-A cable. Note: For USB debugging, a USB 3.0 Type A to Type A cable must be used. Set I-Series 4.0 Backpack to (Developer) •... -
Page 64: Factory Full Reset
Factory Full Reset A full factory reset should only performed if all other recovery methods have failed and all other troubleshooting options. Perfoming a full factory reset results in loss of data. This options will recover the original factory image state by erasing all data in the main storage on the Elo I-Series 4.0 Backpack. -
Page 65: Section 5: Technical Support And Maintenance
Section 5: Technical Support and Maintenance Technical Assistance Technical Specifications Support visit www.elotouch.com/products visit www.elotouch.com/support for technical support for technical specifications for this device Refer to last page for worldwide technical support phone numbers. User Manual – Elo I-Series 4.0 Backpack UM600694 Rev A, page 65 of 73... -
Page 66: Elo I-Series Backpack 4.0 Care And Handling
Elo I-Series Backpack 4.0 Care and Handling The following tips will help maintain optimal performance of your Elo I-Series 4.0 backpack: • To prepare for cleaning the touchscreen, power down the device (if possible), or ensure your on-screen software can tolerate false touches while you clean. •... -
Page 67: Section 6: Regulatory Information
Section 6: Regulatory Information Electrical Safety Information Compliance is required with respect to the voltage, frequency, and current requirements indicated on the manufacturer’s label. Connection to a different power source than those specified herein will likely result in improper operation, damage to the equipment, or pose a fire hazard if the limitations are not followed. - Page 68 This equipment should be installed and operated to ensure a minimum of 20 cm spacing to any person. Notice to Users in Canada for IC compliance: This equipment complies with the Class B limits for radio noise emissions from digital apparatus as established by the Radio Interference Regulations of Industrial Canada. CAN ICES-003 (B)/NMB-003(B) This device contains license-exempt transmitter(s)/receiver(s) that comply with Innovation, Science and Economic Development Canada’s license-exempt RSS(s).
-
Page 69: Radio Equipment Directive
Reposition (turn) the digital device with respect to the affected receiver. iii. Reorient the affected receiver’s antenna. iv. Plug the digital device into a different AC outlet so the digital device and the receiver are on different branch circuits. Disconnect and remove any I/O cables that the digital device does not use. (Unterminated I/O cables are a potential source of high RF emission levels.) vi. -
Page 70: Agency Certifications
Operation frequency and radio-frequency power are listed as below: • WLAN 802.11b/g/n/ac 2400 - 2483.5MHz < 19 dBm EIRP 5150 - 5250MHz < 19 dBm EIRP • BT 2400-2483.5MHz < 11 dBm EIRP ECC/DEC/ (04)08: The use of the frequency band 5 150-5 350 MHz is restricted to indoor operation because of the protection requirements of satellite services EC R&TTE Directive EU Directive 2014/53/EU of the European Parliament and of the Council of 16 April 2014 on the harmonization of the laws of the Member States relating to the making available on the market of radio... -
Page 71: Waste Electrical & Electronic Equipment Directive (Weee)
• VCCI (Japan) • RCM (Australia) • China RoHS Waste Electrical & Electronic Equipment Directive (WEEE) This product should not be disposed of with household waste. It should be deposited at a facility that enables recovery and recycling. Elo has put in place recycling arrangements in certain parts of the world. For information on how you can access these arrangements, please visit www.elotouch.com/e-waste-recycling-program/. -
Page 72: Section 7: Warranty Information
Section 7: Warranty Information For warranty information, go to http://support.elotouch.com/warranty/ User Manual – Elo I-Series 4.0 Backpack UM600694 Rev A, page 72 of 73... - Page 73 www.elotouch.com Visit our website for the latest • Product Information • Specifications • Upcoming Events • Press Releases • Software Drivers Google, Android, Google Play and YouTube are trademarks of Google LLC. To find out more about our extensive range of Elo touch solutions, go to www.elotouch.com, or call the office nearest you.
Need help?
Do you have a question about the I Series and is the answer not in the manual?
Questions and answers