Table of Contents
Advertisement
Available languages
Available languages
Quick Links
Advertisement
Table of Contents

Related Manuals for CORBERO CCV BR 6450


Summary of Contents for CORBERO CCV BR 6450
- Page 1 Placa de Vitrocerá mica Manual de Instrucciones / Manual de Instalació n MODELOS: CCV BR 6450 CCV BR 6350 Las bandejas de piedra, vidrio y barro no son adecuadas para usar en una vitrocerá mica porque no conducen bien el calor.
-
Page 2: Advertencias De Seguridad
Advertencias de seguridad Su seguridad es importante para nosotros. Por favor, lea esta informació n antes de usar su placa. Instalació n Riesgo de descarga elé ctrica. • Desconecte la placa de vitrocerá mica del suministro de corriente elé ctrica antes de realizar cualquier trabajo de mantenimiento. - Page 3 de la persona responsable de la instalació n del aparato, ya que podrí a reducir los costes de instalació n • Con el fin de evitar un peligro, este aparato debe ser instalado de acuerdo con estas instrucciones de instalació n. •...
- Page 4 • Este aparato es conforme a las normas de seguridad electromagné ticas. Peligro de superficie caliente • Durante su uso, las partes accesibles pueden calentarse y causar quemaduras. • No deje que su cuerpo, ropa o cualquier elemento que no sea adecuado para la cocció n toque el cristal de inducció...
-
Page 5: Instrucciones Importantes De Seguridad
cortes. Instrucciones importantes de seguridad • Nunca deje el aparato desatendido durante su funcionamiento. Los desbordamientos al hervir a pueden causar derrames de grasa que se pueden incendiar. • Nunca utilice el aparato como superficie de trabajo o almacenamiento. • Nunca deje objetos o utensilios en el aparato. •... - Page 6 instrucció n adecuada de có mo hacerlo. El instructor debe estar convencido de que se puede utilizar el aparato sin peligro para ellos mismos o sus alrededores. • No intente reparar o reemplazar cualquier parte del aparato a menos que se recomiende especí...
- Page 7 accesibles se calientan durante el uso. Se debe tener cuidado para evitar tocar los elementos calefactores. Los niñ os menores de 8 añ os de edad deberá n mantenerse lejos menos que esté n supervisados de forma continua. • Este aparato puede ser utilizado por niños de 8 añ...
- Page 8 • ADVERTENCIA: Peligro de incendio: No almacene artí culos sobre las superficies de cocció n. • Advertencia: Si se agrieta la superficie, apagar el aparato para evitar la posibilidad de una descarga elé ctrica, para las superficies calientes de productos similares de cristal-cerá...
-
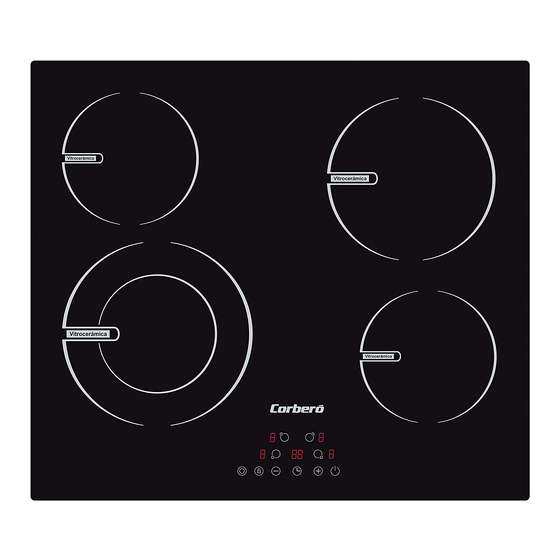
Page 9: Visió N General Del Producto
Visió n General del producto Visió n desde arriba CCV BR 6350 CCV BR 6450 1. zona max. 1100/2200 W 1. zona max. 1800 W 2. zona max. 1200 W 2. zona max. 1200 W 3. zona max. 1800 W 3. -
Page 10: Presentació N Del Producto
Presentació n del producto La placa vitrocerá mica puede satisfacer distintos tipos de necesidades culinarias debido a su calentamiento por resistencia, control por microordenador y selecció n multipotencia: la mejor elecció n para las familias modernas. La placa vitrocerá mica se centra en los clientes y adopta un diseñ o personalizado.La placa funciona de manera segura y fiable, haciendo su vida má... - Page 11 y es del mismo tamañ o que la zona de cocció n. Siempre debe centrar su cacerola en la zona de cocció n. Eleve siempre las cacerolas de la encimera de inducció n. No las arrastre, o pueden rayar el cristal Uso de su placa de Vitrocerá...
- Page 12 Funció n de Doble Zona • La función sólo funciona en la zona de cocció n 1 del modelo CCV BR 6450 y en la zona de cocció n 3 del modelo CCV BR 6350.
-
Page 13: Bloqueo De Los Controles
Activació n de la doble zona (por ejemplo nivel de potencia 6) 1.Presione el control de selecció n de zona de calentamiento de la doble zona 2. El indicador de nivel de potencia parpadeará , a continuació n, pulse "◎", despué... -
Page 14: Uso Del Temporizador
3. Ya puede empezar a usar la placa vitrocerá mica. Cuando la placa está bloqueada, todos los controles está n desactivados excepto ON/OFF siempre se puede encender la placa con el botó n ON/OFF en caso de emergencia, pero en la siguiente operació n deberá desbloquear en primer lugar Protecció... - Page 15 Establecer el tiempo tocando el control “-“ o "+" del temporizador (por ejemplo 5) 4. Toque el control de atenuació n de nuevo, el "0" parpadeará . 5. Establezca el tiempo tocando la tecla "-" o control "+" (por ejemplo.9), el temporizador se establece en 95 minutos.
- Page 16 3. Fije el tiempo tocando”-“ o ”+” en el botó n de control del temporizador (por ej., 5) 4. Toque el temporizador de nuevo y el “0” parpadeará . 5. Fije el tiempo tocando”-“ o ”+” en el botó n de control del temporizador (por ej., 9), y Ahora el temporizador está...
-
Page 17: Consejos De Cocina
(fijado en 15 minutos) (fijado en 45 minutos) 2. Una vez que expira el tiempo del temporizador, la zona correspondiente se apagará . A continuació n, se mostrará de Nuevo los minutos del temporizador y el punto de la zona correspondiente parpadeará . •... - Page 18 • Reduzca al mínimo la cantidad de líquido o grasa para reducir los tiempos de cocció n. • Inicie la cocció n en un ajuste alto de potencia y redú zcalo cuando la comida se caliente por completo. Cocinar a fuego lento, cocinar el arroz •...
- Page 19 Ajustes de calor Ajuste de Idoneidad calor • Calentamiento delicado para pequeñas cantidades de 1 - 2 alimentos • Fundir chocolate, mantequilla y alimentos que queman rá pidamente • Cocer a fuego lento suavemente • El calentamiento lento • recalentamiento 3 - 4 •...
-
Page 20: Limpieza Y Mantenimiento
Limpieza y mantenimiento ¿ Qué ? ¿ Có mo? ¡ Importante! Suciedad diaria 1. Desenchufe la placa de • Cuando la corriente de la placa se sobre el vidrio inducció n. apaga, no habrá ninguna indicació n (huellas dactilares, 2. Aplique un limpiador de "superficie caliente", pero la zona marcas, manchas placas mientras que el vidrio... - Page 21 Consejos y soluciones Problema Posibles causas Solució n La placa de No hay potencia. Asegú rese de que la placa de inducció n no se inducció n está conectada a la enchufa fuente de alimentació n y que está enchufada. Compruebe si hay un corte de electricidad en su casa o á...
-
Page 22: Especificaciones Técnicas
Especificaciones té cnicas Placa de vitrocerá mica CCV BR 6450 CCV BR 6350 Zonas de cocció n 4 Zones 3 Zones Voltaje 220-240V~ 220-240V~ Potencia elé ctrica 6400W 5700W Dimensiones de producto 590X520X55 590X520X55 (L×W×H(mm)) Dimensiones de 560X490 560X490 encastre(A×B (mm)) El peso y dimensiones son aproximados. - Page 23 Modelo L(mm) W(mm) H(mm) D(mm) A(mm) B(mm) X(mm) CCV BR 50 mini 6350 CCV BR 50 mini 6450 Asegúrese de que la placa de vitrocerá mica está bien ventilada y la entrada y salida de aire no estén bloqueadas. Asegúrese de que la placa está en buen estado de trabajo.
- Page 24 Precauciones 1. La encimera vitrocerá mica debe ser instalada por personal o té cnicos cualificados. Tenemos profesionales a su servicio. Por favor, no llevar a cabo la operació n por sí mismo. 2. La encimera vitrocerá mica no se instalará encima de equipos de refrigeració n, lavaplatos y secadores rotatorios.
- Page 25 Conexió n de la encimera a la red de alimentació n La fuente de alimentació n se debe conectar cumplimiendo la norma correspondiente, o en un disyuntor de un solo polo. El mé todo de conexió n se muestra a continuació n. 1.
-
Page 26: Ceramic Hob
Ceramic Hob Instruction Manual / Installation Manual MODEL: CCV BR 6450 CCV BR 6350 Stone, glass and ceramic pans are not suitable to use on a ceramic hob because they do not conduct heat well. -
Page 27: Safety Warnings
Safety Warnings PLEASE READ THE FOLLOWING INSTRUCTIONS CAREFULLY BEFORE USING THE APPLIANCE. Installation Electrical Shock Hazard • Disconnect the appliance from the mains electricity supply before carrying out any work or maintenance on it. • Connection to a good earth wiring system is essential and mandatory. - Page 28 as it could reduce your installation costs. • In order to avoid a hazard, this appliance must be installed according to these instructions for installation. • This appliance is to be properly installed and earthed only by a suitably qualified person. •...
-
Page 29: Health Hazard
cleaning or maintenance. • Failure to follow this advice may result in electrical shock or death. Health Hazard • This appliance complies with electromagnetic safety standards. Hot Surface Hazard • During use, accessible parts of this appliance will become hot enough to cause burns. •... -
Page 30: Important Safety Instructions
Important safety instructions • Never leave the appliance unattended when in use. Boilover causes smoking and greasy spillovers that may ignite. • Never use your appliance as a work or storage surface. • Never leave any objects or utensils on the appliance. - Page 31 qualified technician. • Do not use a steam cleaner to clean your cooktop. • Do not place or drop heavy objects on your cooktop. • Do not stand on your cooktop. • Do not use pans with jagged edges or drag pans across the glass surface as this can scratch the glass.
- Page 32 • Children shall not play with the appliance. Cleaning and user maintenance shall not be made by children without supervision. • WARNING: Unattended cooking on a hob with fat or oil can be dangerous and may result in fire.NEVER try to extinguish a fire with water, but switch off the appliance and then cover flame e.g.
-
Page 33: Product Overview
Product Overview Top View CCV BR 6350 CCV BR 6450 1. max. 1100/2200 W zone 1. max. 1800 W zone 2. max. 1200 W zone 2. max. 1200 W zone 3. max. 1800 W zone 3. 1050/1950/2700 W zone 4. max. 1200 W zone 4. -
Page 34: Product Information
Product Information The microcomputer ceramic hob can meet different kinds of cuisine demands because of resistance wire heating, micro-computerized control and multi-power selection, really the optimal choice for modern families. The ceramic hob centers on customers and adopts personalized design. The hob has safe and reliable performances, making your life comfortable and enabling to fully enjoy the pleasure from life. -
Page 35: Using Your Ceramic Hob
the same size as the cooking zone. Always centre your pan on the cooking zone. Always lift pans off the ceramic hob – do not slide, or they may scratch the glass. Using your Ceramic Hob To start cooking • After power on, the buzzer beeps once, all the indicators light up for 1 second then go out, indicating that the ceramic hob has entered the state of standby mode. -
Page 36: When You Have Finished Cooking
Double Zone Function • The function only work in 1# cooking zone of model CCV BR 6450 and 3# cooking zone of model CCV BR 6350. -
Page 37: Locking The Controls
• The dual cooking zone has two / three cooking areas that you can use a central section and an outer section. You can use the central section (A) independently or both sections (B) or (C) at once. Zone 1# Zone 3# Activate the double zone (e.g. -
Page 38: Residual Heat Warning
• When the controls are locked, all the controls except the ON/OFF control are disabled. To lock the controls Touch the keylock control. The timer indicator will show “Lo “ To unlock the controls 1. Make sure the ceramic hob is turned on. 2. - Page 39 2. Touch timer control , the “00” will show in the timer display. and the “0” fiashes. 3. Set the time by touching the”-“ or ”+” control of the timer (e.g. 5) 4. Touch timer control again, the “0” will flash. 5.
- Page 40 2. Touch timer control , the “00” will show in the timer display. and the “0” fiashes. 3. Set the time by touching the”-“ or ”+” control of the timer (e.g. 5) 4. Touch timer control again, the “0” will flash. 5.
- Page 41 If the timer is set on more than one zone: 1. When you set the time for several cooking zones simultaneously, decimal dots of the relevant cooking zones are on. The minute display shows the min. timer. The dot of the corresponding zone flashes. (set to 15 minutes) (set to 45 minutes) 2.
-
Page 42: Cooking Guidelines
Cooking Guidelines Cooking Tips • When food comes to the boil, reduce the power setting. • Using a lid will reduce cooking times and save energy by retaining the heat. • Minimise the amount of liquid or fat to reduce cooking times. •... -
Page 43: Heat Settings
6. Stir the ingredients gently to make sure they are heated through. 7. Serve immediately. Heat Settings Heat setting Suitability • delicate warming for small amounts of food 1 - 2 • melting chocolate, butter, and foods that burn quickly •... -
Page 44: Hints And Tips
Boilovers, melts, Remove these immediately with • Remove stains left by melts and a fish slice, palette knife or razor sugary food or spillovers as soon hot sugary spills on blade scraper suitable for as possible. If left to cool on the the glass ceramic glass cooktops, but glass, they may be difficult to... -
Page 45: Technical Specification
(layers of different metals vibrating differently). Technical Specification Cooking Hob CCV BR 6450 CCV BR 6350 Cooking Zones 4 Zones 3 Zones Supply Voltage 220-240V~ 220-240V~ Installed Electric Power... - Page 46 Model L(mm) W(mm) H(mm) D(mm) A(mm) B(mm) X(mm) CCV BR 50 mini 6350 CCV BR 50 mini 6450 Under any circumstances, make sure the ceramic cooker hob is well ventilated and the air inlet and outlet are not blocked. Ensure the ceramic cooker hob is in good work state.
- Page 47 Locating the fixing brackets The unit should be placed on a stable, smooth surface (use the packaging). Do not apply force onto the controls protruding from the hob. Fix the hob on the work surface by screw four brackets on the bottom of hob (see picture) after installation.
-
Page 48: Connecting The Hob To The Mains Power Supply
than 0.427 ohm. In case necessary, please consult your supply authority for system impedance information. Connecting the hob to the mains power supply The power supply should be connected in compliance with the relevant standard, or a single-pole circuit breaker. The method of connection is shown below. 1.
Need help?
Do you have a question about the CCV BR 6450 and is the answer not in the manual?
Questions and answers