Table of Contents
Advertisement
Quick Links
Advertisement
Table of Contents

Subscribe to Our Youtube Channel
Related Manuals for C Technologies C-Pen

Summary of Contents for C Technologies C-Pen
- Page 1 USER’S MANUAL E n g l i s h...
- Page 2 Improvements and changes to this manual necessitated by typographical errors, inaccuracies of current information, or improvements to programs and/or equipment, may be made by C Technologies AB at any time and without notice. Such changes will, however, be incorporated into new editions of this manual.
-
Page 3: Table Of Contents
Contents C PEN ............... 5 The Battery .................. 6 How C Pen Works ............... 7 The Buttons ................. 9 Turning On and Off ..............10 The Main Menu ................ 11 Reading text ................14 Reading another line ............... 16 Stop reading ................16 NOTES ............ - Page 4 C Pen C DICTIONARY ..........43 Dictionary license key .............. 43 Introduction ................44 Translation screen ..............45 Word selection list ..............46 Word selection screen .............. 47 Word edit box ................48 Word references ............... 48 Text Language ................49 DICTIONARIES button ..............
-
Page 5: C Pen
C PEN Congratulations - you have just bought yourself a photographic memory! C Pen is a Mobile Information Collector that reads, remembers, processes and transfers printed text cordlessly to your Windows-equipped PC. C Pen is in essence an electronic highlighter that remembers the text that you are marking. -
Page 6: The Battery
C Pen The Battery Attaching 1. Place the battery as shown below. 2. Push down until you hear a click. 3. Secure the battery by pushing the locking catch forward. Locking catch To remove the battery, press the locking catch away from the reading end of the pen and lift the battery upwards. -
Page 7: How C Pen Works
How C Pen Works As C Pen is moved over the text, C Pen’s internal light source illuminates the characters and a camera takes pictures of the text. These images are transformed to computer-readable text by an OCR-system. What is OCR? Optical Character Recognition is the process of turning an image into computer-readable text. - Page 8 C Pen • Anything that is not a printed character, and any character distorted by a mark or smudge on the paper could be unrecognizable. • Characters in the text should not overlap. • Underlined text is difficult for C Pen to read because the underline changes the shape of descenders of the letters q, g, y, p, and j.
-
Page 9: The Buttons
The Buttons Navigation control (Nav) Trigger button Press to select (Trigg) an item On/Off and Turn to navigate Escape (ESC) the menus button Turn the navigation control left or right to move in menus and text. Press it to select an item or option. -
Page 10: Turning On And Off
C Pen Turning On and Off To turn C Pen on and off, press and hold down the On/Off button until the display is activated/deactivated. C Pen turns off automatically after 4 minutes of non-use. To change the automatic power-off time, see Settings, p. -
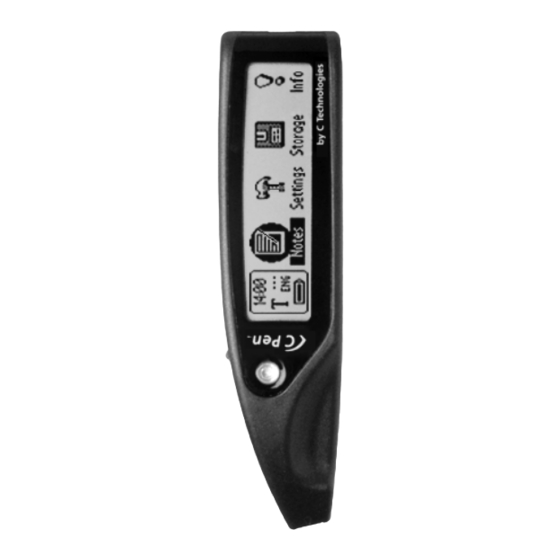
Page 11: The Main Menu
35. Storage is a storage area that can be used like a floppy disk when C-Pen is connected to a PC. In Storage you can store any kind of file. See Connecting to a PC, p. 51. - Page 12 C Pen Status field The area on the left is called the status field. This field displays the time, the current text settings and the battery indicator. Text settings are described in Settings, p. 30. Text quality Current time (see Settings) Text language (see Settings) Battery power Using dialogs...
- Page 13 List Box A list box contains a list of items that can be selected by the user. Edit Box It is possible to enter and edit text in an edit box. Select the box and the text will be highlighted. Use your C Pen to read a text or press Nav to enter edit mode.
-
Page 14: Reading Text
C Pen Reading text Please follow the instructions in this chapter in order to get the best results from your C Pen. Take a few minutes to learn how to use C Pen correctly. To read a line, follow the steps below. 1. - Page 15 4. Move C Pen over the line of text. Keep the trigger pressed as you move C Pen over the text. 0-15 cm/s 5. Release the trigger at the end of the line. The text will appear on the display. The collected text is placed in a new text file in Notes;...
-
Page 16: Reading Another Line
C Pen Reading another line Read the second line the same way you read the first. A space or a line break is inserted between the lines (see Read Mode under Settings, p. 31). You can also insert a line break by clicking Trigg once. The most recent line read is shown as negative text, i.e. -
Page 17: Notes
NOTES Notes contains the text files you have read. Enter Notes by moving the cursor to the Notes icon in the main menu and by pressing Nav. Inside Notes, move between items using Nav. The Command menu The Command menu contains commands for handling texts. -
Page 18: Creating A New File Or Folder
C Pen Creating a new file or folder To create a new file, close the open text, if any, and read a line. You can also create a new file with the command New… in Notes. Select FILE in the dialog box and press Nav. -
Page 19: The Edit Menu
Edit Enters edit mode. You can edit text either by using the Edit menu (see below) or by using C Write (see p. 22). Settings Sets the text settings of the text you are reading; see Settings, p. 30. Select Selects a read line/word. - Page 20 C Pen Delete Deletes a character or a selection. Select Selects characters or a whole text. Settings Sets the text settings of the text you are reading. Cancel Closes the edit menu. Change Place the cursor to the left of the character you want to change and choose Change from the menu.
- Page 21 When you are finished, press ESC to return to the text you are editing. Select Use the Select command to edit more than one character at a time. Choose Select > Characters and turn Nav to select multiple characters. Press Nav and choose Cut, Copy or Delete from the menu.
-
Page 22: C Write
C Pen C Write C Write is a feature that allows you to draw characters by using C Pen as an ordinary pen. C pen can track its own movement over a surface and recognize the movement as a letter, digit or a symbol. Using C Write is an alternative to using the character frame when inserting characters in a text. - Page 23 This visual feedback can be switched on/off in Settings. Select C Write Settings (called C Write if you enter Settings from Notes) and press Nav. A dialog box appears where you can check or uncheck the Feedback utility. Basic rules when using C Write •...
- Page 24 C Pen In order to write a capital letter, you have to write the shift sign first (see C Write Prototypes). Only the first letter will be a capital. The status field will reflect this choice. C Write Capital letter icon If you write two shift signs, C Write will enter Caps Lock mode.
- Page 25 C Write Prototypes Letters, digits and shift Shift Space Backspace...
- Page 26 C Pen...
- Page 27 Special characters Çç Ææ Øø Accents and umlauts Write the letter first and then the accent or umlaut. Example: ä = a + ¨ º ´ Symbols Enter symbol mode by pressing Trigg briefly.
- Page 28 C Pen “ < > ¿ ¡ £ § ß...
-
Page 29: Closing A Text
Closing a text Press Nav to open the text menu, then select Exit. C Pen prompts you to save before closing if changes have been made. Leaving Notes To leave Notes, close the open text and select Exit in the Notes application. -
Page 30: Settings
C Pen SETTINGS Settings contains the parameters controlling C Pen. Enter Settings from the main menu by moving the cursor to the Settings icon and pressing Nav. A list of the available settings appears. To modify a setting: 1. Select the setting from the settings list with Nav. A dialog box appears. -
Page 31: Text Language
Text Language Select the language of the text you are reading from the list of check boxes. If you read text containing numbers only, select Numbers Only as language. Read Mode This setting indicates how C Pen should format the readings. - Page 32 C Pen Calibration C Pen’s reading ability can be adjusted to the present contrast between the text and its background in the following way: 1. Hold C Pen with the pen tip flat against the surface. 2. Press Trigg for two seconds without moving C Pen. 3.
-
Page 33: C Write Feedback
Select Calibration and press Nav and a dialog box appears: In the calibration dialog box, select CANCEL to go back or DEFAULT SETTING to revert to the factory setting. If you press the scan button (Trigg), calibration will start. You can do a calibration whenever you use C Pen. This method increases C Pen’s reading ability if the text is not black and/or the background is not white. -
Page 34: System Settings
C Pen System Settings PIN code You can control the access of your C Pen by a four-digit code. Enter the PIN code setting to enable or disable your PIN (Personal Identification Number). When the dialog box opens, the zero in the first position is blinking. -
Page 35: Storage
Menu The language that C Pen uses in its Language menus and dialog boxes. Select the desired menu language in the list of check boxes. Power-off The time of inactivity in minutes before time C Pen turns off automatically. STORAGE Storage is a storage area that can be used as a floppy disk when C Pen is connected to a PC. -
Page 36: C Address
C Pen C ADDRESS C Address is an application in C Pen for storing and looking up contact information such as addresses, phone numbers and e-mail addresses to people and organiza- tions you communicate with. Start C Address by moving the cursor to the C Address icon in the main menu and press Nav. -
Page 37: Enter A New Contact
Enter a new contact To enter a new contact, select New... and press Nav. The Contact edit screen will open. Contact edit screen You can change the choice of contact details (addresses, phone numbers, e-mail addresses etc.) in OPTIONS. Select OPTIONS, press Nav and scroll through the options. - Page 38 C Pen a box called Full name. The name in this box will later be suggested as your contact file name. Continue reading text into the following boxes in the same way. You can always move to any box you want by turning Nav.
-
Page 39: View A Contact
A file name must not be longer than 64 characters. Invalid characters like ‘\’ or ‘.’ will be replaced with a blank space. If the file name already exists, a number suffix will be added to the file name, for instance ‘John Mill (1)’... -
Page 40: Edit A Contact
C Pen To select OK or EDIT, first press Nav to deactivate the scroll bar - the rectangle stops blinking - then turn Nav to go to the buttons. If the buttons are not visible, just turn Nav to the right to scroll the text sideways. Edit a contact There are two ways to edit a contact: 1. -
Page 41: Delete A Contact
If the Search all fields check box is checked, all informa- tion stored in C Address will be searched in order to find matching text. If the check box is not checked only names will be searched, (First name, Last name and Full name). To start the search, select Find and press Nav. -
Page 42: Exit C Address
C Pen Exit C Address You can exit C Address from the C Address main screen by selecting EXIT and pressing Nav or by pressing ESC. -
Page 43: C Dictionary
C DICTIONARY C Dictionary is an application where you can translate a word from one language to another. One word is trans- lated at a time, but you can read several words at the same time and then select and translate word by word. Dictionary license key After a dictionary is installed, you must enter the dictionary key for this dictionary. -
Page 44: Introduction
C Pen Introduction Start C Dictionary by moving the cursor to the C Dictionary icon in the main menu and press Nav. C Pen is now ready to read words to be translated. If you want to change dictionary before you start reading, see DICTIONARIES button p. -
Page 45: Translation Screen
3. Several words are read and the words are shown in a new screen (see Word selection screen p. 47). 4. A dialog box appears, telling that the word cannot be found in the dictionary. When you are reading a word it may happen that the word (or part of the word) in front of and/or behind your look up word is also included. -
Page 46: Word Selection List
C Pen Pressing Trigg briefly will delete the current reading and bring you back to the C Dictionary main screen. You can start reading a new word without closing the screen. Word selection list If the look up word doesn’t match any word in the dictionary, the application will search for similar words and present these alternatives in a Word selection list. -
Page 47: Word Selection Screen
Close the Word selection list by selecting Cancel and press Nav or by pressing the ESC-button. Pressing Trigg briefly will delete the current reading and bring you back to the C Dictionary main screen. You can start reading a new word without closing the list. Word selection screen If more than three words are read the Word selection screen appears. -
Page 48: Word Edit Box
C Pen Word edit box The read word or words are directed to an edit box where you can edit them in the usual way. To be able to do this you must first close dialogs, lists or screens that have turned up after reading. -
Page 49: Text Language
In this menu you can select to look up the reference, canceling the menu or closing the translation containing the reference (wrote in our example). If you choose to look up the reference (write in our example), this word will be translated. Text Language The Text Language is automatically set to the language you are translating from;... -
Page 50: Info Button
C Pen If you want to use the same dictionary the next time you use your C Pen you do not have to repeat this procedure, since the dictionary setting is stored when C Pen is turned off. INFO button The INFO button displays information about the currently selected dictionary;... -
Page 51: Connecting To A Pc
CONNECTING TO A PC C Pen can be connected to a PC by Infrared (IR) Commu- nication. To enable this communication certain hardware and software must be installed on your PC and config- ured properly. The following are required: 1. IR port. Portable computers often have a built-in IR port. - Page 52 C Pen file does not help, please refer to C Pen Windows Software Help or your notebook’s retailer or manufac- turer. To install C Pen Windows Software: 1. Put the C Pen Software CD into your computer’s CD- ROM drive and the installation program will start automatically.
-
Page 53: Getting Help
C Pen is within range of the computer’s IR port, the On/ Off button flashes with a green and red light). The installation program will place the C Pen icon (My C Pen) on your computer’s desktop. Double-click on the icon to connect to C Pen. -
Page 54: C Address
C Pen Pen Viewer, find the file you want to transfer (e.g. a text file in Notes) and drag the file to a folder on your PC. When transferring files from the PC to C Pen, remember that each application, except Storage, accepts only its own kind of files. -
Page 55: C Direct
C Direct C Direct gives you the opportunity to enter text from your C Pen at the cursor position in all Windows pro- grams. To activate C Direct place C Pen in front of the IR-port on your PC, click the right mouse button on the C Pen icon (My C Pen) and select C Direct from the menu. -
Page 56: Storage
C Pen is automatically opened in C Pen Edit and it can be saved directly back into C Pen. Storage To start using Storage, double-click its icon in C Pen Viewer. Files in Storage are opened if you double-click on them. Text files (files with the extension .txt) are opened by C Pen Edit. -
Page 57: Troubleshooting
TROUBLESHOOTING Problem: C Pen won’t turn on. Solution: Battery is not charged. Charge battery or use AC/DC adapter. You must press the On/Off button for two seconds. Problem: The text on the display does not match the text you are reading. Solutions: Make sure you have chosen the correct language under Settings. - Page 58 C Pen Problem: The infrared communication to the PC does not work. Solutions: Make sure that you have an external IR receiver installed on your stationary PC. If you have a portable PC, it is normally equipped with a built-in IR receiver. Check the infrared under the Control panel in Windows 95/98.
-
Page 59: Care & Safety
CARE & SAFETY • Keep C Pen away from direct sunlight, heat, moisture and dust. • Do not expose C Pen to extreme variations in tempera- ture. • Make sure that the camera opening is free from dust or any other objects. •... -
Page 60: Technical Specifications
C Pen TECHNICAL SPECIFICATIONS Size: 150x38x23 mm Weight: 100 g (with battery installed) Display: 202x32 pixels, 40 characters per row, 4 rows © ™ Processor: Intel StrongARM 100 MHz proces- Memory: 1 MB RAM 8 MB flash memory, of which 6 MB can be used for text files Reading speed: max 15 cm/s (up to 75 characters/s) Character sizes: 7-18 points... - Page 61 INDEX Battery 6 Main Menu 11 Battery indicator 12 Menus 13 Buttons 9 Navigation control, Nav 9 C Address 36, 54 Notes 17 C Dictionary 43, 54 C Direct 55 OCR 7 C Pen Edit 55 C Pen Viewer 53 PIN code 34 C Write 22 C Write Prototypes 25...
-
Page 62: Warranty
C Technologies AB warrants that this product is free from defects in materials and function at the time of original purchase and for a period of one year from that date. When the name C Technologies is mentioned in the following text, it means, unless otherwise stated, C Technologies AB (reg. number 556532-3929), its subsidiaries and retailers.
Need help?
Do you have a question about the C-Pen and is the answer not in the manual?
Questions and answers