Table of Contents
Advertisement
Quick Links
All manuals and user guides at all-guides.com
Contents
1. Introduction ............................................................................................... 2
2. Get Started . ............................................................................................... 2
2.1 Parts List ........................................................................................ 2
2.2 Recommend Tools . ........................................................................ 3
2.3 Thermometer Sensor Set Up ....................................................... 3
2.4 Display Console Set Up . ............................................................... 3
2.4.1 Display Console Layout . ............................................................ 5
2.4.2 Sensor Operation Verification . .................................................. 5
3. Wireless Sensor Installation . .................................................................. 5
3.1 Mounting with Zip Tie .................................................................... 6
3.2 Mounting with Nail or Screw ........................................................ 6
4. Console Operation . .................................................................................. 7
4.1 Setting for 12/24hr Switch, Time and °C/°F Switch .................. 7
4.2 Setting for Alarm Clock ................................................................. 7
4.3 Setting for Min/Max Record . ......................................................... 7
4.4 Setting for RF Channels ............................................................... 8
5.Sensor Resynchronization . ...................................................................... 8
6.Best Practices for Wireless Communication . ........................................ 9
7.Specifications ............................................................................................ 9
7.1 Wireless Specifications . ................................................................ 9
7.2 Measurement Specifications . ....................................................... 9
7.3 Power Consumption ...................................................................... 9
8. FCC Statement....................................................................................... 10
9. Warranty Information ............................................................................. 12
Instruction Manual
User Manual
1
Advertisement
Table of Contents

Subscribe to Our Youtube Channel
Related Manuals for ECOWITT WH0280


Summary of Contents for ECOWITT WH0280
-
Page 1: Table Of Contents
All manuals and user guides at all-guides.com Instruction Manual User Manual Contents 1. Introduction .................... 2 2. Get Started .................... 2 2.1 Parts List .................. 2 2.2 Recommend Tools ................. 3 2.3 Thermometer Sensor Set Up ............ 3 2.4 Display Console Set Up .............. 3 2.4.1 Display Console Layout ... -
Page 2: Introduction
All manuals and user guides at all-guides.com Instruction Manual 1. Introduction Thanks for your purch asing of the WH028 0 Wirel ess Indoor/Outdoor Thermometer with Indoor Humidity . T o ensure the best product performance, please read this ma nual and r etain it for future reference. -
Page 3: Recommend Tools
All manuals and user guides at all-guides.com Instruction Manual 2.2 Recommend Tools Hammer for hanging remote thermometer transmitter. 2.3 Thermometer Sensor Set Up 1. Remove the battery door on the ba ck of the sensor by sliding t he compartment door down, as shown in Figure 1. - Page 4 All manuals and user guides at all-guides.com Instruct tion Manual by the di isplay conso ole). . Remov e e the battery y door on the e back of t h he display, a as shown in Figure 2 2.
-
Page 5: Display Console Layout
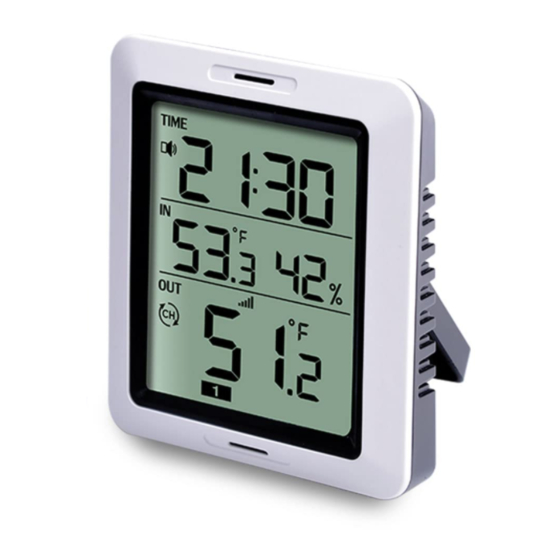
All manuals and user guides at all-guides.com Instruction Manual 2.4.1 Display Console Layout Figure 3 1. Alarm Clock Icon 2. Current Indoor Temperature 3. RF Channels 4. Time 5. Current Indoor Humidity 6. Outdoor Reception Icon 7. -
Page 6: Mounting With Zip Tie
All manuals and user guides at all-guides.com Instruct tion Manual .1 Mounting g with Zip T Mounting the e sensor with h a zip tie w ill result in b better accura acy when mounting out tside, since it is not touc ching anothe er object. -
Page 7: Console Operation
All manuals and user guides at all-guides.com Instruction Manual 4. Console Operation Note: The console has two buttons for easy operation: 【 CH/+】 button (on the left), and【MODE】button (on the right). If no operation for 30s, display will return back to normal mode. 4.1 Setting for 12/24hr Switch, Time and °C/°F Switch Long press【MODE】button 2s, step into setting mode. -
Page 8: Sensor Resynchronization
All manuals and user guides at all-guides.com Instruct tion Manual .1 Min value e mode . Short pres ss【MODE】 for twice, s step into Min n value displ ay mode. . Short pre s ss【CH/+】 to select o t ther availab le outdoo r s sensor Min... -
Page 9: Best Practices For Wireless Communication
All manuals and user guides at all-guides.com Instruction Manual 6.Best Practices for Wireless Communication Note: To insure proper communication, mount the remote sensor on a vertical surface, such as a wall. Do not lay the sensor flat. Keep the console several feet away from computer monitors and TVs. 7.Specifications 7.1 Wireless Specifications ... -
Page 10: Fcc Statement
All manuals and user guides at all-guides.com Instruction Manual 8. FCC Statement Statement according to FCC part 15.19: This device complies with part 15 of the FCC rules. Operation is subject to the following two conditions: 1. This device may not cause harmful interference. 2. - Page 11 All manuals and user guides at all-guides.com Instruction Manual more of the following measures: • Reorient or relocate the receiving antenna. • Increase the separation between the equipment and receiver. • Connect the equipment into an outlet on a circuit different from that to which the receiver is connected.
-
Page 12: Warranty Information
All manuals and user guides at all-guides.com Instruction Manual 9. Warranty Information We disclaim any responsibility for any technical error or printing error, or their consequences. All trademarks and patents are recognized. We provide a 1-year limited warranty on this product against manufacturing defects in materials and workmanship.
Need help?
Do you have a question about the WH0280 and is the answer not in the manual?
Questions and answers