Table of Contents
Advertisement
Advertisement
Table of Contents

Related Manuals for ECOWITT WH32


Summary of Contents for ECOWITT WH32
- Page 1 Wireless Outdoor Thermometer and Hygrometer Sensor Model: WH32...
-
Page 2: Table Of Contents
Contents 1 Introduction.............3 2 Getting Started..........4 2.1 Parts List..........4 3 Overview............5 4 Setup Guide........... 7 5 Sensor Placement.........9 6 Setup Guide using Wi-Fi Gateway... 12 6.1 Replacing an existing sensor unit.14 7 View Online Data on WS View....17 8 Specification..........20 9 Warranty Information........ -
Page 3: Introduction
1 Introduction Thank you for purchasing this WH32 wireless outdoor thermometer and hygrometer sensor. This unit measures outdoor temperature, and humidity. The data can be received by the GW1000 Wi-Fi Gateway (sold separately) and can be viewed using the WS View mobile application (after Wi-Fi configuration on the gateway has been completed). -
Page 4: Getting Started
2 Getting Started 2.1 Parts List Inside the product packaging you should find the following: Item Description Outdoor Temperature and Humidity sensor User Manual Table 1: Package Content If any component is missing or broken, please contact our Customer Service department to resolve the issue. -
Page 5: Overview
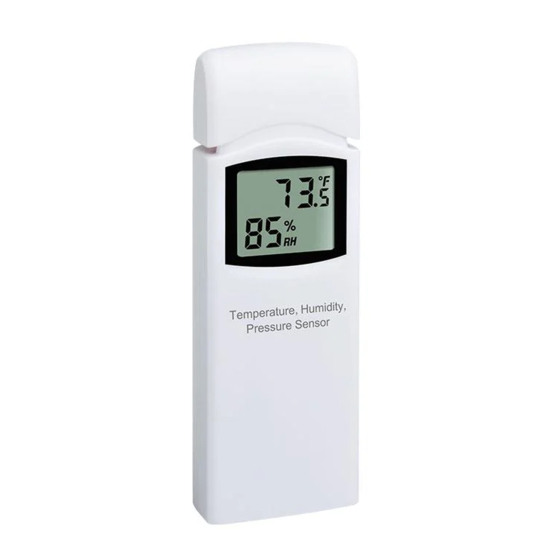
rechargeable batteries, might detect it as low battery power mistakenly. 3 Overview Figure 1: Outdoor Thermo-Hygro sensor... - Page 6 Figure 2: Sensor display layout Temperature reading Temperature unit Relative Humidity (%) Note: The sensor will use US(°F) or metric unit(°C), as appropriate for the locale where the unit was sold.The unit is fixed and could not be changed.
-
Page 7: Setup Guide
4 Setup Guide Note: To avoid permanent damage, please take note of the battery polarity before inserting batteries. Looking at Figure 3 from left to right, the left-most (or bottom) battery is to be installed with its + terminal pointing down, and the other battery with its + terminal pointing up. - Page 8 Figure 3: Sensor battery installation...
-
Page 9: Sensor Placement
5 Sensor Placement The sensor unit is weather proof and meant provide outdoor conditions for display on the WS VIEW application. strongly suggest to place the sensor unit in a location shielded from precipitation, sprinklers etc. (e.g. under an eve or awning). - Page 10 exposed to any nearby radiant heating (radiator, heater, metal surface in direct sunlight, etc.). To mount or hang the unit on a wall or wood beam: Use a screw or nail to affix the remote sensor to the wall, as shown on the left side of Figure 4, or Hang the remote sensor using a ...
- Page 11 Figure 4: Sensor mounting Note: Make sure the sensor is mounted vertically and not lying down on a flat surface. This will insure optimal transmission/reception. Wireless signals impacted distance, radio interference (caused by other weather stations, wireless phones, wireless...
-
Page 12: Setup Guide Using Wi-Fi Gateway
routers, televisions, computer screens and other electronics), and transmission barriers, such as walls. In general, wireless signals will not penetrate solid metal and earth (down a hill, for example). 6 Setup Guide using Wi-Fi Gateway If you wish to view the sensor data on your mobile device, you need to pair this sensor device with the Wi-Fi Gateway... - Page 13 WH32 sensor close to the gateway(keep 5ft away from each other) and insert batteries into the WH32 sensor. Wait for 1-2 minutes, the sensor data will display on the Live Data page of the app then.
-
Page 14: Replacing An Existing Sensor Unit.14
6.1 Replacing an existing sensor unit If this sensor is a replacement for a previous unit, ensure the previous unit is powered down and follow the steps below: Insert the batteries to power up the new sensor unit. Open the WS View app – select Device List on Menu –... - Page 15 Figure 5: WS View Sensor ID Screen...
- Page 16 Find the WH32 sensor picture and click Re-register. After 1-2 minutes, the new sensor ID will displayed. Back to the Live Data page and the new sensor data should display there. It is best to always do this in the vicinity...
-
Page 17: View Online Data On Ws View
7 View Online Data on WS View After correct Wi-Fi configuration on the gateway, you can view all sensor data on the “Live Data” screen of the WS View application. Figure 6: WS View Live Data Screen (IOS & Android) - Page 18 GW1000 gateway, you don’t need to operate it again. 2.We have a similar product: WH31 Multi-channel Temp Humidity sensor. Here are the differences between WH32 and WH31 sensor:...
- Page 19 4). One GW1000 can receive max 8 WH31 sensor data. 5). The WH32 sensor data can be uploaded to weather underground, while the WH31 could not. 6). Both the WH32 and WH31 data can be uploaded to https://www.ecowitt.net. 7).The WH31 work...
-
Page 20: Specification
8 Specification Power: 2 AA batteries (not included) Sensor Size: 123x42x14mm Frequency: 915/868/433 MHz (optional) Temperature range: -10°C ~ 60°C (14°F - 140°F) Temperature display resolution: 0.1°C, or 0.1°F Temperature accuracy: ± 1°C Humidity range: 10% ~ 99% ... -
Page 21: Warranty Information
9 Warranty Information We disclaim any responsibility for any technical error or printing error, or the consequences thereof. trademarks patents recognized. We provide a 1-year limited warranty on this product against manufacturing defects, or defects in materials and workmanship. This limited warranty begins on the original date of purchase, is valid only on products purchased, and only to the original purchaser of this product. - Page 22 This limited warranty covers only actual defects within the product itself and does not cover the cost of installation or removal from a fixed installation, normal set-up or adjustments, or claims based on misrepresentation by the seller, or performance variations resulting from installation-related circumstances.
Need help?
Do you have a question about the WH32 and is the answer not in the manual?
Questions and answers