Table of Contents
Advertisement
Quick Links
WATER DAY
NEXT START
WATER
AM
PM
TODAY
SU
ZONE
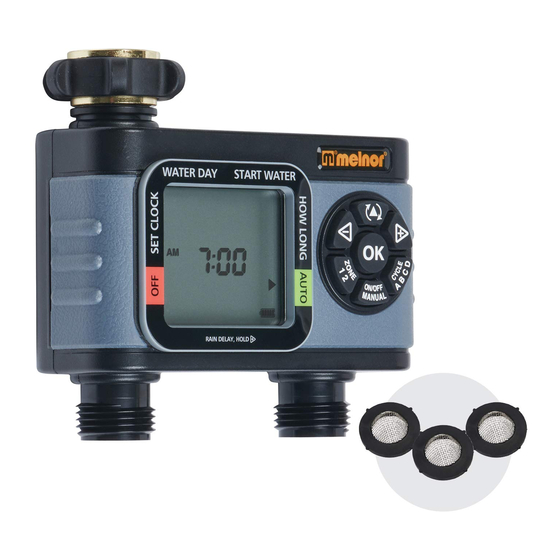
65076-AMZ
Advanced Two-Zone Electronic Water Timer
User Instructions
WATER DAY
START WATER
CYCLE
NEXT START
TIME
A B C D
WATER
DAY
EVERY
DELAY
AM
HRS
PM
DAY
MIN
TODAY
SU
MO
TU
WE
TH
FR SA
ZONE
MANUAL
RESET
1 2 3 4
RAIN DELAY, HOLD
Zone 1
1
Understanding Zones
This is a two zone timer allowing you to water two different areas from the same faucet.
■
Each zone can be programmed with up to four different start times.
■
You can use the PLANNING TABLE provided on the back of this sheet to help organize your
■
watering schedule for each zone.
2
Battery Installation & Assembly
Remove the battery holder from the back of the Timer
■
Control Unit. Insert two AA alkaline batteries (Do not use
rechargeable batteries) as indicated on the battery holder.
Replace the battery holder, making sure that it is firmly
and securely placed in the Timer Control Unit.
NOTE: Do not use your timer when the air temperature is
■
below 40°F (4.5° C). When storing your timer, be sure it is
in a dry place and protected from frost.
We recommend replacing batteries when the indicator reaches
Installation of the Timer
Attach the timer to an outside faucet and turn on the water. The water must be left on while the
■
timer is attached to the faucet for your timer to operate.
NOTE: You may choose to program your timer before or after attaching it to the faucet.
■
3
SET CLOCK: "Set Current Time and Day"
The Water Timer default setting is a 12-hour mode (AM/PM). To ensure correct timing,
■
look for either AM or PM to the left of the time. To switch between 12-hour (AM/PM) and
24-hour (military time), hold the
while 24-hour mode does not. Note: Changing time mode will erase all programs.
Before setting your watering times, you must first set the current time and day of the week.
■
When the batteries are first installed, the arrow in the screen will point to CLOCK. If it is not in
button until the arrow is pointing to CLOCK.
that position, press the
On your screen, a flashing box will appear around the SU.
■
Simply set the timer to the current day by pressing the
and
buttons on the touchpad until the square is on
the correct day. Once the correct day has been indicated,
press the
button.
To set the time, press the
and
■
correct time appears on the screen, and then press
Press the
button (at the top of the touch pad) to move
■
to WATER DAY.
START WATER
CYCLE
TIME
A B C D
DAY
EVERY
DELAY
OK
HRS
DAY
MIN
MO
TU
WE
TH
FR SA
MANUAL
RESET
1 2 3 4
RAIN DELAY, HOLD
English
■
65076AMZ_INS_ENG_00
Cursor Button
+/- Buttons
OK
OK Button
Cycle Button
Manual Watering Button
Zone Button
Battery Indicator
Zone 2
button for 5 seconds. 12-hour mode shows AM or PM
WATER DAY
NEXT START
WATER
DAY
AM
PM
buttons until the
TODAY
SU
MO
TU
.
ZONE
RESET
1 2 3 4
RAIN DELAY, HOLD
4
WATER DAY: "What days do you want to water?"
Check to be sure that the arrow on the screen is pointing to WATER DAY. With this setting, you
■
can select specific days to water or an interval period of the day when watering will occur.
To set the watering day, use the
■
water. Press the
can select as many days as you like. The days selected will have a square around them.
To water at preset intervals, press the
■
the week. Press the
7 DAY(s) ).
Press the
■
Note: You will see Zone 1 highlighted at the bottom of
the screen; program Zone 1 before moving on to Zone 2.
5
START WATER: "What time-of-day do you want to water?"
You can select up to four independant start times (CYCLE A, B, C, D). With the arrow pointing
■
to Start Water on your screen, CYCLE A should be highlighted, use the
select the first watering time.
If you want to set another START WATER time, press
■
process above to set the next START WATER time. You may select up to four START WATER
times.
When you have set all desired START WATER times, press
■
the
Hold the
or
6
HOW LONG: "Set the length of each watering cycle."
With the arrow pointing to HOW LONG, use the
■
watering cycle. After setting HOW LONG you want to water during a selected cycle, press
to move to the next cycle. Repeat until HOW LONG has been set for each cycle.
HOW LONG can be set for up to 360 minutes (6 hours) for each watering cycle. The Cycle
■
length cannot overlap the next START WATER time.
Note: You can only select Watering Cycles if you have set a start time in Step 5 above.
■
7
SETTING ANOTHER ZONE: "Keep your plants watered on separate cycles."
When you have set WATER DAY, START WATER, and HOW LONG for Zone 1, press the
■
button back to WATER DAY.
Press
■
When all desired zones are set, press the
■
8
AUTO MODE: "Your timer is ready to go."
In AUTO Mode, your timer will run the watering program you have entered.
■
The screen display will alternate between showing the current time and the next watering cycle
■
of each zone.
START WATER
CYCLE
TIME
A B C D
EVERY
DELAY
HRS
DAY
MIN
WE
TH
FR SA
MANUAL
and
buttons to select the day-of-the-week you wish to
button when the desired day-of-the-week is highlighted on the screen. You
button on the buttonpad to navigate past the days of
and
buttons to set the time period (EVERY 1 DAY through EVERY
button to move to START WATER.
button to move to HOW LONG.
buttons to advance settings more quickly.
to select Zone 2, and repeat steps 4-6 above.
button to enter AUTO mode.
WATER DAY
START WATER
CYCLE
NEXT START
TIME
A B C D
WATER
DAY
EVERY
DELAY
AM
HRS
PM
DAY
TODAY
MIN
SU
MO
TU
WE
TH
FR SA
ZONE
MANUAL
RESET
1
2
RAIN DELAY, HOLD
and
buttons to
to move to CYCLE B. Repeat the
WATER DAY
START WATER
CYCLE
NEXT
START
TIME
A B C D
WATER
DAY
EVERY
DELAY
HRS
AM
PM
DAY
MIN
TODAY
SU
MO
TU
WE
TH
FR SA
ZONE
MANUAL
RESET
1 2 3 4
RAIN DELAY, HOLD
and
buttons to select the length of each
WATER DAY
START WATER
CYCLE
NEXT START
TIME
A B C D
WATER
DAY
EVERY
DELAY
AM
HRS
PM
DAY
TODAY
MIN
SU
MO
TU
WE
TH
FR SA
ZONE
MANUAL
RESET
1 2 3 4
RAIN DELAY, HOLD
WATER DAY
START WATER
CYCLE
NEXT START
TIME
A B C D
WATER
DAY
EVERY
DELAY
HRS
AM
PM
DAY
MIN
TODAY
SU
MO
TU
WE
TH
FR SA
ZONE
MANUAL
RESET
1
2
RAIN DELAY, HOLD
Advertisement
Table of Contents

Related Manuals for Melnor HydroLogic 65076-AMZ


Summary of Contents for Melnor HydroLogic 65076-AMZ
- Page 1 WATER DAY: “What days do you want to water?” Check to be sure that the arrow on the screen is pointing to WATER DAY. With this setting, you ■ can select specific days to water or an interval period of the day when watering will occur. To set the watering day, use the buttons to select the day-of-the-week you wish to ■...
- Page 2 Adjust the dial to maintain just the right amount Start Water (Time) of moisture for healthy lawns and gardens. www.melnor.com How Long (Minutes) Learn more at Warning: Intended for outdoor use only. Severe electrical shock could result if water is sprayed into outlets or sources of electrical current. Do not use water more than 115°F (46°C). Do not use when the...
Need help?
Do you have a question about the HydroLogic 65076-AMZ and is the answer not in the manual?
Questions and answers