Advertisement
Available languages
Available languages
Quick Links
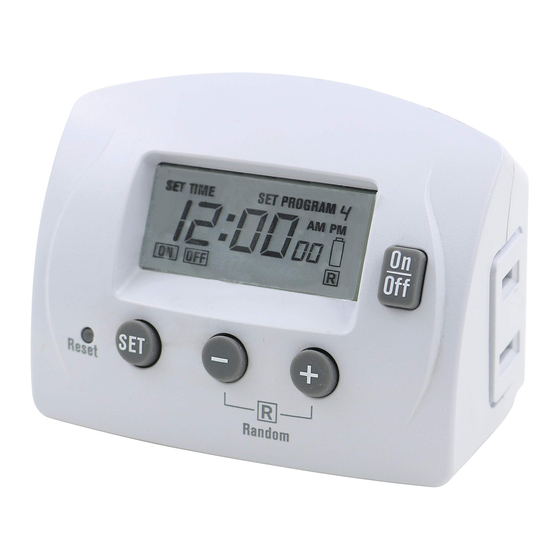
24-Hour
Repeating Cycle
DIGITAL
TIMER
MODEL #TNID7111
Start Here:
Step 1. – Prepare the Timer
1. Pull the sticker off the screen.
2. Plug the timer in for 30 minutes to charge the
battery.
3. After 30 minutes, remove the timer from the outlet
and move to Step 2.
* If timer is not flashing 12:00AM, please see reset
instructions.
Step 2. – Set the Current Time
1. Press "SET" twice.
2. While the hour is flashing , press "+" or "-" to set
the current hour.
-Pay attention to AM and PM
3. Press "SET" once.
4. While the minutes are flashing, press "+" or "-" to
set the current minute.
5. Press "DAY" until the current day is selected.
6. Press "SET" to save the Current Time.
Step 3. – Set an ON/OFF Time
1. Press "SET" once.
2. Press "+" to choose a program (1-4)
3. Press "SET" to enter the program (1-4) of your
choice.
-You can set up to 4 different programs
4. Press "+" or "-" to set the hour you would like the
timer to turn on.
-Pay attention to AM and PM
5. Press "SET" once.
6. Press "+" or "-" to set the current minute.
7. Press "SET" to save the ON time and begin
setting the OFF time.
8. Press "+" or "-" to set the hour you would like the
SET TIME
SET PROGRAM
4
12 : 00
timer to turn OFF.
AM PM
On
00
-Pay attention to AM and PM
Off
ON
OFF
R
9. Press "SET" once.
-
+
SET
10. Press "+" or "-" to set the current minute.
R
11. Press "SET" to save your ON/OFF Time.
Operating Modes
Manual Override
•
Press ON/OFF to bypass the
current setting. Settings will
resume based on the next
programmed cycle.
Random
•
Press "+" and "-" at the same
time to enter or exit the
Random mode.
•
At least one ON/OFF time
must be set for a minimum
of 2 hours and 10 minutes
for Random function.
Reset the Timer
•
Using a small non-metallic object, such as a tooth
pick or pencil press and hold the reset button for
5 seconds.
•
The display will flash "12:00am" when the timer is
reset.
Reviewing, Changing, and Deleting ON/OFF
Times
Review an ON/OFF Time
1. Press "SET" once.
2. Press "+" until the desired program is reached.
3. Press "SET" to enter the program, and continue
pressing "SET" to review the program one setting
at a time.
Change an ON/OFF Time
1. Press "SET" once.
2. Press "+" until the desired program is reached.
3. Use instructions Step 3: 3-13 to change the
ON/OFF time.
SET TIME
SET PROGRAM
4
12 : 00
Delete an ON/OFF Time
AM PM
On
00
Off
R
ON
OFF
1. Press "SET" once.
-
+
SET
2. Press "+" until the desired program is reached.
R
3. Press "SET" to enter the "ON" setting of the
selected program.
4. Press and hold "-" until the clock shows "-:--"
SET TIME
SET PROGRAM
4
12 : 00
AM PM
On
5. Press "SET" twice to enter the "OFF" setting.
00
Off
ON
OFF
R
6. Press and hold "-" until the clock shows "-:--"
-
+
SET
7. Press "ON/OFF" to save the changes.
R
For additional programming assistance, watch
the instructional videos on our website:
www.primewirecable.com -
Look under the Technical Support tab for
"Timer Programming Videos".
IN CASE OF POWER FAILURE
Timer will continue to operate on battery backup if
the power goes out; however, it will not turn
attached devices on or off. Once power is restored,
programming will resume. If power remains out
longer than the battery backup will operate,
re-program the timer as explained in Steps 1, 2 and
3 of the "Programming Instructions". NOTE: Battery
is permanently installed and not replaceable. It
automatically recharges when power is provided to
the timer.
Advertisement

Related Manuals for Prime TNID7111


Summary of Contents for Prime TNID7111
- Page 1 3. Press “SET” to enter the program, and continue pressing “SET” to review the program one setting 11. Press “SET” to save your ON/OFF Time. at a time. MODEL #TNID7111 Change an ON/OFF Time 1. Press “SET” once. Start Here: 2.
- Page 2 For Indoor Use Only. 1. This device may not cause harmful interference, and effective only if such unit is returned to Prime not later than 2. This device must accept any interference received, thirty (30) days after the expiration of the warranty period.
- Page 3 8. Pulse “+” o ”-” para fijar la hora que desea que el Cambiar una hora de encendido/apagado MODELO #TNID7111 temporizador se apague. 1. Pulse “SET” (FIJAR) una vez. -Preste atención a si se trata de la mañana (AM) o la tarde (PM) 2.
- Page 4 Peligro de descarga eléctrica FCC. El funcionamiento está sujeto a las siguientes dos FCC. El funcionamiento está sujeto a las siguientes dos sólo si la unidad se devuelve a Prime a más tardar treinta (30) Mantenga a los niños alejados. Desenchufe el condiciones: condiciones: días tras el vencimiento del período de garantía.
Need help?
Do you have a question about the TNID7111 and is the answer not in the manual?
Questions and answers
I need an instruction on how sto set the light timer 24 hours
To set the 24-hour light timer on the Prime TNID7111, follow these steps:
1. Charge the Battery: Plug in the timer for 30 minutes to charge the internal battery.
2. Set the Time:
- Press the SET button once until the time starts flashing.
- Press SET again to adjust the hour using the + and - buttons. Ensure AM/PM is correct.
- Press SET again to adjust the minutes using + and -.
- Press SET to confirm the time.
3. Set the On/Off Programs:
- Press SET once.
- Press + or - to select the hour the timer should turn on.
- Press SET again and adjust the minutes.
- Press SET to confirm the ON time.
- Repeat the process to set the OFF time.
- Continue for up to four different on/off programs if needed.
4. Confirm and Activate: Ensure the timer is plugged in and the programmed settings are correct.
The timer will now operate based on the set schedule.
This answer is automatically generated