Advertisement
Available languages
Available languages
Quick Links
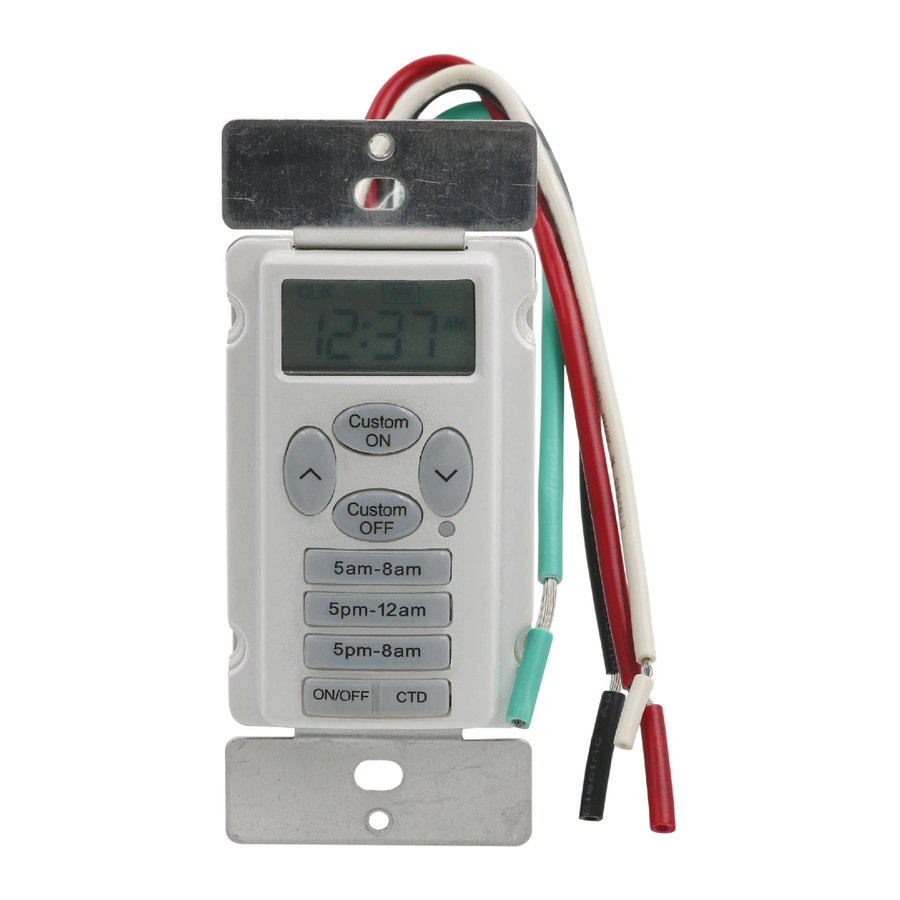
EZ-SET DIGITAL
IN-WALL TIMER
Call customer service at 1-888-445-9955,
8 a.m. - 5 p.m., PST, Monday - Friday.
IMPORTANT PRODUCT INFORMATION
Single Pole: Timer will control devices from one location.
Do not use in a 3-Way application where multiple switches
control the same device.
Neutral Wire: Must be available as part of the wiring of
the building. Timer will not function properly if a neutral
wire is not available.
Direct Wire: This timer is only intended to be permanently
installed into an electrical wall box.
Tool Required: One (1) standard flathead screwdriver.
(not included)
PROGRAMMING INSTRUCTIONS
STEP 1 - Set the time
• Use the up (
) and
down (
) arrow to set the
current time.
ADDITIONAL FEATURES
CUSTOM COUNTDOWN:
• Press "CTD".
• Press up (
) and down (
) arrow to set the
countdown from 1 minute to 24 hours.
(Note: "CTD" will flash on LCD to indicate the
countdown feature is active)
MODEL #TNIWP
INSTALLATION INSTRUCTIONS
1. Turn off power at circuit breaker or fuse box before
uninstalling existing device or installing new timer.
2. Remove existing wall plate and switch from wall box.
3. Make sure the following 3 wires are present in the wall
box. (see Diagram A)
i. 1 Hot Wire from circuit breaker box
ii. 1 Load Wire to the device to be powered
iii. 1 Neutral Wire
If one or more of these are not present, this timer will
not function properly. Additional wiring to the wall box
will be required before installation of this timer can be
completed.
4. Strip wires 1/2 inch long. (see Diagram A)
5. Use the included wire nuts and securely twist together
to attach the timer wires to the building wires. (see
Diagram A)
6. Insert timer into wall box (2-1/2 inch) being careful not to
pinch any wires. Be sure timer is upright with LCD
screen located at the top of the timer. (see Diagram B)
7. Fasten timer to the wall box using screws provided.
(see Diagram B)
8. Place rocker/decorator wall plate around the timer face.
(see Diagram B)
9. Restore power at circuit breaker or fuse box.
STEP 2 - Pick a preset option
• Press one or more of the
preset options that meet your
Custom
needs.
ON
• When the button lights up
the timer is set (timer must
Custom
be hardwired into an
OFF
electrical wall box for buttons
5am-8am
to illuminate).
5pm-12am
• If you would like a custom
On to step 2
on/off time, move to Step 3.
5pm-8am
If not, the setup of your new
ON/OFF
CTD
EZ-SET timer is FINISHED!
MANUAL ON/OFF OVERRIDE:
• Press "On/Off" to bypass the current setting and turn
your device On or Off.
(Note: Timer settings will resume based on the next
programmed cycle)
From Timer
Black Wire
Red Wire
White Wire
Green Wire
*
or to ground post or screw terminal
Custom
ON
STEP 3 - Set a Custom
On/Off Time
• Hold down "Custom ON"
Custom
OFF
and press the up (
5am-8am
down (
ON time.
5pm-12am
• Hold down "Custom OFF"
5pm-8am
and press the up (
down (
ON/OFF
CTD
OFF time.
• Press, BUT DO NOT
On to step 3
HOLD DOWN, the "Custom On" and "Custom Off"
buttons. Buttons will turn blue when the program
is activated.
Hot Wire
Black Wire
Load Wire
White Wire
Neutral Wire
Red Wire
Ground Wire
Green Wire
Diagram A
Diagram B
In Wall Box
Hot Wire
Load Wire
Neutral Wire
*
Ground Wire
Custom
ON
) and
Custom
) arrow to set the
OFF
5am-8am
Custom
ON
5pm-12am
) and
5pm-8am
Custom
) arrow to set the
OFF
ON/OFF
CTD
5am-8am
5pm-12am
5pm-8am
ON/OFF
CTD
03-08292018
Advertisement

Related Manuals for Prime TNIWP


Summary of Contents for Prime TNIWP
- Page 1 MODEL #TNIWP Hot Wire Black Wire EZ-SET DIGITAL Load Wire INSTALLATION INSTRUCTIONS White Wire Neutral Wire IN-WALL TIMER 1. Turn off power at circuit breaker or fuse box before Red Wire uninstalling existing device or installing new timer. Ground Wire Green Wire 2.
- Page 2 1. This device may not cause harmful interference, and NOTE: Battery is permanently installed and not effective only if such unit is returned to Prime not later than 2. This device must accept any interference received, replaceable. It automatically recharges when power is thirty (30) days after the expiration of the warranty period.
- Page 3 INSTRUCCIONES DE INSTALACIÓN MODELO #TNIWP Alambre Alambre negro 1. Apague el suministro en el cortacircuito o caja de activo fusibles antes de desinstalar el dispositivo existente o Alambre instalar un temporizador nuevo. Alambre de carga blanco 2. Retire de la caja mural la placa mural y el interruptor Alambre existentes.
- Page 4 FCC. El funcionamiento está sujeto a las siguientes dos FCC. El funcionamiento está sujeto a las siguientes dos sólo si la unidad se devuelve a Prime a más tardar treinta (30) vuelva a programar el temporizador tal como se explicó en...
Need help?
Do you have a question about the TNIWP and is the answer not in the manual?
Questions and answers
the clock doesn't stay set for me to go onto custom set up. do i skip preset options for setting custom times?
liveabq@gmail.com
To set custom times on the Prime TNIWP clock, follow these steps:
1. Press the "Custom ON" button to set the custom on time.
2. Press the "Custom OFF" button to set the custom off time.
3. Use the up (▲) and down (▼) arrow buttons to adjust the time.
4. Ensure each button lights up blue to confirm activation.
This process allows you to bypass preset options and set personalized on/off times.
This answer is automatically generated
In the Custom Time mode….I set the on and off times and press and release both the On and Off buttons but the Custom On button does not light up blue. The Custome Off Button is Blue.
Custom on light turns blue custom off light will not
The blue light on the Prime TNIWP turns on when the "Custom ON" time is set using the up and down arrows while holding the “Custom ON” button. If the "Custom OFF" light does not work, it may be because the "Custom OFF" time was not properly set by holding the “Custom OFF” button and adjusting with the arrows. The timer must be hardwired into an electrical wall box for full functionality.
This answer is automatically generated
How to "cancel" a pre-set time
To cancel a pre-set time on the Prime TNIWP timer, press the "ON/OFF" button to manually override the current settings and turn the device on or off.
This answer is automatically generated
lights flash on/off when i use manual on switch
The lights may flash on and off when using the manual ON switch for the Prime TNIWP if the timer is not properly hardwired into an electrical wall box. The timer must be correctly installed and powered for its functions to work reliably.
This answer is automatically generated
Timer display works, current goes through but no switch function
The switch function on the Prime TNIWP timer may not be working despite the display and current functioning because the timer requires a Hot Wire, Load Wire, and Neutral Wire to operate properly. If one or more of these wires are missing, the timer will not function correctly. Additionally, if there was a power failure and the battery backup was active for an extended period, the timer may need to be reprogrammed. Ensuring the correct wiring and reprogramming the timer as per the installation and programming instructions may resolve the issue.
This answer is automatically generated
instruction of display. show me what each indicator, lights mean
hooked the switch up to the electrical wiring and it would not turn the lights on with the timer or on/off switch