Table of Contents
Advertisement
Quick Links
Advertisement
Table of Contents

Related Manuals for GE KTD-400


Summary of Contents for GE KTD-400
- Page 1 KTD-400 Controller Keypad User Manual KTD-400 GE Security...
- Page 2 Document number/ 1034790E (March 2006). Disclaimer THE INFORMATION IN THIS DOCUMENT IS SUBJECT TO CHANGE WITHOUT NOTICE. GE ASSUMES NO RESPONSIBILITY FOR INACCURACIES OR OMISSIONS AND SPECIFICALLY DISCLAIMS ANY LIABILITIES, LOSSES, OR RISKS, PERSONAL OR OTHERWISE, INCURRED AS A CONSEQUENCE, DIRECTLY OR INDIRECTLY, OF THE USE OR APPLICATION OF ANY OF THE CONTENTS OF THIS DOCUMENT.
-
Page 3: Table Of Contents
KTD-400 configuration ........ - Page 4 KTD-400 Controller Keypad User Manual...
-
Page 5: Preface
Preface This is the GE KTD-400 Controller Keypad User Manual for models KTD-400 and KTD-300R. This document includes an overview of the product and detailed instructions explaining: • how to install and program; and • how to operate the KTD-400 and KTD-300R. -
Page 6: Product Overview
User Manual Product overview The KTD-400 Controller Keypad is designed for use in a Digiplex system. The KTD-400 can address and control 512 pan/tilt/zoom (PTZ) receiver sites, operate a matrix switcher with 64 monitor outputs, and address/ select views from as many as 64 multiplexers and VCRs. Several modes of multiplexers are supported. -
Page 7: Installation
Installation To install a KTD-400 keypad, you will need to set the DIP switches, mount the unit (KTD-300R only), and wire the device. CAUTION: Do not connect power to the unit before all installation steps have been completed. Do not connect directly to a telecommunication network. -
Page 8: Mounting The Ktd-300R
Mount the unit using the four holes in its front panel and hardware provided from the rack manufacturer. Wiring connections The KTD-400 comes with a 6 ft. (1.8 m) cable that attaches to a modular phone box (Figure 4). All external connections are made in the phone box. KTD-300R connections are made to the removable terminal strip located on the back of the unit (Figure 5 on page 4). -
Page 9: Power-Up
DTMF to KTS-41A Power-up After you make all the connections, the KTD-400 or KTD-300R will be ready for operation. Plug the 12 VDC wall transformer into a power outlet. The LCD window will briefly display keypad setting information (Figure 7 on page 6), then it will enter the operating mode. -
Page 10: Ktd-400 Configuration
User Manual KTD-400 configuration After you install and power up your KTD-400 keypad, you will need to configure it to operate within your systems. You can also use the KTD-400 to configure other components in the Digiplex system. (See System component configuration on page 10.) - Page 11 3. The clear memory option (Figure 10) will Figure 10. Clear memory display erase all data in the controller keypad’s nonvolatile memory and reload the factory CLEAR MEMORY? default values. 0=NO 1=YES SEQ=EXIT • If you do not want to clear the memory, press 0.
- Page 12 KTD-400 Controller Keypad User Manual 6. Use the menu in Figure 13 to deny or permit Figure 13. Monitor access display the controller keypad’s access to certain monitors. Press 0 to deny access or 1 to MONITOR 01 ACC=YES permit access. After each selection, the next...
- Page 13 9. The menu in Figure 16 lets you select which Figure 16. VCR access display VCRs can be can be enabled from the keypad. This display will only come up if VCR 01 ACC=YES your system has at least one VCR. 0=NO 1=YES SEQ=NEXT...
-
Page 14: System Component Configuration
KTD-400 Controller Keypad User Manual System component configuration After you have completed the KTD-400 keypad configuration, you can used the keypad to configure other Digiplex system components. To configure these system components, begin at the normal operating display and do the following: 1. -
Page 15: Ptz Receiver Configuration
PTZ receiver configuration Each PTZ receiver offers modes of operation choices, many of which can be programmed using a KTD-400 series keypad. It can also store preset position information if applicable. To program a PTZ receiver, complete the steps in... - Page 16 KTD-400 Controller Keypad User Manual 6. Use the menu in Figure 27 to reverse the pan Figure 27. Invert pan/tilt display and tilt directions for cameras that must be mounted in an inverted position. Press 1 to INVERT PAN/TILT? invert or 0 for normal pan/tilt operation. The...
- Page 17 PTZ receiver preset position programming If a PTZ receiver or a KTA-12 series PTZ dome is equipped for preset camera positioning (P option), the receiver can store 10 preset positions in its nonvolatile memory. You can call each preset position individually and include each in a preset tour (camera automatically pans, tilts, zooms, and focuses through a series of preset positions).
-
Page 18: Operation
User Manual Operation A KTD-400 series keypad can address and control 512 PTZ receiver sites, operate a matrix switcher with 64 monitor outputs, address and select views from 64 multiplexers, and control 64 VCRs. It can also be used to control a KTS-41 Mini-Matrix switcher. -
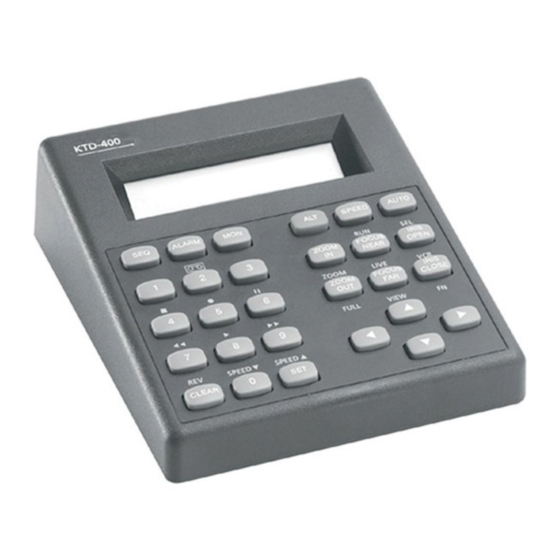
Page 19: Key Functions
Key functions PTZ control keys Zoom in, Zoom out Used to control the zoom function of the selected receiver site’s motorized lens. Focus near, Focus far Used to control the focus function of the selected receive site’s motorized lens. Also used to disengage the autofocus feature on the CyberDome. - Page 20 KTD-400 Controller Keypad User Manual Site select keys 0 to 9 Numerical keys are used for camera and monitor selection in Digiplex operation mode, or camera and multiplexer selection in multiplexer operation. Also used for preset position selection when applicable.
-
Page 21: Keypad Operation
Keypad operation When power is first supplied to a KTD-400 series keypad, the LCD display will briefly display the company name, and then show the normal operating display (Figure 36). Figure 36. KTD-400 normal operating display CAMERA 000 MONITOR 01 From this display and by observing the system’s monitors, you can use the function keys for control. - Page 22 KTD-400 Controller Keypad User Manual Camera sequencing To place a monitor in the sequence mode, select the monitor and press Seq. The display shown in Figure 37 will appear in the keypad’s display window. Figure 37. Sequence selection ENTER SEQUENCE NUMBER? - (1, 2, 3, 4) Use 1 through 4 to enter the desired sequence tour.
-
Page 23: Multiplexer Operation
Multiplexer operation The Mode key toggles the KTD-400 between normal operation mode, multiplexer operation mode, and VCR operation mode. Switching to multiplexer control mode To enter the multiplexer operation mode, press Mode once and the display shown in Figure 39 appears. -
Page 24: Vcr Operation
Each time you press View, the next available view will be displayed by the multiplexer. Refer to the installation and operation documentation provided with the multiplexer to determine available views. VCR operation Press Mode to toggle the KTD-400 between normal operation mode, multiplexer operation mode, and VCR operation mode. Switching to VCR control mode To enter the VCR operation mode, press Mode twice if multiplexers have been enabled, or once if there are no multiplexers. -
Page 25: Contacting Technical Support
Many GE documents are provided as PDFs (portable document format). To read these documents, you will need Adobe Acrobat Reader, which can be downloaded free from Adobe’s website at www.adobe.com. - Page 26 KTD-400 Controller Keypad User Manual...
-
Page 27: Index
Index alarms multiplexer control mode................19 clearing alarms...................18 multiplexer operation................19 video alarms ..................18 MV96 multiplexer..................3 autofocus ....................17 autopan limits..................12 preface.......................1 preset position programming ..............13 camera sequencing ..................18 preset tours....................17 conventions ....................1 product overview ....................2 publication library...................21 DIP switches .....................3 safety terms and symbols................1 key functions...................15 key layouts ....................14 keypad operation..................17... - Page 28 KTD-400 Controller Keypad User Manual...
Need help?
Do you have a question about the KTD-400 and is the answer not in the manual?
Questions and answers