
Related Manuals for VocoPro DigiNet


Summary of Contents for VocoPro DigiNet
- Page 1 DigiNet Professional Wireless Audio System for Active Loudspeakers...
-
Page 3: Table Of Contents
Table of Contents FCC Information ............4 Safety Instructions ........... 5 Welcome ............... 6 Listening for a Lifetime ..........7 Getting Started ............8 Quick Start Guide ............ 9 Getting Connected ..........11 Descriptions and Functions ........13 Battery Replacement ..........16 Troubleshoot ............ -
Page 4: Fcc Information
1. To ensure the finest performance, please read this requirements. Modifications not expressly approved by manual carefully. Keep it in a safe place for future Vocopro may void your authority, granted by the FCC, reference. to use this product. 2. Install your unit in a cool, dry, clean place - away from 2. -
Page 5: Safety Instructions
Safety Instructions 8. Ventilation - The appliance should be situated so its location does not interfere with its proper ventilation. CAUTION For example, the appliance should not be situated on a bed, sofa, rug, or similar surface that may block the RISK OF SHOCK ventilation slots. -
Page 6: Welcome
And while you're there don't forget to check out our Club VocoPro for Karaoke news and events, chat rooms, club directories and even a KJ Service directory! We look forward to hearing you sound like a PRO, with VocoPro, the singer’s ultimate choice. FOR YOUR RECORDS Please record the model number and serial number below, for easy reference, in case of loss or theft. -
Page 7: Listening For A Lifetime
Listening for a Lifetime Some common decibel ranges: The following noises can be dangerous under constant exposure:... -
Page 8: Getting Started
Getting Started What’s in the box? DigiNet ST DigiNet MR (x2) • Mono Receiver (x2) • Stereo Transmitter • USB Charging Cable (x3) • XLR Cable (x3) (x3) • Velco Strap (x3) • RCA-1/4” Adapter (x2) • Power Adapter (x2) -
Page 9: Quickstart Guide
Quickstart Guide -Power on transmitter by holding down power button -LED lights will appear displaying the current transmission channel numbers *Be advised that the transmitter and receivers may actually be factory pre-synced and therefore already paired to communicate right out of the box -To manually adjust frequency channel: 1. - Page 10 Quickstart Guide There are 8 preset frequency channels within each group (A or B) After selecting A or B: 1. Press and hold Left/Right Channel button then press and hold once more until right column LED numbers are blinking 2. Press the Left/Right Channel buttons to increase the transmitting frequency channel number 3.
-
Page 11: Getting Connected
Getting Connected TRANSMITTER 1. Connect your source audio to the transmitter via male XLR or ¼” jack cable 2. Connect the power USB cable to the transmitter (*connect only if rechargeable battery does not have a sufficient charge) 3. Adjust your input source volume and then the transmitter output volume. - Page 12 Getting Connected RECEIVER 1. Connect the receiver to a powered speaker or existing sound system set-up via Female XLR output connector 2. Power on your speaker followed by the DigiNet receiver EJECT PLAY/PAUSE AM/FM PRESET SEARCH ST/MONO AUTO MUTE L / R...
-
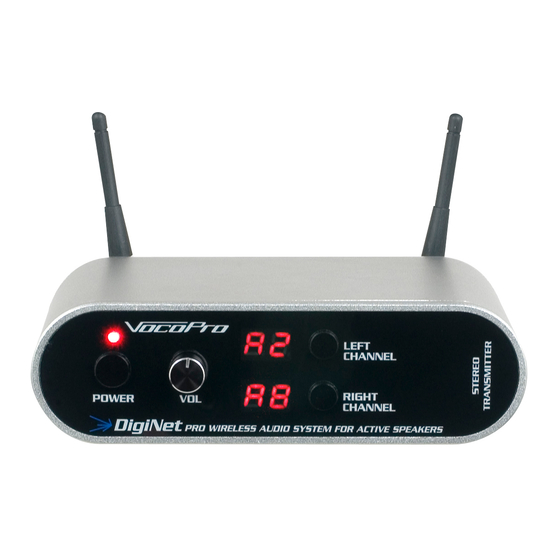
Page 13: Descriptions And Functions
Descriptions and Functions TRANSMITTER: (Front Panel) 1. Power/Select: Press and hold to power unit on/off. Press once to set final frequency channel selection 2. Volume Knob: Adjusts the overall output volume of the audio being transmitted 3. LED Displays: conveniently show frequency channel selection 4. - Page 14 Descriptions and Functions RECEIVER: (Front Panel) 1. Power/Select: Press and hold to power unit on/off. Press once to set final frequency channel selection 2. RF SYNC LED: this light indicates when the receiver has successfully paired with the transmitter 3. Volume Knob: Adjusts the overall output volume of the signal received 4.
- Page 15 Descriptions and Functions (Back Panel) 1. Antenna: Assists with increasing the transmission range (operating distance between transmitter and receiver) 2. MALE XLR Output: Outputs a balanced audio signal USING THE BALANCED XLR: - Connect the female end of a balanced XLR cable into the Balanced Output jack located on the back of the Digital-1 receiver.
-
Page 16: Battery Replacement
Battery Replacement Battery Replacement: In the event that you should ever have to replace the rechargeable battery of the DigiNet components (transmitter or receiver), please follow the following installation instructions: 1. Make sure your DigiNet transmitter or receiver is powered off 2. -
Page 17: Troubleshoot
2. Check that the Antennae are making a solid connection 3. Elevate both receiver and transmitter to ensure the wireless signal has a relatively clear line-of-sight, especially at longer distances. Please contact Vocopro at 800-678-5348 if you have any questions regarding the operation of this unit. - Page 18 DigiNet Owner’s Manual © VocoPro 2018 v1.0328 www.vocopro.com...
Need help?
Do you have a question about the DigiNet and is the answer not in the manual?
Questions and answers