Table of Contents

Related Manuals for ABACO MACHINES SVL100


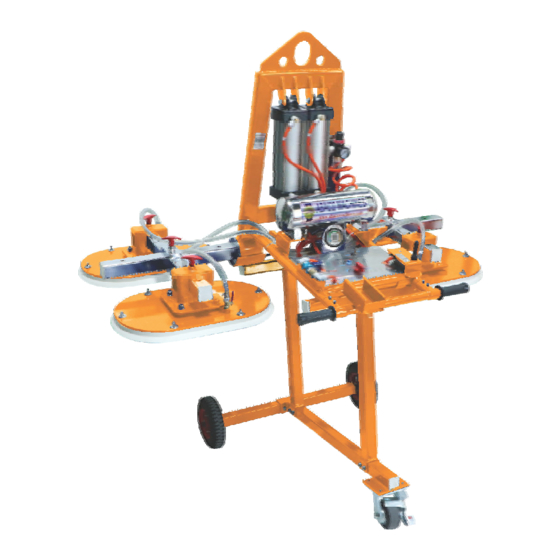
Summary of Contents for ABACO MACHINES SVL100
- Page 1 ABACO MACHINES OPERATION MANUAL ABACO STONE VACUUM LIFTER (SVL100) ABACO MACHINES (USA) 14508 S. Garfield Ave., Paramount, CA 90723, USA Tel : 310-532-0366 Fax : 310-532-0499 Email : sales@abacomachines.com Website : www.abacomachines.com...
- Page 3 OPERATION MANUAL APPLICABLE MODEL of this STONE VACUUM LIFTER SVL100...
-
Page 4: Table Of Contents
INDEX Item Pages Equipment General Information.......... 1 Technical Specifications............2 1) Dimensions..............3 2) Spare Part List - Overall..........3) Spare Part List - Trolley stand.......... 7 4) Spare Part List - Suction cup, left........9 5) Spare Part List - Suction cup, right........11 Safety Instructions............... - Page 5 General Safety Operation Manual Instructions Summary: It is essential to carefully review and understood this Operation Manual before operating the equipment. Failing to read and understand this entire manual may cause injury or death to personnel, or damage to equipment and the products that are being handled by this equipment if not properly followed.
-
Page 7: Technical Specifications
Frame Pneumatic cylinders Vacuum tank Control panel Suction cup Trolley stand... -
Page 8: Dimensions
1) Dimensions: SVL100 Work Load Limit (W.L.L) 2200 lbs (1000 kg) Net weight 308 lbs (140 kg) No. of suction cups 4 pcs ¹⁵⁄₁₆ ” ” x 31 ½ Minimum slab dimensions (1320 x 800 mm) Tilt angle 0 to 90... -
Page 9: Spare Part List - Overall
2) Spare part list - Overall:... - Page 10 Cylinder pin 1 SVL100-06 Pressure accumulator SVL100-07 Stopper pin SVL100-08 Screw M4 x 25 SVL100-09 Pin 1 SVL100-10 Spring SVL100- 1 1 Base with valve stopper pin SVL100-12 Screw M4x10 SVL100-13 Slide pipe SVL100-14 Controller holder SVL100-15 Lock nut M6 SVL100-16...
- Page 11 Washer 4 SVL100-31 Ø Pin 2 SVL100-32 Circlip 20 SVL100-33 Ø Brass washer 20 SVL100-34 Ø Lock/Unlock knob SVL100-35 Screw M4 x 30 SVL100-36 Frame SVL100-37 Pneumatic component SVL100-38 Divider SVL100-39 Allen bolt M6 x 25 SVL100-40 Swivel plate SVL100-41...
-
Page 12: Spare Part List - Trolley Stand
3) Spare part list - Trolley stand:... - Page 13 DESCRIPTION TY PART NUMBER Bar 1 SVL 0- .1 10 23 100 23 2 Bar 2 Latch, trolley 100 23 3 100 13 Screw M4x10 Nut M8 100 23 5 SVL 0- . 10 23 6 Washer 8 Ø 100 23 7 Bar 3 100 23 8 Swivel caster...
-
Page 14: Spare Part List - Suction Cup, Left
4) Spare part list - Suction cup, left:... - Page 15 QTY. PART NUMBER POS. DESCRIPTIONS SVL100- . 1 02 0 Oval rubber base, left SVL100- . 02 03 Base plate, left SVL100- . 02 04 Compression spring SVL100- . 02 05 Washer 6 Ø SVL100- . 02 06 Nut M6 SVL100- .
-
Page 16: Spare Part List - Suction Cup, Right
5) Spare part list - Suction cup, right:... - Page 17 QTY. PART NUMBER POS. DESCRIPTIONS SVL100- . 1 45 0 Oval rubber base, right SVL100- . 45 03 Base plate, right SVL100- . 02 04 Compression spring SVL100- . 02 05 Washer 6 Ø SVL100- . 02 06 Nut M6 SVL100- .
- Page 18 PNEUMATIC COMPONENTS POS. DESCRIPTIONS CODE IMAGE Pressure gauge AVL_031 Air regulator, Pressure L 001 gauge, Water filter Tilt control lever V_042 Lock valve V 006 DT_252 One way throttle valve DT_335 Control switch - 3 gates V_033 Check valve (one-way) Vacuum generator C 008 Air fittings (L shaped, rotary)
- Page 19 DH_011_D Quick coupler DT_077 Connector, plug 13 Ø DT_077_N Connector, plug Ø Push fittings ( L shaped, one DT_250 external thread) Push to connect fittings DT_281 (KQ2H10-02S) One-touch fittings DT_283 (T shaped) DT_292 Air fittings (Y shaped) DT_319 Quick coupler (straight) DT_332 Silencer Push fittings (L shaped)
-
Page 20: Safety Instructions
III. SAFETY INSTRUCTIONS 1. General Warnings, Cautions and Notes: WARNING: Before using the Stone Vacuum Lifter, confirm the surface of the slab to be lifted is evenly flat, smooth, and free from dust, oil, or any kind of such harmful substances. Following this advise to prevent slipping the slabs during operation. -
Page 21: Cautions For Operations
- Caution: Ensure that the operation manual is readily available and next to the place where the hoisting equipment is used. - Caution: Only allow well-trained and well-qualified persons to operate the lifter. - Caution: Wear safety equipment such as: helmet, gloves, etc. - Caution: Inspect the lifter to ensure that it has no physical damage and functions properly. - Page 22 Please note: The pressure indicator has to stay always in the safe zone from -70 kPa to -80 kPa (figure 1). Figure 1 - Stop operation immediately when any abnormal sign (any of deformation, air leakage, source pressure of less than 6 bar, etc.) or noises occur.
-
Page 23: Instructions For Air Hose Assembly
Assemble the component accordingly connect the hoses in accordance with the given mating numbers. Figure 1.2... -
Page 24: Control System Overview
CONTROL SYSTEM OVERVIEW Figure 1.3... - Page 25 Lifter positioning handle Stopper pin Figure 1.4 (4) Positioning handle extension (1) Vacuum pressure gauge “Lock-Unlock” (2) Control valve (tilt speed (5) Lifter positioning handle control). Release the stopper nut to adjust speed controller. (6) Vaccum-Release valve (3) Tilt Control lever “ 0°-90°” (7) Turn-knob “...
-
Page 26: Device Usage
5. Device Usage: Preliminary Safety Checks Have a trained and well-qualified person perform the safety checks on the lifter before each use. WARNING: * Ensure that the Stone Vacuum Lifter is correctly installed and in safe working conditions. * Ensure that the gauge indicator is always in the Green zone at the left, showing the vacuum pressure is sound. - Page 27 Step 2: Connect the air compressor supply to the equipment. Then, turn the Pressure Vessel knob to “Open” position to let the vacuum pressure accumulate into the system (figure 2.1). Figure 2.1 Air pressure Step 3: Check that the air regulator pressure gauge is between 6 Pressure gauge...
- Page 28 Step 4: Move the equipment close to the stone slab (figure 4.1), lower it down to ensure the suction cups is placed on the slab surface in lifting position. Note : - Ensure that the suctions cups are positioned in the middle of the slab to balance.
- Page 29 Step 5: Ensure that the blue valve “Vacuum-Release” is on the Vacuum position. - If the blue valve is not in the Vacuum position, pull the stopper pin out and slide the blue valve down to Vacuum position (figure 5.1). Blue Valve Stopper pin Release...
- Page 30 Caution: Reconfirm that the suction cups are firmly catching and absorbing the slab surface. In case of vertical slab application, a little push of the equipment towards the slab may help firm and faster catch os the slab. Step 6: Lift and move the stone slab to the desired position: - When the air pressure is between -70 Kpa and -80 Kpa, lift the stone slab and confirm the equipment is securely grasping the slab,...
- Page 31 Step 7: Place the stone slab at the desired postion (figure 7.1). Figure 7.1...
- Page 32 Stopper pin Figure 8.1 Figure 8.3 Figure 8.2...
-
Page 33: Appendix
APPENDIX 1) To adjust the angle of suction cups from 0 to 90 : “tilt control lever” to 90° to tilt the suction cups from 0 to Lean the 90 and reverse. - Hold the Lifter positioning handle by hand firmly. - Pull the tilt control lever towards “90 ”. - Page 34 Note: Adjusting the length of “Lifter positioning handle”: Turn the handle “Lock-Unlock” left or right to lengthen or shorten handle to work easier. Before After 2) To rotate the suction cups 90 manually: - First, loosen then remove the hand knob, and take the suction cups out;...
- Page 35 3. Check the water trap filter regularly. The pressure indicator shows the air pressure to the equipment. The drain valve (Figure 9.1) - If water is accumulated, press the water valve head (figure 9.1) to discharge the water inside. 4. To clean the air filter: Lock bracket Use the compressed air...
- Page 36 5) To clean the check (one-way) valve: Sometimes any foreign object may clog the check (one way) valve. In those cases, fix the problem in the following manner. Use a small screwdriver and carefully unscrew the check valve Separate the check valve - Clean by flushing water or wipe out any foreign object from inside the check valve.
-
Page 37: Technical Problems & Solutions
V. TECHNICAL PROBLEMS & SOLUTIONS: Technical Cause Solution Image problem Clean the suction Loose suction Suction cups cups or replace cups have dust or with a new one. damaged 2 The vacuum Damaged Inspect the pressure pipes, air piping by using gauge leakage in diluted neutral... -
Page 38: Inspection & Maintenance
INSPECTION & MAINTENANCE: - Operator is responsible to check the equipment regularly, not limited to check the air valves and tubes, hoses, suction cups to ensure the equipment is in good operating conditions. - Periodically, operator is responsible to schedule equipment maintenance, especially for bolts and nuts. -
Page 39: Warranty Policy
VI. WARRANTY: At the time of delivery, it is necessary to inspect the Stone Vacuum Lifter (SVL100) to make sure that it has not been damaged during shipment. The product at the time of dispatch is warranted to be free of defects in material or workmanship. -
Page 40: Warranty Certificate
WARRANTY CERTIFICATE You are kindly requested to read the following carefully. PERIOD The warranty starts from the date of purchase (date on distributors invoice). Warranty is valid for a period of twelve (12) months WARRANTY This warranty is limited only to provide replacements of the parts recognized by the Company as defective (excluding worn- outs and consumables.) The Company is not responsible for any misuse or abuse of the... - Page 43 All Right Reserved:...