Advertisement
Quick Links
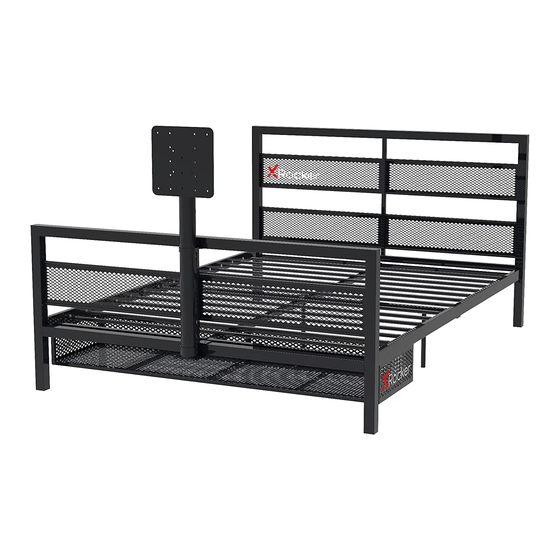
BASECAMP BED W/TV MOUNT
I MPORTANT - READ CAREFULLY - RETAIN FOR FUTURE REFERENCE
2110701
Dimensions
Width - 80.7in
Depth - 56.3in
Height - 41.8in
NEED HELP?
EMAIL:SUPPORT@XROCKERGAMING.COM
BESOIN D'AIDE?
COURRIEL:SUPPORT@XROCKERGAMING.COM
NECESITAS AYUDA?
CORREO ELECTR NICO:SUPPORT@XROCKERGAMING.COM
IMPORTANT: You must keep your original retail receipt as proof of purchase.
1
SXJ00-20210517
Advertisement

Related Manuals for X Rocker 2110701


Summary of Contents for X Rocker 2110701
- Page 1 BASECAMP BED W/TV MOUNT I MPORTANT - READ CAREFULLY - RETAIN FOR FUTURE REFERENCE 2110701 Dimensions Width - 80.7in Depth - 56.3in Height - 41.8in NEED HELP? EMAIL:SUPPORT@XROCKERGAMING.COM BESOIN D'AIDE? COURRIEL:SUPPORT@XROCKERGAMING.COM NECESITAS AYUDA? CORREO ELECTR NICO:SUPPORT@XROCKERGAMING.COM IMPORTANT: You must keep your original retail receipt as proof of purchase.
- Page 2 Safety and Care Advice Read Before Beginning Assembly Call 866-969-2603 if you need assistance. Work in a spacious area and near where the unit will be used, preferably on a carpet, or use a piece of the cardboard packaging to protect your floor and product. Recommended # of people needed for assembly: (however it is always better to have an extra hand).
- Page 3 Safety and Care Advice Avant de commencer l'assemblage Si vous avez besoin d'aide, appelez notre num ro de service 866-969-2603. Travaillez dans un endroit spacieux et pr s du lieu o l'unit sera utilis e, pr f rablement sur un tapis, ou sur un morceau de l'emballage, afin de prot ger le plancher et le produit.
- Page 4 Safety and Care Advice Lea antes de comenzar a ensamblar Llame a nuestro n mero 866-969-2603 si necesita asistencia. Trabaje en un rea espaciosa y cerca de donde su producto ser utilizado, preferiblemente sobre una alfombra o utilice el cart n del empaque para proteger su piso y su producto. El n mero de personas recomendadas para el montaje de este producto es: 2 (sin embargo es recomendable contar con ayuda adicional).
- Page 5 Components - Panels Please check you have all the panels listed below PARTS...
- Page 6 Components - Panels Please check you have all the panels listed below Post X 2 Headboard X 1 Footboard X 1 Side Rail 01 X 1 Side Rail 02 X 1 Side Rail 03 X 1 Side Rail 04 X 1 14b Slats X 14 Plastic Plug X 28 Brace 01 X 2...
- Page 7 Components - Panels Please check you have all the panels listed below 59a Left Mesh Panel X 1 Leg X 3 Bracket X 1 Cap X 1 Brace 03 X 1 59b Right Mesh Panel X 1 59c Rear Mesh Panel X 1 59d Bottom Mesh Panel X 1 61a Mounting Seat X 1 61b Mounting Sleeve X 1...
- Page 8 Components - Fittings Please check you have all the panels listed below Note: The quantities below are the correct amount to complete the assembly. In some cases more fittings may be supplied are required. 38mm M6 Bolt x 6 22mm M6 Bolt x 13 17mm M6 Bolt x 24 Nut M6 x 5 22mm M8 Bolt x 8...
- Page 9 Assembly Instructions Step Insert Post x 2 into Headboard with M6 x 38mm A X 2 J X 1 Step 2 Insert Side Rail 03 into Side Rail 02 with Insert Side Rail 04 into Side Rail 01 with M6 x 17mm J X 1 C X 4...
- Page 10 Assembly Instructions Step Attach Brace 03 to Side Rail 02 and Side Rail 01 with Attach Brace 02 to Side Rail 02 and Side Rail 04 with Attach Brace 02 to Side Rail 03 and Side Rail 01 M6 x 22mm with B X 8 J X 1...
- Page 11 Assembly Instructions Step Attach Footboard Side Rail 01 and Side Rail 03 with Attach Headboard Side Rail 02 and Side Rail 04 with E G H J X 1 Plastic M8 Metal M8 Spring washer washer washer M8 x 22mm H X 8 I X 8 E X 8...
- Page 12 Assembly Instructions Step Attach Bracket and Leg to Brace 03 with Wrenh Nut M6 M6 x 38mm J X 1 K X 1 A X 2 F X 2 Step 8 Attach Right Mesh Panel and Left Mesh Panel Rear Mesh Panel with M6 x 17mm C X 4...
- Page 13 Assembly Instructions Step Attach Right Mesh Panel /Left Mesh Panel Rear Mesh Panel Bottom Mesh Panel with M6 x 17mm J X 1 C X 8 Step 10 Option 1 Option 2 Attach Right Mesh Panel to Side Rail 03 and Left Mesh Panel to Side Rail...
- Page 14 Assembly Instructions Step a:Secure the Slats x 14 to Side Rail 01 /Side Rail /Side Rail 03 Side Rail 04 b:Secure the Plastic Plug x 28 to Side Rail 01 /Side Rail 02 /Side Rail 03 and Side Rail 04...
- Page 15 Assembly Instructions Step Attach EVA 01 to the middle of Footboard shown. at the middle outside of Footboard EVA 01 L X 1 Step 13 Attach EVA 02 to the at the middle inside of buckle middle of Buckle shown. EVA 02 M X 1...
- Page 16 Assembly Instructions Step a:Attach Mounting Sleeve to Mounting Seat with b:Attach Mounting Seat to Footboard with c:Insert TV Mount Buckle d:Insert TV Mount Mounting Sleeve e:Attach Buckle Footboard with f:Connect TV Mount Mounting Sleeve with J X 1 K X 1 M6 x 22mm M6 x 17mm M6 x 10mm...
- Page 17 Assembly Instructions Step a:Cable (not provided) to pass through the TV Mount from top of the pole. Please note:A minimum power cable length of 1.4m is required to connect the mounted TV to the undercarriage of the bed. Please check your TV cable length before installation to Not provided b/c:...
Need help?
Do you have a question about the 2110701 and is the answer not in the manual?
Questions and answers