Table of Contents
Advertisement
Quick Links
Advertisement
Table of Contents
Troubleshooting

Subscribe to Our Youtube Channel
Related Manuals for Lepu Medical AIView Series


Summary of Contents for Lepu Medical AIView Series
- Page 1 AIView Series Patient Monitor Operator’s Manual...
- Page 3 Preface Copyright This manual contains proprietary information protected by copyright law. All rights reserved. Without the prior written consent of the manufacturer, no part of this manual shall be copied or reproduced in any form or by any means. Manual Purpose The instructions for safe operation of the product in keeping with its function and intended use are contained in this manual.
- Page 4 518110 Shenzhen, PEOPLE’S REPUBLIC OF CHINA Website: www.creative-sz.com E-mail: info@creative-sz.com Tel: +86 755 26431658 Fax: +86 755 26430930 Shanghai International Holding Corp. GmbH Representative: (Europe) Address: Eiffestrasse 80, 20537 Hamburg Germany UK Responsible Etheria Medical Ltd Person The Old Brush Factory Unit 2d Whickham Address: Industrial Estate, Swalwell, Newcastle Upon Tyne, United Kingdom, NE16 3DA...
- Page 5 The warnings, cautions and notes in this manual are used to remind readers of some specific information. Warning Indicates a potential hazard or unsafe practice that, if not avoided, could result in death or serious injury. Caution Indicates a potential hazard or unsafe practice that, if not avoided, could result in minor personal injury or product/property damage.
- Page 6 This page intentionally left blank.
-
Page 7: Table Of Contents
Table of Contents Chapter 1 Safety .................. 1-1 1.1 Safety Information ..............1-1 1.1.1 Warnings ..............1-1 1.1.2 Cautions ..............1-4 1.1.3 Notes ................1-4 1.2 Device Symbols ..............1-5 Chapter 2 Product Introduction ............2-1 2.1 Product Name and Model ............2-1 2.2 Intended Use ................. - Page 8 3.9.3 Night Mode ..............3-11 3.9.4 Intubation Mode ............3-12 3.9.5 Private Mode ............. 3-12 3.9.6 Suspend Monitoring Mode ........3-13 3.9.7 Standby Mode ............3-14 3.10 Changing Monitor Settings ..........3-14 3.10.1 Selecting the Language .......... 3-14 3.10.2 Setting the Date and Time ........3-15 3.10.3 Enabling Daylight Saving Time .......
- Page 9 5.6.1 Setting Parameter Alarm Properties ......5-4 5.6.2 Changing the Alarm Volume ........5-5 5.6.3 Setting the Alarm Audio Interval ......... 5-5 5.6.4 Setting the Alarm Audio Pause Time ......5-6 5.6.5 Setting the Switch of the Apnea Alarm Off ....5-6 5.7 Pausing Alarm Sound ............
- Page 10 7.5.2 Setting ECG Alarm Properties ........7-12 7.5.3 Setting ECG Lead Off Alarm Priority ......7-12 7.5.4 Setting the ECG Standard ........7-12 7.6 About Arrhythmia Monitoring..........7-13 7.6.1 Safety Information ............. 7-13 7.6.2 Changing Arrhythmia Alarm Settings ......7-14 7.6.3 Setting the Lethal Arrhythmia Alarms Switch ....
- Page 11 10.3.2 Placing the Electrodes ..........10-2 10.4 Resp Display ..............10-4 10.5 Changing Resp Settings ............ 10-5 10.5.1 Setting Resp Menu ..........10-5 10.5.2 Setting Resp Alarms ..........10-6 Chapter 11 Monitoring Pulse Oxygen Saturation (SpO ) ....11-1 11.1 Introduction ................. 11-1 11.2 Safety Information ...............
- Page 12 13.9.3 Setting NIBP Measurement Timeout ....13-10 13.9.4 Displaying NIBP List ..........13-10 13.10 NIBP Analysis ..............13-10 13.10.1 Entering the NIBP Analysis Screen ....13-10 13.10.2 Setting the NIBP Analysis ........13-11 13.10.3 Viewing NIBP Analysis Results ......13-11 13.11 Assisting Venous Puncture ..........
- Page 13 16.8 OxyCRG Review ..............16-5 16.8.1 Entering the OxyCRG Screen ........ 16-5 16.8.2 Exiting the OxyCRG Screen ........16-6 16.8.3 Entering the OxyCRG Review Screen ....16-6 16.9 Minitrends Screen .............. 16-6 16.9.1 Entering the Minitrends Screen ......16-6 16.9.2 Exiting the Minitrends Screen ......... 16-7 16.10 Screenshot Review ............
- Page 14 17.7.4 Performing EWS Scoring ........17-18 17.7.5 Auto Scoring ............17-19 17.7.6 EWS Settings ............17-19 Chapter 18 Other Functions .............. 18-1 18.1 Freezing Waveforms ............18-1 18.1.1 Entering Freeze Screen .......... 18-1 18.1.2 Exiting Freeze Screen ..........18-1 18.1.3 Reviewing Frozen Waveforms ........ 18-1 18.2 Using the On-Screen Timer ..........
- Page 15 20.5.2 Configuring Real-time Reports ....... 20-3 20.5.3 Configuring Tabular Trends Reports ....... 20-4 20.5.4 Configuring Graphic Trends Reports ...... 20-4 20.5.5 Configuring Event Reports ........20-5 20.6 Viewing Printing Status ............20-5 Chapter 21 Battery ................21-1 21.1 Introduction ................ 21-1 21.2 Safety Information ..............
- Page 16 23.9 Storage, Packaging and Transportation ......23-8 23.10 Viewing Version Information ..........23-8 Chapter 24 Troubleshooting .............. 24-1 24.1 Prompt Messages .............. 24-1 24.2 Common Faults ..............24-7 24.2.1 Display Troubleshooting ......... 24-7 24.2.2 Power Supply Troubleshooting ....... 24-8 24.2.3 Alarm Troubleshooting ..........24-8 24.2.4 ECG Troubleshooting ..........
- Page 17 B.2 Technical Alarm Messages ............ B-3 B.3 Nellcor SpO Alarm Messages ..........B-3 Appendix C Default Settings ..............C-1 C.1 Alarm Default Settings ............C-1 C.2 System Default Settings ............C-6 Appendix D Typical Pressures and CO Readings at Altitudes ... D-1 Appendix E EMC Compliance .............
-
Page 18: Chapter 1 Safety
Chapter 1 Safety 1.1 Safety Information 1.1.1 Warnings Warning WARNING for PACEMAKER PATIENTS: Although the pacemaker pulse inhibition function is available in this device, the heart rate meter may continue to count the pacemaker rate during occurrences of cardiac arrest or some arrhythmias. - Page 19 Warning Connect only approved equipments to this device. Equipments connected to the device must meet the requirements of the applicable IEC standards (e.g. IEC 60950 safety standards for information technology equipment and IEC 60601-1 safety standards for medical electrical equipment). The system configuration must meet the requirements of the IEC 60601-1 medical electrical systems standard.
- Page 20 Warning The monitor is intended only as an adjunct in patient assessment. It must be used in conjunction with clinical signs and symptoms. Warning The monitor is defibrillation-proof. Verify that the accessories can function safely and normally, and the monitor is grounded correctly before conducting defibrillation.
-
Page 21: Cautions
Warning It is recommended that the clinical operator regularly test the device and accessories. The visual and auditory alarm signal can be checked by disconnecting the accessories or by setting it at Demo mode to simulate alarm event. 1.1.2 Cautions Caution All the parts of the monitor should NOT be replaced at will, substitution of a component different from that supplied by the manufacturer might result in... -
Page 22: Device Symbols
Note The device and accessories must be disposed of in compliance with local regulations at the end of their service lives. Note Put the device in a location where it can be easily viewed and operated. Do not locate the device in a place difficult to access the mains plug. ... - Page 23 Symbol Description Symbol Description The symbol indicates that the Authorised device complies with the representative in the European Council Directive European 93/42/EEC concerning Community medical devices. UK Responsible Person Note Your device does not necessarily have all of the above symbols. ...
- Page 24 This page intentionally left blank.
-
Page 25: Chapter 2 Product Introduction
Chapter 2 Product Introduction 2.1 Product Name and Model Product Name: Patient Monitor Product Model: See label on device See the table below for the model differences: Screen HR/ARR NIBP NIBP Nurse Model Resp Temp size 3/5-Lead 6/10-Lead Analysis (KRK) (SunTech) (KRK) (Nellcor) -
Page 27: Intended Use
2.2 Intended Use The AIView series patient monitor, hereafter called the monitor, is intended to be used for monitoring, displaying, reviewing, storing, alarming and transferring of multiple physiological parameters including ECG (3-lead, 5-lead, 6-lead and 12-lead (optional), arrhythmia detection, ST segment analysis, QT analysis, HRV... -
Page 28: Product View
Lead off detection function, and able to send out an alarm. Auto detection of lead types: 3 leads, 5 leads, 6 leads and 12 leads. Drug calculation, oxygenation calculation, ventilation calculation, renal function calculation, hemodynamic calculation is available. ... -
Page 29: Front View
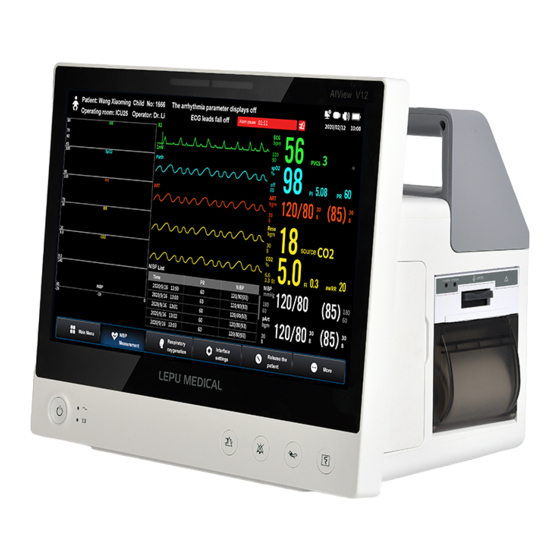
2.6.1 Front View Alarm lamp The alarm lamp is located on the left side of the top of the monitor. When an alarm occurs, this lamp lights and flashes corresponding with the alarm priority: High priority alarms: the lamp flashes red. ... - Page 30 NIBP Start/Stop hard key Press to start an NIBP measurement or stops the current NIBP measurement. Alarm Tone Pause hard key Press to pause the current alarm sound. Alarm Reset hard key Press to acknowledge the on-going alarm. Power indicator ...
-
Page 31: Rear View
2.6.2 Rear View Handle Device label Equipotential grounding terminal AC power connector... -
Page 32: Left View
2.6.3 Left View Reserved connector of Nellcor SpO module Connector and icon Module connector Description TEMP1, TEMP2 Temperature probe connector NIBP NIBP cuff connector sensor connector ECG/RESP ECG cable connector IBP1, IBP2 IBP cable connector module connector module holder... -
Page 33: Right View
2.6.4 Right View Open the door Recorder indicators Recorder (optional) Connectors Connector Connector Description Description Icon Icon ECG Analog signal VGA connector output connector Nurse call connector USB connector Defibrillator synchronization analog Network connector output connector... -
Page 34: Bottom View
2.6.5 Bottom View Battery compartment Anti-slip foot pad 2-10... - Page 35 This page intentionally left blank. 2-11...
-
Page 36: Chapter 3 Getting Started
Chapter 3 Getting Started 3.1 Unpacking and Checking Before unpacking, examine the packaging carefully for signs of damage. If any damage is found, please contact the carrier immediately. If the packaging is intact, perform unpacking inspection according to the following steps: Open the package, take out the monitor and its accessories from the box carefully. -
Page 37: Environment Requirements
have any question, please contact the manufacturer or your local distributor. Warning If it is not evident from the equipment specifications whether a particular combination with other devices is hazardous, for example, due to summation of leakage currents, please consult the manufacturers or an expert in the field, to ensure the necessary safety of patients and all devices concerned will not be impaired by the proposed combination. -
Page 38: Connecting To Power Source
3.4 Connecting to Power Source 3.4.1 Using AC Power Source Before connecting the monitor to the AC mains, check that the voltage and frequency ratings of the power line are the same as those indicated besides the AC power input connector. To connect the AC power source, follow the steps below: Use the power cable provided with the monitor. -
Page 39: Turning On The Monitor
Note The monitor can be used normally without any performance degradation when the battery is being charged. Note It is better to recharge the battery after it has been used up, and the charging time should be 13~15 hours long. 3.5 Turning on the Monitor Press the power switch on the front panel of the monitor for about 3 seconds, the monitor automatically performs a self-test, then the... -
Page 40: Using The Touchscreen
information areas, alarms areas and menus. You can access the same element in different ways. For example, you can access a parameter setting menu by selecting the corresponding waveform area, or through the [Parameters] quick key on the main screen. 3.7.1 Using the Touchscreen You can use the touchscreen to select a screen element by pressing directly on the monitor’s screen. - Page 41 Label Function Label Function screen, only available when 12-lead function is configured. Enter the [Review] Enters Standby Review Standby screen. mode. Freezes Enters Night Mode / Freeze Night Mode waveforms. Exits Night Mode. Starts an NIBP measurement or Enters Private Mode Start NIBP stops the current Private Mode...
- Page 42 Label Function Label Function screen. Enters the Starts/Stops a Minitrends Record [Minitrends] screen. recording. Opens the Enters the [EWS] OxyCRG [OxyCRG] screen. screen. Remote Opens the [Remote Enters the [Config] Config View View] screen. screen. Note The selection of quick keys available on your monitor depends on your monitor configuration and on the options purchased.
-
Page 43: Screen Views
Pop-up keys Pop-up keys are task-related graphical keys that appear automatically on the screen when required. For example, the confirmation pop-up key appears only when you need to confirm a change. 3.8 Screen Views 3.8.1 Screen Types The monitor provides the following display views: ... -
Page 45: Operating Modes
Description Patient type Patient information area (top line): displays patient information, including patient name, medical record number, etc. Clicking this area enters the [Patient Info] menu. Operator information area (bottom line): displays operator name. Clicking this area enters the [Operator] menu. For more information, see Chapter 6 Managing Patients. -
Page 46: Night Mode
by the system, and cannot be used to evaluate the physiological condition of patients. To change the operating mode into the demo mode, follow the steps below: Click [Main Menu]→[Screens]→[Work Mode]. Select [Demo Mode], and then enter the password 123456. To exit the demo mode, follow the steps below: Click [Main Menu]→[Screens]→[Work Mode]. -
Page 47: Intubation Mode
Note The monitor resumes the previous settings after exiting Night mode. 3.9.4 Intubation Mode Intubation mode is available for Resp and CO2 monitoring. The intubation mode is a special clinical monitoring mode. The monitor has the following features after entering Intubation Mode: ... -
Page 48: Suspend Monitoring Mode
The monitor has the following features after entering Private Mode: No parameters and waveforms are displayed. The screen turns blank. Except for the low battery alarm, the monitor inactivates alarm tones and alarm lights for all other alarms. ... -
Page 49: Standby Mode
Warning In Suspend Monitoring mode, the monitor will pause patient monitoring and suppress all system sounds and alarms except for the battery low alarm. Please pay attention to the potential risks. 3.9.7 Standby Mode You can temporarily stop patient monitoring without switching off the monitor by entering the standby mode. -
Page 50: Setting The Date And Time
Note To make the language change valid, please restart the monitor. 3.10.2 Setting the Date and Time To set the system date and time, follow the steps below: Press [Main Menu]→[System]→[System]. Set [Date Format]. Options: YYYY-MM-DD, DD-MM-YYYY, MM-DD-YYYY. Set [Time Mode]. Options: 12 hours, 24 hours. Set the current [Date] and [Time]. -
Page 51: General Operations
Press [Main Menu]→[System]→[System] to enter the system setup screen. Drag the slider to set [Key Volume], [Alarm Volume] and [Beat Volume] respectively. The volume is gradually increasing. Caution When the volume is set to 0, the sound is turned off. It is not recommended to set the alarm volume and beat volume to 0 (Off). -
Page 52: Configuring The Normal Screen Layout
When a parameter is switched off, no measurements and alarms are provided. 3.11.3 Configuring the Normal Screen Layout You can configure the parameter numerics, waveforms, and their sequence displayed on the normal screen. To do so, please refer to the following steps: Access [Layout] screen in either of the following ways: ... -
Page 53: Selecting A Screen
3.11.6 Selecting a Screen The monitor enters the normal screen after it is powered on. The normal screen is most frequently used for patient monitoring. To select other screens, please refer to the following steps: Access [Screen Selection] screen in either of the following ways: ... -
Page 54: Setting Password Protection
3.11.9 Setting Password Protection You can set whether changing alarm-related settings is password protected or not. To do so, follow the steps below: Press [Main Menu] → [Maintenance] → input password → press [Enter]. Select the [Alarm] tab. Switch on or off [Alarm Setup Password] as needed. ... - Page 55 This page intentionally left blank. 3-20...
-
Page 56: Chapter 4 Networked Monitoring
Chapter 4 Networked Monitoring You can connect the monitor to the central monitoring system (CMS), and AI-ECG server through wired or wireless network. If the monitor is networked, a network symbol is displayed on the screen. 4.1 Safety Information Warning Keep network authentication information, for example passwords, safe, to protect the network from being accessed by unauthorized users. -
Page 57: Opening The Remote View Window
Caution The IP addresses of the monitors configured with the remote view function should share the same network segment. The IP addresses of the monitors on the same LAN should be unique from each other; you cannot use the remote view function in the monitors in which an IP address conflict exits. -
Page 58: Setting The Wireless Network
4.4 Setting the Wireless Network To set the wireless network, follow the steps below: Enter the network setup screen in either of the following ways: Press the network status icon in the upper right corner of the screen. Press [Main Menu] →... -
Page 59: Connecting The Ai-Ecg Server
Note Make sure the network connection between the monitor and the central monitoring system is in good condition. 4.6 Connecting the AI-ECG Server To connect the AI-ECG server, follow the steps below: Enter the network setup screen in either of the following ways: ... - Page 60 If your monitor is connected to the AI-ECG server of AI-ECG Platform: You can send the collected ECG information (including original waveforms, filter settings, etc.) to the AI-ECG server for 12-lead resting ECG analysis and diagnosis. Download and print the returned diagnosis reports at the monitor side.
-
Page 61: Chapter 5 Alarms
Chapter 5 Alarms Alarms are triggered by physiological parameters that appear abnormal or by technical problems of the monitor. When an alarm occurs, the monitor indicates it through visual and audible alarm indications. 5.1 Safety Information Warning Before monitoring a new patient, always check that the monitor can work properly, the alarm system works properly, and the alarm settings are appropriate for the patient before starting the monitoring. -
Page 62: Alarm Categories
5.2 Alarm Categories The monitor provides two different types of alarms: physiological alarms and technical alarms. Physiological alarms: also called patient status alarms, are triggered by parameter measurement exceeding the set alarm limits, or by an abnormal patient condition. ... - Page 63 High Medium Alarm Prompt Priority Priority Priority Remarks Indication Message Alarm Alarm Alarm Yellow flashing flashing Yellow Flashing Flashing frequency frequency flashing Alarm lamp None None visual 1.4Hz-2.8 0.4Hz-0.8 duty Hz, visual Hz, visual cycle: duty duty 100% cycle: cycle: 20%-60% 20%-60% Do-Do-D...
-
Page 64: Alarm Status Symbols
High Medium Alarm Prompt Priority Priority Priority Remarks Indication Message Alarm Alarm Alarm Black Black text Black text text Parameter inside a inside a inside a None value yellow red box yellow Caution When multiple alarms of different priorities occur simultaneously, the monitor selects the highest priority alarm to light the alarm lamp and issue the alarm tone. -
Page 65: Changing The Alarm Volume
Access [Alarm Limits] screen in either of the following ways: Press the [Alarms] quick key. Press[Main Menu]→[Alarms]. Select a parameter tab and set alarm properties as desired. You can also change the alarm properties of individual parameter from the corresponding parameter menu. Click the [Defaults] button at the bottom of the screen to restore the default alarm settings. -
Page 66: Setting The Alarm Audio Pause Time
Set [High Alarm Audio Interval], [Medium Alarm Audio Interval] and [Low Alarm Audio Interval]. The setting range of [High Alarm Audio Interval] is 3~15s. Default setting is 10s. The setting range of [Medium Alarm Audio Interval] is 3~30s. Default setting is 10s. ... -
Page 67: Switching Off Alarm Sound
The monitor has the following features after the alarm sound is paused: The sound of all physiological alarms and technical alarms are switched off within the set alarm audio pause time. The remaining alarm audio pause time is displayed in the physiological alarm information area. -
Page 68: Viewing Alarms
Select the [Alarm] tab. Switch on the [Physio. Alarm Latch]. To release the physiological alarm latch, switch off the [Physio. Alarm Latch]. Caution When the alarm system is reset, latched physiological alarms are cleared. 5.10 Viewing Alarms You can view the current alarm in the alarm information area at the top of the screen. -
Page 69: Resetting Alarms
5.13 Resetting Alarms Press the alarm reset hard key on the front panel of the monitor, or press the [Alarm Reset] quick key to confirm the ongoing alarms and reset the alarm system. When the alarm system is reset, the alarm reset symbol displays in the system status information area. - Page 70 Check the patient’s condition. Confirm the parameter of the ongoing alarm or alarm category. Identify the source of the alarm. Take proper action to eliminate the alarm condition. Make sure the alarm condition is corrected. 5-10...
- Page 71 This page intentionally left blank. 5-11...
-
Page 72: Chapter 6 Managing Patients
Chapter 6 Managing Patients 6.1 Admitting a Patient To admit and set a patient as the current monitoring patient, follow the steps below: Access [Patient Info] screen in either of the following ways: Press the patient information area in the upper left corner of the screen. -
Page 73: Quickly Admitting A Patient
Warning For paced patients, set [Paced] to [Yes]. If it is incorrectly set to [No], the monitor could mistake a pace pulse for a QRS and fail to give an alarm when the ECG signal is too weak. For non-paced patients, set [Paced] to [No]. -
Page 74: Starting Monitoring A Patient
6.4 Starting Monitoring a Patient To start monitoring a patient, follow the steps below: Admit the patient. Decide which parameter measurements you want to make. Connect the required patient cables and sensors and make sure they are correctly connected. Check that the patient settings, such as Patient Type, NIBP measuring mode, etc. -
Page 75: Managing Patient Data
Note The monitor supports remote manual discharge of patients through the CMS. 6.7 Managing Patient Data 6.7.1 Querying Patient Data To query patient data, follow the steps below: Access [History] screen in either of the following ways: Press the patient information area in the upper left corner of the screen →... -
Page 76: Configuring Patient Information
Caution If a patient is deleted, all data related to the patient (such as ECG waveform, alarm events, etc.) will be deleted and cannot be recovered. Note The data of the current patient under monitoring cannot be deleted. 6.8 Configuring Patient Information You can set up patient information to be displayed on the [Patient Info] screen, such as registration number, patient ID, race, etc. - Page 77 Caution The operator named ―admin‖ preseted by the system cannot be set as the current operator or deleted from the operator list. Note Editing and deleting operations only change the contents of the operator list, and do not change the operator information recorded in historical patients.
- Page 78 This page intentionally left blank.
-
Page 79: Chapter 7 Monitoring Ecg, Arrhythmia, St, Qt/Qtc Analysis
Chapter 7 Monitoring ECG, Arrhythmia, ST, QT/QTc Analysis 7.1 Introduction Electrocardiogram (ECG) is the main means to measure the electrical activity of the heart. The ECG signals can be detected through electrodes at the surface of the skin, and displayed on the monitor as waveforms and numerics. - Page 80 Warning Some pacemakers may cause false low heart rate or arrest alarms, because pacemaker artifacts, such as pacemaker overshoot, may cover the real QRS complex. Warning Pacemaker automatic recognition function is not suitable for pediatric and neonate patients, as well as patients receiving NMT stimulation. Warning For paced patients, the heart rate meter may record the pacing pulse in case of cardiac arrest or arrhythmia.
-
Page 81: Ecg Monitoring Preparation
Caution Interference from an ungrounded equipment near the patient or electrosurgery usage can induce noise and artifact into the waveforms. Caution When the monitor is inoperable due to overload of ECG signal or saturation of any part of the amplifier, it will prompt ―Lead off‖ to remind the operator. -
Page 82: Ecg Electrode Placement
Place the electrodes on the prepared sites. For more information, see 7.3.3 ECG Electrode Placement. Caution To ensure accurate ECG measurement, please select the appropriate electrode type and pay attention to the placement position of the electrodes. Caution If any side-effect such as allergic or itchy reaction is found, remove the electrodes from the patients immediately. - Page 83 IEC Standard AHA Standard Electrode Placement Position Identifier Color Code Identifier Color Code Directly below the clavicle and near the right shoulder. Right Arm: on White the inside of each arm, between the wrist and the elbow. Directly below the clavicle and near the left shoulder.
- Page 84 IEC Standard AHA Standard Electrode Placement Position Identifier Color Code Identifier Color Code On the left lower abdomen. Left Leg: on Green the inside of each calf, between the knee and the ankle. On the right lower abdomen. Right Leg: on N or RF Black Green...
- Page 85 IEC Standard AHA Standard Electrode Placement Position Identifier Color Code Identifier Color Code On the fourth intercostal White/Yellow Brown/Yellow space at the left sternal border. Midway between C2 White/Green Brown/Green (V2) and C4 (V4) electrode position. On the fifth intercostal space at the White/Brown Brown/Blue...
- Page 86 IEC Standard AHA Standard Electrode Placement Position Identifier Color Code Identifier Color Code On the left midaxillary line, horizontal White/Violet Brown/Violet with the C4 (V4) electrode position. Electrode Placement Caution For the 5-lead and 6-lead placement, place the chest electrode according to the physician's preference.
-
Page 87: Ecg Display
7.4 ECG Display ECG waveform area The figures below are for reference only. The display may be configured to look slightly different. ECG lead label of the displayed waveform ECG waveform gain ECG filter mode Notch filter status Paced status: If [Paced] is set to [Yes], is displayed. -
Page 88: Changing Ecg Settings
Caution The display of ECG waveform area and parameter area will be different, depending on different lead types and settings. 7.5 Changing ECG Settings 7.5.1 Setting ECG Menu Access [ECG] setup screen in either of the following ways: Select the ECG parameter area. ... - Page 89 [Filter]: ECG waveform filter mode. Options: Monitor, Diagnostic, Surgery and ST. [Monitor]: use under normal monitoring conditions. [Diagnostic]: use when diagnostic quality ECG is required. [Surgery]: use when the signal is distorted by high frequency or low frequency interference. High frequency interference usually results in large amplitude spikes making the ECG signal look irregular.
-
Page 90: Setting Ecg Alarm Properties
Set [Notch Filter] to [50Hz] or [60Hz] according to the power line frequency. [Grid]: Switch on or off [Grid] to show or hide grid background on the ECG waveform area. Note If the amplitude of ECG waveform is too large, the wave peak or the wave valley might not be displayed. -
Page 91: About Arrhythmia Monitoring
7.6 About Arrhythmia Monitoring Arrhythmia monitoring is intended for adult, pediatric and neonatal patients. 7.6.1 Safety Information Warning If you switch off all the arrhythmias alarms, the monitor cannot give any arrhythmias alarm when that situation occurs. This may result in a hazard to the patient. -
Page 92: Changing Arrhythmia Alarm Settings
7.6.2 Changing Arrhythmia Alarm Settings To set the arrhythmia alarm properties, follow the steps below: Enter the [Alarms] screen in either of the following ways: Press [Main Menu]→[Alarms]. Press the [Alarms] quick key. Select the [ARR] tab → [Alarm Name] tab. Set alarm properties as desired. -
Page 93: Arrhythmia Analysis Classifications
To change the arrhythmia alarm threshold settings, follow the steps below: Enter the [Alarms] screen in either of the following ways: Press [Main Menu]→[Alarms]. Press the [Alarms] quick key. Select the [ARR] tab → [Threshold] tab. Set the threshold for the desired arrhythmia alarms. The setting range of arrhythmia threshold is shown in the table below. - Page 94 Arrhythmia Event Arrhythmia Event (In Full or Description) (Abbreviation) Asystole Asystole V-Fib/V-Tach Ventricular-Fibrillation/Ventricular-Tachycardia Vent Tachy Ventricular Tachycardia Vent Brady Ventricular Bradycardia Extreme Brady Extreme Bradycardia Extreme Tachy Extreme Tachycardia Non-lethal Arrhythmia Events: Nonsus V-Tach Nonsustained Ventricular Tachycardia Vent Rhythm Ventricular Rhythm Run PVCs More than two consecutive Premature Ventricular Contractions...
-
Page 95: About St Monitoring
Arrhythmia Event Arrhythmia Event (In Full or Description) (Abbreviation) Pauses/min Heartbeat Pauses per Minute Pacer Not Pacing Pacer Not Pacing Pacer Not Capture Pacer Not Capture Premature Atrial Contractions PACs Couplet A Pair of Premature Atrial Contractions SV Bigeminy Supraventricular Bigeminy SV Trigeminy Supraventricular Trigeminy 2nd Degree A-V Block... -
Page 96: Enabling St Analysis/Display St Parameters
7.7.2 Enabling ST Analysis/Display ST Parameters The ST monitoring function is disabled by default. Before you start ST monitoring, enable the ST analysis function. To do so, follow the steps below: Enter the ST setup screen in either of the following ways: ... -
Page 97: Displaying St Segments In The Waveform Area
ST numerics: a positive value indicates ST segment elevation, and a negative value indicates ST segment depression. 7.7.3 Displaying ST Segments in the Waveform Area To display ST segments in the waveform area, follow the steps below: Enter the ST setup screen in either of the following ways: ... -
Page 98: Displaying Baseline St Segments
To display ST segments in the waveform area, follow the steps below: Enter the ST setup screen in either of the following ways: Select the ST parameter area. Press the [Parameters] quick key, select the [ST] tab. Press [Main Menu] →... -
Page 99: Enabling Qt/Qtc Monitoring
the ventricles. QT interval monitoring can assist in the detection of long QT syndrome. QT interval was negatively correlated with heart rate. The faster the heart rate, the shorter the QT interval, and vice versa. Therefore, several formulas are commonly used to correct the QT interval for heart rate. -
Page 100: Selecting Leads For Qt Calculation
QT-HR value QT value ΔQTc value ΔQTc alarm limit (if ΔQTc alarm is off, the alarm off symbol is displayed) 7.8.2 Selecting Leads for QT Calculation You can select one lead or all leads for QT calculation. To do so, follow the steps below: Enter the QT setup screen in either of the following ways: ... -
Page 101: Factors Affecting Ecg Signal
7.9 Factors Affecting ECG Signal The following factors will affect the quality of acquired ECG signals: Interference from electro-surgical units. Unreasonable filter mode setting. Poor grounding. Incorrect placement of electrodes. Use expired electrodes or use disposable electrodes repeatedly. ... -
Page 102: Chapter 8 Resting 12-Lead Ecg Analysis
Chapter 8 Resting 12-Lead ECG Analysis The monitor supports automatic acquisition of 12- lead resting ECG waveforms. After acquisition, the data is transmitted to the AI-ECG Platform server through the network for analysis. You can download, view and print the diagnosis report at the monitor side. ... -
Page 103: Setting The 12-Lead Ecg Acquisition
8.2 Setting the 12-Lead ECG Acquisition You can perform the following operations on the 12-lead screen: [Start / Stop]: press this button to start / stop ECG acquisition. [Freeze]: press this button to freeze the currently displayed waveforms on the screen and enter the freeze screen. ... -
Page 104: Reports Management
Pre-sampling: acquire the ECG data of 10 seconds before pressing the [Start] button. At the completion of acquisition, the system enters the preview screen. In the preview screen, press [Save] to send the saved data to AI-ECG server for analysis. After the report is obtained, you can view it in the [Reports Mgmt] screen. - Page 105 Press [ ] to print the obtained diagnosis report of the selected patient record via the network printer. Note For the processing method of ECG data received by AI-ECG server, please refer to the Operator’s Manual of ECG Analysis Software of AI-ECG Platform.
- Page 106 This page intentionally left blank.
-
Page 107: Chapter 9 Ambulatory Ecg Analysis
Chapter 9 Ambulatory ECG Analysis The monitor supports automatic acquisition of single lead / 8-lead / 12-lead ambulatory ECG waveforms. After acquisition, the data is transmitted to the AI-ECG Tracker server through the network for analysis. You can download and print the diagnosis report at the monitor side. - Page 108 Position Color Label Color Label The fourth intercostal Brown/ White/ space at the right edge of sternum The fourth intercostal Brown/ White/ space at the left edge of Yellow Yellow sternum Brown/ White/ The position between V2 and V4 Green Green White/ Brown/...
-
Page 109: Initiating Ambulatory Ecg Acquisition
IEC Color Position Color Label Label The fourth intercostal Brown/ White/ space at the right edge of sternum Brown/ White/ Anterior axillary line at the same level as V4 Orange Light Blue Black Yellow The left shoulder The lower edge of rib cage, or the level of the Green navel at the position of... -
Page 110: Reports Management
Press the [Holter] quick key to enter the [Holter] screen. You can perform the following operations in this screen: Select [Period] to set the duration of ambulatory ECG acquisition. Options: 24h, 48h, 72h. Press [Start] to start the ambulatory ECG acquisition. ... - Page 111 Note For the processing method of ECG data received by AI-ECG server, please refer to the Operator’s Manual of Ambulatory ECG Analysis Software of AI-ECG Tracker.
- Page 112 This page intentionally left blank.
-
Page 113: Chapter 10 Monitoring Respiration (Resp)
Chapter 10 Monitoring Respiration (Resp) 10.1 Introduction Respiration is monitored by measuring the impedance across the thorax via electrodes places on chest. When the patient is breathing or ventilated, the volume of air changes in the lungs, resulting in impedance changes between the electrodes. Impedance respiration rate (RR) is calculated from the signal representing these impedance changes, and a respiration waveform is displayed on the patient monitor screen. -
Page 114: Resp Monitoring Preparation
Caution Impedance respiration monitoring is not suitable for patients who are very active, otherwise it may lead to false alarm. 10.3 Resp Monitoring Preparation 10.3.1 Preparing the Patient Skin As the skin is a poor conductor of electricity, correct patient skin preparation for electrode placement is important for Resp measurement. - Page 115 Caution To optimize the respiration waveform, place the RA and LA electrodes horizontally when monitoring respiration with ECG Lead I; place the RA and LL electrodes diagonally when monitoring respiration with ECG Lead Caution Some patients (especially neonates) expand their chests laterally, causing a negative intrathoracic pressure.
-
Page 116: Resp Display
10.4 Resp Display Resp waveform area Resp lead label Resp waveform gain Resp lead label Resp parameter area Alarm limits Parameter label Resp unit Respiration rate (RR) RR source Apnea delay time 10-4... -
Page 117: Changing Resp Settings
10.5 Changing Resp Settings 10.5.1 Setting Resp Menu Access Resp setup screen in either of the following ways: Press Resp parameter area. Press the [Parameters] quick key → select the [Resp] tab. Press [Main Menu] →[Parameters], select the [Resp] tab. ... -
Page 118: Setting Resp Alarms
ECG. The RR source name is displayed in the lower right corner of Resp parameter area. When the manually selected RR source is not available, the monitor automatically switches the [RR Source] to [Auto]. 10.5.2 Setting Resp Alarms To set the Resp alarm options, follow the steps below: Access Resp alarm setup screen in either of the following ways: ... - Page 119 This page intentionally left blank. 10-7...
-
Page 120: Chapter 11 Monitoring Pulse Oxygen Saturation (Spo )
Chapter 11 Monitoring Pulse Oxygen Saturation (SpO 11.1 Introduction Pulse oxygen saturation (SpO ) monitoring is a non-invasive optical technique used to measure the amount of oxygenated hemoglobin (HbO ) and pulse rate by measuring the absorption of selected wavelengths of light. The light generated in the emitter side of the sensor is partly absorbed when it passes through the monitored tissue. - Page 121 blood flow could be interrupted by the cuff or the circulatory condition could make low blood perfusion so that would result in no pulse found or loss of pulse during SpO monitoring and further cause false alarm. Warning If the sensor is too tight because the application site is too large or becomes too large due to edema, excessive pressure for prolonged periods may result in venous congestion distal from the application site, leading to interstitial edema, hypoxia, tissue ischemia, and inaccurate...
-
Page 122: Measurement Interferences
Caution Please do not allow the cable to be twisted or bent. Caution Please do not use nail polisher or other cosmetic product on the nail. Caution The fingernail should be of normal length. Caution The SpO sensor cannot be immersed into water, liquor or cleanser completely, because the sensor has no capability to resist the harmful ingress liquid. -
Page 123: Spo
or thiosalicylic hemoglobin, and some with icterus problem, the measurements may be inaccurate. The medicines such as dopamine, procaine, prilocaine, lidocaine and butacaine may also be a major factor blamed for serious error of SpO measurements. As the SpO value serves as a reference value for judgment of anemic anoxia and toxic anoxia, the measurement result of some patients with serious anemia may also present as good... -
Page 124: Spo Monitoring Preparation
Nellcor SpO module Alarm limits label value Pulse intensity bar graph Perfusion index (PI) label Numerical value for the perfusion index Pulse rate value Label of pulse rate value(for Nellcor SpO module) 11.5 SpO Monitoring Preparation To prepare SpO monitoring, follow the steps below: Select an appropriate sensor according to the patient type and weight. - Page 125 Type 1: SpO Finger Clip Sensor Insert the patient's index finger (middle finger or ring finger with proper nail length can be used as well) into the sensor, as shown in the figure below. Type 2: SpO Finger Rubber Sensor Hold the sensor with its opening towards the patient’s finger, the sensor should be oriented in such a way that the sensor side with a finger tip sign is positioned on the top.
- Page 126 L type sensor Neonate foot wrapper Self-adhesive tape Type 5: Nellcor D-YS SpO Sensor with Y-type Wrapper For the connection method, please refer to the attached "Instructions For Use of Nellcor Sensor Multisite Reusable" according to the applicable patient. Select an appropriate extension cable according to the connector type and plug the cable into the SpO connector.
-
Page 127: Changing Spo 2 Settings
11.6 Changing SpO Settings 11.6.1 Setting SpO Menu Enter the SpO setup screen in either of the following ways: Select the SpO parameter area. Press the [Parameters] quick key → select the [SpO ] tab. Press[Main Menu]→[Parameters], select the [SpO ] tab. -
Page 128: Changing The Spo 2 Alarm Settings
11.6.2 Changing the SpO Alarm Settings To set SpO alarm options, follow the steps below: Enter the SpO alarms setup screen in either of the following ways: parameter area → press the [Alarms] Select the SpO button. Press the [Alarms] quick key → select the [SpO ] tab. - Page 129 Set [PR Source], select an appropriate PR source from the drop-down list. 11-10...
-
Page 130: Chapter 12 Monitoring Temperature (Temp)
Chapter 12 Monitoring Temperature (Temp) 12.1 Introduction The patient’s body temperature can be measured by means of a thermistor probe (a semiconductor whose resistance changes with temperature). Very small amount of constant current is applied to the temperature probe to avoid self-heating. The voltage across the thermistor is measured, and further converted into a temperature reading according to the temperature-resistance characteristic for a specific type of thermistor. -
Page 131: Temp Monitoring Preparation
Temperature alarm limits Temperature site Temperature unit Temperature value Temperature difference (ΔT): Difference between two temperature sites. 12.4 Temp Monitoring Preparation To prepare temperature monitoring, follow the steps below: Select an appropriate probe for your patient according to patient type and measured site. If an extension cable is needed, connect the temperature probe to the extension cable. -
Page 132: Setting Temp Alarms
12.5.2 Setting Temp Alarms To set the Temp alarm options, follow the steps below: Access Temp alarm setup screen in either of the following ways: Press the Temp parameter area → press the [Alarms] button. Press the [Alarms] quick key → select the [Temp] tab. ... -
Page 133: Chapter 13 Monitoring Non-Invasive Blood Pressure (Nibp)
Chapter 13 Monitoring Non-Invasive Blood Pressure (NIBP) 13.1 Introduction The monitor uses the oscillometric method to measure non-invasive blood pressure (NIBP). NIBP measurement is based on the principle that pulsatile blood flow through an artery creates oscillations of the arterial wall. A cuff is used to occlude the artery by inflating it above the patient’s systolic pressure, the oscillometric devices measure the amplitude of pressure changes with pulsation in the cuff as the cuff pressure decreases. - Page 134 Warning For SunTech NIBP module, when monitoring neonates, the monitor cannot identify the cuff type, so causing excessive cuff pressures on a neonate when taking the blood pressure measurement for a neonate in the ―Adult‖ patient type setting. It is the responsibility of the user (physician or nurse) to always determine Adult or Neonate mode when initiating a BP measurement.
-
Page 135: Measurement Interferences
Caution DO NOT twist the air tube or put heavy things on it. Caution When unplugging the air tube, hold the head of the connector and pull it out. Caution The NIBP measurement will not be affected when the monitor is connected to the patient on whom the electro-surgical unit and defibrillator is being used. -
Page 136: Measurement Modes
Patients with severe bleeding tendency or sickle cells are forbidden to use the NIBP measurement, otherwise local bleeding may be caused. Do not apply cuff on the limb where skin damage has occurred or is expected. When extremely low or high heart rate or serious arrhythmia of the patient occurs. -
Page 137: Nibp Display
Note During the measurement in any mode, you can manually press the NIBP Start/Stop key ― ‖ to terminate the measurement. 13.5 NIBP Display NIBP label and measurement site NIBP unit: mmHg or kPa Diastolic pressure Diastolic pressure alarm limits. The alarm off icon is displayed when the alarm is set to off. -
Page 138: Nibp Monitoring Preparation
Note NIBP measurement shows no waveform, only numerics are displayed in the parameter area. Note If NIBP measurement fails, ―XX‖ is displayed; if NIBP measurement is not taken, ―--‖ is displayed. 13.6 NIBP Monitoring Preparation Before starting the NIBP measurement, make sure that the patient remains calm and is relaxed. -
Page 139: Starting And Stopping Nibp Measurements
Caution The wrong size of cuff may lead to inaccurate measurement results. Caution Do not touch or apply external pressure against the cuff and air tubing during NIBP measurement. This may cause inaccurate blood pressure values. 13.7 Starting and Stopping NIBP Measurements Use NIBP quick key or NIBP menu to start and stop NIBP measurement, as shown in the following table: Task... -
Page 140: Correcting The Nibp Measurements
Task By quick Key From NIBP Menu → press the [Start NIBP] select [Start NIBP] button quick key Stop the current Press the [Stop All] quick NIBP Select the [Stop All] button measurements End auto NIBP Press the [Stop All] quick Select the [Stop All] button series or NIBP Sequence... -
Page 141: Setting Nibp Alarm Properties
Press[Main Menu]→[Parameters], select the [NIBP] tab. In the NIBP setup screen, you can perform the following operations: [Mode]: set the measurement mode. Options: Manual, Auto, Sequence, ABPM. [Limb]: select NIBP measurement site. Options: Left Arm, Right Arm, Left Leg, Right Leg. [Interval]: available only in ―Auto‖... -
Page 142: Setting Nibp Measurement Timeout
Select the NIBP parameter area → press the [Alarms] button. Press the [Alarms] quick key → select the [NIBP] tab. Press[Main Menu]→[Alarms], select the [NIBP] tab. Set alarm properties as desired. 13.9.3 Setting NIBP Measurement Timeout NIBP measurements become outline fonts after a preset time. This feature prevents older values being misinterpreted as current measurements. -
Page 143: Setting The Nibp Analysis
Press the [Review] quick key → select the [NIBP List] tab, select [NIBP Analysis]. Press [Main Menu] → [Review], select the [NIBP List] tab, select [NIBP Analysis]. 13.10.2 Setting the NIBP Analysis Set the following information before starting the NIBP analysis. ... -
Page 144: Assisting Venous Puncture
Data Label Description DBP threshold. AASI Ambulatory Arterial Stiffness Index Diurnal Blood pressure changes in a cycle of about 24 hours, the Rhythm default is Dipper type blood pressure. The time and date when the maximum systolic pressure SYS Max value occurs in the selected time interval. -
Page 145: Factors Affecting Nibp Measurement
Caution If your monitor is configured with SunTech NIBP module, then the cuff pressure range for adult is 120~180mmHg. Note During venous puncture, pressing the NIBP Start/Stop key ― ‖ cannot perform NIBP measurement. 13.12 Factors Affecting NIBP Measurement Like common non-invasive blood pressure measurement, improper operation may cause inaccurate or blank result or misunderstanding of the measurement information when the oscillometric method is... - Page 146 recommended the measurement be taken at intervals of more than two minutes. Patients should be measured in a relaxed and calm state, otherwise the accuracy of blood pressure measurement data will be affected. When taking NIBP measurement on adult patients, the monitor may fail in giving the blood pressure measurement if the pediatric or neonate patient type is selected.
-
Page 147: Chapter 14 Monitoring Invasive Blood Pressure (Ibp)
Chapter 14 Monitoring Invasive Blood Pressure (IBP) 14.1 Introduction IBP monitoring can realize real-time monitoring of blood pressure changes during some heart surgeries and other major operations. The monitor can monitor up to two-channel invasive blood pressures and displays the systolic, diastolic and mean blood pressures and a waveform for each pressure channel. - Page 148 Warning Use the accessories specified by the manufacturer, when a defibrillator is used. Warning Improper use of a defibrillator may cause injury to the patient. The user should determine whether to perform defibrillation or not according to the patient’s condition. Warning Before defibrillation, the user must ensure both defibrillator and monitor have passed the system test and can be safely used jointly.
- Page 149 Caution Before using the tube, cable and/or transducer, make sure that all accessories meet the performance requirements which is not changed by aging or environmental conditions. 14-3...
-
Page 150: Ibp Display
14.3 IBP Display IBP waveform area The monitor can display 2 channels of IBP pressure waveform. Pressure label Top scale Bottom scale IBP parameter area The monitor can display 2 pressure measurements. Alarm limits. The alarm off icon is displayed when the alarm is set to off. -
Page 151: Changing Ibp Settings
Plug one end of the IBP cable into the corresponding IBP connector on the left side of the monitor, and the other end to the IBP transducer. Flush the IBP transducer system to exhaust all air from the catheter according to the manufacturer’s instructions. Ensure that the system is free of air bubbles. - Page 152 Label Description Label Description Arterial blood pressure Pulmonary artery pressure Central venous pressure Right atrial pressure Left atrial pressure Intracranial pressure Auxiliary pressure 1 Auxiliary pressure 2 P1 / P2 can be chosen if the actual measuring pressure is not in the list of ART, PA, CVP, RAP, LAP, and ICP.
-
Page 153: Setting Ibp Alarm Properties
Press the [Zero IBP] button, a dialog box pops up on the screen, then press [Zero] to start calibration. After the zero calibration is completed, the message "Zero succeeded" will be displayed. If zero calibration fails, corresponding message will also be displayed. -
Page 154: Chapter 15 Monitoring Carbon Dioxide (Co 2 )
Chapter 15 Monitoring Carbon Dioxide (CO 15.1 Introduction measuring principle is based on the fact that CO molecules absorb infrared light energy of specific wavelengths, with the amount of energy absorbed being directly related to the CO concentration. When an IR light beam is passed through a gas sample containing , the electronic signal from a photo detector (which measures the remaining light energy), can be obtained. - Page 155 Warning Explosion Hazard: DO NOT use in the presence of flammable anesthetics or other flammable gasses. Use of the CO Sensor in such environment may present an explosion hazard. Warning Electric Shock Hazard: Do not open the sensor cabinet at will, the CO Sensor contains no user serviceable parts.
- Page 156 Warning Place the exhaust vent of the CO sensor in drafty ambient and do not let anything block the exhaust vent. Warning Periodically check the CO /Flow sensor and tubing for excessive moisture or secretion buildup. Do not use them if there is excessive moisture or exterior condensation.
- Page 157 monitoring. For more information, see Appendix D Typical Pressures and CO2 Readings at Altitudes. Caution When CO monitoring is not required, disconnect the sampling line from the monitor. Caution Do not block the airway. Do not squeeze or bend the sampling line. ...
-
Page 158: Co Display
15.3 CO Display waveform area Parameter label waveform gain parameter area End tidal CO alarm limits. The alarm off icon is displayed when the alarm is set to off. Unit Label of CO Label of end tidal CO (EtCO FiCO alarm limits. -
Page 159: Connecting Co Sensor
status will be displayed in the dialogue window. There are three effective zero status: Zeroing, Zero succeeded, Zero failed. Warning When perform a zero calibration during the measurement, disconnect the sensor from the patient’s airway first. Warning Please do not rely on the readings during zeroing. ... -
Page 160: Sidestream Tubing Types
Exhaust vent sensor Airway adapter Sensor connector After finishing sensor connection, make sure that the air inlet of the sampling tube is exposed to room air and away from all , including the ventilator, the patient’s and sources of CO operator's breathing. -
Page 161: Connecting The Mainstream Co
Nasal sidestream cannula kits Oral sidestream cannula kits 15.5.3 Connecting the Mainstream CO Sensor To connect the mainstream CO sensor, follow the steps below: Insert on end of the CO sensor cable into the connector marked with ―CO ‖ on the connector panel of the monitor. Select an appropriate airway connector and connect it with the adapter, then insert the CO adapter into the CO... - Page 162 Sensor connector adapter sensor Sensor Respirator or ventilation equipment Elbow connector Airway adapter To patient Sensor Respiratory mask Adapter 15-9...
-
Page 163: Changing Co Parameter Settings
After finishing sensor connection, make sure that the air inlet of the sampling tube is exposed to room air and away from all , including the ventilator, the patient’s and sources of CO operator's breathing. Wait 2 minutes for the sensor to warm up. 15.6 Changing CO Parameter Settings 15.6.1 Setting CO... -
Page 164: Measurement Limitations
Options: 1b (calculate once every respiration cycle), 10s (calculate once every 10 seconds) and 20s (calculate once every 20 seconds). [Balance Gas]: set the balance gas in patient's respiration air flow. There are three kinds of selectable balance gas: ―Air‖, ―N2O‖ and ―He‖, namely: air, nitrous oxide and helium. - Page 165 Other sources of interference, if any. 15-12...
- Page 166 This page intentionally left blank. 15-13...
-
Page 167: Chapter 16 Review
Chapter 16 Review 16.1 Review Overview You can review the trend data, events, 12-lead ECG analysis results and waveforms, full disclosure waveforms, and so on, through the Review screen. You can also view the trend data through the Minitrends screen, or the OxyCRG screen, so that you can understand how the patient's condition is developing. -
Page 168: Graphic Trends Review
To print a tabular trends report, select [ ] or [ ] icon. 16.3 Graphic Trends Review The graphic trends review screen displays trend data in a visual format. In the graphic trends review screen, you can perform the following operations: ... -
Page 169: Events Review
In the NIBP List review screen, you can perform the following operations: Press the [<<] or [>>] button in the lower right corner of the screen to turn the page to view the NIBP measurement data. Press the page area to select the required page number to view the NIBP measurement data. -
Page 170: St Review
Options: ECG(I), ECG(II), ECG(III), ECG(aVR), ECG(aVL), ECG(aVF), ECG(V1), ECG(V2), ECG(V3), ECG(V4), ECG(V5), ECG(V6). Select [Duration] to set the length of displayed waveforms. Options: 1min, 2min, 5min and 10min. Select ECG waveform speed from the speed pop-up list. Options: 6.25mm/s, 12.5mm/s, 25mm/s, 50mm/s. ... -
Page 171: Oxycrg Review
In the ST review screen, you can perform the following operations: In the pop-up menu of [Trend Group], select ST lead and HR. Select [Zoom] to set the length of data displayed on the current screen. Options: 8min, 30min, 1h, 2h, 4h, 8h, 12h, 24h, 48h. ... -
Page 172: Exiting The Oxycrg Screen
Options: Resp, RR, EtCO . The default is Resp. Press the [Review] button to enter the OxyCRG review screen. 16.8.2 Exiting the OxyCRG Screen Exit the [OxyCRG] screen in either of the following ways: Press the [×] button in the upper right corner of the [OxyCRG] screen. -
Page 173: Exiting The Minitrends Screen
On the Minitrends screen, the parameter label is displayed above each trend curve, the scale is on the left side, and the time line is at the bottom of the screen. 16.9.2 Exiting the Minitrends Screen Exit the [Minitrends] screen in either of the following ways: ... -
Page 174: Chapter 17 Calculations
Chapter 17 Calculations 17.1 Introduction The monitor provides calculation function. The calculated values, which are not directly measured, are computed based on the values you provide. You can perform the following calculations: Drug calculations Hemodynamic calculations Oxygenation calculations ... -
Page 175: Checking The Titration Table
Set [Drug Name] and [Patient Type]. If the dose of drug is weight dependent, you must switch on [Weight Based] and input the patient’s weight. Enter the known values, for example Drug Amount and Solution Volume. Press the [Calculate] button to do the calculation. The calculated values are displayed on the screen automatically. - Page 176 Description Unit Formula Volume Rate × Infusion Duration Dose = Infusion Rate × Dose Dose/h, Dose/min Concentration Dose (weight based) = Dose (weight Dose/kg/h, Infusion Rate × Concentration based) Dose/kg/min / Weight mcg/ml, mg/ml, g/ml, Concentration = Drug Amount Concentration Unit/ml, KU/ml, MU/ml, / Solution Volume mEq/ml...
-
Page 177: Titration Table Calculation Formula
17.2.4 Titration Table Calculation Formula Description Unit Formula Infusion Rate = Dose / Infusion Rate ml/h Concentration Infusion Rate Infusion Rate = Dose × Weight / ml/h (weight based) Concentration Dose = Infusion Rate × Dose Dose/h, Dose/min Concentration Dose (weight Dose/kg/h, Dose (weight based) = Infusion based) - Page 178 Input Full Name / Adjustable Unit Parameter Description Range Weight Patient weight 0.1-499.0 Heart rate 0-300 Mean arterial pressure mmHg 0-300 Central venous mmHg 0-40 pressure C.O. Cardiac output L/min 0.1-20.0 Pulmonary artery mmHg 0-40 wedge pressure Mean pulmonary artery MPAP mmHg 1-120...
- Page 179 17.3.3 Output Parameters and Formulas for Hemodynamic Calculations Output Full Name Reference Unit Formula Parameter /Description Range liters/min/ C.I. Cardiac Index C.O. / BSA 2.5-4.0 Stroke C.O. / HR 60-100 Volume Stroke ml/m SV / BSA 33-47 Volume Index Systemic 79.96*(MAP Dynes·...
-
Page 180: Oxygenation Calculations
Output Full Name Reference Unit Formula Parameter /Description Range Right 0.0136*paM RVSW g· m 51-61 Ventricle AP*SV Stroke Work Right Ventricle RVSWI g· m/m RVSW/BSA 5-10 Stroke Work Index Ejection (SV/t)*100 40-60 Fraction Remarks: 0.425 0.725 BSA (Body Surface Area) = Weight * Height * 0.007184 ... - Page 181 Select [Range] to view the normal range of each parameter. Select [Unit] to view the unit of each parameter. 17-8...
-
Page 182: Input Parameters For Oxygenation Calculations
17.4.2 Input Parameters for Oxygenation Calculations Input Full Name / Adjustable Unit Parameter Description Range Height Height 20.0-300.0 Weight Weight 1.0-250.0 C.O. Cardiac output L/min 0.1-20.0 Hemoglobin 50-200 —— Respiratory quotient 0.1-1.5 Percentage fraction of FiO2 18-100 inspired oxygen CaO2 Arterial oxygen content ml/L 10-400... -
Page 183: Output Parameters And Formulas For Oxygenation
17.4.3 Output Parameters and Formulas for Oxygenation Calculations Output Full Name Reference Unit Formula Parameter /Description Range 0.425 0.725 —— Body surface *0.0 area 07184 —— calc Oxygen ml/mi (SaO2-SvO )*13. consumption 4*Hb * C.O. C(a-v)O Arteriovenous ml/L - CvO 42-59 oxygen content... -
Page 184: Ventilation Calculations
Output Full Name Reference Unit Formula Parameter /Description Range —— /FiO Oxygenation /(FiO *100) index —— —— /PaO Ratio of [(FiO2*100)*(AT alveolar-arteri MP-47)–(PaCO al oxygen RQ) - PaO partial pressure difference to oxygen partial pressure —— Oxygen ml/mi (CaO delivery index C.O.)/BSA –... - Page 185 Select [Range] to view the normal range of each parameter. Select [Unit] to view the unit of each parameter. 17-12...
-
Page 186: Input Parameters For Ventilation Calculations
17.5.2 Input Parameters for Ventilation Calculations Input Full Name / Adjustable Unit Parameter Description Range Percentage fraction of 18-100 inspired oxygen PeCO End-tidal CO pressure mmHg 0-114 Partial pressure of mmHg 10-800 oxygen in the arteries —— Respiratory quotient 0.1-1.5 ATMP Atmospheric pressure mmHg... -
Page 187: Output Parameters And Formulas For Ventilation Calculations
17.5.3 Output Parameters and Formulas for Ventilation Calculations Output Full Name Reference Unit Formula Parameter /Description Range Partial *(ATMP-47) pressure of —— mmHg –(PaCO oxygen in the / RQ) alveoli *(ATMP-47) Alveolar-arteri —— –(PaCO AaDO al oxygen mmHg /RQ)- difference Oxygenation ——... -
Page 188: Input Parameters For Renal Function Calculations
Press [Main Menu] → [Calculations], select the [Renal] tab. Enter the known values. Press the [Calculate] button, the system will calculate the value of each output parameter according to the calculation formula. An abnormal calculated value is indicated by a yellow background. An invalid calculated value is indicated by ―---‖. -
Page 189: Output Parameters And Formulas For Renal Function Calculations
17.6.3 Output Parameters and Formulas for Renal Function Calculations Output Full Name / Reference Unit Formula Parameter Description Range Urine sodium mmol/2 URNa*Urine/10 URNaEx 51-102 excretion 00ml Urine mmol/2 URK*Urine/100 —— URKEx potassium excretion Excretion ratio of urine URNa/URK*100 —— Na/K sodium and potassium... -
Page 190: Scoring Parameters
observations. Depending on the score calculated, appropriate recommendations are displayed. The monitor supports the following scoring systems: NEWS (National Early Warning Score) MEWS (Modified Early Warning Score) CART (Cardiac Arrest Risk Triage) There are two scoring type: total score and single parameter score. ... -
Page 191: Displaying The Ews Parameter Area
17.7.2 Displaying the EWS Parameter Area To display the EWS parameter area, follow the steps below: Access [Layout] screen in either of the following ways: Press the [Screens] quick key → select the [Layout] tab. Press [Main Menu] → [Screens], select the [Layout] tab. Select the parameter area where you want to display the EWS score, and then select [Timer] from the popup list. -
Page 192: Auto Scoring
17.7.5 Auto Scoring When [Mode] is set to [Auto], the monitor automatically calculates the total score when the following conditions occur: At the completion of the preset refresh period (time interval); At the completion of each NIBP measurement; ... - Page 193 NEWS Settings Default Parameter Setting Range Unit Setting Alert, Reacting to Consciousness Voice, Reacting to Alert Pain, Unresponsive Current RR 0-150 value / empty Current Temp ℃ Temp 0-50 value / empty Current SBP 0-300 mmHg value / empty Current HR 0-350 value / empty CART Settings...
- Page 194 This page intentionally left blank. 17-21...
-
Page 195: Chapter 18 Other Functions
Chapter 18 Other Functions 18.1 Freezing Waveforms During patient monitoring, you can freeze the currently displayed waveforms on the screen so that you can have a close examination of the patient’s status. 18.1.1 Entering Freeze Screen In the Non-Freeze status, press the [Freeze] quick key to exit the current operating screen. -
Page 196: Using The Timer
Press [Main Menu] → [Screens], select the [Layout] tab. Select the parameter area where you want to display the timer, and then select [Timer] from the popup list. 18.2.2 Using the Timer You can perform the following operations on the timer: ... -
Page 197: Managing Configurations
18.4 Managing Configurations When performing continuous monitoring on a patient, the clinical professional often needs to adjust the monitor’s settings according to the patient’s condition. The collection of all these settings is called a configuration. The system configuration items can be classified as: parameter configuration items, alarm configuration items, conventional configuration items, and user maintenance items. -
Page 198: Deleting A Configuration
Select [Enter] to import the configuration as a user configuration. 18.4.3 Deleting a Configuration To delete a configuration, follow the steps below: Press [Main Menu] → [System], select the [Configurations] tab. Select the configuration you want to delete. Select [Delete]. Select [Yes] in the popup dialog box. - Page 199 Press [Main Menu] → [System], select the [Configurations] tab. Select [Import]. Select the configuration you want to import, and select [Open]. Enter the name of the configuration to import. Select [Enter] to import the configuration as a user configuration. 18-5...
-
Page 200: Chapter 19 Recording
Chapter 19 Recording 19.1 Recorder A thermal recorder can be used for the monitor and output patient information, measurement data, up to three waveforms, etc. Built-in thermal recorder may be used due to the different configuration. Power indicator: On (green light): the recorder works correctly. ... -
Page 201: Starting Recordings
Note The recorder can output up to three waveforms at a time. Note Only ECG waveform can be selected for [Wave 1]. [Wave 1], [Wave 2] and [Wave 3] cannot be set to the same options (for example, [Wave 2] and [Wave 3] cannot be set to Resp at the same time). -
Page 202: Stopping Recordings
Recording when a parameter alarm is triggered To enable automatic recording via recorder when a parameter alarm is triggered, follow the steps below: Select the tab related to parameter alarm in either of the following ways: Press the [Alarm Setup] quick key. ... -
Page 203: Precautions
19.7 Precautions Observe the following precautions when using the recorder: Only standard thermo-sensitive recording paper can be used. Otherwise, it may cause damage to the recorder’s thermo-sensitive print head, the recorder may not function, or the recording quality may be poor. ... - Page 204 This page intentionally left blank. 19-5...
-
Page 205: Chapter 20 Printing
Chapter 20 Printing 20.1 Supported Printer The monitor can output patient reports via a connected network printer. The currently supported printer type is HP Laser Jet M203-M206 laser printer. Caution For more information about the printer, refer to the document accompanying the printer. -
Page 206: Starting A Printing Task
20.3 Starting a Printing Task 20.3.1 Manual Printing Print a report manually in one of the following ways: Press the button on the top right corner of the current screen. Press the [Real-time Print] quick key at the bottom of the main screen. -
Page 207: Configuring Real-Time Reports
[Print ECG Grid]: set whether to print grids on ECG waveforms of a printout. The default setting is switched off. Switching on means that the 5x5(mm ) grid background will be printed on the ECG waveforms. [12-Lead Format]: select the format of 12-lead ECG waveforms on a printout. -
Page 208: Configuring Tabular Trends Reports
The default setting is 10s. When it is set to [Continuous], [Timed Record Interval] is deactivated, and the recorder will not stop recording the real-time waveform until the recording is manually stopped. 20.5.3 Configuring Tabular Trends Reports To configure tabular trends reports, follow the steps below: Press [Main Menu] →... -
Page 209: Configuring Event Reports
Press [Main Menu] → [Reports], select the [Report Setup] tab. Select the [Graphic Trend] tab. Set the desired options. The menu settings are described below: [Start Date]: select the date before which a graphic trends report will be printed. ... - Page 210 This page intentionally left blank. 20-6...
-
Page 211: Chapter 21 Battery
Chapter 21 Battery 21.1 Introduction The monitor is equipped with a lithium-ion rechargeable battery to support its normal operation when the external power is not available. 21.2 Safety Information Warning Keep the battery out of the reach of children. Warning Use only the battery specified by the manufacturer. -
Page 212: Installing The Battery
Warning Do not disassemble the battery, place it in high ambient temperature (above 60℃) environment, burn the battery or short-circuit it. Otherwise, it may cause a risk of fire, explosion, battery leaks or high temperature and even personal injury. Warning The lithium-ion rechargeable battery has a service life. -
Page 213: Battery Indication
To install the battery, follow the steps below: Turn off the monitor, disconnect the power cord and other cables. Place the monitor face down on the table. Use a Phillips screwdriver to loosen the fixing screws on the battery cover and open the battery cover. Insert the battery into the battery compartment and keep the battery cable outward. -
Page 214: Battery-Related Alarms
The battery power is low and needs to be charged. When this icon appears, the battery can power the monitor for up to 30 minutes. The battery is almost depleted and needs to be charged immediately. Otherwise, the monitor will automatically shut down after 5 minutes. -
Page 215: Checking Battery Performance
Allow the monitor to run on the battery until the battery is completely depleted and the monitor automatically shuts down. Fully charge the battery again for use or charge it to 40%-60% for storage. Caution Do not use the monitor to monitor patient during the battery optimization. Caution Do not interrupt charging or discharging during battery optimization. -
Page 216: Replacing And Recycling The Battery
Caution It will greatly shorten the service life of the battery if it is stored in a high temperature environment for a long time. 21.8 Replacing and Recycling the Battery Replace the battery if it is damaged, aging or cannot store power, and recycle it correctly. -
Page 217: Chapter 22 Cleaning And Disinfection
Chapter 22 Cleaning and Disinfection 22.1 Safety Information Warning Do not immerse the device and accessories in liquid. Warning Do not pour liquid on the device or accessories. Do not allow the liquid permeate into the device. Warning Do not use abrasive materials or any strong corrosive solvents for cleaning to avoid scratches or damages to the device. -
Page 218: Disinfection
Clean the surface of the monitor with a clean soft gauze moistened with one of the recommended cleaning agents. Wipe off all the cleaning agent residue with a clean dry cloth. Dry your monitor in a ventilated, cool place. Caution Keep the cleaning agent away from the connectors of the monitor and accessories while cleaning the device housing. -
Page 219: Sterilization
22.5 Sterilization It is not allowed to sterilize the monitor and related accessories unless stated in their operation instructions. 22.6 Cleaning the Print Head If the thermal printer has been used for a long time, deposits of paper debris may collect on the print head, which may affect the print quality and shorten the lifetime of the roller. -
Page 220: Chapter 23 Care And Maintenance
Chapter 23 Care and Maintenance In order to ensure the normal operation of the monitor and maintain its service life, please pay attention to the maintenance of the monitor. Refer to the detailed provisions in the sales contract for the warranty period of main unit and accessories of the monitor. -
Page 221: Daily Inspection
Caution The device and accessories shall not be serviced or maintained while in use on a patient. Caution If you discover a problem with any of the device, contact your service personnel or our company. Caution Use and store the device within the specified temperature, humidity, and altitude ranges. -
Page 222: Routine Maintenance
23.3 Routine Maintenance The monitor is designed with a service life of 10 years. It is strongly recommended to use the product within its life cycle, or it may cause inaccurate measurement. During the long-term use, it is recommended that the user check and calibrate the monitor once a year to ensure the measurement accuracy. -
Page 223: Battery Maintenance
The inspection items mainly include: Check whether the safety signs are damaged. Check the main unit and accessories for mechanical and functional damages. Carry out the protective grounding impedance, leakage current and insulation resistance test according to the requirements of IEC60601-1. -
Page 224: Nibp Maintenance
Switch off [Calibration] to end the calibration of ECG module. Caution During ECG calibration, the patient cannot be monitored. 23.6 NIBP Maintenance 23.6.1 NIBP Leakage Test The NIBP leakage test checks the integrity of the system and of the valve. In order to avoid significant error of blood pressure measurement or even no measurement result caused by air leakage in the pneumatic system including the cuff during measuring, it is recommended to check if there is leakage in the pneumatic system. - Page 225 Mercury blood pressure meter NIBP cuff with dual air tube Air tube Air tube Air tube Air vent Air tube Increase the pressure Manual valve manually through the inflatable balloon NIBP module Inflation balloon Module testing software This belongs to the monitor ...
-
Page 226: Co Calibration
At this mode, the pressure should be increased manually by a pumping balloon, and the verification can be done by applying different pressure value manually. If the increased pressure exceeds the given limit as shown in the table above, the monitor will deflate automatically because of over-pressure protection. -
Page 227: Storage, Packaging And Transportation
If you think the monitor’s pressure readings are not correct. When you select another measuring label, the monitor displays the prompt message Unzeroed. There is two methods for calibration: zero calibration and pressure value calibration. Calibration procedure: Press[Main Menu]→[Maintenance]→ input password → press [Enter]. - Page 228 To view the system software version, hardware version, module version, firmware version, and other version information, follow the steps below: Press[Main Menu]→[Maintenance]→ input password → press [Enter]. Select the [Version] tab. You can also press the [Main Menu] → [System], and select [Version] tab to view the software version, monitor name, monitor ID and monitor network information (MAC and IP address).
- Page 229 This page intentionally left blank. 23-10...
-
Page 230: Chapter 24 Troubleshooting
Chapter 24 Troubleshooting This chapter lists the problems that are likely to occur. If the problem persists after corrective actions have been taken, contact the manufacturer or your local distributor. 24.1 Prompt Messages The monitor prompts messages to indicate the current system status. Follow the instructions in the table below to eliminate the problems. - Page 231 Status / Description Corrective Actions Error Check the cuff for air leakage. Check the tightness of the module Air moving part, tube Air leak airway. or the cuff leak air. Recondition the module pneumatic components. Check the airway, especially the Unstable cuff Pressure hose, for kinks.
- Page 232 Temp Status / Description Corrective Actions Error Module abnormal or faulty, it is recommended to power on again. Temperature Power on hardware If this symptom cannot be self-test self-test of temp eliminated, it is recommended to failed module failed. replace the Temp module or return to the factory for repair.
- Page 233 Status / Description Corrective Actions Error The transducer is faulty or the signal line inside the device Transducer The transducer signal appears, it is recommended to error appears. replace the transducer or return to the factory for repair. IBP cable connector Normal prompt message, not an Probe off not connected.
- Page 234 Status / Description Corrective Actions Error When the temperature of the sensor is higher than Module hardware error or module Sensor over 40℃, the module will failure, please return to the factory temp for repair or replace the sensor. send out the information automatically.
- Page 235 Status / Description Corrective Actions Error sensor is faulty. Please return to the factory for repair or replace the sensor. The value being It is recommended to perform calculated is greater sensor zeroing at this time. If the than the upper CO zeroing operation fails for more out of limit (150mmHg).
-
Page 236: Common Faults
Status / Description Corrective Actions Error include: Breaths detected The preheating is not completed, and the sensor temperature is not stable The sensor is still in sleep mode Sensor barometric pressure and gas compensation settings are not completed The status Zero in Normal report during zero information returned... -
Page 237: Power Supply Troubleshooting
Use a universal meter to check if the outlet has proper voltage. Check the power cable is in good condition, and that it has been properly connected to the monitor and outlet. Remove the fuse from the back cover of this device, and make sure it is in good condition. -
Page 238: Ecg Troubleshooting
Probe off. Please check the connection of the probes. 24.2.4 ECG Troubleshooting If there are excessive ECG signal interferences or the baseline is too thick, always check the following: Check if the plate electrodes are properly located, and if valid plate electrodes are used. -
Page 239: Co Troubleshooting
Possible Symptoms Corrective Actions Causes Perform zero No valid zero. Zero the transducer first. first The pressure hardware may be faulty. Device Contact the manufacturer or your local malfunction distributor. Excessive Confirm that the transducer is vented to air offset and try again. - Page 240 If the monitor gives a message indicating the airway still works incorrectly, it indicates that the water trap must have been blocked, and you should replace with a new one. Otherwise, you can determine that the sampling line must have been blocked.
-
Page 241: Chapter 25 Accessories
Chapter 25 Accessories The accessories listed in this chapter comply with the requirements of IEC 60601-1-2 when in use with the patient monitor. The accessory material that contacts the patients has undertaken the bio-compatibility test and is verified to be in compliance with ISO 10993-1. - Page 242 Caution Discard disposable accessories according to your local regulations or hospital regulations. Note Part No. is subject to change without prior notice, please refer to the label of parts or the supplied package list. Note This manual describes all the accessories that are validated for use. Not all accessories are available in every market.
-
Page 243: Ecg Accessories
25.1 ECG Accessories Model/Part Applicable Accessories Description Patient 3-lead, snap, ECG cable KE-IGB031/ defibrillation-proof, and electrode 15010028 reusable Adult/ ECG cable KE-IGB051/ 5-lead, snap, and electrode 15010020 defibrillation-proof Pediatric/ ECG cable KE-IGB061/ 6-lead, snap, Neonate and electrode 15010029 defibrillation-proof ECG cable KE-IGB101/ 12-lead, snap, and electrode... -
Page 244: Spo 2 Accessories
25.3 SpO Accessories Model/ Applicable Accessories Description Part No. Patient Nellcor SpO Finger-clip, DS100A Adult/Pediatric sensor reusable NellcorSpO D-YS Y-type, reusable Neonate sensor NellcorSpO sensor Adult/Pediatric/N DOC-10 Reusable eonate extension cable Adult/Pediatric/N sensor KS-AE01 Ear-clip, reusable eonate Finger-clip, sensor KS-AC01 Adult reusable Large soft... - Page 245 Model/ Applicable Accessories Description Part No. Patient reusable 98-0084- 31cm-40cm, Cuff Adult/Pediatric reusable 10cm-19cm, Cuff KN-232 Adult/Pediatric reusable 18cm-26cm, Cuff KN-233 Adult/Pediatric reusable 25cm-35cm, Cuff KN-241 Adult/Pediatric reusable 33cm-47cm, Cuff KN-243 Adult/Pediatric reusable 25-5...
-
Page 246: Co Accessories
25.5 CO Accessories Model/ Applicable Accessories Description Part No. Patient module LoFlo Sidestream (sidestream) Sampling Disposable, Adult/Pediatric/N #3475-00 cannula non-sterile eonate module CAPONS Mainstream TAT 5 (mainstream) Sampling Disposable, #606300 Adult adapter non-sterile module KM7003 Sidestream (sidestream) 240cm-φ2.5*1.6 sampling 1510012 , two male line Adult/Pediatric/N... -
Page 247: Ibp Accessories
25.6 IBP Accessories Model/ Applicable Accessories Description Part No. Patient IBP transducer 15030121 Disposable Adult/Pediatric/N eonate 4 pin, plastic, IBP cable 15039057 reusable 25.7 Other Accessories Accessories Specification / Model Rechargeable lithium battery HYLB-2260/10.95V/2750mAh Rechargeable lithium battery HYLB-2261/10.95V/5500mAh 25-7... - Page 248 This page intentionally left blank. 25-8...
-
Page 249: Appendix A Technical Specifications
Appendix A Technical Specifications A.1 Safety Specifications IEC 60601-1 Standards Safety standards IEC 60601-2-27 Class I and internally Anti electric-shock type powered device Type CF with defibrillation Anti electric-shock degree protection Electromagnetic Group I, Class A compatibility Operation mode Continuous Degree of protection against harmful ingress of IPX2... -
Page 250: Power Supply Specifications
A.3 Power Supply Specifications External Power Supply Input Voltage 100 -240 V~ Input Current 2.0 – 0.9A Frequency 50/60Hz Battery Configuration Standard Optional Type Lithium ion rechargeable Lithium ion rechargeable battery battery Rated Voltage 10.95 V 10.95 V Battery 2750 mAh 5500 mAh Capacity Run Time... - Page 251 Shutdown At least 5 minutes (since the first low battery alarm) Delay...
-
Page 252: Physical Specifications
A.4 Physical Specifications Model AIView V10、AIView PH10 AIView V12、AIView PH12 Main Unit ≤290mm×170mm×230mm ≤330mm×170mm×25 mm Size (L×W×H) ≤ 3 kg ≤4 kg Net Weight of the Main Unit Display 11.6 inches, color TFT LCD 13.3 inches, color TFT LCD Screen screen screen Resolution:... -
Page 253: Signal Outputs Specifications
2 TEMP connectors 2 IBP connectors 1 CO connector Thermal Thermal dot matrix recorder recorder Horizontal resolution: 8 dot/mm Vertical resolution: 8 dot/mm Recording paper width: 50 mm ± 1 mm Paper speed: 25 mm/s, 50 mm/s, error ≤±5% A.5 Signal Outputs Specifications Auxiliary output Standard Meets the requirements of IEC 60601-1 for... -
Page 254: Data Storage
≤ 1 ms Rising and falling time Duration of Short circuit to ground for 1 minute, no fault after short-circuit disconnection. Nurse call signal output Amplitude 10~15V Maximum load 350mA current Duration of Lasting short-circuits is allowable, and it can return to short-circuit normal automatically. -
Page 255: Ecg Specifications
features WPA/WPA2 Enterprise for Client EAP-TLS EAP-FAST EAP-TTLS PEAP-MSCHAP-v2 Data security AES128/256, SHA256/384/512, RSA, ECC, ECDH, RNG, CRC A.8 ECG Specifications Compliant IEC 60601-2-27: 2011 and IEC 60601-2-25: 2011 standards Lead type 3-lead: I, II, III 5-lead: I, II, III, aVR, aVL, aVF, V 6-lead: I, II, III, aVR, aVL, aVF, Va, Vb 12-lead: I, II, III, aVR, aVL, aVF, V1 to V6 Sampling rate... - Page 256 ±800 mV Electrode polarization voltage range Input offset ≤0.1μA current Baseline recovery <5 s after defibrillation time 10μA Patient leakage current ≤30 µV (p-v RTI) System noise Calibration 1mV, error range ± 5% voltage ESU protection ESU cutting power: 300 W ESU coagulating power: 100 W Recovery time: <10 s Heart rate change under ESU interference: <±...
- Page 257 rejection 350ms, duration of 180ms and amplitude lower than capability 1.2mV, the heart rate calculation is not affected. Minute heart rate The lastest 8 RR intervals are all in a certain range of average heart beats. averaging algorithm Display refresh rate: 1 beat/s Response time to Meets the requirements of IEC 60601-2-27: Clause 201.7.9.2.9.101 b) 5).
-
Page 258: Resp Specifications
pediatric and neonate Measurement QT: 30 ms accuracy QTc, QT-HR: not defined Resolution QT: 4 ms QTc: 1 ms QT-HR: 1 bpm QTc alarm high 200 ms~800ms, step: 1 ms limit ΔQTc alarm high 30 ms~200ms, step: 1 ms limit A.9 Resp Specifications Respiration rate Adult: 0 rpm~120 rpm... -
Page 259: Nibp Specifications
error is ± 0.1℃ (without probe) within the range of 25℃~45.0℃, the maximum allowable error is ± 0.2℃ within other measurement ranges, the maximum allowable error is ± 0.4℃ Minimum time for Body surface: <100 s accurate measurement System response <150 s time Alarm limit setting... - Page 260 Neonate: 70mmHg (9.3kPa)~110mmHg (14.7kPa) Static pressure 0 mmHg~300 mmHg (0.0 kPa~40.0 kPa) measurement range ±3 mmHg (± 0.4 kPa) Static pressure measurement accuracy Initial inflating KRK blood pressure module pressure setting Adult: 80 mmHg~280 mmHg (10.6 kPa~37.2 kPa) range Pediatric: 80 mmHg~210 mmHg (10.6 kPa~27.9 kPa) Neonate: 60 mmHg~140 mmHg (7.8 kPa~18.2 kPa) Suntech blood pressure module...
- Page 261 mmHg 25~290 25~240 25~140 3.3~38.6 3.3~31.9 3.3~18.6 mmHg 15~260 15~215 15~125 2.0~34.6 2.0~28.6 2.0~16.6 mmHg 10~250 10~200 10~115 1.3~33.3 1.3~26.6 1.3~15.3 Suntech blood pressure module Blood pressure Adult Pediatric Neonate (unit) mmHg 40~260 40~230 40~130 5.3~34.6 5.3~30.6 5.3~17.3 mmHg 26~220 26~183 26~110 3.5~29.3...
-
Page 262: Spo Specifications
(16~ (16~ (16~ 260)/ 215)/ 125)/ High limit (2.1~ (2.1~ (2.1~ 34.6) 28.6) 16.6) (15~ (15~ (15~ 259)/ 214)/ 124)/ limit (2.0~ (2.6~ (2.6~ 34.5) 28.5) 16.5) (11~ (11~ (11~ 250)/ 200)/ 115)/ High limit (1.5~ (1.5~ (1.5~ 33.3) 26.6) 15.3) (10~... -
Page 263: Pr Specifications
1%~69%: not defined Sensor KRK SpO module: Wavelength: Red light: 660nm, Infrared light: 905nm Maximum optical output power: ≤2mW Nellcor SpO module: Wavelength: Red light: 660nm, Infrared light: 900nm Maximum optical output power: ≤15mW ≤8s Data update cycle Perfusion index KRK SpO module: (PI) measurement... -
Page 264: Co Specifications
Measurement 30bpm~250bpm 20bpm~250bpm range ±2bpm or ± 2%, ±3bpm Measurement accuracy whichever is greater PR from IBP module Measurement 20bpm~250bpm range Measurement ±3bpm accuracy A.14 CO Specifications Compliant ISO 80601-2-55: 2018 standards Measurement Sidestream and mainstream mode Measurement 0 mmHg~150 mmHg (0 kPa~20.0 kPa) range 0 mmHg~40 mmHg (0 kPa~5.3 kPa), the error is ±... -
Page 265: Ibp Specifications
response time < 7 s (LoFlo CO module) Mainstream: rise time <60 ms Short-term: The module works for more than 4 hours, and Drift of the maximum drift does not exceed 0.8mmHg. measurement Long-term: The module works for more than 120 hours accuracy and still meets the specified performance standards. - Page 266 (-0.80kPa~16.0kPa) CVP/LAP/RAP/ICP: -10mmHg~40mmHg (-1.3kPa~5.3kPa) AUXP1/AUXP2: -50mmHg~300mmHg (-6.7kPa~40.0kPa) Measurement ±3mmHg(±0.4kPa) ±4mmHg (±0.5kPa) or accuracy ±4%, whichever is greater Resolution 1mmHg (0.1kPa) 1mmHg (0.1kPa) Alarm limit setting ART (SYS, DIA, MAP): range (adult) High limit: 1mmHg~300mmHg (0.1kPa~40.0kPa) Low limit: 0mmHg~299mmHg (0kPa~36.7kPa) PA (SYS, DIA, MAP): High limit: 1mmHg~120mmHg (0.1kPa~16.0kPa) Low limit: 0mmHg~119mmHg (0kPa~15.8kPa) CVP, RAP, LAP, ICP (SYS, DIA, MAP):...
-
Page 267: Appendix B Alarm Messages
Appendix B Alarm Messages This chapter lists only the most important physiological and technical alarm messages. Some messages appearing on your monitor may not be included. B.1 Physiological Alarm Messages Alarm Category Alarm Messages Default Priority XX High General XX Low Asystole High V-Fib/V-Tach... - Page 268 Alarm Category Alarm Messages Default Priority HR Low SV Tachy SV Brady A-Fib (HR High) A-Fib A-Fib End Irr Rhythm Irr Rhy End Pause Pauses/min Missed Beats Pacer Not Pacing Pacer Not Capture PACs Couplet SV Bigeminy SV Trigeminy 2nd Degree A-V Block 1st Degree A-V Block Extreme Tachy High...
-
Page 269: Technical Alarm Messages
Alarm Category Alarm Messages Default Priority Pulse not found High Apnea High Note: ―XX‖ represents a measurement or parameter label, such as HR, ST, RR, SpO or PR, etc. B.2 Technical Alarm Messages Default Alarm Alarm Messages Priority Source System Battery low, unknown error High sensor failure, CO... - Page 270 Default Alarm Event Remarks Priority information area, but it will be recorded firmware error as alarm event. Communication error sensor faulty hardware error module faulty sensor error It means that the SpO sensor identification fails. sensor The sensor cable or extension cable is disconnected not connected to the monitor.
-
Page 271: Appendix C Default Settings
Appendix C Default Settings This chapter lists only the most important default settings of your monitor as it is delivered from the factory. Note If your monitor has been ordered preconfigured to your requirements, the settings at delivery will be different from those listed here. C.1 Alarm Default Settings Item Adult... - Page 272 Item Adult Pediatric Neonate Parameter ST-V6, ST-V, Priority ST-Va, ST-Vb Alarm Outputs Switch High Priority Alarm Outputs Switch High ΔQTc Priority Alarm Outputs High 30 rpm 30 rpm 100 rpm 8 rpm 8 rpm 30 rpm Switch Priority Alarm Outputs Switch Apnea High...
- Page 273 Item Adult Pediatric Neonate Parameter Apnea 5-120s 10-60s 10-60s Delay Alarm Outputs 38.0 ℃ 38.0 ℃ 38.0 ℃ High 35.0 ℃ 35.0 ℃ 35.0 ℃ Switch Temp1, Temp2 Priority Alarm Outputs ΔT 2.0 ℃ 2.0 ℃ 2.0 ℃ Switch ΔT Priority Alarm Outputs...
- Page 274 Item Adult Pediatric Neonate Parameter Alarm Outputs Switch High Event Priority Alarm Outputs Switch High 120 bpm 160 bpm 200 bpm 50 bpm 75 bpm 100 bpm Priority Alarm Outputs Alarm Auto Auto Auto Source Switch High 160 mmHg 120 mmHg 90 mmHg 90 mmHg 70 mmHg...
- Page 275 Item Adult Pediatric Neonate Parameter Priority Alarm Outputs Switch High 110 mmHg 90 mmHg 70 mmHg 60 mmHg 50 mmHg 25mmHg NIBP-M Priority Alarm Outputs Switch High 50mmHg 50mmHg 45mmHg 25mmHg 25mmHg 30mmHg EtCO Priority Alarm Outputs Switch High 4mmHg 4mmHg 4mmHg FiCO...
-
Page 276: System Default Settings
Item Adult Pediatric Neonate Parameter Priority Alarm Outputs Switch High 120 mmHg 100 mmHg 90 mmHg PA-S/ 10 mmHg 10 mmHg 10mmHg PA-D/ PA-M Priority Alarm Outputs C.2 System Default Settings Screen Item Default Setting Lead Auto ECG1 ECG2 Speed 25mm/s ECG Setup Gain... - Page 277 Screen Item Default Setting QT Analysis Lead QTc Formula Hodges Speed 6.25mm/s Gain ×2 Resp Setup Resp Lead RR Source Auto Speed 25mm/s Display PI Setup PR Source Auto NIBP Simul. Sat-Seconds Temp1 Label Temp1 Temp2 Label Temp2 Temp Setup ℃...
- Page 278 Screen Item Default Setting 10min 15min 30min 15min —— —— —— Phase Duration Interval Current time - Current 10min time + 1 hour Current time +1 15min hour - 22:00 on that day 22:00 on that day - 30min 6:00 the Sequence (Duration) next day 6:00 on...
- Page 279 Screen Item Default Setting Gain X1/2 Unit mmHg Temp(℃) CO2 Flow 50ml/min Period Balance Gas Gas Compensation Atmospheric 760mmHg Pressure IBP1: ART IBP Label IBP2: PA Calculation Mode Dynamic Average Time Pressure Unit mmHg CVP Unit cmH2O IBP Setup ICP Unit mmHg Speed 25mm/s...
- Page 280 Screen Item Default Setting Waveform 3 Resp Waveform 4 Parameter 1 Parameter 2 Resp Parameter 3 Parameter 4 NIBP Parameter 5 Temp1 Key Volume Beat Volume Alarm Volume System Setup Screen Brightness Beat Mode 2 Date Format YYYY-MM-DD Time Mode 12 hours Type Adult...
- Page 281 Screen Item Default Setting Med Alarm Audio Interval(s) Low Alarm Audio Interval(s) ARR - V-Fib/V-Tach Enable ECG lead off IBP No Transducer Sensor Off Apnea Off Disable C-11...
-
Page 282: Appendix D Typical Pressures And Co
Appendix D Typical Pressures and CO Readings at Altitudes Atmospheric EtCO Reading Altitude Pressure (mmHg) (%) (mmHg) 38.0 37.7 100m 37.5 200m 37.1 1500m 32.0 3000m 26.8 5000m 21.0... - Page 283 This page intentionally left blank.
-
Page 284: Appendix E Emc Compliance
Appendix E EMC Compliance Table 1 Guidance and manufacturer’s declaration-electromagnetic emission for all EQUIPMENT and SYSTEMS The Patient Monitor is intended for use in the electromagnetic environment specified below. The customer or the user of the equipment or system should assure that it is used in such an environment. Electromagnetic Emissions test Compliance... - Page 285 Table 2 Guidance and manufacturer’s declaration-electromagnetic immunity for all EQUIPMENT and SYSTEMS The Patient Monitor is intended for use in the electromagnetic environment specified below. The customer or the user of the equipment or system should assure that it is used in such an environment. Electromagnetic IEC60601 test Compliance...
- Page 286 250/300 cycle uninterruptible power 0 % U supply or a battery. 250/300 cycle Power Power frequency frequency magnetic fields should (50Hz/60Hz) be at levels magnetic field 30A/m 30A/m characteristic of a typical location in a IEC61000-4-8 typical commercial or hospital environment. NOTE: U is the a.c.
- Page 287 Table 3 Guidance and manufacturer’s declaration – electromagnetic immunity for EQUIPMENT and SYSTEM that are not LIFE-SUPPORTING Patient Monitor is intended for use in the electromagnetic environment specified below. The customer or the user of Patient Monitor should assure that it is used in such an electromagnetic environment. Electromagnetic Immunity IEC 60601 test...
- Page 288 manufacturer and d is the recommended separation distance in metres (m). Field strengths from fixed RF transmitters, as determined by an electromagnetic site survey, should be less than the compliance level in each frequency range. Interference may occur in the vicinity of equipment marked with the following symbol.
- Page 289 less than 3V/m.
- Page 290 Table 4 Recommended separation distances between portable and mobile RF communications equipment and the equipment or system for EQUIPMENT and SYSTEM that are not LIFE-SUPPORTING The Patient Monitor is intended for use in an electromagnetic environment in which radiated RF disturbances are controlled. The customer or the user of the equipment or system can help prevent electromagnetic interference by maintaining a minimum distance between portable and mobile RF communications equipment...
- Page 291 § 15.19 Labeling requirements. This device complies with part 15 of the FCC Rules. Operation is subject to the following two conditions: (1) This device may not cause harmful interference, and (2) this device must accept any interference received, including interference that may cause undesired operation.
- Page 292 This equipment complies with FCC radiation exposure limits set f orth for anuncontrolled environment. This equipment should be in stalled and operated withminimum distance 20cm between the ra diator & your body. Operations in the 5.15-5.35GHz band are restricted to indoor usage only.
Need help?
Do you have a question about the AIView Series and is the answer not in the manual?
Questions and answers
Welches Programm sollte ich verwenden, um das Bild von der SK-Karte auf den Computer übertragen zu können?