
Related Manuals for Yolink Garage Door Kit 3


Summary of Contents for Yolink Garage Door Kit 3
- Page 1 Garage Door Controller Garage Door Kit 3 Garage Door Sensor 2 YS4906-UC_YS7706-UC Installa on & User Guide Rev 1.0...
-
Page 2: Table Of Contents
·· · ·1 Important No ce ·······················································································2 Introduc on ······························································································3 Set Up ·······································································································5 Installa on ································································································8 Using the YoLink App ················································································19 About YoLink Control ················································································29 Maintenance ···························································································35 Specifica ons ··························································································40 Garage Door Controller Troubleshoo ng ···················································41 Garage Door Sensor 2 Troubleshoo ng ······················································42 Warning ··································································································43... -
Page 3: In The Box
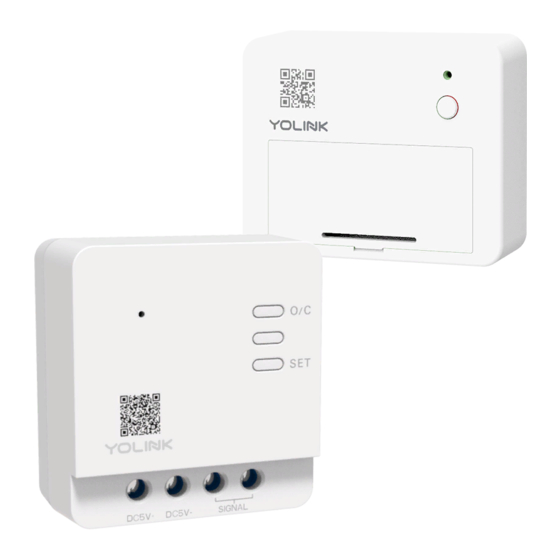
In the Box A. Garage Door Controller B. Garage Door Sensor 2 C. Power Adapter D. USB Cable Signal Wire F. Quick Start Guide... -
Page 4: Important No
Improper use of your garage door operator/opener can cause property damage and/or serious injury or death. Install and use your Garage Door Kit 3 only as instructed in this manual If you are uncomfortable working with wiring or electricity, please consult or hire a qualified... -
Page 5: Introduc
YS7706-UC Garage Door Sensor 2 Garage Door Controller: Used for garage door operator or bu on control, allows you to control your garage door from the YoLink app, as well as via popular voice assistants like Alexa and Google Assistants... - Page 6 Green Once Opening / Closing the door Blinking Green Connec ng to Cloud Fast Blinking Green Establishing Connec on with YoLink System Slow Blinking Green Upda ng Fast Blinking Red Removing Connec on to YoLink System Blinking Red And Green Alternately...
-
Page 7: Set
Set Up Follow the steps below to set up your Garage Door Kit via the YoLink app Set Up - First-Time YoLink Users (Exis ng users proceed to Add Device, next page) * Get ready: To set up and use your Garage Door Kit, you will need an Apple iPhone or tablet that is iOS 9.0 or higher, or an Android phone or... - Page 8 Garage Door Controller. A er pairing you will get real- me ba ery status of your Garage Door Sensor 2, signal level between Garage Door Controller or Garage Door Sensor 2 and the YoLink Hub, and real- me opened or...
- Page 9 Turn on power of controller a er installa on (refer to Installa on sec on on next page), the Status LED will blink several mes (red, then green). The green LED indicates the device is online and ready to use Press the SET bu on (on front of sensor) once, the Status LED will blink several mes (red, then green).
-
Page 10: Installa
(Opened or Closed) may be inaccurate Avoid allowing the controller and sensor to be exposed to strong impacts or vibra on Please add the Garage Door Controller and Sensor 2 to the YoLink app before installa on... - Page 11 Garage Door Controller Get Ready to Install the Garage Door Controller Before star ng, choose the appropriate method for your installa on, connec ng to your garage door operator (typically on the ceiling of your garage) or the bu on (typically on the wall). For connec ons to the operator (Method A) you may install the Garage Door Controller on the garage door operator itself, near it on the ceiling, or on the wall, but please note the wiring requirements: the Garage Door Controller requires the included power adapter, which requires...
- Page 12 Begin Installa on: Loosen the screw terminal using a 3 mm slo ed screwdriver, connect the first wire to the associated screw terminal on the Garage Door Controller; do the same for the remaining three wires Before connec ng the wire to the terminal, ensure there is about 2/5 inch of bare wire visible (strip off insula on as needed) Insert the wire into the terminal, then ghten the screw terminal * For Method A, Connec ng...
- Page 13 Method A: Connec ng to the Garage Door Operator Remove the exis ng wires from the door operator, a er making a note (or taking a picture) of their loca ons. Twist* together one exis ng wire to one (new) signal wire, install under the exis ng wire's original terminal. Repeat for the other exis ng wire and new control wire * If the wires are not twisted together, it is important to ensure both the old and new wires are both secured in place under the terminal, making a good electrical connec on...
- Page 14 Power on the controller Te st yo u r ga ra ge d o o r o p e rato r a s yo u wo u l d n o r m a l l y u s e i t . I f i t i s n o t wo r k i n g p ro p e r l y, d o u b l e - c h e c k o r re - d o ste ps 3 t h ro u g h 6 a s n e e d e d .
- Page 15 Method B: Connec ng to the Garage Door Control Bu on Remove the exis ng garage door control bu on. Remove the exis ng wires, a er making a note (or taking a picture) of their loca ons. Twist* together one exis ng wire to one (new) signal wire, install under the exis ng wire's original terminal.
- Page 16 Power on the controller Ve r i f y yo u r ex i s n g ga ra ge d o o r co nt ro l l e r b u o n f u n c o n s n o r m a l l y. O t h e r w i s e , d o u b l e - c h e c k o r re - d o ste p 5 Power on the controller...
- Page 17 Garage Door Sensor 2 Method A: Install the Garage Door Sensor 2 with double-sided tape on the back of the device Find a suitable area on the top panel (le or Remove the protec ve layer of the double-sided right side suggested). Ensure the sensor will tape not come in contact with moving parts of the garage door operator/mechanism.
- Page 18 Keep the SET bu on of the Garage Door Sensor 2 at the top and the longer side parallel to the floor, press the sensor firmly to the door for at least 5 seconds Panel The door is opened * Keep the longer side parallel to Place the sensor at the desired loca on, the floor pressing firmly for at least 5 seconds...
- Page 19 Method B: Mount the Garage Door Sensor 2 to the wall with screws (not included) For wall-moun ng, open the ba ery cover Keep the longer side of the Garage Door Sensor 2 and remove the screws to gain access to the parallel to the floor, mount the sensor to the moun ng holes on the back of the Sensor top panel (le...
- Page 20 Reinstall the ba eries and close the ba ery cover Panel The door is opened Reinstall the ba eries and close the ba ery cover The door is closed...
-
Page 21: Using The Yolink App
Using the YoLink App Device page (Paired with a Sensor) Details * Tap to go to Details page (refer to page 20) Connec on status of controller/sensor and Hub (the worse one) Device name * Edit name on Details page... - Page 22 Device page (Controller Only) Details * Tap to go to Details page (refer to page 22) Connec on status of controller and Hub Device name Unknown status of door * Edit name on Details page * Pair with a sensor to obtain the status of door * Tap to open/close the garage door...
- Page 23 Device page (Sensor Only) Details * Tap to go to Details page (refer to page 23) Connec on status of sensor and Hub Device name * Edit name on Details page Ba ery level current ba ery level * Shown red if replacement is required Real- me status: Device history Opened or closed or inaccurate status...
- Page 24 ” indicates a from favorites new update is available (refer to page Device history * Tap to delete the device from Door opened and closed, your YoLink account logged with date & me Device status Opened or closed or inaccurate status...
- Page 25 Details page of Sensor Device type Rename the device Device model Device EUI (unique) Connec on status of sensor and Hub Firmware version “#### ready now ” indicates a new update is available (refer to page 33) * Tap to unpair the sensor with the controller...
- Page 26 “#### ready now ” indicates a Tap to pair/unpair new update is available (refer with a sensor to page * Sensor’s device name * Tap to delete the device from indicates the controller is paired with a sensor your YoLink account...
- Page 27 * Default is set to 30 minutes. A er the first no fica on, there * Tap to delete the device from will be con nuously no fica on your YoLink account at a default interval of 30 minutes Device status Opened or closed or...
- Page 28 Device Alerts Upon the opening or closing or le open for a set me of the garage door, an alert will be sent to your YoLink account Door is opened Door is closed Door is s ll open for a set me...
- Page 29 Automa on Easily set up rules for “if this then do that” func ons Go to “Smart”, tap “Automa on” followed by the “ ” icon to add an automa on Fill in details followed by the “ ” icon * Garage Door Sensor 2 can be set as a trigger only, Garage Door Controller cannot be set as either a trigger or an ac on device Tap to add an automa on...
- Page 30 Go to Se ngs > Voice Assistants for the applicable voice assistant integra on guide * Garage Door Kit 3 is integrated with Alexa and Google Assistant only when the Garage Door Controller is paired with the Garage Door Sensor 2, and is also integrated with IFTTT.com...
-
Page 31: About Yolink Control
Hub or an internet connec on. (Use of YoLink Control is op onal; you can use the Automa on feature in the app OR use YoLink Control, but YoLink Control offers the benefit of opera on without the Hub or internet connec on.) One device controls another, directly. - Page 32 (verify the door is closed), and let the closed door sensor enter pairing mode Also for the same Garage Door Sensor 2 and YoLink Plug Mini , you can only choose to either turn on or turn off the YoLink Plug...
- Page 33 * Open the door first or just keep the front side of sensor Turn on the plug downward * verify the Status LED of YoLink Plug Mini displays blue. Refer to the YoLink Plug Mini manual for more informa on:...
- Page 34 Opera on When the door is opened, the YoLink Plug Mini will be immediately turned on. The plug will remain turned on un l turned off using the POWER bu on or via the app More advanced sequences, controlling mul ple outputs (e.g. turn off plug and ac vate siren) are available via the YoLink app Turned off...
- Page 35 LED quickly blinks blue, then red Upon un-pairing, the Garage Door Sensor 2 LED will stop blinking and turn off, and the YoLink Plug Mini LED will stop blinking and return to the previous color (blue for turned on, red for turned off)
- Page 36 SET Bu on POWER Bu on Hold the SET button for 10-15 Hold the POWER button on the YoLink seconds, until the red light Plug Mini for 10-15 seconds, until the red blinks quickly light blinks quickly...
-
Page 37: Maintenance
Maintenance Firmware Update (Pair with a Sensor) To ensure our customers have the best user experience, we highly recommend you update to the newest version firmware when an update is available In “Firmware” , if a new version is listed as available (#### ready now), click it to start the firmware update process You may use your device during the update as it... - Page 38 Firmware Update (Controller Only) To ensure our customers have the best user experience, we highly recommend you update to the newest version firmware when an update is available In “Firmware”, if a new version is listed as available (#### ready now), click it to start the firmware update process You may use your device during the update as it is performed in the background.
- Page 39 Firmware Update (Sensor Only) To ensure our customers have the best user experience, we highly recommend you update to the newest version firmware when an update is available In “Firmware”, if a new version is listed as available (#### ready now), click it to start the firmware update process The device's firmware will be updated automa cally within 4 hours (maximum).
- Page 40 Factory reset will erase all of your se ngs and restore it to factory defaults. A er the factory reset, your device will remain in your Yolink account Hold the SET bu on for 20-25 seconds un l the status light blinks red and green alternately,...
- Page 41 Replacing the Ba eries (Garage Door Sensor 2) Remove the ba ery cover by gently prying with your finger p or tool at the edge as shown Remove the old ba eries Install alkaline non-rechargeable AAA ba eries , and then close the ba ery cover Using the app, check the online status of the sensor and verify there is no low-ba ery indicator Note: do not mix old and new ba eries 2 x AAA...
-
Page 42: Specifica Ons
Specifica ons Garage Door Controller 5V DC Voltage: Current: 2.09 x 1.93 x 0.98 inch (L x W x D) Dimensions: Environment: Working Temperature: 32°F - 104°F (0°C - 40°C) Working Humidity: 10% - 90% non-condensing Garage Door Sensor 2 Voltage: 3V DC (2 - AAA ba ery) Dimensions:... -
Page 43: Garage Door Controller Troubleshoo
Hardware: 1. Wiring: Garage Door Controller cannot compa ble for all the garage door openers, visit yolink.net to check compa bility of your garage door opener first 2. Input voltage: Be sure device is powered by 5V AC Symptom: 1. Device is offline - If controller is not connected to the cloud, press the SET bu on on controller once - If Hub is offline, reconnect the Hub to the Internet and press the SET bu on on controller once... -
Page 44: Garage Door Sensor 2 Troubleshoo
Garage Door Sensor 2 Troubleshoo ng Hardware: Ba eries: Ba eries should be brand new, name brand “AAA” alkaline type. Refer to “Warnings” Sec on on page 41 Symptom: 1. Device is offline or no alert received from door opened/closed events - If senor is not connected to the cloud, press the SET bu on on senor once - If Hub is offline, reconnect the Hub to the Internet and press the SET bu on on senor once - If Hub is not on, power on the Hub again and press the SET bu on on senor once... -
Page 45: Warning
Warning Please install, operate and maintain the Garage Door Controller and Sensor 2 only as directed herein. Failure to follow the informa on in this manual can void the warranty and result in malfunc ons and/or equipment failure Garage Door Controller and Sensor 2 are not waterproof and are designed and intended only for indoor use. - Page 46 Do not mix new and old ba eries Do not puncture or damage ba eries. Leakage can cause harm on skin contact, and is toxic if ingested Do not dispose of ba eries in fire as they may explode! Please follow local ba ery disposal procedures To avoid damaging the device, if storing the device for an extended period, remove the ba eries...
-
Page 47: Customer Service & Warranty
(such as floods, lightning, earthquakes, etc.). This warranty is limited to repair or replacement of the Garage Door Kit 3 only at YoSmart's sole discre on. YoSmart will NOT be liable for the cost of installing, removing, nor reinstalling this product, nor direct, indirect, or consequen al damages to persons or property resul ng from the use of this product. - Page 48 FCC Statement This equipment has been tested and found to comply with the limits for a Class B digital device, pursuant to part 15 of the FCC Rules. These limits are designed to provide reasonable protec on against harmful interference in a residen al installa on. This equipment generates, uses and can radiate radio frequency energy and, if not installed and used in accordance with the instruc ons, may cause harmful interference to radio communica ons.
- Page 49 Note: The manufacturer is not responsible for any radio or TV interference caused by unauthorized modifica ons to this equipment. Such modifica ons could void the user’s authority to operate the equipment. FCC RF Radia on Exposure Statement This equipment complies with FCC RF radia on exposure limits set forth for an uncontrolled environment.
Need help?
Do you have a question about the Garage Door Kit 3 and is the answer not in the manual?
Questions and answers