Table of Contents
Advertisement
Advertisement
Table of Contents

Related Manuals for Accutome B-Scan Plus


Summary of Contents for Accutome B-Scan Plus
- Page 1 Accutome B-Scan Plus User’s Guide 24-6110 Rev D...
- Page 2 CAUTION: Changes or modifications not expressly approved by Accutome, Inc. could void the FCC compliance and negate your authority to operate the product. Authorized Representative in Europe (for regulatory affairs only): The B-Scan Plus is manufactured by: Accutome, Inc.
-
Page 3: Table Of Contents
Safety Issues to Consider When Using the Accutome B-Scan Plus- - - - - - - - - - - - - - - - - - Indications for use - - - - - - - - - - - - - - -... - Page 4 - - - - - - - - - - - - - - - - 23 Starting Accutome B-Scan Plus Program - - - - - 23 How to Start a New Patient Exam - - - - - - - - 24...
- Page 5 Contents Restore - - - - - - - - - - - - - - - - - - - 47 Sequences - - - - - - - - - - - - - - - - - - 48 How to Create Sequences - - - - - - - - - - - 48 How to Add New Sequences- - - - - - - - - - 49...
- Page 6 Accutome B-Scan Plus User Guide Save- - - - - - - - - - - - - - - - - - - - - 82 Restore - - - - - - - - - - - - - - - - - - - 83...
- Page 7 Contents Operator - - - - - - - - - - - - - - - - - - 99 Exam Setup - - - - - - - - - - - - - - - - Create Date/Time - - - - - - - - - - - - - Scan Group - - - - - - - - - - - - - - - - Protocol - - - - - - - - - - - - - - - - - Description - - - - - - - - - - - - - - - -...
- Page 8 Accutome B-Scan Plus User Guide Using the Probe Trigger Button - - - - - - - - Using the Footswitch - - - - - - - - - - - - - Scanning with a Predefined Protocol - - - - - -...
- Page 9 Contents Exit - - - - - - - - - - - - - - - - - - - Selecting an Existing Exam - - - - - - - - - - -141 How to Edit Exam Info - - - - - - - - - - - - Drop Down Lists - - - - - - - - - - - - - - Text Fields - - - - - - - - - - - - - - - - Restore...
- Page 10 Accutome B-Scan Plus User Guide How to Print an Image - - - - - - - - - - - - -174 Selecting Patient Exam - - - - - - - - - - - - Selecting a Frame - - - - - - - - - - - - - -...
- Page 11 Contents Save Reports Only - - - - - - - - - - - - - Erase Disc - - - - - - - - - - - - - - - - Abort Proc. - - - - - - - - - - - - - - - - Disc Info - - - - - - - - - - - - - - - - - Verify Burn - - - - - - - - - - - - - - - - Check to Fit the Media - - - - - - - - - - -...
- Page 12 Accutome B-Scan Plus User Guide Exams on System - - - - - - - - - - - - - - DVD/CD Features - - - - - - - - - - - - - - Free Space On The System - - - - - - - - -...
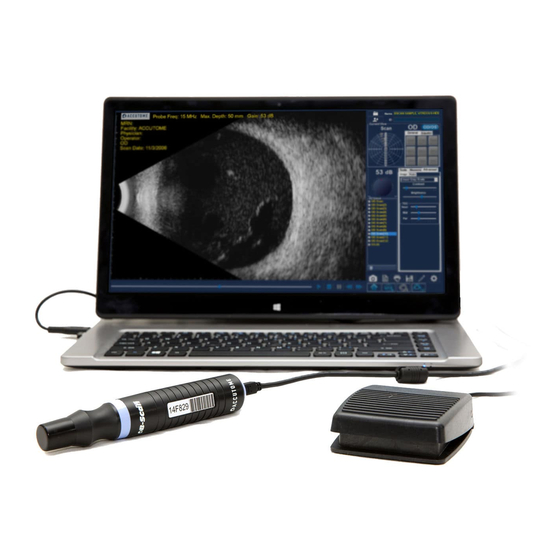
- Page 13 Accutome B-Scan Plus Components - - - - - - - - - - - - - 1 Figure 2 Accutome B-Scan Plus Probe - - - - - - - - - - - - - - - - - 21 Figure 3...
- Page 14 Accutome B-Scan Plus User Guide Figure 33 Assigning Name to New Sequence - - - - - - - - - - - - - 51 Figure 34 New Sequence - New View Active - - - - - - - - - - - - - - 52...
- Page 15 List of Figures Figure 72 No Probe Found Message - - - - - - - - - - - - - - - - - - - 90 Figure 73 Initial Exam Screen - - - - - - - - - - - - - - - - - - - - - - - - 91 Figure 74 Initial Exam Screen with Patient Name - - - - - - - - - - - 94 Figure 75...
- Page 16 Accutome B-Scan Plus User Guide Figure 110 Restore Changes Information Dialog - - - - - - - - - - - 144 Figure 111 Exit Edit Exam Information Dialog - - - - - - - - - - - - - 145...
- Page 17 List of Figures Figure 149 Selecting Archive - - - - - - - - - - - - - - - - - - - - - - - - - 191 Figure 150 Archive Screen - - - - - - - - - - - - - - - - - - - - - - - - - - 192 Figure 151 Selecting the First Exam - - - - - - - - - - - - - - - - - - - - 193 Figure 152 Selecting the Second Exam - - - - - - - - - - - - - - - - - 194 Figure 153 Select All - - - - - - - - - - - - - - - - - - - - - - - - - - - - - - - 195...
- Page 18 Accutome B-Scan Plus User Guide Figure 188 Removing Exam from Restored Folder Warning - - - 230 Figure 189 Exams on System - Acctuome Exam Data Folder - 230 Figure 190 Free Space on The System - - - - - - - - - - - - - - - - - 231...
- Page 19 Range and Accuracy- - - - - - - - - - - - - - - - - - - - - - - 242 Table 8 Acoustic Output Reporting Table for Track 1 Non-Autoscanning Mode 243 Table 9 Accutome Replacement Parts - - - - - - - - - - - - - - - - 247 xvii...
- Page 20 Accutome B-Scan Plus User Guide xviii...
-
Page 21: Introduction
Introduction Accutome B- The Accutome B-Scan Plus provides high quality B-Scan Scan Plus imaging and playback with the ease of plugging into any Overview computer in the world. The Accutome B-Scan also has many additional features that allow multiple methods of viewing, diagnosing and printing acquired images. -
Page 22: Features
Patient data reports and printouts Adjustable TGC Curves The Accutome B-Scan Plus allows you to adjust the Gain, Time Gain Compensation (TGC) as a default in Setup, live during an exam or on a saved existing exam. Gamma Settings... -
Page 23: Measurements
Distance Area Patient Data Storage and Retrieval The Accutome B-Scan Plus saves all patient exams in a preset designated folder on the user computer, allowing you to playback, archive and backup any and all patient exams. Reports and Printouts... -
Page 24: About This Manual
Accutome B-Scan Plus User Guide About This This manual is a guide for technicians and Manual opthamologists who are experienced in ultrasonographic biometric techniques. This manual is organized as follows: Section 2 Safety Summarizes safety precautions, warnings, symbols and terms. - Page 25 B-Scan Plus warranty information and repair procedures. Having read this manual you will be able to set up the Accutome B-Scan Plus, perform scans, playback, save frames as snapshots, analyze images, print snapshots, create reports and archive patient exams.
- Page 26 Accutome B-Scan Plus User Guide...
-
Page 27: Safety
The maximum power allowed to be set by the Application Software, and/or by the user is below the FDA, Health Canada, and EU maximum power limits. The Accutome B-Scan Plus Probe must be cleaned and disinfected before use. Indications for use... -
Page 28: Disposal Requirements
Scan Plus specified on the delivery note in domestic waste or by municipal waste disposal companies. If the B-Scan Plus or its components are resold, the seller has the duty to notify the buyer that the product must be disposed of in accordance with currently valid national regulations. -
Page 29: Safety Precautions
Safety Safety Precautions There are several areas in the use of the Accutome Safety Precautions B-Scan Plus that require special attention, as they may pose a safety threat. WARNING! DO NOT AUTOCLAVE! WARNING! DO NOT IMMERSE THE PROBE TIP IN TAP WATER AS THE FLUORIDE CAN DAMAGE THE CRYSTAL. - Page 30 Accutome B-Scan Plus User Guide Do not completely immerse the probe and cable. Only the probe tip of the B-Scan Plus should be placed in the solution. Do not immerse the connectors. Do not autoclave the probe or the cable.
-
Page 31: Cleaning Of The Probe
-Let the transducer and probe air dry. Electrical Hazard and Safety The instrument, foot switch and probe of the Accutome B-Scan Plus are electrical/electronic devices. Reasonable care should be taken when making electrical connection and handling electrically powered devices. -
Page 32: Avoiding Equipment Damage
Please refer to the manufacturer’s instructions regarding it’s use. The User is responsible for ensuring that the PC to which the B-Scan Plus system is connected must be of the grounding type in compliance with applicable electrical codes. To avoid interruption of a procedure the user is... -
Page 33: Avoiding Electromagnetic And Other Interference
Accutome. WARNING! THE USE OF ACCESSORIES, TRANSDUCERS AND CABLES OTHER THAN THOSE SPECIFIED BY THE MANUFACTURER MAY RESULT IN INCREASED EMISSIONS OR DECREASED IMMUNITY OF THE B-SCAN PLUS... - Page 34 Accutome B-Scan Plus User Guide WARNING! THE B-SCAN PLUS SHOULD NOT BE USED ADJACENT TO OR STACKED WITH OTHER EQUIPMENTAND THAT IF ADJACENT OR STACKED USE IS NECESSARY, THE B-SCAN PLUS SHOULD BE OBSERVED TO VERIFY NORMAL OPERATION IN THE CONFIGURATION IN...
-
Page 35: Getting Started
The user supplies a PC with Windows XP SP2 as the operating system. The Accutome B-Scan Plus is designed to be used in multiple environments and is as simple as carrying a notebook computer and probe. -
Page 36: Probe
You will also need a printer connected to the computer to print snapshots or reports. Probe The probe provided with the B-Scan Plus is an essential component of the product. No other probes should be used with the instrument. Printer... -
Page 37: Installing The Software
Getting Started Installing the Software Installing the The Accutome B-Scan Plus software is shipped on a CD Software which contains all of the programs you will need to install for proper system operation. PLEASE READ THROUGH ALL OF THE INSTALLATION INSTRUCTIONS... - Page 38 1.1 in the list, proceed to step 3 below. If you DO find Microsoft .NET Framework 1.1 in the list, proceed to install the Accutome B-Scan Plus software found in Installation - Phase Two on page 15. Be sure to close the Add or Remove Programs window and the Control Panel window before you proceed.
-
Page 39: Installation - Phase Two
Microsoft DirectX 9.0. Click Finish to complete software installation. Installation - Phase Three Follow the steps below to set up the Accutome B-Scan Plus probe and USB port(s). Insert the Accutome B-Scan Plus probe into any USB port. Select the port that is most convenient for you to use while taking image scans.... - Page 40 USB port on which it has not been installed. To install the Accutome B-Scan Plus probe on another USB port, repeat section 1. Be sure to unplug the probe from the current USB port and insert it into the new USB port to start setup of the new USB port....
-
Page 41: Probe
Getting Started Probe Probe The Accutome B-Scan Plus probe is an integral component of the Accutome B-Scan Plus product. The probe is easily installed by connecting the end of the cable into the B-Scan’s computer USB port. The marker at the top of the probe is easily aligned with eye tissues during scanning and the start/stop button makes operation simple. -
Page 42: Footswitch Setup
Setup be used to start and stop scanning. The footswitch is simple to install; plug the end of the footswitch cable into a USB port on the computer running the Accutome B-Scan Plus. Figure 3 Accutome B-Scan Plus Footswitch... -
Page 43: Basic Operation
Getting Started Basic Operation Basic The basic operation of the Accutome B-Scan Plus Operation consists of the following steps: Turn on the Accutome B-Scan Plus computer. Start the Accutome program (refer to "Starting Accutome B-Scan Plus Program" below). Start a new exam (refer to "How to Start a New Patient Exam"... -
Page 44: How To Start A New Patient Exam
Accutome B-Scan Plus User Guide How to Start a New Patient Exam To start a new Patient exam: On the Accutome Main Screen, click on "New Exam". Refer to Figure 5 below. Figure 5 Main Screen Starting New Exam... -
Page 45: Entering Patient Exam Information
Getting Started Basic Operation Entering Patient Exam Information After you execute "New Exam" from the Accutome B-Scan Plus main screen the Patient Exam Screen will launch shown in Figure 6 below. The pre-filled information fields the setup defaults. When you start a new exam the Accutome B-Scan will launch the Exam Info Screen shown below and will clear all fields. -
Page 46: Figure 7 Entering New Patient Information
Accutome B-Scan Plus User Guide Enter information in data fields by clicking in each field and typing accordingly. In Figure 7 below the First Name field has just been completed. To move from one field to another you may use the Tab Key on your computer keyboard. -
Page 47: Figure 8 Selecting Facility
Getting Started Basic Operation The Patient Name must be entered to proceed to the next screen. Select the First Name field and enter the Patient First Name. Use the Tab key, or select the Last Name field and enter the Patient Last Name. Continue entering all relevant Patient information. -
Page 48: Figure 9 Selecting Physician
Accutome B-Scan Plus User Guide Continue to select Physician and Operator from the drop downs lists located at the right side of the each field. Position the cursor on the small arrow at the right of the physician and operators fields. Left click to open the drop down list. -
Page 49: Figure 10 Selecting Scan Group And Protocol
Getting Started Basic Operation Select a predefined or undefined Scan Group and Protocol (Sequence) within the group. from the Scan Group and Protocol drop down lists. Position the cursor on the small arrow at the right of the Scan Group and Protocol fields. Left click to open the drop down lists. -
Page 50: Figure 11 Starting A New Exam
Accutome B-Scan Plus User Guide Click on the "Start" button, located at the bottom right of the Patient/Exam Info Screen. Figure 11 Starting a New Exam... -
Page 51: Figure 12 Exam Screen
Getting Started Basic Operation 10. The Accutome B-Scan Plus will launch the Exam Screen shown below. Figure 12 Exam Screen... -
Page 52: Operation
Accutome B-Scan Plus User Guide Operation After you have entered all the Patient information and prior to scanning you should set the imaging selections to your liking. The selections you can change are: Current View - OD/OS which eye are you... -
Page 53: Figure 14 Probe Tab Active
Getting Started Basic Operation The figures that follow show the imaging tools in their respective tabs; select the tab to display the tools. Figure 14 Probe Tab Active Figure 15 Cine Tab Active... -
Page 54: Figure 16 Tgc Tab Active
Accutome B-Scan Plus User Guide Figure 16 TGC Tab Active Figure 17 Gamma Tab Active... -
Page 55: Scanning
To go to the next view in the sequence you must step on the footswitch or press the start/stop button on the probe. The B-Scan Plus will also create a new view in the sequence if you continue to scan after completing all the defined sequence steps. -
Page 56: How To Save Patient Exams
"Printing Images and Reports" on page 173 of this manual. How to Save Patient Exams The Accutome B-Scan Plus allows you to save patient records at any point during the exam. Whenever you start/stop a scan, using the probe or footswitch, the scan just completed is saved in the patient’s exam folder. -
Page 57: Setup
Setup Setting Up the The Accutome B-Scan Plus is equipped with personal B-Scan Plus preference options, and provides the flexibility necessary to customize your instrument. You can not only create new scanning sequences, you can also set many operational defaults. -
Page 58: Setup Menu Selections
Accutome B-Scan Plus User Guide Setup Menu When you select "Setup" the Accutome B-Scan Plus Selections displays the setup window shown below. The window has tabs that correspond to the various setup features. Each tab will display the corresponding screen upon selection. -
Page 59: Facilities
Facilities Facilities The Facilities tab (and related screen) is the first tab displayed upon starting Setup. The Accutome B-Scan Plus provides the ability to add facilities where exams will take place. The list of available facilities is displayed at the right of the screen and command buttons related to facility functions are located below the list. -
Page 60: Figure 21 New Facility Information Active
Accutome B-Scan Plus User Guide Activate the Name area under the Facility Information area as shown below. The available information fields are: Name Address Description Figure 21 New Facility Information Active... -
Page 61: Deleting Facilities
Setup Facilities After entering all facility data click "Save" to save the information. An "Update Restore Point" dialog will launch. If you would like to save all changes, and have the current facilities setup become the data restore point click "Yes". If you would like to retain the old data restore point click "No". -
Page 62: Duplicate Facilities From Selected
Select the facility you would like to become the default from the "Available Facilities" list. Click on "Set Selected as Default". The facility will become the default to appear when you power up the Accutome B-Scan Plus. Save To save all facility information: Click on "Save". -
Page 63: Restore
Setup Facilities Restore To restore the previously saved facility information: Click on "Restore". A "Restore Facilities" dialog will launch. Click "Yes" to revert to the previously saved facilities information. Figure 24 Restore Facilities Dialog... -
Page 64: Users
B-Scan Plus User Guide Users The Users tab (and related screen) is the second tab from the left in Setup. The Accutome B-Scan Plus provides the ability to add Users to a B-Scan user list. How to Add a New User To add a new user: In the Users screen select "New"... -
Page 65: Figure 26 New User Information Active
Setup Users Activate the Name area under the Users Information area as shown below. The available information fields are: First Name Last Name Facility - select entered facility from drop down menu Department Telephone Figure 26 New User Information Active... -
Page 66: Deleting Users
Accutome B-Scan Plus User Guide After entering all user data click "Save" to save the information. An "Update Restore Point" dialog will launch. If you would like to save all changes, and have the current users setup become the data restore point click "Yes". -
Page 67: Set Selected User As Default
Select the user you would like to become the default from the "Available Users" list. Click on "Set Selected as Default". The user will become the default to appear when you power up the Accutome B-Scan Plus. Save To save all user information: Click on "Save". -
Page 68: Sequences
Setup. The Sequences screen (see Figure 30 below) allows you to set up operational protocols for the Accutome B-Scan Plus. A Sequence is the series of predefined scans with labelled views, scan methods and positions that are executed during B-Scan diagnostic imaging. -
Page 69: How To Add New Sequences
Setup Sequences The list of available sequences is displayed at the right of the screen and command buttons related to available sequences are located below the list. How to Add New Sequences To add a new sequence: In the Sequences screen select "New" as shown in Figure 31 below. -
Page 70: Figure 32 Adding New Sequence
Accutome B-Scan Plus User Guide The B-Scan Plus will list the new sequence as "Undefined" in the Available Sequences list. Figure 32 Adding New Sequence... -
Page 71: Figure 33 Assigning Name To New Sequence
Setup Sequences In the Name field, located below "Edit Current Sequences" enter the name of the newly added sequence. When you have finished entering the new name the sequence name in "Available Sequences" will be renamed as shown in Figure 33 below. -
Page 72: How To Define The Sequence Scan
Accutome B-Scan Plus User Guide How to Define the Sequence Scan The key components in defining the sequence scan are the eye (OD/OS), scanning method and probe position for the scan. To change the first scan of the sequence Select the first view, or scan, of the new sequence by either clicking in the checkbox or double click- ing on the scan title (e.g. -
Page 73: Edit Current View Selections
The selections you can make and edit are listed below. Edit Current View Selections The Accutome B-Scan Plus provides all the tools necessary to change the sequence scan view. Using the Edit Current View selections you can change: ... -
Page 74: Figure 35 First Scan Editing View
Accutome B-Scan Plus User Guide Probe positioning for a scan is illustrated graphically by a wheel, representing the hours of the clock. There is an indicator with an arrow at one end which indicates the position and can be dragged to edit the probe position. When you... -
Page 75: How To Add Another Sequence Scan
Setup Sequences How to Add Another Sequence Scan The "Views of" panel on the Sequences screen list all available scans in the current sequence. There are several command buttons for manipulating the sequence scans: Insert Under - adds a new scan under the currently selected scan ... -
Page 76: Figure 37 New Sequence Scan (View) Added
Accutome B-Scan Plus User Guide The newly added sequence scan will display as "Scan" as shown in Figure 37 below. The "Scan" scan is active, is a free scan view and has no definition. To assign a particular eye for scanning to the sequence scan either OD or OS, click on the appropriate eye. -
Page 77: Figure 38 Change Probe Orientation
Setup Sequences Adjust the position for the new sequence scan by dragging the tip of the position indicator as shown in Figure 38 below. The new scan defaults to AX as the method for probing. If you would like to change the probing method select either "Long"... -
Page 78: Figure 39 Change Probe Orientation
Accutome B-Scan Plus User Guide When you arrive at the appropriate position for the probe in the newly added sequence scan release the position indicator. The new position will be reflected in the label for the new sequence scan as shown in Figure 39 below. -
Page 79: Figure 40 Saving New Sequence
Setup Sequences Continue to add and define new sequence scans as previously described. When your sequence is complete and ready to save click on the "Save" button as shown in Figure 40 below. Figure 40 Saving New Sequence... -
Page 80: Deleting Sequences
Accutome B-Scan Plus User Guide Deleting Sequences To delete a sequence: Select the sequence you would like to delete from the "Available Sequences" list. Click on "Delete". The sequence will be deleted from the list of Available Sequences. Figure 41... -
Page 81: Duplicate Sequences From Selected
Figure 42 Duplicating Current Sequence Set Selected Sequence as Default To set a sequence as the default B-Scan Plus operation: Select the sequence you would like to become the default from the "Available Sequences" list. Click on "Set Selected as Default". -
Page 82: Save
Accutome B-Scan Plus User Guide Save To save all sequence information: Click on "Save". An "Update Restore Point" dialog will launch. If you would like to save all changes, and have the current available sequences setup become the data restore point click "Yes". If you would like to retain the old data restore point click "No". -
Page 83: Options
The Options tab (and related screen) is the fourth tab from the left in Setup. The Options screen (see Figure 45 below) allows you to set up optional operational parameters for the Accutome B-Scan Plus application. The options you can set are: ... -
Page 84: Folders Of Exams
The default location is: C:\\Program Files\Accutome\Exam Data. You can store patient exams in any computer location you choose. To change from the default location: Click on "Select" as shown in Figure 46 below. -
Page 85: Figure 47 Windows Browser - Locate Exam Folder
Setup Options The Accutome B-Scan Plus will launch a Windows browser as shown in Figure 47 below. Using the browser locate the folder for storing exam data. If you would like to restore the default folder for exam data, click on "Reset"... -
Page 86: Restored Folder
Accutome B-Scan Plus User Guide Restored Folder The Restored selection allows you to designate the exam folder location to which you would like to restore patient exams from backup. The default location is: C:\\Program Files\Accutome\Restored Exams. You can store patient records in any computer location you choose. -
Page 87: Figure 49 Windows Browser - Locate Exam Folder
Setup Options The Accutome B-Scan Plus will launch a Windows browser as shown in Figure 49 below. Using the browser, locate the folder where you would like to restore exam data. If you would like to restore the default folder for exam data, click on "Reset"... -
Page 88: Exam Name Combination
Accutome B-Scan Plus User Guide Exam Name Combination The Exam Name Combination allows you to select how patient information will appear on a patient exam and exam record. There are many combinations of several fields that are available for the Exam Name. The fields are as follows: ... -
Page 89: Probe Control
Setup Options Probe Control The Probe Control options allow you to change the default settings of the probe. The options are: Frequency Depth Cine Buffer Start/Stop Power Frequency The probe frequency field allows you to select from two frequencies: 12 MHz or 15 MHz. -
Page 90: Depth
Accutome B-Scan Plus User Guide Depth The depth field allows you to change the depth of the probe signal. The depth options are dependent upon the frequency selected: 12 MHz - depths are 30 mm and 60 mm ... -
Page 91: Cine Buffer
Setup Options Cine Buffer The Cine Buffer is the length of time data is stored for each acquired image. For example, with a setting of 8.5 seconds, the last 8.5 seconds of the scanning time are saved as the scanned image. The cine buffer options are: ... -
Page 92: Start/Stop
Accutome B-Scan Plus User Guide Start/Stop The Start/Stop selection allows you to choose the method to start/stop the probe. The choices are: Probe Button Foot Pedal Both To choose a start/stop option simply click the radio button beside the appropriate selection. The default setting is "Both". -
Page 93: System Defaults
Setup Options System Defaults When you select "System Defaults" in the Probe Control area, all probe settings will return to the default settings. Info On Images The "Info on Images" selections allow you to choose what information is displayed on patient images and the position of the measured data. -
Page 94: File And Print
Accutome B-Scan Plus User Guide File and Print The File and Print selections allows you to show the name on the medical record snapshot filename and to select a print page format. Show Name on Snapshot Filename By selecting the "Show Name on Snapshot Filename"... -
Page 95: Image Controls
Setup Options Image Controls One of the great features of the Accutome B-Scan Plus is the ability to view the actual adjustments to image controls live, while you are changing the settings. As you make image control adjustments the Small Image... -
Page 96: Tgc
Accutome B-Scan Plus User Guide TGC (Time Gain Compensation) is the ability to adjust the signal gain segmentally as distance from the probe increases. There are three TGC setup options: Near - increases the gain for the anterior portion of... -
Page 97: Gamma Settings
Setup Options Gamma Settings The Gamma portion of the Image Controls Setup allows you to choose a preset gamma for scanning and to adjust the brightness and contrast for captured images. Preset Gamma Adjusting gamma settings make certain parts of the scanned image brighter and others less bright. -
Page 98: Contrast
Accutome B-Scan Plus User Guide Contrast You can adjust the contrast between light and dark areas of the scanned image capture by dragging the slide indicator as shown in Figure 58 below. Brightness You can adjust the brightness of the scanned image capture by dragging the slide indicator as shown in Figure 58 below. -
Page 99: Gain
Options Figure 59 Image Settings after Adjustments Gain The gain feature of the Accutome B-Scan Plus allows you to adjust the strength of the signal as it travels through the eye, thereby making the captured image brighter. Adjusting the Gain The Accutome B-Scan Plus provides an user-adjustable gain feature. -
Page 100: Figure 60 Selecting Gain Adjustment
Accutome B-Scan Plus User Guide Gain Adjustment Knob Figure 60 Selecting Gain Adjustment Drag the knob until the dB level (and the image visual) reaches the appropriate level as shown in Figure 61 on page 77. -
Page 101: Image Controls System Defaults
Setup Options Small Image Window Figure 61 Adjusting Gain Image Controls System Defaults If would like to restore all adjustments made to the Image Controls to the System Defaults, select "System Defaults" located under the Gain Adjustment knob. -
Page 102: Reset All To Defaults
Accutome B-Scan Plus User Guide Reset All to Defaults If you would like to restore all option setting adjustments to the system defaults: Click on "Reset all to Defaults". A "Restore All to System Setting" dialog will launch. If you would like to restore all option settings and not save changes, click "Yes". -
Page 103: Restore
When you want to leave the B-Scan Setup function you must select one of the following: Done - Selecting "Done" closes the Setup window and returns you to the main Accutome B-Scan Plus Screen. Cancel - Allows you to reject any changes that may have been made in Setup. -
Page 104: Physicians
Physicians The Physicians tab (and related screen) is the fifth tab from the left in Setup. The Accutome B-Scan Plus provides the ability to add Physicians to a B-Scan Plus physician list. How to Add a New Physician To add a new physician: In the Physicians screen select "New"... -
Page 105: Figure 67 Physician Name Entered
Setup Physicians Activate the Name area under the Physicians Information area as shown below. The available information fields are: First Name Last Name Facility - select entered facility from drop down menu Department Telephone Figure 67 Physician Name Entered... -
Page 106: Deleting Physicians
Accutome B-Scan Plus User Guide After entering all physician data click "Save" to save the information. An "Update Restore Point" dialog will launch. If you would like to save all changes, and have the current physicians setup become the data restore point click "Yes". -
Page 107: Set Selected Physician As Default
Setup Physicians Set Selected Physician as Default To set a physician as the default B-Scan Plus operation: Select the physician you would like to become the default from the "Available Physicians" list. Click on "Set Selected as Default". The physician will become the default to appear when you power up the Accutome B-Scan Plus. - Page 108 Accutome B-Scan Plus User Guide...
-
Page 109: Performing Exams
Performing Exams Overview The Accutome B-Scan Plus is very simple to operate, and has advanced features to help you obtain the best possible images. The Accutome B-Scan Plus creates eye images by sending a signal through the eye from the ultrasonic probe. -
Page 110: How To Start A New Exam
Figure 71 Starting a New Exam No Probe Found If the Accutome B-Scan Plus probe is not connected, not connected properly, or for some other reason is not recognized you will receive the message Figure 72 below. if you exit the program, reinsert the probe, and restart the program, and you still receive the message please contact Accutome Customer Support for help. -
Page 111: Initial Exam Screen
Initial Exam Upon starting a new exam (by selecting "New Exam" Screen from the main Accutome B-Scan Plus Screen) the Accutome B-Scan Plus launches the Initial Exam Screen shown in Figure 73 below. On this screen you start a new patient exam by entering Patient data and making appropriate selections for the new patient. -
Page 112: Entering Information On Initial Exam Screen
Accutome B-Scan Plus User Guide Entering Information on Initial Exam Screen ® The Initial Exam Screen is set up like a typical Windows application and you enter information, move between fields, and select items from drop down lists like using any other software tool. -
Page 113: Patient Info
Performing Exams Initial Exam Screen Patient Info The Patient Info area displays patient information and has fields that require data entry as outlined below. Required Fields The only fields that require entry in the Patient Info are are the First Name and Last Name fields. Both these fields are used to create a unique patient exam record. -
Page 114: Figure 74 Initial Exam Screen With Patient Name
Accutome B-Scan Plus User Guide Figure 74 Initial Exam Screen with Patient Name... -
Page 115: Gender
Performing Exams Initial Exam Screen Gender The gender field provides a drop down to select either Male (M) or Female (F) as shown in Figure 75 below. Gender is not a required entry. Position the cursor on the small arrow at the right of the gender field. -
Page 116: Probe Info
Probe Info The Probe Info displayed on the New Exam initial Info Screen is informational only and is determined by the Accutome B-Scan Plus probe setup. Frequency The Frequency field indicates the frequency of the signal from the probe through the eye. -
Page 117: Exam Info
Performing Exams Initial Exam Screen Exam Info The Exam Info area displays information related to the current exam and patient. Exam ID The B-Scan generates an Exam ID based on this entered Medical Record # number in combination with the date and tracking number. Facility In the Facility field you can select the facility for the Patient Exam by selecting the name from the drop down... -
Page 118: Physician
Accutome B-Scan Plus User Guide Physician In the Physician field you can select the physician for the Patient Exam by selecting the name from the drop down list. Physician names are entered in the B-Scan Setup. (Refer to Chapter 4 of this manual.) Position the cursor on the small arrow at the right of the physician field. -
Page 119: Operator
Performing Exams Initial Exam Screen Operator In the Operator field you can select the operator for the Patient Exam by selecting the name from the drop down list. Operator names are entered in the B-Scan Setup on the Users tab. (Refer to Chapter 4 of this manual.) Position the cursor on the small arrow at the right of the operator field. -
Page 120: Exam Setup
Create Date/Time The Create Date/Time field displays the time stamp created by the Accutome B-Scan Plus for the time that the current patient exam was started. Scan Group The B-Scan Plus provides the ability to set up Imaging Sequence protocols and select the protocols for exams. -
Page 121: Protocol
Performing Exams Initial Exam Screen Protocol All Sequences protocols created in the B-Scan Plus Setup are listed in the Protocol drop down. If you selected System Defaults as the Scan Group all the system default protocols will be listed. If you selected User Defined as the Scan Group all the customized sequence protocols will be listed. -
Page 122: Figure 81 Starting New Exam
Accutome B-Scan Plus User Guide Start Exam After you have completed all necessary fields in the Initial Exam Screen and have made the appropriate selections click "Start". Figure 81 Starting New Exam... -
Page 123: Exam Screen Features
Performing Exams Initial Exam Screen Exam Screen Features Upon start of the exam the Accutome B-Scan Plus launches the Exam Screen. The Exam Screen displays: Exam Information Current View All Views Tools Palette with Selectable Tabs for Probe and Scan Controls ... -
Page 124: Exam Information Displayed Above Image
B-Scan Plus Setup, Options tab Physician - Physician display can be turned on or off in B-Scan Plus Setup, Options tab Operator - Operator display can be turned on or off in B-Scan Plus Setup, Options tab ... -
Page 125: Tools Palette
Performing Exams Initial Exam Screen Tools Palette The tools palette contains all the tool for adjusting and controlling scans. In the palette there are tabs for: Probe Gamma Cine Tools Probe and Scan Controls The probe and scan controls shown in Figure 83 on page 106 allow you to adjust the probe settings and start and stop image scans. -
Page 126: Adjusting The Power
Accutome B-Scan Plus User Guide Adjusting the Power Above the Scan/Stop and Save buttons there is an adjustable sliding probe power indicator. To increase or decrease the probe power drag the indicator to the right or left. Figure 83 Probe and Scan Controls Tab Selected... -
Page 127: Tgc Adjustments
Performing Exams Initial Exam Screen TGC Adjustments TGC (Time Gain Compensation) is an adjustment to compensate for the strength of the signal through the eye. The TGC adjustments are: Near - adjustment for signal near the probe Mid - adjustment for the middle of signal ... -
Page 128: Gamma Adjustments
Accutome B-Scan Plus User Guide Gamma Adjustments Gamma curves are a type of contrast adjustment that favors selectively, the low end, high end, or middle end of the contrast gradient. There is no correct gamma only the one that best delineates the subject of interest. The Gamma adjustments allow you to adjust the brightness mapping of the B-Scan image. -
Page 129: Cine Adjustments/Playback
Performing Exams Initial Exam Screen Cine Adjustments/Playback The cine adjustments allow you to control how an image is captured an displayed. Frame Averaging is used to smooth out an image. A scan takes individual frames and averages up to three frames before displaying the image on the screen. -
Page 130: Add View
Edit Current View When you select "Edit" in the Current View area the B-Scan Plus allows changes to the currently active scan view label. Edit the label for the view. Make the adjustments to the probe orientation or positions by dragging the position indicator. -
Page 131: Longitudinal
Axial image, such that the probe crosses or tranverses the optical axis. Edit Exam Info When you select "Edit Exam Info" the Accutome B-Scan Plus displays a window containing the Patient and Exam info entered in the Initial Exam Screen (refer to "Initial Exam Screen"... -
Page 132: Analyze
Accutome B-Scan Plus User Guide Analyze When you select "Analyze" the Accutome B-Scan Plus launches the Image Analysis Screen where you can play, reverse and forward, take measurements and zoom on selected portions of an image for a highly successful diagnosis. -
Page 133: Probe Usage In Scanning
How the B-Scan Probe Works The Accutome B-Scan Plus probe is an ultrasonic probe and sends a sound wave through the eye being scanned. As the sound wave travels through the various... -
Page 134: Probe Operation
The Accutome B-Scan Plus emits an oscillating sound beam that pulses, pauses and pulses again. The pause allows the B-Scan Plus to receive, process and display the returning echo. The pulse-echo is repeated thousands of times per second resulting in a "real-time"... -
Page 135: Marker Alignment
Performing Exams Probe Usage in Scanning Marker Alignment There is a marker at the end of the Accutome B-Scan Plus probe, the Accutome logo, (refer to Figure 2 on page 21 of this manual) that indicates the direction of the "slice"... -
Page 136: Probe Positions
Accutome B-Scan Plus User Guide Probe Positions One of the great features of the Accutome B-Scan Plus is the ability to use the probe in any position and be able to quickly and easily label the scan view. There are three major positions for holding the probe when you scan. -
Page 137: Longitudinal Probe Positions
Performing Exams Probe Usage in Scanning Longitudinal Probe Positions Longitudinal scans are radial scans encompassing only one clock per slice, from the posterior pole to the anterior periphery. Therefore the optic nerve shadow (the center of the "clock") will be at the bottom of every longitudinal scan so long as it is aligned properly. -
Page 138: How To Scan
P - Posterior Pole How to Scan To start and freeze a scan with Accutome B-Scan Plus is as simple as pressing the start/stop button on the probe or stepping on the footswitch. Both the probe and the footswitch can be used for start/stop operation if the setup is predefined to use both. -
Page 139: Scanning With A Predefined Protocol
Performing Exams How to Scan Scanning with a Predefined Protocol Figure 90 below shows the first step of a scan completed using a scan group protocol. After you complete the first scan and have stopped the probe you should move the probe to conform to the next scan in the sequence. -
Page 140: Scanning Without A Protocol
Accutome B-Scan Plus User Guide Scanning without a Protocol When you are not following a predefined protocol for scanning the first scan always defaults to OD.Scan. If you are making a free scan of the right eye you should change the view label for this scan (see "Edit Current View"... -
Page 141: Figure 92 New Exam First Scan Complete
Performing Exams How to Scan Start and stop the scan using the probe trigger button or the footswitch. Once the first scan is captured as shown in Figure 92 below proceed with the second scan. Figure 92 New Exam First Scan Complete... -
Page 142: Proceed With The Next Scan
Accutome B-Scan Plus User Guide Proceed with the Next Scan After you have completed the first scan and you press the probe trigger button or step on the footswitch the B- Scan Plus will automatically add another scan to the "All Views"... -
Page 143: Adding A View
Performing Exams How to Scan Adding a View You may decide during the scanning process that you need to scan another view of the patient’s eye. To add another view: Click on the "Add View" button as shown in Figure 94 below. -
Page 144: Adjusting The Gain
Accutome B-Scan Plus User Guide Adjusting the Gain You may decide the signal gain for your new view is too strong or not strong enough. To adjust the signal gain: Select the red dot in the adjustable gain knob with the mouse cursor. -
Page 145: Changing The Scan View
Performing Exams How to Scan Changing the Scan View After you have added a new scan to the list of All Views you may want to change the label of the view if the new scan has an intended purpose. For example, if the new scan is intended to capture a transverse view of the eye you want to label the view transverse. -
Page 146: Figure 97 Changing A View - Slice Position
Accutome B-Scan Plus User Guide Change the slice position by dragging the arrow indicator around the clock until you reach the cor- rect slice position. Figure 97 Changing a View - Slice Position... -
Page 147: Figure 98 Changing A View - Global Orbit
Performing Exams How to Scan For transverse scans you must also select the appropriate orbit for the new scan. Place the mouse cursor inside the orbit wheel. Click on the correct orbit for the new scan. Orbit Wheel Figure 98 Changing a View - Global Orbit... -
Page 148: Figure 99 Changing A View - Done
Accutome B-Scan Plus User Guide The edited current view will appear in the list of "All Views" as shown in Figure 99 below. Figure 99 Changing a View - Done... -
Page 149: Macula Scans
Performing Exams Macula Scans Macula Scans The macula can be scanned with the Accutome B-Scan Plus in several ways. Two of the ways are a Horizontal (HMAC) and a Longitudinal (LMAC) scan. Horizontal Macula The Horizontal Macula scan is accomplished by first... -
Page 150: Figure 100 Labeling An Lmac Scan
Accutome B-Scan Plus User Guide To label a scan as a macula scan: Select either "HMAC" or "LMAC" In the example given in Figure 100 below the scan being labeled is an LMAC scan. Figure 100 Labeling an LMAC Scan... -
Page 151: Figure 101 Lmac Scan Labeled
Performing Exams Macula Scans The macula scan will appear in the All Views list as the label you assigned to the scan. In Figure 101 below, the new labeled scan is OD.LMAC Figure 101 LMAC Scan Labeled... -
Page 152: A-Vector
B-Scan Plus User Guide A-Vector The A-Vector function displays an equivalent A-Scan of the captured B-Scan Plus image. Looking at the A-Vector you can get a graphical picture of the echoes received back through the eye from the ultrasonic probe. -
Page 153: Figure 103 A-Vector Displayed
Performing Exams A-Vector The A-Vector will be displayed under the live image as shown in Figure 103 below. To close the A-Vector select "Hide A-Vector". Figure 103 A-Vector Displayed... -
Page 154: Completing Patient Exam
After you have completed the patient exam you have Patient Exam several choices to exit the screen. Main Menu The Main Menu selection will return to the Accutome B-Scan Plus main screen. New Exam The New Exam selection will close the current patient exam and return you to the Initial Patient Exam Screen (see Figure 73 on page 91). -
Page 155: Patient Image Analysis
Patient Image Analysis Overview The Accutome B-Scan Plus provides many features for high quality, personalized, image capture and analysis. You can perform image analysis with Accutome B-Scan Plus during an exam or later, on a saved, existing exam. Selecting There are two methods of selecting an image for... -
Page 156: Figure 105 Analyze Screen
Accutome B-Scan Plus User Guide The Analyze Screen shown in Figure 105 below will display. Figure 105 Analyze Screen... -
Page 157: Analyze Screen
Analyze Screen Analyze The Analyze Screen contains many features to enhance Screen image diagnostics Analyze Screen Features Upon start of the exam the Accutome B-Scan Plus launches the Analyze Screen. The Analyze Screen displays: Exam Information All Exams (drop down list for selecting an existing exam) ... -
Page 158: Exam Information Displayed Above Image
B-Scan Plus Setup, Options tab Physician - Physician display can be turned on or off in B-Scan Plus Setup, Options tab Operator - Operator display can be turned on or off in B-Scan Plus Setup, Options tab ... -
Page 159: Editing Current View Info
Patient Image Analysis Analyze Screen Editing Current View Info When you click "Edit" in the Current View area the B- Scan Plus changes the currently active imaging sequence step. After you make the adjustments to the probe orientation or positions by dragging the position indicator the changes will be reflected in the new name of the step. -
Page 160: Edit Exam Info
When you click on "Main Menu" the Accutome B-Scan Plus returns you to the top level, main menu. Rescan When you click on "Rescan" the Accutome B-Scan Plus will launch the Exam Imaging Screen where you can rescan the patient exam. -
Page 161: Selecting An Existing Exam
Analyze Screen by selecting "Analyze" on the New Exam screen. If you entered the Analyze Screen from the Main Accutome B-Scan Plus Screen you need to select an existing exam from the All Exams drop down list The "All Exams"... -
Page 162: Figure 108 Existing Exam Displayed
Accutome B-Scan Plus User Guide Position the mouse cursor on the name of the Exam you would like to analyze. The exam will displayed in the screen as shown in Figure 108 below. Figure 108 Existing Exam Displayed... -
Page 163: How To Edit Exam Info
Patient Image Analysis Selecting an Existing Exam How to Edit Exam Info To edit the information for the active patient click on "Edit", located at the right of the All Exams field. The "Edit Exam Information" Window shown in Figure 109 on page 144 will launch. -
Page 164: Restore
Accutome B-Scan Plus User Guide To change any text field: Click the mouse cursor in the field. If there is text to remove drag the mouse and select the text and hit the "Delete" key on the com- puter keyboard. -
Page 165: Cancel
Patient Image Analysis Selecting an Existing Exam Cancel If you would like to cancel the Edit Exam Information activity without saving changes click on "Cancel" The dialog displayed in Figure 111 below will launch. If you would like to cancel the process click "OK". If you would like to return to the Edit Exam Information window and continue activity, click "Cancel"... -
Page 166: Exams
Accutome B-Scan Plus User Guide Exams In the Tools Palette there is a tab labeled "Exams". The Exams tab allows you to select the Exams folder location. Click on the Exams tab and the Exams folder selections will display as shown in Figure 112 below. -
Page 167: Playing An Exam
Patient Image Analysis Playing an Exam Playing an The Accutome B-Scan Plus allows you to view any Exam portion of a scan film loop. At the bottom of the existing exam screen are the image playback controls. They are intuitive and easy to use and similar in appearance to controls on a VCR or DVD remote controller. -
Page 168: Stopping An Exam
Accutome B-Scan Plus User Guide Stopping an Exam After you have started playing a scan film loop the Stop and Pause buttons become active as shown in Figure 114 below. When you click the Stop button the scan film loop stops and returns to the beginning... -
Page 169: Pause
Patient Image Analysis Playing an Exam Pause When you click on the Pause button shown in Figure 115 below the scan film loop will pause and not play in any direction. Pause Figure 115 Pausing the Scan Film Loop... -
Page 170: Forward
Accutome B-Scan Plus User Guide Forward When you click on the Forward button shown in Figure 116 below the scan film loop will play forward. There are two methods of playing forward: you can move forward one frame at a time or you can move forward through frames continuously. -
Page 171: Backward
Patient Image Analysis Playing an Exam Backward When you click on the Backward button shown in Figure 117 below the scan film loop will play backward There are two methods of playing backward: you can move backward one frame at a time or you can move backward through frames continuously. -
Page 172: Tgc Adjustment
TGC setting. There are three adjustable TGC settings: Near - increases the gain for the anterior portion of the eye in the B-Scan Plus image, near the probe Mid - increases the gain for the middle portion of the eye... -
Page 173: Figure 118 Tgc Adjustments Displayed
Patient Image Analysis TGC Adjustment Figure 118 TGC Adjustments Displayed... -
Page 174: Image Enhancement Gammas
Accutome B-Scan Plus User Guide Image The Gamma adjustment feature is another great Enhancement diagnostic feature that allows you to selectively Gammas manipulate the ratio between signal (or gain) and image brightness (known as Gamma), resulting in greatly enhanced tissue differentiation. Very subtle tissue... -
Page 175: Linear
Linear The Linear gamma represents a "standard" processing algorithm. Linear describes a greyscale representation of a B-Scan Plus echogram in which the brightness represented on the screen is directly proportional to the strength of the ultrasonic echo. Therefore an ophthalmic... -
Page 176: S-Curve
"S". The brightness response differs from Linear and Log in that the image contains a higher contrast for mid range signals. Figure 120 below displays an example of a B-Scan Plus image with a S-Curve Full Range gamma setting. Current View... -
Page 177: Log
Patient Image Analysis Image Enhancement Gammas The Log gamma settings stands for "Logarithm" and the ultrasound response curve can be represented as conventional logarithmic curve whose brightness response differs from the linear algorithm. The image represented by the Log gamma produces higher contrast for weaker signals. -
Page 178: Color
Accutome B-Scan Plus User Guide Color The color gamma setting allows you to view the image in color. The color setting can be advantageous in seeing any abnormalities that may not easily be seen in the other greyscale gamma settings. -
Page 179: Changing Gamma Settings
Patient Image Analysis Image Enhancement Gammas Changing Gamma Settings To change the gamma setting you must first select the "Gamma" tab from the tools palette. With the Gamma tab displayed, position the cursor on the small arrow at the right of the gamma field. Left click to open the drop down list as shown in Figure 123 below. -
Page 180: How To Use Zoom
Accutome B-Scan Plus User Guide How to Use To access the Zoom feature click on the "Tools" tab from Zoom the Tools palette. The zoom feature allows you to zoom in on a selected patient image. Zoom proportionally expands the image and fills the B-Scan screen. Zoom has preset values that increment by steps of .2 from 1.2... -
Page 181: Reset Zoom
Patient Image Analysis How to Use Zoom ZOOM FACTOR Figure 125 Zoom Changed Reset Zoom After you have zoomed in on an image you may want to reset the view back to the default normal view. To reset the zoom value simply click on "Reset Zoom". -
Page 182: How To Move Image
It is simple to move images in the Accutome B-Scan Plus. Place the Windows mouse cursor over any location on the image... -
Page 183: Measurement Types
Patient Image Analysis How to Take a Measurement on an Existing How to Take a The Analyze Screen provides the diagnostic feature of Measurement making measurements on a B-Scan Plus image. You can on an Existing measure on a zoomed image; you get much finer Image resolution of the measurements. -
Page 184: Figure 128 Line 1 Measurement Displayed
Accutome B-Scan Plus User Guide Right click and hold on the image at the starting point of the measurement, and drag the line along the length of the feature you would like to mea- sure. The measurement will be displayed on the screen as shown in Figure 128 below. -
Page 185: Taking Area Measurements
Patient Image Analysis How to Take a Measurement on an Existing Taking Area Measurements To take an area measurement: Select either Area 1 or Area 2 in the Measure- ments area as shown in Figure 129 below. Figure 129 Area 1 Measurement Selected... -
Page 186: Delete Current
Accutome B-Scan Plus User Guide Right click on the image and drag the outline of the area on the image you would like to measure. The measurement will be displayed on the screen as shown in Figure 130 below. You can change the velocity of the sound to reflect the density of the tissue being measured. -
Page 187: A-Vector
A-Vector A-Vector The A-Vector function displays an equivalent A-Scan of the captured B-Scan Plus image. Looking at the A-Vector you can get a graphical picture of the echoes received back through the eye from the ultrasonic probe. The echoes are represented as spikes arising from the baseline and indicate the sound beam travelling through the different intraocular tissues. -
Page 188: Figure 132 A-Vector Displayed
Accutome B-Scan Plus User Guide The A-Vector will be displayed under the live image as shown in Figure 132 below. The position of the A-Vector on the image can be moved by using the buttons or the slide control to the right of the Hide A-Vector button. -
Page 189: Comments On Image
Patient Image Analysis Comments on Image Comments on The Accutome B-Scan Plus allows you to place Image comments on an image from a patient exam. The comments feature can be important in providing an accurate image analysis. To place a comment on an image: In the "Tools"... -
Page 190: Figure 134 Entering Comments
Accutome B-Scan Plus User Guide The "Comments on Image" dialog shown in Figure 134 below will display on the screen. Click in the text field and enter your comments. If you would like to clear the comments that you have typed, click on "Clear"... -
Page 191: Figure 135 Comments Appearing On Image
Patient Image Analysis Comments on Image The entered comments will appear on the image as shown in Figure 135 below. New Comments Figure 135 Comments Appearing on Image... - Page 192 Accutome B-Scan Plus User Guide...
-
Page 193: Printing Images And Reports
The Accutome B-Scan Plus has every feature you need to capture and print any portion of a patient exam. Not only does the Accutome B-Scan Plus allow you to print to any printer you can also print single snap shots of any elevation of any image, print on plain or thermal paper, select multiple images and print them in a report. -
Page 194: How To Print An Image
Accutome B-Scan Plus User Guide How to Print With the Accutome B-Scan Plus you can easily print any an Image frame of any scan by simply selecting the frame, making any necessary image adjustments and clicking the "Print Image" button. You can also select a frame and save the frame as a snapshot. -
Page 195: Adjusting Images
"Playing an Exam" on page 147 Adjusting Images If the frame you would like to print needs enhancement use the tools provided with the Accutome B-Scan Plus. Open the tools palette and make all the necessary adjustments to the image: ... -
Page 196: Figure 136 Printing A Frame
Accutome B-Scan Plus User Guide PRINT IMAGE Figure 136 Printing a Frame... -
Page 197: Creating Reports
Printing Images and Reports Creating Reports Creating With the Accutome B-Scan Plus you can create a report Reports for any patient. The report can contain the following: Patient Name Physician Clinician Indication for Scan Patient snapshot images All patient information is saved as part of the patient record. -
Page 198: Capturing Snapshots
Accutome B-Scan Plus User Guide *Note: For more information on selecting existing exams refer to "How to Select an Existing Exam" on page 135 of this manual. Capturing Snapshots If there are any additional snapshots you would like to add to the patient report: Select the appropriate elevation from the list of scan views. -
Page 199: Reports Tool
Printing Images and Reports Creating Reports Reports Tool When you are ready to create a report select the "Reports" tab from the tools palette as shown in Figure 137 below. The Reports tools has three function buttons: Snapshot List - displays all available snapshots for the active patient ... -
Page 200: Snapshot List
Accutome B-Scan Plus User Guide Snapshot List To display all snapshots available for the active patient: Click on "Snapshots List" as shown in Figure 138 below. All snapshots will be displayed in the panel below the reports tool buttons. Figure 138 Selecting Snapshot List... -
Page 201: Deleting Snapshots
Deleting Snapshots If for any reason you don’t want to keep one of the patient snapshots the Accutome B-Scan Plus allows you to simply select the snapshot and delete. The snapshot file, in the patient’s exam folder will be permanently deleted providing space on the B-Scan computer to store more snapshot files. -
Page 202: Executing Manage Reports
Accutome B-Scan Plus User Guide The Accutome B-Scan Plus will then launch the dialog displayed below. If you would like to perma- nently delete the snapshot file from the system (from the computer which you are using to operate the B-Scan) select "Yes". If you don’t want to delete the snapshot select "No". -
Page 203: Create A New Report
Create a New Report After you execute "Manage Reports" the Accutome B-Scan Plus launches the Report Form window with the snapshot list at the right as shown in Figure 142 below. The Report Form window also contains function buttons... -
Page 204: Report Form
Accutome B-Scan Plus User Guide Report Form After you execute "New" in the Manage Reports window the Reports Form will display as shown in Figure 143 below. The Report Form for the selected patient will display all information in all the fields that have been... -
Page 205: Selecting Snapshots
Printing Images and Reports Creating Reports Selecting Snapshots The snapshots are displayed at the right side of the report form. Select the snapshots to be inserted into the report as described below. Left click and hold on the mouse in the blue area near the first snapshot, then drag until you select all snapshots you would like to place in the report as shown in Figure 144 below. -
Page 206: Inserting Selected Snapshots
Accutome B-Scan Plus User Guide Inserting Selected Snapshots After you have selected all the snapshots you would like to include in the report click on "Insert Selected to Report" as shown in Figure 145 below. The report is now ready to print or save. -
Page 207: Print Or Save Report
Click on the Windows printer icon in the Report Form toolbar. Save The report will print to the printer connected to the Accutome B-Scan Plus computer Paste To save the report: Click on the Windows save icon as shown in Fig- ure 146 below. -
Page 208: Figure 147 Selecting File Type
Accutome B-Scan Plus User Guide The Accutome B-Scan Plus will launch a Windows browser for you to locate the folder in which to save the patient report. Select the file type you would like to save the report as from the "save as type" drop down list. - Page 209 Printing Images and Reports Creating Reports...
- Page 210 Accutome B-Scan Plus User Guide...
-
Page 211: Archive And Restore
(not entire patient exam). To access the archive function click on the Archive button in the Accutome B-Scan Plus main window as shown in Figure 149 below. Figure 149 Selecting Archive... -
Page 212: Archive Screen
Accutome B-Scan Plus User Guide Archive The Accutome B-Scan Plus will launch the Archive Screen screen shown below with two tabs; Backup and Restore. The default is Backup. On this screen you can select multiple patient exams and burn them to a CD or DVD. -
Page 213: Archive To Cd Or Dvd
Select "Burn Disc" on the CD/DVD Recordable Media tab. Selecting Patient Exams When you launch the Archive function the B-Scan Plus displays all exams found on the system at the left side of the screen. You will select the exams to archive from this list. -
Page 214: Figure 152 Selecting The Second Exam
Accutome B-Scan Plus User Guide You can also click on the name of the exam you would like to select as shown in Figure 152 below Figure 152 Selecting the Second Exam... -
Page 215: Select All
Archive and Restore Archive to CD or DVD Select All If you would like to archive all exams on the system and don’t want to select them individually: Click "Select All" as shown in Figure 153 below. All system exams will be displayed in the "Exams To Be Archived"... -
Page 216: Clear All
Accutome B-Scan Plus User Guide Clear All If you don’t want to archive all system exams you can individually de-select the exams you don’t want to archive by clicking in the checkbox or on the exam name or you can clear all the exams from the list to be archived. -
Page 217: Burn Disc
Archive and Restore Archive to CD or DVD Burn Disc Once you have selected all the exams you would like to burn on the CD/DVD: Select "Burn Disc" to execute the burn as shown in Figure 155 below. Figure 155 Burning the Disc... -
Page 218: Figure 156 Disc Burning Progress
Accutome B-Scan Plus User Guide While the disc is burning the archive screen will display in the process information area the burning progress as shown in Figure 156 below. Disc burning information includes textual information and burn progress in the status bar at the bottom of the screen. -
Page 219: Archive To A Local/Net Hard Disk
Archive and Restore Archive to a Local/Net Hard Disk Archive to a The Archive function also gives you the option of backing Local/Net Hard up files to a local or network hard disk. The process like Disk burning a CD/DVD is simple: Select the patient exams you would like to backup Select the Backup tool. -
Page 220: Selecting The Destination Folder
Accutome B-Scan Plus User Guide Selecting the Destination Folder After you have selected the exams you would like to back up you need to designate the location at which you would like to store the exams. Click on "Select Destination Folder" as shown in Figure 158 below. -
Page 221: Locating Destination Folder
Archive and Restore Archive to a Local/Net Hard Disk Locating Destination Folder After you execute "Select Destination Folder" the B-Scan Plus will launch a Windows browser shown in Figure 159 below. Using the Windows browser locate the folder in which you would like to backup the patient exams. Figure 159 Windows Browser - Locating Destination Folder After you have the selected the destination folder the path and name of the folder will appear as... -
Page 222: Figure 161 Execute Backup Exams
Accutome B-Scan Plus User Guide To complete the backup process click on "Backup Exams" as shown in Figure 161 below. Figure 161 Execute Backup Exams... -
Page 223: Figure 162 Backup Activity
Archive and Restore Archive to a Local/Net Hard Disk The status bar at the bottom of the Archive Screen will display backup activity, indicating that the backup is in process and how much of the backup has been completed (see Figure 162 below). Backup Amount Completed Backup Status Figure 162 Backup Activity... -
Page 224: Additional Archive Features
Accutome B-Scan Plus User Guide Additional The Archive function provides many other additional Archive features that allow you to gather information about disc Features size and operation, allows you to manage exams, and to load exams from discs. Delete Selected Exams After you have archived patient exams you may want to delete them to free up computer disk space. -
Page 225: Disc Tool Features
Archive and Restore Additional Archive Features The Accutome B-Scan Plus will issue a warning shown in Figure 164 below about deleting the file. Click on "Yes" if you would like to permanently delete the file. Click "No" or "Cancel" if you would like to terminate the delete process. -
Page 226: Disc Info
Accutome B-Scan Plus User Guide Disc Info When you select "Disc Info" the Accutome B-Scan Plus displays information about the CD/DVD including disc size, date, the number of sessions, amount of space remaining in the disc, etc. as shown in Figure 165 below. -
Page 227: Verify Burn
Archive and Restore Additional Archive Features Verify Burn The "Verify Burn" feature confirms that an executed disc burn actually happened by listing all files burned on the CD/DVD and confirming that the burn process was successful as shown in Figure 166 below. Figure 166 Verify Burn Results Check to Fit the Media The "Check to Fit Media"... -
Page 228: Load Disc
Accutome B-Scan Plus User Guide Load Disc The "Load Disc" feature loads the contents of the disc installed in the CD/DVD drive and launches a Windows browser so that you can select the location for loading the disc. Local/Net Hard Disk... -
Page 229: Verify
Restore Not only can you archive patient exams with the Screen Accutome B-Scan Plus but you can also restore them to your computer for analysis and reporting. The Restore screen is represented by a tab on the main Archive screen. To access the Restore screen, click on the "Restore"... -
Page 230: Figure 168 Restore Screen
Accutome B-Scan Plus User Guide The Accutome B-Scan Plus will launch the Restore screen shown below. On this screen you can select and restore multiple patient exams from a CD or DVD. You can also restore selected exams from a location on your computer or network. -
Page 231: Restore From Dvd Or
Select "Restore" on the DVD/CD Device tab. Selecting Patient Exams When you launch the Restore function the B-Scan Plus defaults to displaying all exams found on the DVD/CD at the left side of the "Exams on Backup" tab of restore exams palette (top left corner of the screen). -
Page 232: Selecting Individual Exams
Accutome B-Scan Plus User Guide Selecting Individual Exams To select exams one at a time: Click in the checkbox beside the exam name as shown in Figure 169 below. Figure 169 Selecting the First Exam... -
Page 233: Figure 170 First Exam Selected
Archive and Restore Restore from DVD or CD The selected exam will appear in the "Selected Exams To Be Restored" list as shown in Figure 170 below. Figure 170 First Exam Selected... -
Page 234: Figure 171 Selecting The Second Exam
Accutome B-Scan Plus User Guide You can also click on the name of the exam you would like to select as shown in Figure 171 below. Figure 171 Selecting the Second Exam... -
Page 235: Select All
Archive and Restore Restore from DVD or CD Select All If you would like to restore all exams on the system and don’t want to select them individually: Click "Select All" as shown in Figure 172 below. All system exams will be displayed in the "Selected Exams To Be Restored"... -
Page 236: Clear All
Accutome B-Scan Plus User Guide Clear All If you don’t want to restore all selected exams you can individually de-select the exams you don’t want to restore by clicking in the checkbox or on the exam name or you can clear all the exams from the list to be restored. -
Page 237: Restore
Archive and Restore Restore from DVD or CD Restore Once you have selected all the exams you would like to restore from the DVD/CD: Select "Restore" to execute the restoring process as shown in Figure 174 below. Figure 174 Restoring the Exam from the CD... -
Page 238: Figure 175 Exam Restoring Progress
Accutome B-Scan Plus User Guide While the exams are being restored the restore screen will display in the process information area the restoring progress as shown in Figure 175 below. Exam restoring information includes tex- tual information and restore progress in the status bar at the bottom of the screen. -
Page 239: Restore Local/Network Hard Disk
Select the Restore tool. *Note: The folder where the restored exams will be placed is preset on the Options Screen during Accutome B- Scan Plus setup. See "Restored Folder" on page 62 of this manual for more information. Selecting the Local/Network HD Tool To activate the local/ network hard drive restore tools: Locate the Local/Net HD tab in the tools palette. -
Page 240: Figure 177 Local/Network Hd Restore Tools Active
Accutome B-Scan Plus User Guide The Local/Network HD tools will be displayed as shown in Figure 177 below. Figure 177 Local/Network HD Restore Tools Active... -
Page 241: Selecting The Folder For Restoring Exams
Archive and Restore Restore Local/Network Hard Disk Selecting the Folder for Restoring Exams Before you can restore selected exams you need to locate the folder from which they will be restored. Click on "Select Folder" as shown in Figure 178 below. -
Page 242: Figure 179 Windows Browser
Accutome B-Scan Plus User Guide After you execute "Select Folder" the B-Scan Plus will launch a Windows browser shown in Figure 179 below. Figure 179 Windows Browser Browse the local and network drives and folders until you locate the folder from which you would like to restore exams. -
Page 243: Selecting Patient Exams
Archive and Restore Restore Local/Network Hard Disk After you have the selected the restore from folder the path and name of the folder will appear as shown in Figure 181 below. The contents of the folder will also display in the "Exams on Backup" tab. -
Page 244: Executing Restore
Accutome B-Scan Plus User Guide Executing Restore To complete the restore process: Click on "Restore" as shown in Figure 182 below. Figure 182 Execute Restore Exams on Local/Network HD... -
Page 245: Figure 183 Restore Activity
Archive and Restore Restore Local/Network Hard Disk The status bar at the bottom of the Restore Screen will display restoring activity, indicating that the exam restoration is in process and how much of the restore has been completed (see Figure 183 below). -
Page 246: Additional Restore Features
Accutome B-Scan Plus User Guide Additional The Restore function provides many other additional Restore features that allow you to gather information about Features restore size and operation and allows you to manage exams. Exams on Backup Features When the "Exams on Backup" tab is active there are many additional features available related to the exams in the backup folder. -
Page 247: Total Space Needed
Archive and Restore Additional Restore Features Total Space Needed The "Total Space Needed" feature checks the amount of disk space required to restore the selected exams and displays the required disk space. Check Conflict The "Check Conflict" feature will check if there are duplicate names in the Restored Exams folder and the selected exams in the restore from folder. -
Page 248: Exams On Destination
Accutome B-Scan Plus User Guide Exams on Destination The Exams on Destination tab as shown in Figure 186 below displays the contents of the current Restored exams folder. Additional features allow you to select and delete current restored exams. Figure 186 Exams on Destination - Restored Exams Folder Select All When you click on "Select All"... -
Page 249: Remove Selected Exams
Archive and Restore Additional Restore Features Remove Selected Exams After you have restored patient exams you may want to delete them to free up computer disk space. The "Remove Selected Exams" function allows you to permanently remove a restored patient exam. To remove selected exams: Select the exam(s) you would like to delete (see "Selecting Patient Exams"... -
Page 250: Exams On System
Figure 188 Removing Exam from Restored Folder Warning Exams on System The "Exams On System" tab when active displays all the exams in the Accutome B-Scan Plus Exam Data folder. The list can be useful in determining which exams need to be restored. -
Page 251: Dvd/Cd Features
Free Space On The System When you execute "Free Space on The System" as shown in Figure 190 below, the Accutome B-Scan Plus will display all available space on all drives. Space on System Info Figure 190 Free Space on The System Select Folder The "Select Folder"... -
Page 252: Information Of Media
Accutome B-Scan Plus User Guide Information of Media When you select "Information of Media" the Accutome B- Scan Plus displays information about the DVD/CD in the device drive, including disc size, date, the number of sessions, amount of space remaining in the disc, etc. as shown in Figure 191 below. -
Page 253: Available Exams
The "Abort" function stops the restoring process when selected. Main Menu and The Main Menu and Exit buttons located at the bottom of Exit the Archive and Restore Screens bring you back to the B-Scan Plus main menu and exit the B-Scan Plus program accordingly. - Page 254 Accutome B-Scan Plus User Guide...
-
Page 255: Maintenance
General Maintenance that should be performed on the Accutome Maintenance B-Scan Plus consists of activities such as keeping surfaces free of dust and dirt and storing in a dry and cool place so as to not adversely effect electronic parts. - Page 256 Accutome B-Scan Plus User Guide...
-
Page 257: Specifications
Specifications Overview This section provides the physical and operational specifications of the Accutome B-Scan Plus. Physical Table 2 below lists the physical specifications and Specifications associated peripherals. Table 2 Accutome B-Scan Plus Physical Specifications Probe (Accutome Part Number 24-6120) Frequency 12 MHz, 15 MHz 7.0 inches long X 1.25 inches diameter... - Page 258 Accutome B-Scan Plus User Guide Table 2 Accutome B-Scan Plus Physical Specifications 6 feet Cable Length 1.83 m Interface Connector USB Type A Wireless Mouse (Accutome Part Number 24-6130) 1.75 inches X 2.25 inches X 1.63 inches Dimensions 4.45 cm X 5.72 cm X 4.14 cm .222 lb.
-
Page 259: Environmental Specifications
Specifications Environmental Specifications Environmental Table 3 below lists the Accutome B-Scan Plus system Specifications operating and storage values for temperature and humidity. Table 3 Environmental Specifications Temperature Operating +10 C to +40 C Storage -20 C to +60 C Relative Humidity... -
Page 260: Computer Specifications
Accutome B-Scan Plus User Guide Computer Table 4 below provides the recommended specifications Specifications for the computer to be used with the Accutome B-Scan Plus Table 4 Recommended Computer Specifications Dell Latitude D820 with Intel Core 2 Duo T7200 (2.00GHz) 4M L2 Cache, 667MHz Dual Core or... -
Page 261: Operating Modes
Specifications Operating Modes Operating The following table summarizes the mode/application Modes possibilities for each system/transducer combination: Table 5 Operating Mode(s) Com- Clinical Other† bined Application (Specify) (Specify) Ophthalmic Fetal Imaging & Other* Cardiac, Adult & Pediatric Peripheral Vessel * Abdominal, Intraoperative, Pediatric, Small Organ (breast, thyroid, testes, etc.), Neonatal Cephalic, Adult Cephalic, Musculo-Skeletal (conventional), Musculo-Skeletal (superficial) †... -
Page 262: Storage/Range Specifications
Accutome B-Scan Plus User Guide Storage/Range Table 6 below lists the data storage and range Specifications specifications of the Accutome B-Scan Plus. Table 6 Data Specifications Data Storage Capacity Patients & Patient Data Only limited by the computer’s disk storage capacity... -
Page 263: Acoustic Output
Specifications Acoustic Output Acoustic Table 8 below provides the acoustic output reporting for Output the following: Transducer Model: OP (S/N 09065836) Operating Mode: B-Mode Application(s): Ophthalmic Table 8 Acoustic Output Reporting Table for Track 1 Non-Autoscanning Mode SPTA..3 Acoustic SPPA..3 (mW/ Output (W/cm... - Page 264 Accutome B-Scan Plus User Guide Table 8 Acoustic Output Reporting Table for Track 1 Non-Autoscanning Mode SPTA..3 Acoustic SPPA..3 (mW/ Output (W/cm Operating Frequency: 12 MHz These values are based on measurements of production units.
-
Page 265: Warranty & Repairs
Warranty & Repairs Warranty Accutome, Inc. warrants its new equipment to be free from defects in workmanship or materials. Any product that is proven to be defective will be repaired or replaced at our discretion, free of charge, up to one year from the date of purchase by the initial user of the equipment from Accutome, Inc. -
Page 266: Product Returns
Follow the instructions given below to return products to Returns Accutome Inc. Service and Repair Before returning instruments for service or repair, contact the Accutome Technical Service Group for a Return Goods Authorization (RGA) number. Toll Free (in USA): 1-800-979-2020 Tech Service:... -
Page 267: Replacement Parts
Replacement Table 9 below lists items that are available from Parts Accutome, Inc. or from your local sales representative. Please be sure to use the Accutome part number for the item when placing an order. Table 9 Accutome Replacement Parts Description Accutome Part No. - Page 268 Accutome B-Scan Plus User Guide...
Need help?
Do you have a question about the B-Scan Plus and is the answer not in the manual?
Questions and answers