Table of Contents
Advertisement
Advertisement
Table of Contents

Related Manuals for Accutome B-Scan Plus


Summary of Contents for Accutome B-Scan Plus
- Page 1 B-Scan Plus User’s Guide 24-6110 Rev-E...
- Page 2 (2) this device must accept any interference received, including interference that may cause undesired operation. CAUTION: Changes or modifications not expressly approved by Accutome, Inc. could void the FCC compliance and negate your authority to operate the product.
-
Page 3: Table Of Contents
Patient Data Storage and Retrieval Reports and Printouts Components About This Manual Chapter 2: Safety Safety Information Safety Issues to Consider When Using the Accutome B-Scan Plus Indications for use Disposal Requirements Symbol Definitions for the Accutome B-Scan Plus Safety Precautions Disinfection and Cleaning... - Page 4 Accutome B-Scan Plus Manual How to Print an Exam How to Save Patient Exams Chapter 4: Setup Setting Up the B-Scan Plus How to Access Setup Setup Menu Selections Facilities Users Sequences Options Image Controls Physicians Chapter 5: Performing Exams...
- Page 5 Creating Reports Selecting Patient Exam Capturing Snapshots Reports Tool Create a New Report Report Form Selecting Snapshots Inserting Selected Snapshots Print or Save Report (800) 979.2020 US & CA • (610) 889.0200 International • +31 (0) 485.350300 Europe • www.accutome.com...
- Page 6 Accutome B-Scan Plus Manual Chapter 8: Archive and Restore Overview Archive Screen Archive to CD or DVD Selecting Patient Exams Burn Disc Archive to a Local/Net Hard Disk Additional Archive Features Restore Screen Restore from DVD or CD Selecting Patient Exams...
- Page 7 Storage/Range Specifications Acoustic Output EMC Compliance Information Warranty Product Returns Service and Repair All Other Returns Non-Returnable Merchandise Chapter 11: Warranty & Repairs Replacement Parts (800) 979.2020 US & CA • (610) 889.0200 International • +31 (0) 485.350300 Europe • www.accutome.com...
- Page 8 Figure 3.1 - Accutome B-Scan Plus Probe Figure 3.2 - Accutome B-Scan Plus Footswitch Figure 3.4 - Main Screen Starting New Exam Figure 3.3 - Accutome B-Scan Plus Desktop Shortcut Figure 3.5 - New Exam Info Screen Figure 3.6 - Entering New Patient Information Figure 3.7 - Selecting Facility...
- Page 9 Figure 5.18 - B-Scan Example Figure 5.19 - Eye and Probe Marker Alignment Figure 5.20 - New Exam with Selected Protocol - First Scan Complete (800) 979.2020 US & CA • (610) 889.0200 International • +31 (0) 485.350300 Europe • www.accutome.com...
- Page 10 List Of Figures Accutome B-Scan Plus Manual Figure 5.21 - New Exam No Protocol - First Scan Selected Figure 5.22 - New Exam First Scan Complete Figure 5.23 - New Exam Second Scan Complete Figure 5.24 - Adding a View Figure 5.28 - Changing a View - Done...
- Page 11 Figure 8.37 - Exams on Destination - Restored Exams Folder Figure 8.39 - Removing Exam from Restored Folder Warning Figure 8.40 - Exams on System - Accutome Exam Data Folder Figure 8.41 - Free Space on The System Figure 8.42 - Information od Media Figure 8.38 - Remove Selected Exams...
- Page 12 Table 5.6 - Guidance And Manufacturer’s Declaration - Electromagnetic Immunity Table 5.7 - Recommended Separation Distances Between Portable And Mobile Rf Communications Equipment And The B-Scan Plus Table 11.1 - Accutome Replacement Parts www.accutome.com • (800) 979.2020 US & CA • (610) 889.0200 International • +31 (0) 485.350300 Europe...
-
Page 13: Chapter 1: Introduction
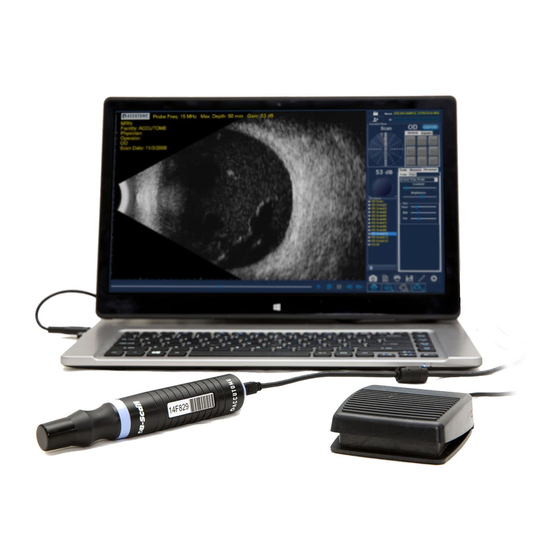
Figure 1.1 - Accutome B-Scan Plus Components Features The Accutome B-Scan Plus images the internal structure of the eye is designed for easy access to all functions. The B-Scan provides the following general features: • Adjustable TGC (Time Gain Compensation) curves •... -
Page 14: Adjustable Tgc Curves
(TGC) as a default in Setup, live during an exam or on a saved existing exam. Gamma Settings The Accutome B-Scan Plus allows you to adjust the Gamma settings as a default in Setup, live during an exam or on a saved existing exam. -
Page 15: About This Manual
Section 11 - Warranty and Repairs Describes Accutome B-Scan Plus warranty information and repair procedures. Having read this manual you will be able to set up the Accutome B-Scan Plus, perform scans, playback, save frames as snapshots, analyze images, print snapshots, create reports and archive patient exams. -
Page 16: Chapter 2: Safety
Accutome B-Scan Plus. Descriptions and meanings are listed to the right of the symbols. Safety Precautions There are several areas in the use of the Accutome B-Scan Plus that require special www.accutome.com • (800) 979.2020 US & CA • (610) 889.0200 International • +31 (0) 485.350300 Europe... -
Page 17: Disinfection And Cleaning
The following information is provided for the guidance of users, and specific products are mentioned for illustration only. Accutome does not endorse the use of these or any other product. Products must be used in accordance with the manufacturer’s instructions. -
Page 18: Cleaning Procedure At Point Of Use
If repair or maintenance is being performed, the equipment must be turned off and the power cord disconnected. WARNING! THE B-SCAN PLUS IS ONLY TO BE USED WITH A COMPUTER USING A MEDICAL www.accutome.com... -
Page 19: Avoiding Equipment Damage
GRADE POWER SUPPLY COMPLIANT WITH IEC60601-1. Please refer to the manufacturer’s instructions regarding it’s use. The User is responsible for ensuring that the PC to which the B-Scan Plus system is connected must be of the grounding type in compliance with applicable electrical codes. -
Page 20: Chapter 3: Getting Started
Accutome software, all packed in a plastic carrying case. The user supplies a PC with Windows XP SP2 as the operating system. The Accutome B-Scan Plus is designed to be used in multiple environments and is as simple as carrying a notebook computer and probe. -
Page 21: Installing The Software
The footswitch can be used to start and stop scan image acquisition. Installing the Software The Accutome B-Scan Plus software is shipped on a CD which contains all of the programs you will need to install for proper system operation. -
Page 22: Installation - Phase Two
Finish to complete software installation. Installation - Phase Three Follow the steps below to set up the Accutome B-Scan Plus probe and USB port(s). Insert the Accutome B-Scan Plus probe into any USB port. Select the port that is most convenient for you to use while taking image scans. The Found New Hardware Wizard window will appear on the desktop. -
Page 23: Probe
USB port to start setup of the new USB port. 3. Unplug the Accutome B-Scan Plus probe from the USB port and eject the installation CD from the CDROM drive. Reboot the computer by clicking on Start, then Shut Down, then Restart, then OK. -
Page 24: Basic Operation
Accutome B-Scan Plus Manual Basic Operation The basic operation of the Accutome B-Scan Plus consists of the following steps: Turn on the Accutome B-Scan Plus computer. 2. Start the Accutome program (refer to "Starting Accutome B-Scan Plus Program" below). 3. Start a new exam (refer to "How to Start a New Patient Exam" ) 4. -
Page 25: Figure 3.5 - New Exam Info Screen
Getting Started When you start a new exam the Accutome B-Scan will launch the Exam Info Screen shown below and will clear all fields. *Note:The Patient/Exam Info Screen contains drop down lists that are created during B-Scan setup. Refer to Section 4, Setup for further information. -
Page 26: Figure 3.11 - Exam Screen
9. Click on the “Start” button, located at the bottom right of the Patient/Exam Info Screen. Figure 3.10 - Selecting Scan 10. The Accutome B-Scan Plus will Group and Protocol launch the Exam Screen shown below. Figure 3.11 - Exam Screen www.accutome.com... -
Page 27: Operation
2. Click on “Scan” on the Probe tab, or press the start/stop button on the probe, or step on the footswitch to activate the image acquisition film loop. 3. Once the scanning is started the B-Scan Plus computer will store the last “X” seconds of image data (predetermined in Setup, Cine Buffer). -
Page 28: How To Print An Exam
The B-Scan Plus will also create a new view in the sequence if you continue to scan after completing all the defined sequence steps. -
Page 29: Chapter 4: Setup
• Setting New Exam Defaults, including Gamma, TGC, and Information Displayed How to Access Setup After you launch the Accutome software the main screen shown in Figure 18 below will be displayed. Select "Setup" and click to launch the Setup window. Figure 4.1 - Selecting Setup Setup Menu Selections When you select “Setup”... -
Page 30: Facilities
The Facilities tab (and related screen) is the first tab displayed upon starting Setup. The Accutome B-Scan Plus provides the ability to add facilities where exams will take place. The list of available facilities is displayed at the right of the screen and command buttons related to facility functions are located below the list. -
Page 31: Figure 4.4 - New Facility Information Active
3. A copy of the facility will be displayed in the list of Available Facilities with “(1)” beside the name. If you make more than one copy the number will (800) 979.2020 US & CA • (610) 889.0200 International • +31 (0) 485.350300 Europe • www.accutome.com... -
Page 32: Users
Figure 4.7 - Restore The Users tab (and related screen) is the second tab from Facilities Dialog the left in Setup. The Accutome B-Scan Plus provides the ability to add Users to a B-Scan user list. Figure 4.8 - Users Screen www.accutome.com... -
Page 33: Figure 4.10 - New User Information Active
To set a user as the default B-Scan operation: Select the user you would like to become the default from the “Available Users” list. (800) 979.2020 US & CA • (610) 889.0200 International • +31 (0) 485.350300 Europe • www.accutome.com... -
Page 34: Sequences
The Sequences tab (and related screen) is the third tab from the left in Setup. The Sequences screen (see Figure 4.14 below) allows you to set up operational protocols for the Accutome B-Scan Plus. A Sequence is the series of predefined scans with labelled views, scan methods and positions that are executed during B-Scan diagnostic imaging. -
Page 35: Figure 4.16 - Adding New Sequence
How to Add New Sequences To add a new sequence: In the Sequences screen select “New” as shown in Figure 4.15. 2. The B-Scan Plus will list the new sequence as Figure 4.15 - Adding “Undefined” in the Available Sequences list. New Sequence Figure 4.16 - Adding New Sequence... -
Page 36: Figure 4.18 - New Sequence - New View Active
The selections you can make and edit are listed below. Edit Current View Selections The Accutome B-Scan Plus provides all the tools necessary to change the sequence scan view. Using the Edit Current View selections you can change: • Eye - OD/OS •... -
Page 37: Figure 4.20 - Adding A New Sequence Scan
AX as the method for probing. If you would like to change the probing method select either “Long” or “Trans”. Figure 4.22 - Change Probe Orientation (800) 979.2020 US & CA • (610) 889.0200 International • +31 (0) 485.350300 Europe • www.accutome.com... -
Page 38: Figure 4.24 - Saving New Sequence
Accutome B-Scan Plus Manual 5. When you arrive at the appropriate position for the probe in the newly added sequence scan release the position indicator. The new position will be reflected in the label for the new sequence scan as shown in Figure 4.23. -
Page 39: Figure 4.26 - Duplicating Current Sequence
Figure 4.26 - Duplicating Current Sequence Set Selected Sequence as Default To set a sequence as the default B-Scan Plus operation: Select the sequence you would like to become the default from the “Available Sequences” list. -
Page 40: Options
The Options tab (and related screen) is the fourth tab from the left in Setup. The Options screen (see Figure 45 below) allows you to set up optional operational parameters for the Accutome B-Scan Plus application. The options you can set are: • exam folder •... -
Page 41: Figure 4.30 - Selecting Main Exam Folder
Click on “Select” as shown in Figure 4.30 below. Figure 4.30 - Selecting Main Exam Folder 2. The Accutome B-Scan Plus will launch a Windows browser as shown in Figure 4.31. Using the browser locate the folder for storing exam data. -
Page 42: Figure 4.34 - Selecting Exam Name Combination
Accutome B-Scan Plus Manual The fields are as follows: • LastName - patient’s last name • FirstName - patient’s first name • MRN - medical record number • DateTime - date and time that exam occurred. The default Exam Name Combination is: LastName,FirstName_MRN_DateTime To use a combination other than the default select the combination from the drop down list as shown in Figure 4.34 below. -
Page 43: Figure 4.34 - Selecting Probe Depth
Figure 4.36 - Adjusting the Power scale. To adjust the power select the arrow Level indicator and slide as shown in Figure 4.36 until you reach the appropriate value. (800) 979.2020 US & CA • (610) 889.0200 International • +31 (0) 485.350300 Europe • www.accutome.com... -
Page 44: Image Controls
Image Controls One of the great features of the Accutome B-Scan Plus is the ability to view the actual adjustments to image controls live, while you are changing the settings. As you make image control adjustments the Small Image Window, located at the bottom right of the screen (see Figure 4.37) displays how the changes will affect... -
Page 45: Figure 4.37 - Image Settings Before Adjustment
The default gamma setting is S-Curve Full Range. To change the gamma preset select the appropriate value from the drop down list located at the right of the depth field as shown in Figure 4.39. (800) 979.2020 US & CA • (610) 889.0200 International • +31 (0) 485.350300 Europe • www.accutome.com... -
Page 46: Figure 4.41 - Image Settings After Adjustments
Figure 4.41 - Image Settings After Adjustments Gain The gain feature of the Accutome B-Scan Plus allows you to adjust the strength of the signal as it travels through the eye, thereby making the captured image brighter. -
Page 47: Figure 4.43 - Adjusting Gain
Figure 65 below will Setup (Cancel) launch. Select “OK” if you would like to cancel all changes made and return to the B-Scan Plus main screen. (800) 979.2020 US & CA • (610) 889.0200 International • +31 (0) 485.350300 Europe •... -
Page 48: Physicians
Accutome B-Scan Plus Manual Physicians The Physicians tab (and related screen) is the fifth tab from the left in Setup. The Accutome B-Scan Plus provides the ability to add Physicians to a B-Scan Plus physician list. How to Add a New Physician To add a new physician: In the Physicians screen select "New"... -
Page 49: Figure 4.50 - Saving New Physician
3. The physician will be deleted from the list of Available Physicians. Set Selected Physician as Default To set a physician as the default B-Scan Plus operation: Select the physician you would like to become the default from the “Available Physicians” list. -
Page 50: Figure 4.52 - Restore Physicians Dialog
Accutome B-Scan Plus Manual Restore To restore the previously saved Physician information: Click on "Restore". 2. A "Restore Physicians" dialog will launch. Click "Yes" to revert to the previously saved Physician Figure 4.52 - Restore information. Physicians Dialog www.accutome.com • (800) 979.2020 US & CA • (610) 889.0200 International • +31 (0) 485.350300 Europe... -
Page 51: Chapter 5: Performing Exams
Chapter 5: Performing Exams Performing Exams Overview The Accutome B-Scan Plus is very simple to operate, and has advanced features to help you obtain the best possible images. The Accutome B-Scan Plus creates eye images by sending a signal through the eye from the ultrasonic probe. -
Page 52: Initial Exam Screen
• Patient Info - requires you to enter current patient data • Probe Info - displays the current probe operational specifications • Exam Info - displays the Exam ID generated by the Accutome B-Scan Plus and provides selections for facility, physician and operator •... - Page 53 The B-Scan then generates an Exam ID based on the specific Exam Name Combination chosen. The medical record field requires an entry of a minimum of five alphanumeric characters. (800) 979.2020 US & CA • (610) 889.0200 International • +31 (0) 485.350300 Europe • www.accutome.com...
-
Page 54: Figure 5.4 - Initial Exam Screen With Patient Name
Probe Info The Probe Info displayed on the New Exam initial Info Screen is informational only and is determined by the Accutome B-Scan Plus probe setup. Frequency The Frequency field indicates the frequency of the signal from the probe through the eye. -
Page 55: Figure 5.6 - Selecting Facility
The Sweep Angle field displays the angle at which the probe sweeps the eye during imaging. Serial Number The Serial Number field displays the serial number of the connected Accutome B-Scan Plus probe. Exam Info The Exam Info area displays information related to the current exam and patient. -
Page 56: Figure 5.8 - Selecting Operator
Create Date/Time The Create Date/Time field displays the time stamp created by the Accutome B-Scan Plus for the time that the current patient exam was started. Scan Group The B-Scan Plus provides the ability to set up Imaging Sequence protocols and select the protocols for exams. -
Page 57: Exam Screen Features
• Medical Record Number (MRN) • Exam Creation Time (Date) • Facility - Facility display can be turned on or off in B-Scan Plus Setup, Options tab (800) 979.2020 US & CA • (610) 889.0200 International • +31 (0) 485.350300 Europe •... -
Page 58: Current View
Accutome B-Scan Plus Manual • Physician - Physician display can be turned on or off in B-Scan Plus Setup, Options tab • Operator - Operator display can be turned on or off in B-Scan Plus Setup, Options tab • Current View in Image Sequence Protocol The information fields displayed and the position of the information on the screen is determined by the Options settings in Setup. -
Page 59: Add View
Axial, Longitudinal (Long) or Transverse (Trans). 6. Select the view position indicator in the Current View area and drag the indicator tip to the desired position. (800) 979.2020 US & CA • (610) 889.0200 International • +31 (0) 485.350300 Europe • www.accutome.com... -
Page 60: Edit Current View
Edit Current View When you select "Edit" in the Current View area the B-Scan Plus allows changes to the currently active scan view label. Edit the label for the view. Make the adjustments to the probe orientation or positions by dragging the position indicator. -
Page 61: Analyze
When you click on "New Exam" the Accutome B-Scan Plus will launch the Initial Exam Screen where you can start a new patient exam. Main Menu When you click on "Main Menu" the Accutome B-Scan Plus returns you to the top level, main menu. Exit When you click "Exit"... -
Page 62: Probe Operation
Marker Alignment There is a marker at the end of the Accutome B-Scan Plus probe, the Accutome logo, (refer to Figure 2 on page 21 of this manual) that indicates the direction of the “slice”... -
Page 63: Probe Positions
Performing Exams Probe Positions One of the great features of the Accutome B-Scan Plus is the ability to use the probe in any position and be able to quickly and easily label the scan view. There are three major positions for holding the probe when you scan. Within these positions there are slices that correspond to the hours of a clock. -
Page 64: How To Scan
The probe trigger button toggles between start/stop. When you are scanning and press the button it stops the scan. If you stopped scanning and press the button, the B-Scan Plus will proceed to the next step in your scan sequence, or will add a new scan view. -
Page 65: Figure 5.20 - New Exam With Selected Protocol - First Scan Complete
(see "Edit Current View" on page 48). Figure 5.21 - New Exam No Protocol - First Scan Selected (800) 979.2020 US & CA • (610) 889.0200 International • +31 (0) 485.350300 Europe • www.accutome.com... -
Page 66: Figure 5.22 - New Exam First Scan Complete
After you have completed the first scan and you press the probe trigger button or step on the footswitch the B-Scan Plus will automatically add another scan to the “All Views” list. The label for the second scan will default to OD.Scan(2). -
Page 67: Figure 5.28 - Changing A View - Done
5. The edited current view will appear in the list of a View - Slice Position “All Views” as shown in Figure 5.28. and Global Orbit Figure 5.28 - Changing a View - Done (800) 979.2020 US & CA • (610) 889.0200 International • +31 (0) 485.350300 Europe • www.accutome.com... -
Page 68: Macula Scans
Accutome B-Scan Plus Manual Macula Scans The macula can be scanned with the Accutome B-Scan Plus in several ways. Two of the ways are a Horizontal (HMAC) and a Longitudinal (LMAC) scan. Horizontal Macula The Horizontal Macula scan is accomplished by first aligning a horizontal axial scan and centering the macula by aiming the slice directly above the visual axis, rather than tilting nasally. -
Page 69: Completing Patient Exam
Initial Patient Exam Screen (see Figure 73 on page 91). Enter new patient information and start a new exam. Exit Selecting “Exit” will close the Accutome B-Scan Plus software. Analyze Selecting “Analyze” will launch the Analyze Screen with the current patient active. -
Page 70: Chapter 6: Patient Image Analysis
The Accutome B-Scan Plus provides many features for high quality, personalized, image capture and analysis. You can perform image analysis with Accutome B-Scan Plus during an exam or later, on a saved, existing exam. Selecting Images for Analysis There are two methods of selecting an image for analysis: In the New Exam Screen by executing "Analyze"... -
Page 71: Analyze Screen
• Medical Record Number (MRN) • Exam Creation Time (Date) • Facility - Facility display can be turned on or off in B-Scan Plus Setup, Options tab • Physician - Physician display can be turned on or off in B-Scan Plus Setup, (800) 979.2020 US &... -
Page 72: Current View
Accutome B-Scan Plus Manual Options tab • Operator - Operator display can be turned on or off in B-Scan Plus Setup, Options tab • Current View of stored scanned film loops The default position for exam information fields is at the top left of the screen. The... -
Page 73: Selecting An Existing Exam
The three buttons located at the bottom of the Exam Screen; Rescan, Main Menu and Exit perform Accutome B-Scan Plus menu functions. Main Menu When you click on “Main Menu” the Accutome B-Scan Plus returns you to the top level, main menu. Rescan When you click on “Rescan”... -
Page 74: How To Edit Exam Info
Accutome B-Scan Plus Manual 2. Position the mouse cursor on the name of the Exam you would like to analyze. The exam will displayed in the screen as shown in Figure 6.5 below. Figure 6.5 - Existing Exam Displayed How to Edit Exam Info To edit the information for the active patient click on “Edit”, located at the right of... -
Page 75: Figure 6.6 - Edit Exam Information Window
Edit Exam Information Figure 6.8 - Exit Edit Exam window and continue activity, click “Cancel” Information Dialog (800) 979.2020 US & CA • (610) 889.0200 International • +31 (0) 485.350300 Europe • www.accutome.com... -
Page 76: Exams
Figure 6.9 - Exams Playing an Exam The Accutome B-Scan Plus allows you to view any portion of a scan film loop. At the bottom of the existing exam screen are the image playback controls. They are intuitive and easy to use and similar in appearance to controls on a VCR or DVD remote controller. -
Page 77: Backward
Select the TGC tab from the tools palette. 2. To adjust the gain slide the appropriate setting indicators. Figure 6.12 - TGC Adjustments Displayed (800) 979.2020 US & CA • (610) 889.0200 International • +31 (0) 485.350300 Europe • www.accutome.com... -
Page 78: Image Enhancement Gammas
Figure 6.13 displays an example of a B-Scan Plus image with a Linear Full Range gamma setting. Figure 6.13 - Linear Full Range Gamma Setting www.accutome.com... -
Page 79: S-Curve
Linear and Log in that the image contains a higher contrast for mid range signals. Figure 6.14 below displays an example of a B-Scan Plus image with a S-Curve Full Range gamma setting. Figure 6.14 - S-Curve Full Range Gamma Setting The Log gamma settings stands for “Logarithm”... -
Page 80: Color
Accutome B-Scan Plus Manual Color The color gamma setting allows you to view the image in color. The color setting can be advantageous in seeing any abnormalities that may not easily be seen in the other greyscale gamma settings. Figure 6.16 - Color Gamma Setting... -
Page 81: Reset Zoom
It is simple to move images in the Accutome B-Scan Plus. Place the Windows mouse cursor over any location on the image... -
Page 82: How To Take A Measurement On An Existing Image
How to Take a Measurement on an Existing Image The Analyze Screen provides the diagnostic feature of making measurements on a B-Scan Plus image. You can measure on a zoomed image; you get much finer resolution of the measurements. Measurements as small as .1 mm can be easily taken. -
Page 83: A-Vector
The echoes are represented as spikes arising from the baseline and indicate the sound beam travelling through the different intraocular tissues. The A-Vector function can be useful is diagnosing pathologies with the eye. (800) 979.2020 US & CA • (610) 889.0200 International • +31 (0) 485.350300 Europe • www.accutome.com... -
Page 84: Comments On Image
4. To close the A-Vector select “Hide A-Vector”. Figure 6.26 - A-Vector Displayed Comments on Image The Accutome B-Scan Plus allows you to place comments on an image from a patient exam. The comments feature can be important in providing an accurate image analysis. -
Page 85: Figure 6.28 - Entering Comments
6. The entered comments will appear on the image as shown in Figure 6.29 below. New Comments Figure 6.29 - Comments Appearing on Image (800) 979.2020 US & CA • (610) 889.0200 International • +31 (0) 485.350300 Europe • www.accutome.com... -
Page 86: Chapter 7: Printing Images & Reports
The Accutome B-Scan Plus has every feature you need to capture and print any portion of a patient exam. Not only does the Accutome B-Scan Plus allow you to print to any printer you can also print single snap shots of any elevation of any image, print on plain or thermal paper, select multiple images and print them in a report. -
Page 87: Creating Reports
Figure 7.1 - Printing a Frame captured as snapshots. Creating Reports With the Accutome B-Scan Plus you can create a report for any patient. The report can contain the following: • Patient Name • Physician •... -
Page 88: Selecting Patient Exam
Selecting Patient Exam To select the patient exam: After launching Accutome B-Scan Plus, select “Existing Exam”. The B-Scan Plus Analyze Screen will display with the existing exam drop down list. 2. Scroll through the drop down list until you find the patient for whom you would like to create a report. -
Page 89: Figure 7.5 - Confirming Snapshot Deletion
3. When the snapshot(s) you’d like to delete are selected click on “Delete Selected” as shown in Figure 7.4. 4. The Accutome B-Scan Plus will then launch the dialog displayed below. If you would like to permanently delete the snapshot file from Figure 7.4 - Selecting... -
Page 90: Create A New Report
Reports tab as shown in Figure 7.6. Create a New Report After you execute “Manage Reports” the Accutome B-Scan Plus launches the Report Form Figure 7.6 - Executing Manage window with the snapshot list at the right as shown Reports in Figure 7.7. -
Page 91: Selecting Snapshots
Continue selecting and inserting until all snapshots are inserted. Figure 7.9 - Selecting Snapshots (800) 979.2020 US & CA • (610) 889.0200 International • +31 (0) 485.350300 Europe • www.accutome.com... -
Page 92: Inserting Selected Snapshots
To print the report: Click on the Windows printer icon in the Report Form toolbar. 2. The report will print to the printer connected to the Accutome B-Scan Plus computer To save the report: Click on the Windows save icon as shown in Figure 7.11. -
Page 93: Us & Ca • (610) 889.0200 International • +31 (0) 485.350300 Europe • Www.accutome.com
Printing Images & Reports 2. The Accutome B-Scan Plus will launch a Windows browser for you to locate the folder in which to save the patient report. 3. Select the file type you would like to save the report as from the "save as type"... -
Page 94: Chapter 8: Archive And Restore
You can also load patient exams from discs, acquire disc information, verify burn or backup and store reports only (not entire patient exam). To access the archive function click on the Archive button in the Accutome B-Scan Plus main window as shown in Figure 8.1 below. -
Page 95: Archive To Cd Or Dvd
Figure 8.4 - Selecting the 2. You can also click on the name of the exam Second Exam you would like to select as shown in Figure 8.4. (800) 979.2020 US & CA • (610) 889.0200 International • +31 (0) 485.350300 Europe • www.accutome.com... -
Page 96: Burn Disc
Accutome B-Scan Plus Manual Select All If you would like to archive all exams on the system and don’t want to select them individually: Click "Select All" as shown in Figure 8.5. All Figure 8.5 - Select All system exams will be displayed in the "Exams To Be Archived"... -
Page 97: Archive To A Local/Net Hard Disk
Click on “Select Destination Folder” as shown in Figure 8.10. Figure 8.10 - Launching Select Destination Folder (800) 979.2020 US & CA • (610) 889.0200 International • +31 (0) 485.350300 Europe • www.accutome.com... -
Page 98: Additional Archive Features
Accutome B-Scan Plus Manual Locating Destination Folder After you execute "Select Destination Folder" the B-Scan Plus will launch a Windows browser shown in Figure 8.11. Using the Windows browser locate the folder in which you would like to backup the patient exams. -
Page 99: Figure 8.17 - Verify Burn Results
CD and you would like to stop the burn, select "Abort Proc." Disc Info When you select “Disc Info” the Accutome B-Scan Plus displays information about the CD/DVD including disc size, date, the number of sessions, amount of space Figure 8.16 - “Disc Info”... -
Page 100: Restore Screen
“Restore” tab as shown in Figure 8.18. Restore Screen The Accutome B-Scan Plus will launch the Restore screen shown in figure 8.19. On this screen you can select and restore multiple patient exams from a CD or DVD. -
Page 101: Restore From Dvd Or Cd
3. Select “Restore” on the DVD/CD Device tab. Selecting Patient Exams When you launch the Restore function the B-Scan Plus defaults to displaying all exams found on the DVD/CD at the left side of the “Exams on Backup” tab of restore exams palette (top left corner of the screen). -
Page 102: Selecting Individual Exams
Accutome B-Scan Plus Manual Note: The folder where the restored exams will be placed is preset on the Options Screen during Accutome B-Scan Plus setup. See “Restored Folder” on page 29 of this manual for more information. Note: On the DVD/CD Device tab you can also select exams for restoring from a computer folder. -
Page 103: Restore
4. Select the Restore tool. Note: The folder where the restored exams will be placed is preset on the Options Screen during Accutome B-Scan Plus setup. See “Restored Folder” on page 29 of this manual for more information. Selecting the Local/Network HD Tool... -
Page 104: Selecting The Folder For Restoring Exams
Click on "Select Folder" as shown in Figure 8.29. 2. After you execute “Select Folder” Figure 8.29 - Launching Select the B-Scan Plus will launch a Windows Folder (for Restoration) browser shown in Figure 8.30. 3. Browse the local and... -
Page 105: Additional Restore Features
The “Check Conflict” feature will check if there are duplicate names in the Restored Exams folder and the selected exams in the restore from folder. (800) 979.2020 US & CA • (610) 889.0200 International • +31 (0) 485.350300 Europe • www.accutome.com... -
Page 106: Overwrite Old Exams
Accutome B-Scan Plus Manual Overwrite Old Exams When you activate “Overwrite Old Exams” by clicking the radio button, the restore process will keep the same exam name and overwrite the exam that is currently on the local/net disk. Figure 8.36 - Overwrite Warning... -
Page 107: Exams On System
“Selecting Patient Exams” on page 89). 2. Click on “Remove Selected Exams” as shown in Figure 8.38. 3. The Accutome B-Scan Plus will issue a warning Figure 8.38 - shown in Figure 8.39 about deleting the file. Click on Remove Selected “Yes”... -
Page 108: Eject
The “Abort” function stops the restoring process when selected. Main Menu and Exit The Main Menu and Exit buttons located at the bottom of the Archive and Restore Screens bring you back to the B-Scan Plus main menu and exit the B-Scan Plus program accordingly. www.accutome.com... -
Page 109: Chapter 9: Maintenance
Maintenance General Maintenance Maintenance that should be performed on the Accutome B-Scan Plus consists of activities such as keeping surfaces free of dust and dirt and storing in a dry and cool place so as to not adversely effect electronic parts. -
Page 110: Chapter 10: Specifications
Accutome B-Scan Plus Manual Chapter 10: Specifications Specifications Overview This section provides the physical and operational specifications of the Accutome B-Scan Plus. Physical Specifications Table 10.1 below lists the physical specifications and associated peripherals. Table 10.1 - Accutome B-Scan Plus Physical Specifications... -
Page 111: Environmental Specifications
IEC 60601-1-2 Medical Electrical Equipment: Electromagnetic Compatibility IEC 60601-2-37 Medical Electrical Equipment: Particular Requirements for Ultrasound Equipment Environmental Specifications Table 10.2 lists the Accutome B-Scan Plus system operating and storage values for temperature and humidity. Table 10.2 - Environmental Specifications Temperature Operating +10°... -
Page 112: Operating Modes
Examples may include: Amplitude Doppler, 3-D Imaging, Harmonic Imaging, Tissue Motion † Doppler, Color Velocity Imaging. Storage/Range Specifications Table 10.5 below lists the data storage and range specifications of the Accutome B-Scan Plus. Table 10.5 - Data Specifications Data Storage Capacity Patients & Patient Data Only limited by the computer’s disk storage capacity... -
Page 113: Acoustic Output
EMC information provided in this manual. Portable and mobile RF communications equipment can affect Medical Electrical Equipment. (800) 979.2020 US & CA • (610) 889.0200 International • +31 (0) 485.350300 Europe • www.accutome.com... -
Page 114: Electromagnetic Emissions
Table 5.4 - Guidance And Manufacturer’s Declaration - Electromagnetic Emissions The B-Scan Plus is intended for use in the electromagnetic environment specified below. The customer or the user of the B-Scan Plus should assure that it is used in such an environment. -
Page 115: Electromagnetic Immunity
Table 5.6 - Guidance And Manufacturer’s Declaration - Electromagnetic Immunity The B-Scan Plus is intended for use in the electromagnetic environment specified below. The customer or the user of the B-Scan Plus should assure that it is used in such an environment. -
Page 116: Table 5.7 - Recommended Separation Distances Between Portable And Mobile Rf Communications Equipment And The B-Scan Plus
Communications Equipment And The B-Scan Plus The B-Scan Plus is intended for use in an electromagnetic environment in which radiated RF disturbances are controlled. The customer or the user of the B-Scan Plus can help prevent electromagnetic interference by maintaining a minimum distance between... -
Page 117: Warranty
Any product that is proven to be defective will be repaired or replaced at our discretion, free of charge, up to one year from the date of purchase by the initial user of the equipment from Accutome, Inc. or any of its authorized distributors. -
Page 118: Replacement Parts
Accutome B-Scan Plus Manual Replacement Parts Table 11.1 below lists items that are available from Accutome, Inc. or from your local sales representative. Please be sure to use the Accutome part number for the item when placing an order. Table 11.1 - Accutome Replacement Parts Description Accutome Part No. - Page 119 Warranty & Repairs (800) 979.2020 US & CA • (610) 889.0200 International • +31 (0) 485.350300 Europe • www.accutome.com...
- Page 120 US and Canada (800) 979-2020 International (610) 889-0200 European Office +31 (0) 485-350300 Info@accutome.com www.accutome.com...
Need help?
Do you have a question about the B-Scan Plus and is the answer not in the manual?
Questions and answers