Table of Contents
Advertisement
Quick Links
Fish Analyzer
Fish Analyzer
TM
PRO [DFA110]
Operation Manual
Yamato Scale Co., Ltd.
● Please read this manual before using the device for correct use and keep it with you at all
times for later reference.
Introduction
Thank you for purchasing the Fish Conditioner Fish Analyzer
TM
or the Fish Analyzer
TM
PRO. Please read
this manual carefully for proper use and it is our hope that it can help improve the fish quality for your
business or your organization.
Yamato Scale Co., Ltd.
Advertisement
Table of Contents

Related Manuals for Yamato DFA110


Summary of Contents for Yamato DFA110
- Page 1 Fish Analyzer Fish Analyzer PRO [DFA110] Operation Manual Yamato Scale Co., Ltd. ● Please read this manual before using the device for correct use and keep it with you at all times for later reference. Introduction Thank you for purchasing the Fish Conditioner Fish Analyzer or the Fish Analyzer PRO.
- Page 2 Pro, we joined forces with Japan’s top researchers and Universities such as: Nagasaki University Fisheries Department, Nagasaki Prefectural Fisheries Research Institute, Chiba Prefectural Fisheries Research Center, Yamato Scale Co., Ltd., Fisheries Research Institute (currently National Research Development Corporation Fisheries Research and Education Organization). We developed technology conferences with Agriculture and Forestry and Fisheries Technology 2010 “New Practical Technology...
-
Page 3: Table Of Contents
―――――――――― Table of contents ―――――――――― Contents Read before use For Your Safety Preparation How the Fish Analyzer Pro works & Functions Product package: What included in the box Main device interface & details Maintenance & Upkeep Preparation before use Battery & Sensor attachment setup Display and keys Fish species and recommended measuring spots/locations on the fish Day of the catch and day after catch measurements... -
Page 4: Read Before Use
Chapter 1 Read before use 1-1. For Your Safety Read "For Your Safely" before using this product for protecting yourself and for others. After you read it, keep it with care so as to be available whenever you need it. ●... - Page 5 (1) When the housing case or electrodes are damaged from being dropped, stop using the device. It may damage the fish or injure you. (2) When the display is damaged from being dropped and liquid leaks, stop using it as it is toxic.
-
Page 6: Preparation
1-2. Preparation ● In order to avoid common issues: Do not separate or modify the device. (1) Do not hit the display and keyboard (buttons) with a nail tip or a sharp tool. (2) Hold the main body portion when you carry it. (3)... -
Page 7: How The Fish Analyzer Pro Works & Functions
1-3. How the Fish Analyzer Pro works & Functions Measurement method that does not damage the fish (Nondestructive). Fish AnalyzerTM Pro uses "bioelectrical impedance method" to send weak electrical signals into the fish using the four electrodes (sensors) that estimates fat percentage and fish freshness. -
Page 8: Product Package: What Included In The Box
1-4. Product package: What included in the box Main device Accessories Manual Attachment Batteries (CCC size x 2) 1-5. Main device interface & details... -
Page 9: Maintenance & Upkeep
1-6. Maintenance & Upkeep ● Wipe off and clean the sensors after each use to avoid rust. If the sensor electrode and attachment have fish slime or sea salt water, it may rust. Use a wet wipe or towel to clean off the sensors. ●... -
Page 10: Preparation Before Use
Chapter 2 Preparation before use 2-1. Battery & Sensor attachment setup ● Batteries Step ① Step ② Step ③ Slide the battery lid down to Insert batteries and make sure Insert the top hook of the battery lid remove. polarity (+/-) align correctly. and push it upwards. -
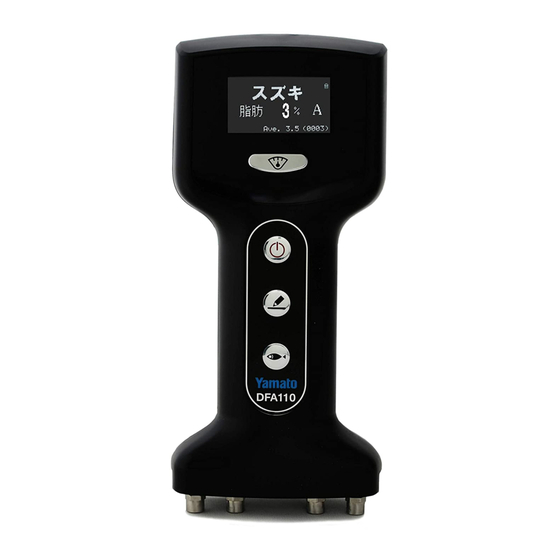
Page 11: Display And Keys
2-2. Display and keys ● Display Fish Analyzer Ver.3.00 Fish Analyzer PRO Ver.1.00 ● Symbols and what they mean Battery level Battery level is displayed in 3 levels. Replace when only one (bar) is shown. Attachment It means that the attachment is needed for measurement. Next day This means it’s a measurement mode for the day after (24hrs) the catch. -
Page 12: Fish Species And Recommended Measuring Spots/Locations On The Fish
2-3. Fish species and recommended measuring spots/locations on the fish No.2 Mackerel 1 No.1 Horse mackerel 1 Use attachment Center the sensor electrode between the first and Center the sensor electrode on the back of the dorsal second fins just above the sideline. fin just above the sideline. - Page 13 Align the tip of the sensor electrode to the back of Center the sensor electrode on the back of the dorsal the anal position slightly below the sideline. fin just above the sideline. No.9 Alfonsino No.10 Bonito 1 Center the sensor electrode on the center of the Center the sensor electrode between the first and dorsal fin, just above the sideline.
- Page 14 Center the sensor electrode on the tip of the dorsal Center the sensor electrode between the first and fin just above the sideline. second fins just above the sideline. No.20 Horse mackerel 2 No.19 Sea eel Use attachment Straightening the fish, align the tip of the sensor Center the sensor electrode between the first and electrode to the anal position just above the lateral second fins just above the sideline.
-
Page 15: Day Of The Catch And Day After Catch Measurements
2-4. Day of the catch and day after catch measurements This device measures fish fat percentage based on the condition of its cells. These cells change from the day of the catch as the fish erodes. In order to measure the fish fat accurately, this device uses 2 measuring modes. -
Page 16: How To Measure
Chapter 3 How to measure 3-1. How to hold and place the device on the fish for accurate measurement Although this device is a non-destructive device that does not destroy the fish, it must touch and make contact with the fish to take a measurement. Do not press firmly on the fish as it may distort the fish content that leads to inaccurate measurement results. -
Page 17: Taking Measurements
3-2. Taking Measurements As an example, let’s measure Yellowtail fish Operation Screen Press key to turn on. Press key to select “Yellowtail”. Choose ”Yellowtail ”. (day of the catch, within 24 hours) Go back to the home screen and place the sensor electrode onto the fish and press key to measure. - Page 18 ● Clearing/deleting measured result Operation Screen Long press down on the key to delete the measured result shown on the display. Holding down the key “Result clear” is displayed. Choosing <Yes> with a cursor by moving it with key, then press key.
-
Page 19: Determining Fish Freshness (Fish Status)
3-4. Determining Fish Freshness (Fish Status) Fish AnalyzerTM PRO determines fish freshness by measuring the fish cell erosion electronically rather than using the K-value index that is based on biochemical analysis. This device uses a multi-frequency measurement method. The cell membrane has high electrical capacity and insulation at low frequency bands and as electricity flows around/outside the cell without flowing through/inside the cell, thus the impedance (electrical resistance) is high. -
Page 20: Options And Usage
Chapter 4 Options and usage 4-1. Fish species selection You can select the fish species to be measured by using the button, but you can select only the fish species you want to measure in advance and exclude all the fish species you don’t want to measure from the display for faster measurement. -
Page 21: Energy Saving Mode For Longer Battery Life
4-2. Energy saving mode for longer battery life Settings for saving energy 1. Auto off 1 Automatically turn off the power after a set time. : The screen display turns off automatically after a set time has passed. When the screen 2. -
Page 22: Display The Average Value
4-3. Display the average value By enabling the operation setting "4. Average value", the average value of the measurement taken is displayed at the bottom of the screen. It can be used to determine the fat percentage from multiple measurements and from several fish within a container. -
Page 23: Evaluation Of Measured Result
Chapter 5 Evaluation of measured result 5-1. Evaluation by impedance mode The impedance mode is for actual measurement value for those who want to know: 1) Fish fat percentage of unregistered (not within the 20 supported) fish species listed in this document. 2) To make your own fish fat calibration. - Page 24 Example: Making an algorithm for “Fish A” by entering “0.0865” for slope and “-4.8” for section Operation Screen Move the cursor(→)to Fish A and press key. Then put a check mark ”レ” (check mark) on Fish A. Hold down key awhile to go to slope and section screen. Press key to enter a value for slope.
-
Page 25: Other Topics - Error Messages & Faq's
If any of the messages appear below, take corrective action accordingly. If you encounter messages that are not listed below or the recommended fix do not work, please look at our "Product inquiry" on our website at http://www.yamato-scale.co.jp/en/ Error Display Recommendations on how to fix This is displayed when sensor electrodes are not contacting the fish properly. -
Page 26: Specifications
6-3. Specifications ■ Product appearance and specifications are subject to change without notice. Product name/Model Fish Analyzer PRO/DFA110 Measuring method Bioelectrical impedance method (4 sensor electrode type) 20 fish species in total: Fish species Horse mackerel 1, Mackerel 1, Mackerel 2, Sardine, Saury,... - Page 27 Operating conditions ・Operating temperature -10℃ to +40℃ ・Operating humidity 30% R.H. to 85% R.H.(no condensation) Diagram measurement unit unit:mm (millimeters) ● Standard ● With attachment YAMATO SCALE CO., LTD 5-22 Saenba-cho, Akashi 673-8688, Japan Phone: +81-78-918-6 Fax: +81-78-918-5552...
- Page 28 PRINTED IN JAPAN...
Need help?
Do you have a question about the DFA110 and is the answer not in the manual?
Questions and answers