Table of Contents
Advertisement
Quick Links
Advertisement
Table of Contents
Troubleshooting

Related Manuals for Maxima MAXIMA 2


Summary of Contents for Maxima MAXIMA 2
- Page 1 Operating & Maintenance Manual Maxima Cream Whipping Machines...
- Page 3 All of the staff at MAXIMA and its dealers hope that you will enjoy working with our machines! This operating and maintenance manual is part of the machine and must always be kept with it, even...
-
Page 4: Table Of Contents
CONTENTS 1. GENERAL INFORMATION 1.1 General safety instructions 1.2 Information about precautions, specific warnings and symbols 1.3 Testing, guarantee and liability 1.4 Purpose of the manual • 1.4.1 Structure of the manual • 1.4.2 Modifications and additions 1.5 Manufacturer identification •... - Page 5 Introduction Contents 5 MACHINE OPERATION 5.1 Controls 5.2 Switching on and starting the machine 5.3. Production 5.4 Adjusting the air valve 5.5 Defrosting the refrigeration tank 6. WASHING 6.1 Washing and sanitising • 6.1.1 Sanitising steps 7 ROUTINE MAINTENANCE 7.1 Type of checks and interval between them 7.2 Maintenance work 7.3 Maintenance intervals and time needed 7.4 Maintenance sheets...
-
Page 7: General Information
Chapter 1 General Information 1 GENERAL INFORMATION 1.1 General safety instructions Before using the machine, carefully read all of this manual, which is an integral part of the machine. Knowing the information and instructions in this manual is essential for users to use the machine correctly and safely. The manufacturer declines all responsibility in the event of modifications, tampering or any operations carried out in a way that does not coincide with what is specified in this manual, since they may put the health and safety of personnel and/or objects at risk. -
Page 8: Testing, Guarantee And Liability
Guarantee MAXIMA guarantees the machines put on the market for 12 months from the date of delivery. During the guarantee period the seller undertakes to substitute, free of charge ex works, any parts which may develop a fault due to obvious manufacturing defects or poor quality materials. -
Page 9: Modifications And Additions
Maxima reserves the right, should it deem it appropriate and for valid reasons, to update the manuals already on the market, sending its customers sheets of technical and/or operating updates which must be considered and kept in the manual. -
Page 10: Ordering Spare Parts
1.5.2 Ordering spare parts When requesting spare parts, contact your dealer or consult the website of the manufacturer www.maximaholland.com. 1.5.3 Downloading the technical manual Hard copy technical manuals have been replaced by “PDF” files which can be downloaded directly from www.maximaholland.com. -
Page 11: Intended Uses
The machines are designed to dispense whipped cream using a manual button. The cream is dispensed until the DISPENSE button is released. The "MAXIMA" range of models are discontinuous cream whippers for dispensing portions of whipped cream, generally from 25 to 50 g. -
Page 12: Packaging, Transportation And Storage
1.9 Packaging, transportation and storage The machine is packaged in a wooden or cardboard crate on a pallet having dimensions and features suitable for the type and weight of the machine. The machine will be delivered packaged, ensuring that it is protected from the elements. Each package is marked with the following information: •... -
Page 13: Technical Specifications
The range consists of the following models: - MAXIMA 2, fitted with an extractable tub with a maximum capacity of 2 litres of liquid cream. - MAXIMA 5, fitted with an extractable tub with a maximum capacity of 5 litres of liquid cream. -
Page 14: Illustration Of The Machine As A Whole And Its Components
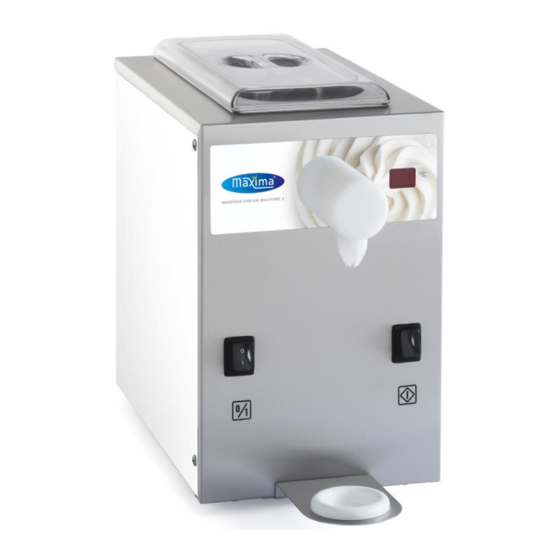
2.2 Illustration of the machine as a whole and its components Refrigeration tank cover Refrigeration tank Rotary pressure pump Extractable product reserve tub Air valve adjustment knob Air regulator Dispensing tap Dispense button ON/OFF button Drip tray Labyrinth Labyrinth tube Outlet nozzle Outer panels Support feet... - Page 15 Chapter 2 Technical Specifications...
-
Page 16: Working And Control Position
The operator must stand in front of the machine and load the ingredients, programme the recipe, start the processing and unload the processed product at the end of the recipe. 2.4 Machine technical data Model MAXIMA 2 MAXIMA 5 Net weight Coolant gas (type) -
Page 17: Noise
80 dB(A) and 135 dB(C). Test documents and certificates for the instruments used for the measurements are filed at MAXIMA and are available to monitoring authorities. TEST DOCUMENTS AND CERTIFICATES FOR THE INSTRUMENTS USED FOR THE MEASUREMENTS... -
Page 18: Items Supplied With The Machine
2.6 Items supplied with the machine The machine is supplied together with the following items: 1. Operating and maintenance manual. 2. Kit of gaskets and packet of food-safe lubricating grease. 3. Tube brush for cleaning. 4. Paddle for stirring the liquid cream in order to make it smooth and even. 3 GENERAL SAFETY REGULATIONS 3.1 General instructions THE INSTRUCTIONS LISTED BELOW MUST BE CAREFULLY READ SO THAT USERS ACT AP-... - Page 19 Chapter 3 Safety regulations 19. Pay maximum attention to all caution and danger signs on the machine. 20. The machine must be installed in a location protected from rain and sun. 21. Do not allow water and/or liquids to penetrate the machine. 22.
-
Page 20: Safety Symbols And Stickers
3.2 Safety symbols and stickers On the machine there are symbols/stickers for highlighting: what you must not do, important information and warnings: This symbol indicates the presence of an electric shock hazard. It indicates to the relevant personnel that they risk an electric shock if they do not work in compliance with safety regulations. -
Page 21: Installation Instructions
Chapter 4 Installation 4 INSTALLATION INSTRUCTIONS 4.1 General requirements INSTALLATION MUST ONLY BE PERFORMED BY QUALIFIED TECHNICAL PERSONNEL. Once the package has been deposited in the machine installation area, cut the straps (A) or remove the metal points (B), open the case (C) and remove the internal protection cards (D). -
Page 22: Spaces Needed For Use Of The Machine
4.3 Spaces needed for use of the machine The machine must be positioned on a solid, level and even floor that can bear its weight and must not be near heat sources or be directly exposed to sunlight. Keep the machine air inlets clear to allow adequate air circulation around it. -
Page 23: Electricity Supply
Chapter 4 Installation 4.5 Electricity supply WORK ON ELECTRICAL CONNECTIONS MUST ONLY BE CARRIED OUT BY QUALIFIED TECHNICAL PERSONNEL. The machine must be powered at the voltage shown on the data plate at the top of the rear panel. Connect the machine only to a power supply using a suitable earth connection. -
Page 24: Machine Operation
5 MACHINE OPERATION 5.1 Controls The control panel functions are illustrated below: 1. Digital display Displays the temperature of the liquid cream, contained in the extractable tub, inside the refrigeration tank. 2. “0/1 ON/OFF” button For switching the machine on and off. When the machine comes on, the following values are shown on the digital display (2) in this sequence: the factory set preservation temperature for the liquid cream (+3°C) and then the temperature of the internal surface of the refrigeration tank. -
Page 25: Switching On And Starting The Machine
Chapter 5 Using the machine 5.2 Switching on and starting the machine Connect the machine power cable to a mains socket and press the 0/1 ON/OFF button (1). When the machine comes on, the following values are shown on the digital display (2) in this sequence: the factory set conservation temperature for liquid cream (+3°C) and then the temperature of the internal surface of the refrigeration tank. -
Page 26: Production
5.3. Production BEFORE STARTING PRODUCTION, THOROUGHLY WASH AND SANITISE THE MACHINE, AS IN- DICATED IN SEC. 6 (WASHING). - Press the “Machine ON/OFF 0/1” button. - When the machine comes on, the following values are shown on the digital display in this sequence: the factory set conservation temperature for liquid cream (+3°C) and then the temperature of the internal surface of the refrigeration tank. - Page 27 Chapter 5 Using the machine For optimum machine performance, the following indications should be observed: We suggest using liquid creams with a fat content of between 33 and 35%. Notes: Cream with a fat content of less than 33% is defined as “low-fat” and tends not to increase volume. Cream with a fat content of more than 35% is defined as “full-fat”...
-
Page 28: Adjusting The Air Valve
The instructions for using the “labyrinths” are indicated in the table below according to the percentage of fat in the cream. A labyrinth (1.5 measurement) is supplied with the machine for normal cream (33…35% of fat). If other types of cream are used, a specific labyrinth must be ordered from the retailer or directly from the manufacturer. LABYRINTH MEAS- WEIGHT OF LABY- CODE... - Page 29 Chapter 5 Using the machine Note: Using a liquid cream with a fat content between 33 and 35% and a cooling temperature of between +2°C and +4°C, the valve regulation is generally set in a position between 2 and 5 (standard operating condition).
-
Page 30: Defrosting The Refrigeration Tank
5.5 Defrosting the refrigeration tank If the machine is used in continuous mode and not turned off for several days, the refrigeration tank should be defrosted as described below. As the refrigeration tank acts as an evaporator, the inside surface tends to freeze on account of the humidity in the surrounding environment. -
Page 31: Washing
Chapter 6 Washing 6. WASHING 6.1 Washing and sanitising Sanitising includes all of those activities intended to make hygienic the inner surface of the cylinder and reserve tanks and the removable components that come into contact with the food. Aims of sanitising: To remove all traces of product residues To reduce the microbial load without leaving chemical residues of the products used on the surface treated. - Page 32 Rinse phase: At the end of operations, thorough rinsing is needed, to completely remove any product residues. Proceed as follows: - Pour drinking water, at room temperature, into the reserve tub until it is ½ full. - Position a suitable container under the dispensing tap. - Press the “DISPENSE”...
- Page 33 Chapter 6 Washing To thoroughly wash with detergent all the components installed on the machine, remove them and proceed as follows: TURN OFF AND ISOLATE THE MACHINE POWER SUPPLY BEFORE PERFORMING THE FOL- LOWING OPERATIONS. TURN OFF THE MACHINE BY PRESSING THE 0/1 ON/OFF BUTTON AND SET THE MAIN ON/OFF SWITCH TO “0”.
- Page 34 • Disassembling the outlet nozzle, splash guard and cream distributor – Remove the outlet nozzle (13) from the cream distributor (14) by un- screwing it in an anticlockwise direction. – Remove the cream distributor (14) from the dispensing tap (8), by unscrewing it in an anticlockwise direction using the labyrinth fixing rod (10).
- Page 35 Chapter 6 Washing Rinsing phase to remove detergent: After washing with detergent, all the parts must be thoroughly rinsed. - Use room temperature drinking water to rinse all components previ- ously removed and washed separately. Always wear suitable protective gloves. c) Refitting the components: After washing, re-fit all of the machine components as described below: •...
- Page 36 Note: Regularly check the integrity of the gaskets and substitute them if they are broken, worn or swol- len. Only use original gaskets, made of food-safe rubber. The gaskets and their housings must be carefully lubricated before re-use. A full spare set of all gaskets is supplied with the machine, plus a tube of food-safe grease for lubricating them.
- Page 37 Chapter 6 Washing Disinfection phase: After re-fitting all of the components in the machine, carry out the disinfection phase. For the disinfection phase, purchase a food-safe chemical disinfectant. The dose used should comply with the instructions on the label, including the contact times. - Pour a disinfectant solution, at a temperature NOT HIGHER THAN 40°C, into the reserve tub until it is ½...
-
Page 38: Routine Maintenance
Alternatively, all components removed from the machine may be washed and disinfected using an industrial dishwasher. - Place all removable components and parts in the dishwasher (G), removing any gaskets (H), then wash them. DO NOT PUT GASKETS IN THE INDUSTRIAL DISHWASHER, AS THE HIGH TEMPERATURES COULD DEFORM THEM, MAKING THEM UNUSABLE. -
Page 39: Maintenance Work
Chapter 7 Maintenance 1) checking the integrity of parts subject to wear, such as the seal gaskets. 2) checking that the machine reaches and maintains the programmed temperatures without difficulty. 3) checking that the machine does not make any unusual noises. 4) keeping outer panels and the area near to and under the machine clean. -
Page 40: Maintenance Sheets
7.4 Maintenance sheets Replacing the gaskets CHECKING INTERVAL: 500 hours or quarterly AUTHORISED OPERATOR: 1 Operator TIME NEEDED: 5 minutes TOOL: Non-metallic pointed tool - Regularly check the integrity of the gaskets and substitute them if they are broken, worn or swollen. - Only use original gaskets, made of food-safe rubber. - Page 41 Chapter 7 Maintenance Aspiration tube gaskets • Remove the aspiration tube from the air regulator and take out the worn gaskets using a non-metallic pointed tool, taking care not to damage the housing. • Eliminate any product residues from the housings and fit the new gaskets, lubricating them with the food-safe grease supplied.
-
Page 42: Troubleshooting
8 TROUBLESHOOTING Most faults and problems during machine operation are promptly automatically indicated by the machine. aLaRms stop the machine, With an emeRgencY stop message dispLaYed on the con- tRoL paneL. to RestaRt the machine, YoU mUst eLiminate the caUse of the emeRgencY. People involved in troubleshooting: Operator: person trained in the ordinary operation of the machine who performs initial fault-finding and if possible,... - Page 43 8.1 General alarm indications displayed on the control panel – causes and solutions This section shows the machine alarms, which can be viewed on the digital display, together with possible causes and solutions. INSTRUCTIONS FAULT/ FOR THE OPERA- POSSIBLE CAUSES SOLUTIONS PROBLEM ●...
-
Page 44: Troubleshooting - Flowchart
8.2 Troubleshooting – flowchart In abnormal conditions the machine may malfunction, as specified below: MACHINE DOES NOT OPERATE OR OPERATION IS INTERRUPTED THE MAIN SWITCH IS IN THE ON (1) POSITION, THE TANK TEMPERATURE IS NOT DISPLAYED. The plug is not inserted in the sock- Insert it correctly. - Page 45 Chapter 8 Troubleshooting MACHINE REPEATEDLY TRIPS THE ELECTRIC OVERLOAD SWITCHES OR BLOWS THE MAINS FUSES. Contact the Technical assistance ser- The capacity of the electrical sys- vice. tem is not sufficient to power the machine. The electrical specifications of the Contact the Technical assistance overload switches or fuses are not service.
- Page 46 NO CREAM IS DISPENSED Remove the labyrinth and the cream The cream “churns” in the laby- distributor, wash them as described in section 6.1.1, points “a” - “b” and replace rinth (the liquid cream has a too high fat percentage). the type of liquid cream to be dispensed.
- Page 47 Chapter 8 Troubleshooting COOLING IS INSUFFICIENT OR SWITCHES OFF IN A FAULTY WAY There are obstructions in front of the air condenser grilles, or the distance is less than required in Restore the minimum distance required. sec. 2.4 “Machine technical data”. Restore the operating temperature, as in- The temperature in the working dicated in the manual in sec.
-
Page 48: Inactivity
DISPENSING DOES NOT START OR IS SUDDENLY BLOCKED WITHOUT TRIPPING THE EXTERNAL ELECTRIC SAFETY DEVICES The rotary pressure pump motor Turn the machine off and wait for about is overheating due to overuse. 20 minutes before restarting it (so the Cream has been continually dis- rotary pressure pump motor safety tem- pensed for too long (more than 5... -
Page 49: Decommissioning The Machine
Chapter 7 Maintenance 10 DECOMMISSIONING THE MACHINE 10.1 Description of method of disposal The lifetime of the machine estimated by the manufacturer is 20,000 hours (10 years) of operation under normal operating conditions, described in this operating manual. At the end of its lifetime the machine must be disposed of in accordance with the regulations in force in the country where it was used, concerning the disposal of waste electrical and electronic equipment. - Page 50 Notes:...
- Page 51 Chapter 7 Maintenance INFORMATION FOR USERS In accordance with Directives 2011/65/EU and 2012/19/EU, on the restriction of the use of certain hazardous substances in electrical and electronic equipment (EEE) and waste electrical and electronic equipment (WEEE), we hereby inform you that: “the crossed bin symbol on the device or on its packaging indicates that, at the end of its life, the product must be disposed of separately from other waste”.
- Page 52 MAXIMA HOLLAND Nijverheidsweg 19F - 3641 RP - Mijdrecht The Netherlands Tel: +31 (0) 297 253 969 E-mail: info@maximaholland.com...
Need help?
Do you have a question about the MAXIMA 2 and is the answer not in the manual?
Questions and answers