ORBILOC DOG DUAL User Manual
Hide thumbs
Also See for DOG DUAL:
- Quick manual (52 pages) ,
- User manual (48 pages) ,
- User manual (48 pages)

Related Manuals for ORBILOC DOG DUAL


Summary of Contents for ORBILOC DOG DUAL
- Page 1 TIGHTEN, ATTACH, DOG DUAL USER MANUAL THE SAFETY LIGHT MADE IN DENMARK Register for your 3-year warranty at orbiloc.com/warranty/...
-
Page 2: Table Of Contents
CHANGE MODE SELECTOR RING . . . 13 ORBILOC MOUNTS . . . . . . . . . . . . . . . 14 CHANGE MOUNT . - Page 3 U.S., EU, NO and CN. Our three-year warranty applies to the Orbiloc Dog Dual. Please visit: orbiloc.com/warranty/ To get the most out of your new high- quality Orbiloc Dog Dual Safety Light™, please read the User Manual carefully.
-
Page 4: Introduction
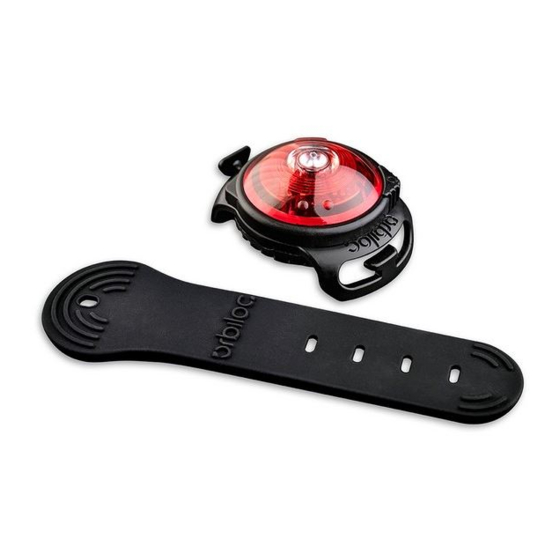
INTRODUCTION Orbiloc Dog Dual Orbiloc Dog Dual is a high-quality, light weight LED Safety Light designed to keep both you and your dog safe. The Orbiloc Dog Dual Safety Light ensures that both you and your dog are visible to others when out and about in... - Page 5 LENS (1) MODE SELECTOR RING (2) O-RING (3) QUICK MOUNT (4) BATTERY PACK (5) 2 x CR2032 BASE (6) ADJUSTABLE STRAP (7) SERVICE TOOL (8)
-
Page 6: Basic Principles
Read the specific recommendations for each product in this User Manual, also available at orbiloc.com/user-manual/. If the Orbiloc Dog Dual gets muddy or exposed to seawater on a regular ba- sis, please rinse the outside of the light with running water while turning the Mode Selector Ring (2). -
Page 7: Warranty
– absolutely free! Simply register your Orbiloc Dog Dual within 30 days of purchase at orbiloc . com/warranty/ . Terms and Conditions The Orbiloc warranty does not affect your statutory rights. -
Page 8: Getting Started
(See page 5 for illustration references.) Use the Service Tool (8) to tighten the base (6) and you are ready to use your Orbiloc Dog Dual . Orbiloc Dog Dual gives you the freedom to engage in your outdoor activity with your canine companion while being safe. -
Page 9: On / Off / Steady / Flash
ON / OFF / STEADY / FLASH The Orbiloc Dog Dual is very user-friendly; just turn the Mode Selector Ring (2) to the left or right. The triangle indicates the desired function. FLASHING STEADY-ON Flashing ( ) and Steady-on ( ) symbols are found on the top of the Lens (1). -
Page 10: Orbiloc Accessories
– and our common contribution to a sustainable world. With our custom range of maintenance products and mounts, you can take care of your Orbiloc Safety Light for a lifetime and adapt it to your specific needs. See the accessory range at: orbiloc.com/product/orbiloc-dual-acces-... -
Page 11: Orbiloc Service Kit
ORBILOC SERVICE KIT With the Orbiloc Service Kit maintaining your Orbiloc Dog Dual is quick and easy. The Orbiloc Service Kit contains a battery pack (5) (2 x CR2032), a Service Tool (8) and an O-ring (3) lubricated with silicone. -
Page 12: Change Battery And O-Ring
CHANGE BATTERY AND O-RING Rinse your light (refer to page 6). Use the Service Tool (8) to unscrew the base (6) of the light. Remove the old battery pack (5) and O-ring (3) and return it to your local recycling centre. Wipe off the O-ring groove with a piece of clean tissue or a swab. -
Page 13: Change Mode Selector Ring
CHANGE MODE SELECTOR RING push push Rinse your light (refer to page 6). Unscrew the base (6) of the Orbiloc Dog Dual. Using your fingers, push on opposite sides of the O-ring (3) to create protrusion and remove and save the O-ring. - Page 14 CARABINER MOUNT CARABINER QUICK MOUNT ADJUSTABLE STRAP BUCKLE MOUNT RUBBER STRAP VELCRO STRAP CLIP MOUNT ARMBAND...
-
Page 15: Orbiloc Mounts
ORBILOC MOUNTS The Orbiloc Dog Dual includes the Orbiloc Quick Mount (4) and Orbiloc Adjustable Strap (7). Further mounts can be purchased, so that you can attach your Orbiloc Safety Light to different objects and gear. See the range of mounts at: orbiloc.com/product/orbiloc-dual-acces-... -
Page 16: Change Mount
CHANGE MOUNT push push Rinse your light (refer to page 6). Unscrew the base (6) of the Orbiloc Dog Dual. Using your fingers, push on opposite sides of the O-ring (3) to create protrusion and remove and save the O-ring. -
Page 17: Quick Mount Adjustable
Once you have selected the right adjust- ment hole, secure it on the designated hook. Place the Orbiloc Dog Dual on your dog’s collar, harness or leash, and pull/wrap the other end of the Adjustable Strap around the gear and secure the Adjustable Strap on the designated hook on the opposite side of the Quick Mount. -
Page 18: Orbiloc Buckle Mount
With the hook part facing down, slide the Velcro Strap through the two holes in the Buckle Mount. Place the Orbiloc Dog Dual on your dog’s collar, harness or leash and adjust the length of the Velcro Strap by cutting off excess length. -
Page 19: Orbiloc Rubber Strap
ORBILOC RUBBER STRAP Put the Rubber Strap through the two holes in the Buckle Mount . Place the Orbiloc Dog Dual on the gear you want to attach it to. Pull and thereby stretch one end of the Rubber Strap to double length (A) under... -
Page 20: Orbiloc Clip Mount
ORBILOC CLIP MOUNT The Clip Mount is very convenient for using the Orbiloc Dog Dual on different collars or leashes with a height of up to 35 mm. It enables a quick change from one piece of equipment to another. -
Page 21: Orbiloc Armband
Armband so that it fits comfortably, and then secure the Velcro pull-tab. Do not secure the Armband too tightly. You should be able to place two fingers beneath it. Position the Orbiloc Safety Light so that the light is facing the traffic. -
Page 22: Orbiloc Carabiner Mount
We do not recommend attaching the Orbiloc Dog Dual onto the collar of smaller dogs with the Carabiner, as it could potentially bump and bruise the chest of a small dog. -
Page 23: Appendix
APPENDIX WARNING The Orbiloc Light is not a toy. Keep away from chil- dren. It contains small parts which may present a choking hazard for children or pets. Individuals with photosensitive epilepsy should avoid using this product. Batteries must not be opened, charged, heated up to above 75°C nor burned. - Page 24 THE SAFETY LIGHT MADE IN DENMARK Register for your 3-year warranty at orbiloc.com/warranty/ Jens Olsens Vej 1 8200 Aarhus N Denmark +45 86 99 88 77 info@orbiloc.com orbiloc.com...
Need help?
Do you have a question about the DOG DUAL and is the answer not in the manual?
Questions and answers