ORBILOC DOG DUAL User Manual
Safety light
Hide thumbs
Also See for DOG DUAL:
- Quick manual (52 pages) ,
- User manual (24 pages) ,
- User manual (25 pages)
Advertisement
Available languages
Available languages
Quick Links
Download this manual
See also:
Quick Manual
Advertisement

Related Manuals for ORBILOC DOG DUAL


Summary of Contents for ORBILOC DOG DUAL
- Page 1 DOG DUAL USER MANUAL THE SAFETY LIGHT MADE IN DENMARK Register for your 3-year warranty at www.orbiloc.com/warranty...
- Page 2 INTRODUCTION . . . . . . . . . . . . . . . . . 04 BASIC PRINCIPLES . . . . . . . . . . . . . . . 06 WARRANTY .
- Page 3 Congratulations on your new Orbiloc® Dog Dual Safety Light © 2015 The Orbiloc® name and logo are among the trademarks/registered trademarks owned by Orbiloc®. Our three-year warranty applies to the Orbiloc Dog Dual. Please visit: www.orbiloc.com/warranty To get the most from your new high quality Orbiloc Dog Dual Safety Light, please read the User Manual carefully.
- Page 4 INTRODUCTION Orbiloc Dog Dual Orbiloc Dog Dual is a high quality LED Safety Light designed to keep both you and your dog safe. The Orbiloc Dog Dual Safety Light ensures that both of you are visible to others when out and about in the dark,...
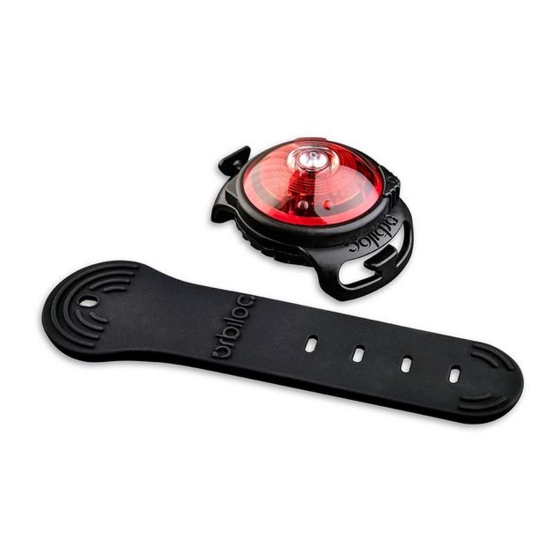
- Page 5 LENS (1) MODE SELECTOR RING (2) O-RING (3) BATTERY SHEET (4) BUCKLE (5) BATTERY PACK 2 x CR2032 (6) BASE (7) RUBBER STRAP (8)
-
Page 6: Basic Principles
BASIC PRINCIPLES Please take care of your new Orbiloc Outdoor Dual and accessories. Read the specific recommendations for each product in our User Manual, available at www.orbiloc.com. If the Orbiloc Outdoor Dual Light gets muddy or exposed to sea water, please... -
Page 7: Warranty
WARRANTY Orbiloc Dog Dual Lights are manufactu- red to the highest standards of quality and technology, which is why we offer a three-year warranty – absolutely free! Simply register your Orbiloc Dog Dual within 30 days of purchase at: www .orbiloc .com/warranty... -
Page 8: Getting Started
Tighten the Base (7) and you are ready to use your Orbiloc Dog Dual . ON / OFF / STEADY / FLASH The Orbiloc Dog Dual is very user-friendly; just turn the Mode Selector Ring (2) to the left or right. - Page 9 ORBILOC RUBBER STRAP Put the Orbiloc Rubber Strap (9) through the two holes in the Orbiloc Buckle (5) . Place the Orbiloc Dog Dual on your object. Pull and thereby stretch to double length one end of the Orbiloc Rubber Strap (9)
-
Page 10: Orbiloc Service Kit
ORBILOC SERVICE KIT The Orbiloc Service Kit makes maintaining your Orbiloc Dog Dual quick and easy. The Orbiloc Service Kit contains a Lithium Bat- tery Pack (6) (2 x CR2032) and an O-ring (3) lubricated with silicone. CHANGE BATTERY AND MAINTAIN... - Page 11 ADDENDUM WARNING Orbiloc Lights are not toys. Keep away from chil- dren. They may contain small parts which present a choking hazard for children or pets. Individuals with photosensitive epilepsy should avoid use of this product. Do not open batteries, charge, or heat above 75°C , or burn.
- Page 12 Batterie (4). Schrauben Sie Deckel (1) und Boden (7) fest zusammen, da vom Werk nur locker aufgeschraubt. BLINKEND / DAUERLICHT / AUS Das Orbiloc Dog Dual ist sehr benutzer- freundlich. Sie wählen zwischen Dauerlicht und blinkendem Licht. Dazu stellen Sie den Bedienungsring (2)
- Page 13 DER ORBILOC RUBBER STRAP Ziehen Sie den Orbiloc Rubber Strap (9) durch die zwei Löcher der Orbiloc Buckle (5). Legen Sie das Orbiloc Dog Dual auf Ihren Gegenstand. Nun ziehen Sie das eine Ende des Orbiloc Rubber Strap (9) zur doppelten Länge unter den Gegenstand und über das...
- Page 14 ERSATzBATTERIEN UND O-RING Mit dem Orbiloc Service Kit halten Sie Ihr Orbiloc Dog Dual immer funktionsfähig. Es enthält Lithium-Ersatzbatterien (6) (2 x CR2032) und einen Silikon-gefetteten O-Ring (3). BATTERIEWECHSEL UND WARTUNG Schrauben Sie Boden (1) und Deckel (7) des Orbiloc Dog Dual auseinander.
- Page 15 EMC. Die Deklarationen befinden sich auf www.orbiloc.com. WEEE RICHTLINIE Waste Electrical and Electronic Equipment Directives - Dieses Symbol auf der Orbiloc Leuchte oder der Verpackung zeigt an, dass dieses Produkt nicht in den Hausmüll gehört. Gemäß EU Direktive 2002/86/EC über Elek- tromüll müssen Orbiloc Leuchten und - Ersatzteile...
- Page 16 DÉMARRAGE Retirez la Languette de la Batterie (4). Serrez la base (7) ; votre Orbiloc Dog Dual est prêt à l’emploi. MARCHE / ARRÊT / CONTINUE / FLASH L’Orbiloc Dog Dual est très simple d’utili- sation. Tournez simplement la molette de Sélection de Mode (2) vers la gauche ou...
- Page 17 Orbiloc (9) sous votre objet. Placer le caoutchouc dans l’insert opposé (5). NB! Chaque extrémité du bracelet en caou- tchouc Orbiloc (9) doit faire le tour complet de la lampe. N’ayez pas peur d’étirer le ruban en caoutchouc Orbiloc (9).
- Page 18 (2 x CR2032) et un Anneau (3) lubrifié avec du silicone. CHANGEMENT DE LA PILE ET ENTRETIEN Dévissez la Base (7) de l’Orbiloc Dog Dual et remplacez le vieil Anneau (3) par le nouveau du Kit d’entretien Orbiloc. Remplacez la vieille Pile (6) par la nouvelle...
- Page 19 Européenne 2002/96/CE sur les Déchets d’équipements électriques et électroniques (DEEE), l’Orbiloc Light et ses pièces détachées ne doivent pas être jetés sans être triés. Jetez l’Orbiloc en le rapportant au votre centre local de recyclage. CE DOCUMENT Certaines informations peuvent ne pas être à jour du fait du développement constant du produit.
-
Page 20: Para Comenzar
Ajustar la Base (7) y podrá comenzar a usar su Orbiloc Dog Dual . ENCENDIDO / APAGADO CONTINUO / INTERMITENTE Orbiloc Dog Dual es realmente fácil de usar, solamente se debe girar el Anillo Selector de Modo (2) hacia la izquierda o la derecha. - Page 21 Orbiloc (9) bajo su objeto hasta la Lente (1) y colóquela en el agujero designado de la Hebilla Orbiloc (5) . Mientras tira de la Correa de Caucho Orbiloc (9) sobre la Lente (1), el otro extremo de la Correa de Caucho Orbiloc (9) debe pasar a través del hueco en...
- Page 22 óptica (1)) y que la Hebilla Orbiloc (5) esté ubicada en las espigas en la óptica (1). Atornillar juntas nuevamente la Parte Superior (1) y la Base (7) de la Orbiloc Dog Dual.
- Page 23 Directiva de la UE 2002/96/CE para el reciclado de Residuos Eléctricos y Electrónic- os (RAEE), la Luz Orbiloc o sus partes de repuesto no deben ser desechadas como basura municipal sin clasificar. Por favor al desechar la Orbiloc debe regresarla a su punto de recolección municipal para...
-
Page 24: Per Iniziare
Serrate la Base (7) e sarete pronti ad utiliz- zare il vostro Orbiloc Dog Dual. ACCESO / SPENTO FISSO / INTERMETTENTE Orbiloc Dog Dual è molto facile da usare, basta ruotare l’anello per Selezionare la Modalità (2) verso destra o sinistra. Il triangolo indica la funzione desid- erata. - Page 25 ORBILOC RUBBER STRAP Inserire il cinturino Orbiloc in gomma (9) attraverso i due fori nella Fibbia Orbiloc (5). Posizionare Orbiloc Dog Dual sull’oggetto. Estrarre e quindi allungare a lunghezza doppia un’estremità del cinturino Orbiloc in gomma (9) sotto l’oggetto e tutta la parte sopra dell’obiettivo (1) e posizionarlo nella...
- Page 26 ORBILOC SERVICE KIT Il Kit di Manutenzione Orbiloc rende la ma- nutenzione di Orbiloc Dog Dual facile e ve- loce. Il Kit di Manutenzione Orbiloc contiene un Pacco Batterie (6) al Litio (2 x CR2032) ed un O-ring (3) lubrificato con silicone.
- Page 27 In linea con la Direttiva UE 2002/96/ CE per Attività di Trattamento e Riciclo dei Rifiuti da Apparecchiature Elettriche ed Elettroniche. (RAEE), la Luce Orbiloc o le sue parti non devono essere smalt- iti come rifiuti urbani indifferenziati. Pertanto, per smaltire l’apparecchio Orbiloc è necessario restituirlo al punto di raccolta locale per il riciclaggio.
-
Page 28: Kom Godt I Gang
KOM GODT IGANG Start med at fjerne batteripapiret (4). Stram efterfølgende bunden (7) og du er nu klar til at bruge din Orbiloc Dog Dual . TÆND / SLUK / BLINK / KONSTANT Orbiloc Dog Dual er meget brugervenlig. Alt du skal gøre for at tænde og slukke og vælge mellem blink eller konstant lys er... - Page 29 ORBILOC RUBBER STRAP Træk enderne af Orbiloc Rubber Strap (9) gennem hullerne på Orbiloc Buckle (5). Placer Orbiloc Dog Dual på dit udstyr. Træk og stræk dermed den ene ende af Orbiloc Rubber Strap (9) til dobbelt længde under dit udstyr og over linsen (1) og placer den i hulrummet på...
- Page 30 SKIFT BATTERI OG VEDLIGEHOLD Skru bund (7) og top (1) af Orbiloc Dog Dual fra hinanden og fjern den gamle O- ring (3) og erstat den med en ny fra Orbiloc Service Kit. Erstat den gamle batteripakke (6) med en...
- Page 31 TILLÆG ADVARSEL Orbiloc lygten er ikke egnet til børn. Indeholder små dele, som kan udgøre en kvælningsrisiko for børn eller kæledyr. Personer med epilepsi bør und- gå at bruge dette produkt. Batterier må ikke åbnes, oplades, varmes over 75°C eller brændes. Hold bat- terier og indhold tørt.
-
Page 32: Komma Igång
Avlägsna batteriskyddet (4). Skruva åt bottenluckan (7), sedan är din Orbiloc Dog Dual redo att användas. PÅ / AV / FAST / BLINK Orbiloc Dog Dual är mycket lätt att an- vända, vrid funktionsringen (2) till vänster eller höger. Triangeln visar vald funktion. - Page 33 ORBILOC GUMMIBAND Dra Orbiloc Rubber Strap (9) genom de två hålen i the Orbiloc Buckle (5). Placera Orbiloc Dog Dual på ditt objekt. Dra ena änden av Orbiloc Rubber Strap (9) och stretcha det på så sätt det till den dubbla längden under objektet och hela...
- Page 34 ORBILOC SERVICE KIT Att sköta din Orbiloc Dog Dual är enkelt med en Orbiloc Underhållssats. Den inne- håller ett litiumbatteripack (6) (2xCR2032) och en silikonsmörjd o-ring (3). BYTA BATTERI OCH O-RING Skruva av bottenluckan (7) på din Orbiloc Dog Dual och avlägsna den gamla o-ringen (3) och ersätt den med en ny från Orbiloc...
- Page 35 TILLÆG VARNING Orbiloc lampan är inte en leksak. Förvaras oåtkom- lig för barn. Kan innehålla små delar som kan or- saka kvävning hos barn och husdjur. Personer med epilepsi bör ej använda produkten. Batterierna får ej laddas eller upphettas över 75°C. Förvaras torrt.
- Page 36 HVORDAN KOMME I GANG Fjern arket fra batteriet (4). Stram til bunnen (7) og Orbiloc Dog Dual lyset er klar til bruk. PÅ / AV KONSTANT LYS / BLINKEFUNKSJON Orbiloc Dog Dual lyset er veldig bruker- vennlig, bare vri ringen (2) rundt lyset til høyre eller venstre.
- Page 37 ORBILOC GUMMISTROP Trekk endene av Orbiloc Gummistroppen (9) gjennom hullene i Orbiloc spennen (5) . Plasser Orbiloc Dog Dual på ditt utstyr. Trekk og strekk den ene enden av Orbiloc gum- mistroppen (9) til dobbelt lengde under ditt utstyr og over lyset (1), og plasser den i hulrommet i Orbiloc spennen (5).
- Page 38 ORBILOC SERVICE KIT Orbiloc Vedlikeholdskit hjelper deg å holde ditt Orbiloc Dog Dual lys i orden. Orbiloc Vedlikeholdskit inneholder en Lithium batteripakke (6) (2xCR2032) og en o-ring (3) med silikon. BYTTE BATTERI OG VEDLIKEHOLDE Løsne bunnen (7) fra Orbiloc Dog Dual lyset.
- Page 39 (WEEE), må ikke Orbiloc Lysene eller dets reserve- deler kastes som usortert restavfall. Vennligst kast Orbiloc Lysene ved å returnere det til en lokal re- sirkuleringsstasjon. DETTE DOKUMENTET Konstant produktutvikling kan medføre at noe av informasjon ikke alltid er helt oppdatert.
- Page 40 TURVAVALON KÄYTTÖÖNOTTO Poista Paristosuoja (4) . Kiristä Alusta (7) – nyt Orbiloc Dog Dual – turvavalo on valmis käyttöön. PÄÄLLÄ / POIS JATKUVA VALO / VILKKUVA VALO Orbiloc Dog Dual on hyvin käyttäjäystäväl- linen, sinun tarvitsee vain kääntää Toimintovalitsinrengasta (2) vasemmalle tai oikealle.
- Page 41 ORBILOC RUBBER STRAP Pujota Orbiloc Kumihihna (9) kahden Orbiloc Soljen (5) reiän läpi. Aseta Orbiloc Dog Dual –turvavalo halu- amaasi kohteeseen (kuten panta). Vedä ja venytä Orbiloc Kumihihna (9) tup- lamittaan kohteen alle ja vedä se Linssin (1) yli ja aseta lenkki sille osoitettuun paikkaan Orbiloc Soljessa (5) .
- Page 42 Litiumparistopaketilla (6) (symboli alaspäin). Varmista, että Toimintovalitsinrengas (2) on napsautettu tukevasti yläosaan/linssiin (1) ja että Orbiloc Solki (5) on asetettu sille tarkoitettuihin ohjaustappeihin linssissä (1). Ruuvaa Orbiloc Dog Dual – turvavalon Yläosa (1) ja Alusta (7) toisiinsa kiinni.
- Page 43 Orbiloc ei ole vas- tuussa teknisistä tai toimituksellisista vahingoista jotka johtuvat tämän dokumentin esittämisestä tai käytöstä. Tämä dokumentti sisältää informaatiota joka on suojattu tekijänoikeuslailla. Tätä dokument- tia ei saa kopioida tai jäljentää ilman Orbiloc:in kir- jallista lupaa. MALLI: Orbiloc Dog Dual...
- Page 44 WERKWIJzE Verwijder de batterijplaat (4). Maak de onderkant (7) stevig vast en u bent klaar om uw Orbiloc Dog Dual te gebruiken. AAN / UIT / RUSTIG / KNIPPEREN De Orbiloc Dog Dual is zeer gebruiksvrien- delijk, draai simpelweg de modusselectie- ring (2) naar links of naar rechts.
- Page 45 ORBILOC RUBBER STRAP Steek de Orbiloc Rubberstrip (9) door beide openingen in de Orbiloc Ring (5) . Plaats de Orbiloc Dog Dual op je voorwerp. Trek aan de Orbiloc Rubberstrip (9) en maak één zijde dubbel zolang als de an- dere.
- Page 46 (2) stevig op de lens (1) geklikt is (het ge- deelte met de kleine magneet dient geplaatst te worden in één van de vier halve cirkels op de lens (1)) en dat de Orbiloc Sluiting (5) in de overeenstemmende geleidingspinnen op de lens (1) geplaatst is.
- Page 47 Uitrusting (WEEE), mogen de Orbiloc lamp of haar reserveonderdelen niet verwerkt worden als niet-gesorteerd gemeentelijk afval. Verwerk de Orbiloc als afval door het in te leveren bij uw lokaal gemeentelijk ophaalpunt voor recyclage. DIT DOCUMENT Constante productontwikkeling kan betekenen dat sommige informatie niet volledig bijgewerkt is.
- Page 48 THE SAFETY LIGHT MADE IN DENMARK Register for your 3-year warranty at www.orbiloc.com/warranty Langdyssen 5 8200 Aarhus N Denmark +45 86 99 88 77 info@orbiloc.com orbiloc.com...
Need help?
Do you have a question about the DOG DUAL and is the answer not in the manual?
Questions and answers