
Related Manuals for Jovision JVS-H411


Summary of Contents for Jovision JVS-H411
- Page 1 JOVISION Quick Start Guide JVS-H411 Copyright© Jovision Technology Co., Ltd. All rights reserved. TEL: 400-637-6777 http://en.jovision.com...
-
Page 2: Fcc Certification Requirements
JVS-H411 Quick Start Guide FCC Certification Requirements Caution: Any changes or modifications in construction of this device which are not expressly approved by the party responsible for compliance could void the user's authority to operate the equipment. This device complies with part 15 of the FCC Rules. Operation is subject to the following two conditions: (1) This device may not cause harmful interference, and (2) This device must accept any interference received, including interference that may cause undesired operation. -
Page 3: Statement
JVS-H411 Quick Start Guide Statement Thank you for choosing Jovision, this user manual is intended for users of JVS-H411 network camera. It includes instructions on how to use the product. The software embodied in the product is governed by the user license agreement covering that product. -
Page 4: Table Of Contents
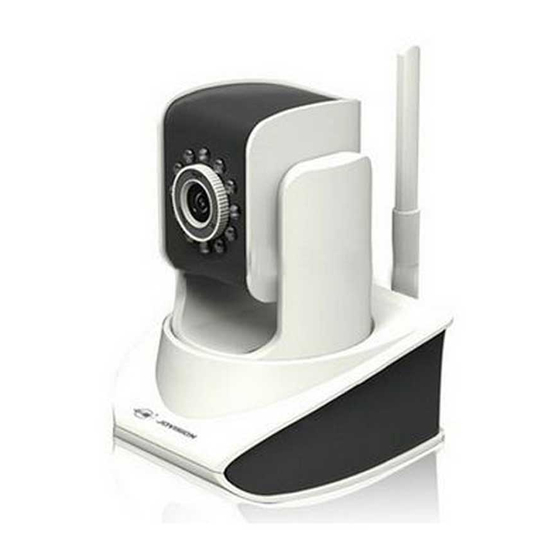
JVS-H411 Quick Start Guide Introduction 1.1 Appearance and Interface Contents FCC Certification Requirements ......................1 Statement............................2 1. Introduction ..........................3 1.1 Appearance and Interface ....................3 1.2 Specification ........................4 2. Installation.............................5 2.1 Ceiling Mounting.........................5 3. Network Connection ..............Error! Bookmark not defined. 3.1 Wireless connection......................7 3.2 Wired Connection .......................7... -
Page 5: Specification
JVS-H411 Quick Start Guide 1.2 Specification Image Sensor 1/4″CMOS Resolution 1280×720 Pixel 1.0MP Frame Rate 25fps View Angle 71° Focus 3.6mm Fixed Local Storage Infrared Lamp 10 LED Lamps IR distance(m) Best distance(m) Temperature -20℃~55℃ Humidity 10%~90% Power Supply DC 5V ≦3.2W... -
Page 6: Installation
JVS-H411 Quick Start Guide Installation 2.1 Ceiling Mounting Before you start: H411 can be installed to wall/ceiling or fixed on desktop. Ceiling mounting is taken as an example in this section; if you adopt wall mounting, you can also take below procedure as a reference. - Page 7 JVS-H411 Quick Start Guide...
-
Page 8: Wireless Connection
JVS-H411 Quick Start Guide 3.1 Wireless connection Notes: With wireless connection, you can add the device by “Add Wi-Fi Device”, which is based on AP function. Once you connect H411 to the router with Ethernet cable, H411 will disable AP, which means the function mentioned above won’t work. -
Page 9: Preparation On Smart Phone (Ios, Android)
JVS-H411 Quick Start Guide Preparation on Smart Phone (iOS, Android) 4.1 Get CloudSEE APP 1. Search “CloudSEE” in App Store (iOS) or Google play (Android). 2. Get and install CloudSEE on your smart phone. 4.2 Register CloudSEE Account Notes: You need to register a CloudSEE account before using CloudSEE service which is free. Although you can use “Visitor Login”, but we strongly recommend that register your own account for... -
Page 10: Add H411 On Smart Phone (Ios, Android)
JVS-H411 Quick Start Guide Add H411 on Smart Phone (iOS, Android) Before you start: The device has to be configured by “Add by Sound Wave” or “Add Wi-Fi Device” for first-time use if you want to use wireless connection. Press reset button for about 3 seconds and release to start sound wave configuration Press reset button for about 15 seconds and release to reset the device. - Page 11 JVS-H411 Quick Start Guide input the password and tap Next. ○ ○ ○ ○ + + + + , and select “Add by sound wave” ③ ③ ③ ③ ④ ④ ④ ④ Press reset button for at least 3 seconds until There will be a demonstration with audio hear the voice “Start voice configuration”,...
-
Page 12: Add Wi-Fi Device On Iphone
JVS-H411 Quick Start Guide ⑦ ⑦ ⑦ ⑦ ⑧ ⑧ ⑧ ⑧ The device will be added. Tap the device on the list, live video will display. 5.3 Add Wi-Fi Device on iPhone Notes: Do not connect Ethernet cable before this operation. - Page 13 JVS-H411 Quick Start Guide ④ ④ ④ ④ ③ ③ ③ ③ CloudSEE will prompt that a new device has Then the live video of the device will display, been found. Tap NEXT. you can access Audio, PTZ, Talk function here, but we haven’t finished configuring...
- Page 14 JVS-H411 Quick Start Guide ⑦ ⑦ ⑦ ⑦ ⑧ ⑧ ⑧ ⑧ Confirm the information of the device, and CloudSEE will prompt that “A new device has tap Save been configured by you”, tap Add. ⑨ ⑨ ⑨ ⑨ ⑩ ⑩ ⑩ ⑩...
-
Page 15: Add Wi-Fi Device On Android
JVS-H411 Quick Start Guide 5.4 Add Wi-Fi Device on Android ① ① ① ① ② ② ② ② The app will scan AP from H411 and list ○ ○ ○ ○ + + + + , and select “Add Open CloudSEE App, Tap them, select the one you want to add. -
Page 16: Add By Device Id
JVS-H411 Quick Start Guide ⑤ ⑤ ⑤ ⑤ ⑥ ⑥ ⑥ ⑥ Then CloudSEE will prompt that “Discovering Tap the device on the list, live video will Device”, and click Add display. 5.5 Add by Device ID Notes: This method requires that the device be connected to Internet and get CloudSEE ID online first. -
Page 17: Scan Devices In Lan
JVS-H411 Quick Start Guide ③ ③ ③ ③ ④ ④ ④ ④ The device will be added. Tap the device on the list, live video will display. 5.6 Scan devices in LAN Notes: This method requires that the device be connected to the SAME Wi-Fi network with your smart phone first. - Page 18 JVS-H411 Quick Start Guide ③ ③ ③ ③ ④ ④ ④ ④ Tap the device on the list, live video will The device will be added. display.
-
Page 19: Alarm Device
JVS-H411 Quick Start Guide Alarm Device 6.1 Connection... - Page 20 JVS-H411 Quick Start Guide ① ① ① ① ② ② ② ② Open CloudSEE App, tap Setting at the ○ ○ ○ ○ + + + + to add alarm device. bottom of screen, and tap “Alarm Device” in Setting Page ④...
- Page 21 JVS-H411 Quick Start Guide ⑤ ⑤ ⑤ ⑤ ⑥ ⑥ ⑥ ⑥ After connecting alarming device, you need Then you can find the alarm device just added to edit the name of the device. in the list, make sure the switch is turned on.
-
Page 22: Appendix
JVS-H411 Quick Start Guide Appendix I Packing List and Qualification Card Component Units Amount H411 Power Adapter Quick Start Guide Stand Notes: Accessories may vary due to different models, please take the actual model received as standard.
Need help?
Do you have a question about the JVS-H411 and is the answer not in the manual?
Questions and answers