
Related Manuals for AquaLabo TOXmini


Summary of Contents for AquaLabo TOXmini
- Page 1 Operating Manual Version: V 1.1 Date : 2020 microLAN b.v. Biesbosweg 2 NL-5145 PZ Waalwijk www.microlan.nl www.toxcontrol.com...
-
Page 2: Table Of Contents
Contents TOXmini Contents Symbol Key ................... 4 Safety Instructions ................5 Overview ......................7 Instrument Set-Up ................... 12 2.1. Control Panel ..................13 Measuring Chamber ................14 Connections ................... 15 Battery Compartment ................16 Power Supply ..................17 Software ....................17 Getting started .................... -
Page 3: Symbol Key
Messages on the TOXmini's display are written in bold type and set in brackets [ ], for example [Measurement Start]. < > Function keys for the TOXmini are written in bold type and placed in arrow keys <ENT> or <ON>. -
Page 4: Safety Instructions
Safety Instructions TOXmini Safety Instructions Prescribed Usage Instructions for Use of Applications The TOXmini is a small portable luminometer. It is designed bio- chemiluminescence measurements using reagents that generate a relatively constant light output. Typical applications are for example: research, clinical diagnostics and hygiene monitoring. - Page 5 Safety Instructions TOXmini The following safety instructions are to be observed before starting the instrument and during its operation: The instrument may only be put into operation by authorized persons used properly-trained personnel. All users of the instrument must first read the instruction manual.
-
Page 6: Overview
The TOXmini is a small portable luminometer which is suitable for measuring all types of ”glow” luminescence, i.e., bio- and chemiluminescent reactions that emit a constant light output over a given period of time. The TOXmini is used in research (molecular biology, medicine, biochemistry and pharmacy), ... - Page 7 TOXmini ... and operation is so simple The Display After the TOXmini is switched on with the <ON> key, the Start display appears in the Display mode. The desired line can be selected using the arrow keys , and the <ENT> key activates the selected field (see figure 1.1):...
- Page 8 1.Overview TOXmini The Key Functions (also see Chapter 4.2) Switches on the instrument. Press “ON” again the display illumination can be switched on or off. Switches off the instrument. Activates the selected field: Menu field, Input or Selection field. Input and Selection mode: Confirms the entry or selection.
- Page 9 1.Overview TOXmini Overview of the menus Figure 1.2: The menu structure The user is directly in de main menu after switching on the instrument. There the users has a choice between the <Measure>, <Results> and <Settings> options: <Measure> This option is called up if measurements should be carried out.
- Page 10 1.Overview TOXmini How do I proceed? Step Chapter Page 1. Getting started 2. Define measurement protocol 3. Select measurement protocol 4. Measure Where in the manual is the explanation found? Function Chapter Page Start display Start measuring Site identification Test identification (in process)
-
Page 11: Instrument Set-Up
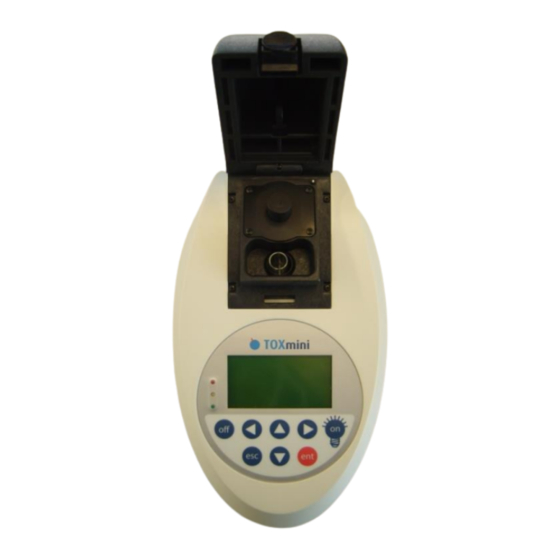
2. Instrument Set-Up Function, quality and reliability were the values most important during development. On the front panel of the TOXmini you have access to the measuring chamber containing the sample holder and photomultiplier (see Chapter 2.2) and the control panel (see Chapter 2.1). -
Page 12: Control Panel
2.Instrument Set-Up TOXmini 2.1. Control Panel The control panel contains 6 function keys that operate the software and 2 keys that control the power switch, as well as the graphic display. display's background illumination automatically switched to the energy-saving mode when the key pad has not been used for several seconds. -
Page 13: Measuring Chamber
2.Instrument Set-Up TOXmini Measuring Chamber The measuring chamber contains both the sample holder and the photomultiplier. It can be opened using the black button. Only in its closed state the measuring chamber is light-tight, which is a prerequisite for luminescence detection. -
Page 14: Connections
The measured counts are directly displayed as RLUs. Connections There are two external connections. Both are located on the rear panel of the TOXmini and can be protected with the sliding panel: RS232 port for transferring data to a personal computer (serial port). -
Page 15: Battery Compartment
2.Instrument Set-Up TOXmini Battery Compartment Remove test tubes from the measuring chamber before turning the instrument over! Danger of damage from leaking fluids! The battery compartment is located on the instrument's underside. The compartment is covered by a panel, which is fastened screw. -
Page 16: Power Supply
2.Instrument Set-Up TOXmini Power Supply The TOXmini operates with an input voltage of 6 V. The instrument can be run by means of either the power supply or the rechargeable batteries. When the instrument is connected to the power supply and t it is switched on, the batteries will be charged. -
Page 17: Getting Started
<ON> key. A few seconds after being switched on, the display will first show instrument model number together with the software version, followed by the Start display (see Figure 3.2). Figure 3.1: TOXmini rear panel Measurements are started here. - Page 18 3.Getting started TOXmini Switching on the instrument in battery mode: If the TOXmini is not connected to the power supply, simply press the <ON> key. M e a s u re m e n t S ta rt M e s s un g S ta r t...
-
Page 19: Software Set-Up And Operation
4. Software Set-up and Operation TOXmini 4 Software Set-up and Operation Set-up The TOXmini's software is set up for easy measurement of standard applications. After switching on the instrument the measurement menu Measurement Start appears on the display. A measurement can be started immediately by pressing the <ENT>... -
Page 20: Operation
(blinking) = Overload 4.2.1 Display mode When the TOXmini is switched on, the readout is automatically in the Display mode. The cursor may be moved from one line to the next by using the arrow key. This causes either the entire line or a field to be marked. -
Page 21: Selection Fields (Text)
4. Software Set-up and Operation TOXmini key enables the value at the selected point to be raised or lowered using a scale of 0–9. Pressing the <ENT> key a second time confirms the value and exits the input mode. Example: Changing test number 111 to 121... -
Page 22: Option Fields
4. Software Set-up and TOXmini Operation 4.2.4 Option Fields A selected menu or a selected option can be identified by the extended cursor block covering the entire line. If a menu or option has been marked with the cursor, pressing the <ENT>... -
Page 23: The Keys
4. Software Set-up and Operation TOXmini 4.2.5 The Keys Switches on the instrument. Press “ON” again the display illumination can be switched on or off. Switches off the instrument. Activates the selected field: Menu field, Input or Selection field. Input and Selection mode: Confirms the entry or selection. -
Page 24: Setting The Parameter
5.Setting the Parameter TOXmini 5 Setting the Parameter In the [Settings] menu, the user- Measurement Start specific instrument Assay: Location: measurement parameters Test: defined. These parameters should be set following the first start-up of the instrument. The procedure for insert sample doing so is described in the next pages. -
Page 25: Password
If you want only authorized persons to change parameter settings and/or delete results, it is possible to define a password (max. 4 characters). Upon delivery, the TOXmini's password has been defined as ”0000”. If this preset password is not changed, each password query can be bypassed by using the <ENT>... -
Page 26: User Input (Measurement Parameters)
5.Setting the Parameter TOXmini User Input (Measurement Parameters) The measurement parameters are defined in the [User Input] sub-menu. A total of up to 6 different programs containing measurement parameters, respectively protocols can be saved for various measurement requirements. The desired program can then be selected with the [Assay] query in the Start display prior to measurement start. - Page 27 5.Setting the Parameter TOXmini Press the <ENT> key in order to activate the Input mode and enter the RLU value for the [limit fail] which will serve as the upper/lower threshold value to classify results as fail. Confirm the entry with the <ENT> key.
- Page 28 5.Setting the Parameter TOXmini In accordance with the defined threshold values, the results will be displayed and classified: If [limit pass] is smaller than [limit fail], RLU values, which are smaller than [limit pass], are classified as pass. If [limit pass] is higher than [limit fail], RLU values, which are higher than [limit pass], are classified as pass.
-
Page 29: Date/Time
5.Setting the Parameter TOXmini Date/Time The date and time for the internal real-time clock can be entered or changed. All results will be saved with corresponding time and date entries. These also serve as selection criteria for the readout on the display, the transfer of information to a PC, and the deletion of results. -
Page 30: Language
5.Setting the Parameter TOXmini Language The TOXmini's operation language is selectable. Procedure Settings Password In the [Settings] sub-menu, Customer Settings select the [Language] option. Date/Time Language RS232 Press the <ENT> key. System Select the desired language and press the <ENT> key in order to confirm the selection. -
Page 31: The Rs232 Port
5.Setting the Parameter TOXmini The RS232 Port The RS232 port on the rear of the TOXmini enables the transfer of saved data (up to max. 2000 measurements) to a PC. This requires a standard zero-modem cable. The transmission parameters necessary for your computer's configuration are to be set in the [RS232] menu. - Page 32 5.Setting the Parameter TOXmini Selection: [XON/XOFF] = [Rts/Cts] = [None] = Pressing the <ESC> key, returns you to the [Settings] sub-menu. In order to transfer the selected data to your PC, first select the [Results] sub-menu in the Main menu and then the [PC] option.
-
Page 33: The Lcd Display
5.Setting the Parameter TOXmini The LCD Display Using this sub-menu, it is possible to modify brightness and contrast on the LCD display. Settings Password Procedure Customer Settings Date/Time Language In the [Settings] sub-menu, RS232 select the [System] option. System Press the <ENT> key. -
Page 34: Measuring
6. Measuring TOXmini Measuring To start a measurement in the Measure menu choose the [Measurement Start] option and press <ENT>. Parameters for the measurement can be selected and/or set in the Measure menu. This is achieved by moving the cursor to the appropriate line using the arrow keys activating the Input and/or the Selection mode with the <ENT>... -
Page 35: Measurement Procedure
Measuring TOXmini Measurement Procedure Prepare the sample according Measurement Start to the reagent manufacturer’s Assay: Location: instructions. Test: Select desired insert sample measurement protocol and if necessary, enter a location, as well as a test identification number. Assay: Open cover... - Page 36 6. Measuring TOXmini Automatic Storing of Results The results are saved sequentially. If the memory is full (after the 2000th measurement), the oldest measurement data will be lost. Stopping a Measurement A measurement in progress can be stopped by pressing the <ESC>...
-
Page 37: Processing The Results
7. Processing the Results TOXmini 7 Processing the Results There are several options available in the [Results] menu for processing the stored results: The results, selected using Time and Site, may be transferred to a PC. The results, selected using Time and Site, may be shown on the LCD display. -
Page 38: Readouts On The Display
7. Processing the Results TOXmini Readouts on the Display The results can be selected using the time of measurement and the site identification number and subsequently shown one after the other on the LCD display. Procedure Select the [Screen] option. -
Page 39: Transferring Data To A Pc
PC and start your terminal program (see delete Chap. 2.3). On the TOXmini’s display, select the [PC] option. Press the <ENT> key. The [Display by Starting Point at] Display by Starting at: display is shown with the selection criteria. - Page 40 7. Processing the Results TOXmini Format of Data Transfer a) Data transfer to PC Data is transferred in the following order: Date Time Program Limit pass Limit fail Measuring time Location identification number Test identification number Result (= integrated RLUs) or ”Overload”...
-
Page 41: Deleting Results
7. Processing the Results TOXmini Deleting Results The results to be deleted are Results selected using the time of measure- Screen ment as well as the site identification delete number shown before deletion on the display. Procedure Select the [Delete] option. - Page 42 7. Processing the Results TOXmini This causes the first measured result corresponding to the entered point in time and the defined site identification to be displayed. Page further with the key until you reach the readout of the result that you would like to display.
-
Page 43: Maintenance
Discharging duration: ca. 6 h. Recharging duration: ca. 4–5 h. In order to discharge the batteries, detach the TOXmini from the power supply and leave it on for a given period of time, for example, overnight. To recharge the batteries,... -
Page 44: Trouble Shooting
9. Trouble Shooting TOXmini 9 Trouble Shooting Error Cause Solution Display - 10 HV part could be Turn off instrument and let it dry. Switch on again. If error message appears again, contact service. other error contact service messages... -
Page 45: Technical Data
10. Technical Data TOXmini 10 Technical Data Detector Ultra fast single photon counter with spectral sensitivity range of 380-630 nm Sensitivity 1 fmol ATP using the ATP Bioluminescence Assay Kit CLSII (Boehringer Mannheim, FRG) Dynamic range more than 6 decades Tube format 12 mm diameter, 47-75 mm height;... - Page 46 Pin2 Pin3 Pin4 Pin5 Pin6 Pin7 Pin8 Pin9 Ordering Information Ordering number TOXmini portable luminometer 01TM32526-10 Disposable Glass Cuvettes 200 04AZF686004-200 Adapter vials, 15x42 mm,10 pack 01TM32737 Rechargeable batteries, 3 pack 06TM40650 PC connecting cable 07TM20246 Sturdy Metal Transport case...
Need help?
Do you have a question about the TOXmini and is the answer not in the manual?
Questions and answers