
Related Manuals for FAME DIY-Kit ST-Style


Summary of Contents for FAME DIY-Kit ST-Style
- Page 1 ENGLISH FAME DIY-Kit ST-Style For a complete ST style electric guitar. GIT0056427-00 0 12/2021 Bedienungsanleitun g User’s Manual...
- Page 2 ENGLISH Important safety instructions! Please read! DANGER! (for babys and children) Ensure that plastic covers, packaging, etc. are disposed of properly and are out of reach of babies and small children. Risk of suffocation! Make sure that children do not detach small parts from the product. They could swallow the parts and choke on them! Do not allow children to play with the product unsupervised.
- Page 3 ENGLISH Symbols on the unit and packaging: The lightning symbol warns the user of the presence of uninsulated voltage and the risk of electric shock. The exclamation mark symbol draws the user's attention to important maintenance and operating instructions in the operating instructions. The lightning flash warns you of dangerous voltage that is accessible from the outside.
-
Page 4: Warranty
ENGLISH Congratulations on your new FAME DIY-Kit ST-Style! Thank you for choosing the FAME DIY kit ST-Style. The kit contains all the components in the form of the wood parts, hardware parts and assembly accessories for a complete ST-Style electric guitar. -
Page 5: Scope Of Delivery
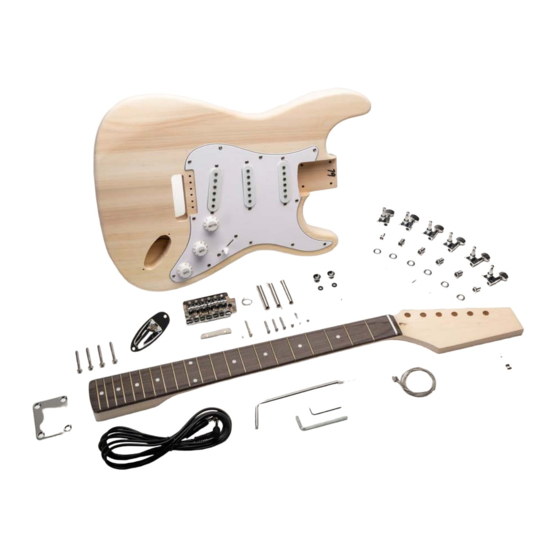
Scope of Delivery The following parts are included in the Fame DIY kit ST-Style: 1. 1x Body, pre-drilled 1x Cover plate tremolo compartment, white 2. 1x Maple neck, with fretboard and nut 6x Die-cast tuners, chrome 3. Electronics (prewired): a. 6x Lock nut for tuner a. - Page 6 ENGLISH • • • !"...
-
Page 7: Required Tools
ENGLISH Required tools: Drill/Drill-press • Wood drill bit, 2 mm • Phillips screwdriver (small and medium) • Spanner, 10 mm • Wire cutter • Soldering iron • Optional tools: Fret files and saddle files • Sandpaper or chisel • Accessories for painting and finishing (e.g. stain, cloth, etc.) •... - Page 8 ENGLISH DIY-Kit ST-Style – Building instructions Step 1: Body and neck attachment First make sure that the heel of the neck (2) fits exactly into the neck pocket of the body (1) and rework it with some sandpaper or a chisel if necessary. Ideally, the neck heelsits in the neck pocket without play.
- Page 9 ENGLISH Step 3: Vintage-Tremolo assembly To attach the vintage tremolo to the ST-style electric guitar, first place the pre-assembled vintage tremolo (4) from the front into the recess provided in the body and screw all six fastening screws (8) into the pre-drilled holes in the body (see illustration). Attention: The six bridge screws should not be screwed in completely, but should protrude a little bit to ensure a smooth function of the tremolo! We recommend that the screw heads protrude approx.
- Page 10 ENGLISH Now the three tremolo springs (7) can be fitted. To stretch the springs to the right length for mounting, hang the springs with the hook in the tremolo block and draw the spring with the help of a screwdriver until the round opening of the spring can be hooked on the spring claw (see picture). If necessary, the mounting screws of the spring claw can be loosened a little to make it easier to install the springs.
- Page 11 ENGLISH Step 5: Stringing and mounting the tailpiece Now string the enclosed nickel strings (17) onto the instrument to be able to check the functionality of the electrics and to adjust the setup of the ST-style electric guitar. To do this, feed each string from below through the matching guide in the tremolo block, through the tailpiece and up to the tuners, where the strings are wound with 2-3 axle windings.
- Page 12 ENGLISH Step 6: Tremolo adjustment Before fitting the cover plate of the tremolo compartment, it is recommended to adjust the response of the vintage tremolo. First make sure that the mounting screws of the vintage tremolo (8) have approx. 1 mm play. Then you can screw in the tremolo arm (9) and adjust the tightness of the tremolo by screwing in the spring claw.
- Page 13 ENGLISH Adjusting the neck curvature The integrated truss rod offers the possibility to adjust the neck curvature with an Allen key. Access to the neck tension rod is located on the headstock behind the nut. The following applies here: When the neck tension rod is tightened (clockwise rotation), the neck tilts back and •...
-
Page 14: Environmental Protection
ENGLISH Cleaning: Regular cleaning of the appliance to remove dirt and dust increases the longevity of the product. Always disconnect the instrument from the mains before cleaning it! Never clean the unit when it is wet! A dry microfiber cloth is best. Ventilation grilles and openings should always be kept free of dust and dirt. - Page 15 Notes MS ID: GIT0056427-000 12/2021...
Need help?
Do you have a question about the DIY-Kit ST-Style and is the answer not in the manual?
Questions and answers