
Subscribe to Our Youtube Channel
Related Manuals for Stanton SCS.1d


Summary of Contents for Stanton SCS.1d
- Page 1 All manuals and user guides at all-guides.com SCS.1d d Deck Con ntrol Surface e US S ER MANU...
- Page 2 • Place your mixer on stable surfaces, away from vibration and from sources that generate hum or noise, such as transformers, or electric motors. • The location and position of the unit should not interfere with its proper ventilation. • Do not use this unit near water. For example, near a bathtub, washbowl, kitchen sink, laundry tub, in a wet basement, or near a swimming pool. • To reduce the risk of fire or electric shock do not expose the equipment to rain or moisture or use it in damp or wet conditions. • Protect the unit from excessive dirt and dust. • Avoid drinks spillage, tobacco ash, and smoke (especially that associated with smoke machines). • Do not place heavy objects on the unit surface. Cleaning: Unplug the unit from the wall outlet before cleaning. Never use benzene, thinner, or other solvents for cleaning. Use only a soft damp cloth. Service: • The unit contains no user‐serviceable parts. • The manufacturer is not responsible for any damage or personal injury resulting from unauthorized user servicing or modifications. Please read the warranty. • The warranty will be void if any unauthorized service by the user is detected. • If service is required, please contact Stanton Tech at +1 954.316.1500 (Option 3) ii ...
-
Page 3: Table Of Contents
Unpacking .............................. 2 Connecting the SCS.1 ............................ 3 Connecting to Your Computer ........................ 3 Connecting to the SCS.1d to the SCS.1m ..................... 4 SCS.1d Setups ............................... 4 SCS.1d Description ............................... 5 Top Panel Functional Groups ........................ 5 Encoder Section ............................ 7 Trigger Section ............................. 7 ... -
Page 4: Introduction
Finally, we would like to point out that the descriptions of specific functionality of the SCS.1d are generic. The SCS.1d is a MIDI controller and does not generate any audio itself. Although it looks like a CD player or turntable, it in fact is not. The functionality of a given control on the surface of the SCS.1d (like the pitch slider for ... -
Page 5: Overview
• (1) FireWire cable • (1) 4 to 6 pin FireWire adapter • (1) Power cable and adapter (24V) • (1) Felt slipmat • (1) Vinyl control disc • (1) SCS.1d Manual Upon unpacking the SCS.1d, you should place the slipmat on the platter and then place the record on top of the slipmat. In addition to the above items, remember that to take advantage of the SCS.1d full potential you will need the SCS.1m or a traditional DJ mixer, a Mac or PC computer, a DJ application, and to download and install DaRouter software. So let’s get started! 2 ... -
Page 6: Connecting The Scs.1
Figure 2.1 Step 2: Attach the included FireWire cable to the SCS.1d. The FireWire ports are clearly labeled on the back panel of the SCS.1d. (Figure 2.2) Figure 2.2 Step 3: Download and run the DaRouter installer for the SCS.1d. A dialog box will open telling you to connect your SCS.1d. At this point, turn the SCS.1d on and connect the FireWire cable to your computer’s FireWire port (Figure 2.3). Do not connect the SCS.1d until prompted. Figure 2.3 On laptops, there are two different types of FireWire ports: 6 and 4 pin. Typically, you will find “full sized” 6 pin ports on Apple laptops. If your computer has a full sized (6 pin) FireWire port, use the included FireWire cable to connect directly from the SCS.1d to your computer. Most PCs will have a 4 pin FireWire port. So if you have a 4 pin port on your computer, connect the FireWire cable to the provided 4 to 6 pin adapter, and then just plug it to your computer’s 4 pin FireWire port. ... -
Page 7: Connecting To The Scs.1D To The Scs.1M
All manuals and user guides at all-guides.com Connecting to the SCS.1d to the SCS.1m All of the SCS.1 controllers have two FireWire ports on them, so devices can be chained together if needed. So when connecting a single SCS.1d to the SCS.1m, you would go from the unused FireWire port on the SCS.1m (Figure 2.4), (the other port is connected to your computer) to an open port on the SCS.1d. (Figure 2.5) Figure 2.4 Figure 2.5 Likewise, if you’re connecting two SCS.1d’s to a SCS.1m, then you would go from the free FireWire port on the first SCS.1d to a port on the second. Any other FireWire devices should go at the end of the chain and not before any of the SCS.1 controllers. Let’s take a look of the SCS.1d Setups. SCS.1d Setups The following configurations can be used for the SCS.1d for typical use cases: SCS.1m + SCS.1d This mixer‐and‐deck configuration can be used to emulate a dual‐deck setup by using virtual decks for controlling transport, loop, and effects, while using the mixer to blend and EQ songs and sounds. This system is the perfect entry into the world of ... -
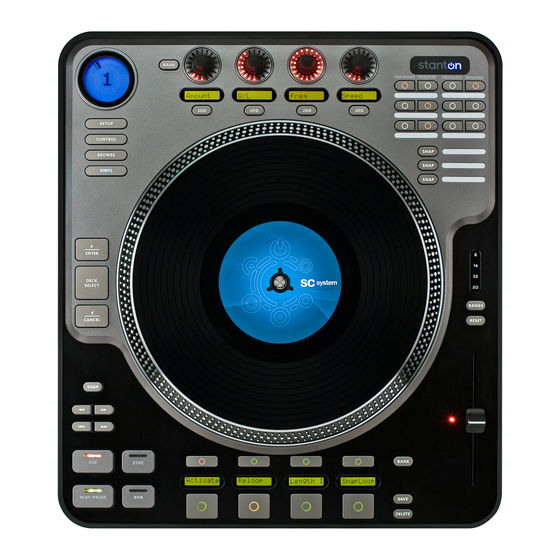
Page 8: Scs.1D Description
All manuals and user guides at all-guides.com SCS.1d Description In this chapter, we will briefly describe the top panel of the SCS.1d. It’s important to understand that the SCS.1d is a traditional DJ turntable / CD player “analogy” in a control surface. This means that while the SCS.1d looks like a DJ turntable / CD player, at its core, it is really a control surface that sends and receives control data to and from a computer. As a control surface, the SCS.1d’s functionality is completely derived from the host application (software) that it is controlling. The SCS.1d also utilizes presets in DaRouter to define its capabilities, which can drastically change its functionality depending on how the preset is configured. So as we discuss the panel and layout it is important to remember that when running a specific preset its best to read the documentation associated with that preset as it will explain how the SCS.1d is tailored towards the application it is being used with. So in the below explanations we describe the controls and how they traditionally may be mapped into an application. ... - Page 9 All manuals and user guides at all-guides.com Top Panel Functional Gro oups (continua ation) Figure 3.1 Now, let’s take a closer lo ook of each of the functiona l groups. 6 ...
-
Page 10: Encoder Section
All manuals and user guides at all-guides.com Encoder Section This section consists of four rotary push encoders, each with an LED encoder ring to indicate the value of the encoder, and an LCD “scribble strip” that can be used to indicate the functionality of each encoder. Encoders are used to control variable parameters such as effect levels. Encoders do not physically stop when you turn them; instead the LED encoder ... -
Page 11: Platter / Global Section
All manuals and user guides at all-guides.com Platter / Global Section This section controls the assignment of the platter as well as global functionality. The DECK SELECT button will allow you toggle virtual decks on screen. In this way when you switch virtual decks, the SCS.1d will also change its state to match the on screen deck. By using one physical SCS.1d you can control multiple virtual decks. The VINYL, CONTROL and BROWSE buttons all modify the motorized jogwheel’s functionality within the application. The motorized platter is normally used for scratching and scrubbing through a song when “VINYL” is activated. However, the Control button allows the platter to be freely used as a large parameter control such as scratching an ... -
Page 12: Pitch Section
All manuals and user guides at all-guides.com Pitch Section The pitch section represents a traditional pitch control found on a CD player or turntable. However, the key difference is that the pitch control is motorized to support functionality such as auto‐sync in an application and updating position when switching virtual decks. It’s important to not stop the motorized fader while it’s moving ... -
Page 13: Preset Switcher Section
All manuals and user guides at all-guides.com Preset Switcher Section The preset switcher section controls switching of presets on the SCS.1d. Presets are generally related towards switching presets for the encoder section, trigger section or pitch slider. Presets are groups of controls with functionality focused towards doing a single task. For instance, a loop preset will contain all the controls needed to create, move and modify a loop. Preset configuration and functionality ... -
Page 14: Scs.1 Software Installation
‐ In Windows, a high level FireWire driver must be installed to communicate with the SCS.1d. Once this driver is installed the SCS.1d and can communicate with DaRouter. Upon installing DaRouter, both the FireWire and virtual MIDI port driver are installed. It is important to not connect the SCS.1d until prompted. It is also important to connect all units that will be used when installing the driver (if using multiple SCS.1d’s or with a SCS.1m). In either case, (Mac or PC) the DaRouter software needs to be installed. This software acts as an intermediary ... - Page 15 All manuals and user guides at all-guides.com Windows XP 1. Double click the executable file (.exe). If the following Open File‐ Security Warning appears, click Run. (Figure 4.1) Figure 4.1 2. The Stanton SCS.1 DaRouter Setup Wizard will guide you through the installation process. Click Next. (Figure 4.2) Figure 4.2 12 ...
- Page 16 All manuals and user guides at all-guides.com 3. To install the software for the first time, choose the Standard option. To update your previously installed version, choose Custom. In this example, let’s choose Standard. (Figure 4.3) Figure 4.3 4. Read the License Agreement, select the “I accept the agreement” option, and then click Next. (Figure 4.4) Figure 4.4 13 ...
- Page 17 All manuals and user guides at all-guides.com 5. The installation of the ASIO / high level FireWire driver will begin. When you are ready, click Next. (Figure 4.5) Figure 4.5 6. In this step, you are able to choose where to install the driver. However, if you do not really need to change the location, leave the default setting and click Install. (Figure 4.6) Figure 4.6 14 ...
- Page 18 All manuals and user guides at all-guides.com 7. Files will begin to copy or if you are installing a new driver the old drivers will be uninstalled before new files are copied. When prompted to connect your devices (Figure 4.7), turn ON all SCS.1 devices to be used and then connect the FireWire cable from the device(s) to your computer and click OK. Figure 4.7 8. Wait for a few seconds, normal operation will resume shortly. (Figure 4.8) Figure 4.8 15 ...
- Page 19 All manuals and user guides at all-guides.com 9. Once the files are done copying click Next to continue. (Figure 4.9) Figure 4.9 10. Click Finish. (Figure 4.10) Figure 4.10 16 ...
- Page 20 All manuals and user guides at all-guides.com 11. Read information regarding this build of the installer then click Next. (Figure 4.11) Figure 4.11 12. Click Finish. (Figure 4.12) Figure 4.12 That’s it. You have installed the SCS.1d driver and DaRouter. 17 ...
- Page 21 My Computer icon and click Properties. In n the System P Properties win ndow, click the e Hardware ta b, and then t he Device Man nager button. (Figure 4.13) Figure 4 4.13 You w will see a new section called Stanton 1394 4 Audio Device es that include s the Stanton 1394 Virtual D Device and a hardware spe cific driver for each controlle er you have co onnected. Chec ck that the SCS S.1d device (or r other SCS.1 devices such a as a mixer) are attached to yo our computer.
-
Page 22: Mac Os
All manuals and user guides at all-guides.com Mac OS X To install DaRouter, first make sure that your SCS1 controller is not connected and then follow the next instructions 1. Double click the .dmg file to expand it. (Figure 4.16) Figure 4.16 2. Double click the DaRouter.pkg file to start the installer. (Figure 4.17) ... - Page 23 All manuals and user guides at all-guides.com 3. Once the installer has started, click Continue. (Figure 4.18) Figure 4.18 4. Read the license agreement and click Continue. In the next dialog, click Agree. (Figure 4.19) Figure 4.19 20 ...
- Page 24 All manuals and user guides at all-guides.com 5. Next, you can set the default path of the program. Click Install unless you want to install DaRouter to a specific destination. (Figure 4.20) Figure 4.20 6. DaRouter will be installed. Once done, click Close. (Figure 4.21) Figure 4.21 21 ...
- Page 25 All manuals and user guides at all-guides.com 7. DaRouter will be installed into your Applications folder and the presets will be placed in your home directory. Plug in your SCS.1 controller, power it ON, connect the FireWire cable to your computer, start DaRouter, and read the rest of this documentation. (Figure 4.22) Figure 4.22 Now that you have installed DaRouter, let’s learn about it. 22 ...
-
Page 26: Darouter
More importantl ly, presets can be created an nd edited freel y with virtually y no limit to w what SCS.1 con trollers can do o, thus opening up p a whole elem ment in contro ol surface DJing g. It is importa ant to constant tly check the S Stanton websit te and forums for r new presets. natomy of D DaRouter DaRouter i is the brains b ehind interact ion between S SCS.1 controlle ers and the app plication they a are being used d with. DaRouter ... - Page 27 All manuals and user guides at all-guides.com 5.2.1 ection A Active Preset D Dropdown he Active Pres set is the curr rently used pre eset. In this d rop down me nu, all re‐installed pr resets will be li isted as well as s any presets d dragged or ma anually oaded into Da Router. ...
- Page 28 Deferred Procedure Calls (DPC) Latency Checker (for more information please read the Appendix), and select the Sampling Rate, FireWire Latency, and ASIO Buffering settings. (Figure 5.4) Start / Stop Streaming – Use this to start or stop the audio stream between the driver and hardware. If streaming has been stopped, then no audio will be passed to the hardware. DPC Latency Tool – Stanton includes a troubleshooting tool for detecting high DPC latency. When there is high DPC latency apparent on a machine it can affect the performance of audio and MIDI streaming. You must have low DPC latency to achieve consistent performance and low latencies. ...
- Page 29 Figure 5.5 Pitch Bend d Sensitivity – – The SCS.1d a lso has the ab bility to detect t when the pla atter is being rubbed manua ally by hand to slo ow or speed th he track up. Th his is detected d when the pla atter and recor...
-
Page 30: Using Darouter
Stanton w website for the e latest preset ts as they are constantly be eing updated t to support ne ew functionalit ty and application ns! ... -
Page 31: Troubleshooting
All manuals and user guides at all-guides.com Troubleshooting I have both the SCS.1m and SCS.1d, and when I try to power them up nothing happens. What is wrong? You probably have the power supplies for each controller swapped. If you plug the wrong power cord into a unit, it won’t power up. The power cable for the SCS.1m supplies 12V, and the one for the SCS.1d supplies 24V. You can also tell which is which by the color‐coding. For example, gray for the SCS.1m and blue for the SCS.1d. Can I use the FireWire cable alone to power the SCS.1 controllers? No, the SCS.1 controllers require external power. We intentionally wanted power to be supplied to ... -
Page 32: Specifications
All manuals and user guides at all-guides.com Specifications Motor Type 16 Pole, 3 phase, brushless DC motor Motor Speeds 33 1/3 rpm, 45 rpm Starting Torque >4.5 kgf.cm Start / Stop Time .2 seconds FireWire Speed FireWire 400 Power 24 VDC / 3.0 Amps 29 ... -
Page 33: Appendix
When using any computer for live audio applications it is always suggested to perform certain optimizations to ensure consistent performance. For the most part live audio is not always the highest consideration for both hardware designers and software programmers. With that being said, Stanton has put together this guide and included one of the most widely used troubleshooting tools (DPC Latency Checker) with the SCS1 to help optimize ... - Page 34 All manuals and user guides at all-guides.com Figure A.1 The green Bar Graph sh ows the curre ent latency val ue over time. Each bar repr resents the ma aximum DPC la atency occurred w within one seco ond. Every sec cond, bars are scrolled from right to left an nd a new bar is s added at the e right‐ hand side, (representing the most rece ent value). DPC Late ncy Checker updates its internal sta tistical ...
- Page 35 All manuals and user guides at all-guides.com For examp ple, a typical pr roblem is show wn in the next f figure. Red bar s indicate exce essive DPC late ency. (Figure A .2) Figure A.2 So let’s op en Device Man nager to find o out the driver t that causes the e excessive DPC C latencies. On n your desktop p, right click My C omputer icon and click Prop perties. In the System Prope erties window, click the Hard dware tab, and d then click the D evice Manage r button. In th e next page, p lease check Fig...
- Page 36 All manuals and user guides at all-guides.com Figure A.3 Now, befo ore you start f finding out wh hich device cou uld be the cau use of the exc cessive DPC lat tency, please follow these sugg gestions: You should d not disable: ...
- Page 37 All manuals and user guides at all-guides.com To disable a device, right t‐click on it (e. .g. on the Ethe ernet adapter) and choose D isable. The dis sabled device w will be marked wi th a red cross. (Figure A.4) Figure A.4 Now, che eck the DPC Latency Che cker to see if the exces ssive latency values (red bars) ...
-
Page 38: Windows 1394A Bandwidth Limiting Issue / Sidspeed Fix (Windows Xp-Vista)
All manuals and user guides at all-guides.com Windows 1394a Bandwidth Limiting Issue / SidSpeed Fix (Windows XP‐Vista) First, let’s explain a little about what the SidSpeed Fix is. Basically, SidSpeed is a value in your windows registry that regulates the speed of your FireWire bus. It can have a value from 0‐3 (0=S100 speed, 1=S200 speed, 2=S400 speed, and 3=800 speed). If a SidSpeed value larger than 3 is used, then Windows will reject that and use a value of 0 instead, so it’s important to use a value of 0‐3. Normally, the default value for SidSpeed is 2, which corresponds to a transfer rate of 400 mbps (FireWire 400). This speed is standard for most audio interfaces, including ours. The problem is that there are situations where this value can be lowered to “0” during an OS update and result in choppy and unusable performance for streaming audio. This issue seems to have first been encountered in the SP2 update for Windows XP… http://support.microsoft.com/kb/885222 …and came back again with the XP SP3 update. ... - Page 39 All manuals and user guides at all-guides.com This will op pen your Regis stry Editor, wh ich will look lik ke this…(Figure e A.7) Figure A.7 Now, befo re we go any f further, we nee ed to give you a warning and back some th ings up. The registr ry is a dangero ous place to be e playing arou nd. Using this tool makes it very easy to c completely ruin n your installation n of Windows. Please do not t do anything t that isn’t outlin ned in this gui ide. If you have e any question n at all ...
- Page 40 All manuals and user guides at all-guides.com Now click F File, and then c click Export. A new window w will pop up. (Fi igure A.9) Figure A.9 At the bott tom of the new w window, the ere is an area c alled Export Ra ange. Make su ure that Selecte ed Branch is m arked, and that th he text in the f field there say ys HKEY_LOCAL L_MACHINE. G Go to the top o of the window and find the S Save In drop down n. Select a loca ation to save t he backup tha t you will rem ember (like yo our desktop). N Now go down ...
- Page 41 All manuals and user guides at all-guides.com Then expa nd the SYSTEM M branch. (Figu ure A.11) Figure A.11 Then expa nd CurrentCon ntrolSet. (Figur re A.12) Figure A.12 38 ...
- Page 42 All manuals and user guides at all-guides.com Now expan nd Enum. (Figu u re A.13) Figure A.13 39 ...
- Page 43 All manuals and user guides at all-guides.com Then expa nd the PCI bra nch. (Figure A. .14) Figure A.14 Now we n eed to find th e specific key for your FireW Wire controller . As you can s ee, all the dev vices are name e d in a way that d oes not seem to make a who ole lot of sense e. It is not as ha ard as it may lo ook. 40 ...
- Page 44 All manuals and user guides at all-guides.com Leave the Regedit windo ow open and go o back to Start t > Run. Type in n devmgmt.ms sc and then pre ess OK. (Figure e A.15) Figure A.15 This will op pen your Devic ce Manager. Lo ook for your Fi ireWire control ller (commonly y called IEEE 13 394). One exam mple is highlight ted in Figure A .16). Figure A.16 Right click on your FireW Wire device and d click Properti es. 41 ...
- Page 45 All manuals and user guides at all-guides.com Now click o on the Details tab. (Figure A. .17) Figure A.17 See this str ring of text? Th his is what we are going to lo ook for in the P PCI branch we h have open in R Regedit. Going back k to Regedit, w we can see that t I got a little lu ucky and have it as the first k ey. (Figure A.1 18) Figure A.18 42 ...
- Page 46 All manuals and user guides at all-guides.com If you expa and out the de evice subkey, y you’ll find ano ther subkey ca alled Device P arameters. Cli ck it to select it and look in the e right pane. (F igure A.19) Figure A.19 In the exa mple above, t the SidSpeed k key actually ex xists, but it is set to the inc orrect ...
- Page 47 All manuals and user guides at all-guides.com If you do n not have the S SidSpeed value e, you will need d to make one e. Right click in n the right pan ne and select N New > DWORD V alue. (Figure A A.21) Figure A.21 Once you h have created a a new string, na ame it SidSpee ed (Figure A.22 ) Figure A.22 Finally, do uble click SidS Speed and cha ange its value data to 3 as o outlined above e. Press OK an d close the Re egistry ...
-
Page 48: Firewire Chipsets
All manuals and user guides at all-guides.com FireWire C Chipsets High defin ition audio flow wing over FireW Wire requires a consistent st tream between n the chipset in n the host com mputer and the ch hipset in the SC CS1 device. Unf fortunately, so ome FireWire c chipsets have k known issues w when it comes to the reliability a and synchroni zation require ed for streamin ng audio. It is suggested to use ... - Page 49 All manuals and user guides at all-guides.com Model Type _________ Model No. _________ Serial No. ________________ Date of Purchase ________________________________________________ Thank you for choosing Stanton! Your satisfaction is extremely important to us. We proudly stand behind the quality of our work and appreciate that you put your trust in us. Registering your product will help us guarantee that you are kept up to date on our latest advances. Warranty Service in the United States: Please contact Stanton Tech Support BEFORE sending your product. In some cases, our Tech Support team can resolve your problem immediately, avoiding down time due to shipping delays. However, if Tech Support determines that a repair is needed; please call us at +1 954.316.1500 (Option 3) to obtain a Return Authorization Number (RA#) PRIOR to shipping your product to us. Warranty Service outside the United States: To initiate a warranty repair, please contact the authorized Stanton dealer from whom you purchased your product, and follow the dealer’s return policy. Save your shipping boxes and all packaging materials! For the fastest and safest product return to Stanton, please use the original shipping carton and packaging materials. Stanton cannot be responsible for any damages incurred during the shipping process due to poor or inadequate packing. Please remember to insure your shipment! 46 ...
- Page 50 All manuals and user guides at all-guides.com Stanton Warranty Through Stanton's authorized dealers around the World, Stanton, or one of Stanton's authorized distributors outside the U.S., will, without charge, repair or replace, at the sole discretion of the entity responsible for making the repair or providing the replacement, any Stanton merchandise proved defective in material or workmanship for a period of one (1) year following the date of original purchase. Exceptions to this warranty are as noted below: The warranty for mechanical parts which are subject to wear and tear are limited to either the earlier of thirty (30) days following the date of original purchase or for 10,000 cycles for switches. Stanton will warrant all replacement parts and repairs for ninety (90) days from the date of original shipment. Repairs made necessary by reason of misuse, alteration, normal wear, or accident are not covered under this warranty. Returns Authorized Stanton dealers are only authorized to sell and distribute merchandise within a specific country. All goods requiring warranty repair or replacement must be returned (freight prepaid if not hand‐delivered) to the authorized Stanton dealer from whom the merchandise was purchased and in the same country where the merchandise was purchased. For purposes of purchases made via the Internet, the merchandise must be returned to the authorized Stanton dealer in the country where the authorized Stanton dealer which sold the merchandise to purchaser is located and not the authorized Stanton dealer in the country where the purchaser is located or the country in which the merchandise was received. Any returns to a non‐authorized dealer or to an authorized Stanton dealer not in the same country as the merchandise was intended to be sold or as set forth above will void this warranty. To initiate a warranty repair, you must contact the authorized Stanton dealer from whom you purchased the merchandise, and follow such authorized Stanton dealer's return policy. Stanton assumes no risk and shall be subject to no liability for damages or loss resulting from the specific use or application made of the merchandise. Stanton's ...
- Page 51 SC System, DaRouter, SCS.1m, and SCS.1d are trademarks of the Stanton Group. All other trademarks are property of their respective owners, who are in no way affiliated with Stanton DJ or SC System products. All information included in the User Manual is subject to change without notice.
Need help?
Do you have a question about the SCS.1d and is the answer not in the manual?
Questions and answers