Lexmark E210 Setup Manual
Hide thumbs
Also See for E210:
- User manual (137 pages) ,
- Service manual (74 pages) ,
- Setup manual (34 pages)

Related Manuals for Lexmark E210


Summary of Contents for Lexmark E210
- Page 1 All manuals and user guides at all-guides.com Lexmark E210 Setup Guide May 2001 www.lexmark.com...
- Page 2 Lexington, Kentucky 40550, U.S.A. In the United Kingdom and Eire, send to Lexmark International Ltd., Marketing and Services Department, Westhorpe House, Westhorpe, Marlow Bucks SL7 3RQ. Lexmark may use or distribute any of the information you supply in any way it believes appropriate without incurring any obligation to you. You can purchase additional copies of publications related to this product by calling 1-800-553-9727.
-
Page 3: Table Of Contents
All manuals and user guides at all-guides.com Table of Contents Introducing Your Printer Special Features ......1.2 Printer Components . -
Page 4: Introducing Your Printer
All manuals and user guides at all-guides.com chapter Introducing Your Printer Congratulations on your purchase of the Lexmark E210 printer! This chapter provides information on the following topics: • Special Features • Printer Components... -
Page 5: Special Features
All manuals and user guides at all-guides.com Special Features Lexmark E210 is a versatile, productive printer equipped with special features that improve print quality, giving you a competitive edge. You can: Print with excellent quality • You can print at 600 dots per inch (dpi). See “Setting Graphic Properties”... - Page 6 All manuals and user guides at all-guides.com Special Features Create professional documents • You can customize your documents by using watermarks such as “Confidential.” See “Printing Watermarks” on page 5.14. • Preprinted forms and letterheads can be printed on plain paper.
-
Page 7: Printer Components
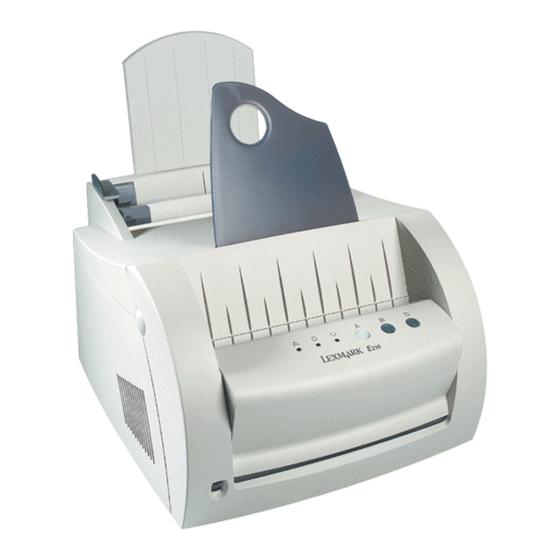
All manuals and user guides at all-guides.com Printer Components Paper support Paper output support Automatic input tray Face-down output slot Paper guides Manual input tray Output lever Front cover Face-up output slot Control panel NTRODUCING YOUR PRINTER... - Page 8 All manuals and user guides at all-guides.com Printer Components Print cartridge Front cover Power switch Parallel port Power receptacle USB port NTRODUCING YOUR PRINTER...
-
Page 9: Setting Up Your Printer
All manuals and user guides at all-guides.com chapter Setting Up Your Printer This chapter provides step-by-step information on setting up your printer. Topics included are: Unpacking Your Printer • STEP 1 : Installing the Print Cartridge • STEP 2 : Loading Print Media •... - Page 10 All manuals and user guides at all-guides.com Unpacking Your Printer Remove the printer and all accessories from the packing carton. Make sure that your printer has been Paper output packed with the items shown on the Print cartridge Power cord support right.
- Page 11 All manuals and user guides at all-guides.com Installing the Print Cartridge Pull the cover open. Remove the print cartridge from its bag and remove the paper covering from the print cartridge completely. Gently shake the cartridge from side to side to distribute the toner evenly. Note: If toner gets on your clothing, wipe it off with a dry cloth and wash the clothing in cold water.
- Page 12 All manuals and user guides at all-guides.com Installing the Print Cartridge Locate the cartridge slots, one on each side. Insert the cartridge until it snaps into place. Close the front cover securely. Note: When printing text at 5% coverage, expect a print cartridge life of approximately 2,000 pages (1,000 pages for the print cartridge that is shipped with the printer).
-
Page 13: Step 3 : Loading Print Media
All manuals and user guides at all-guides.com Loading Print Media Pull on the automatic input tray support until it stops. Before loading any print media, flex the sheets back and forth to loosen them, and then fan them. Tap the edges of the stack on a table top to straighten them. - Page 14 All manuals and user guides at all-guides.com Loading Print Media Do not load too much paper. This tray holds 150 sheets. Keep the paper below this height mark. Push the guide gently against the paper stack. Notes: • Do not push the width guide tightly causing the print media to warp. •...
-
Page 15: Step 4 : Connecting To The Computer With A Parallel Cable
All manuals and user guides at all-guides.com Connecting to the Computer with a Parallel Cable Make sure both the printer and the computer are turned off and unplugged. Plug the parallel printer cable into the connector as shown. Push the metal clips down to fit inside the notches on the cable plug. -
Page 16: Step 5 : Turning On The Printer
All manuals and user guides at all-guides.com Turning on the Printer Plug the power cord in as shown. Plug the other end into a properly grounded AC outlet. Turn on the power. To AC outlet Printing a Demo Page! As the printer powers up, all the printer control panel lights turn on briefly. -
Page 17: Step 7 : Installing The Printer Software
All manuals and user guides at all-guides.com Installing the Printer Software Included with your printer is a CD containing the printer driver for some of the most popular Windows-based software applications. To operate your printer, you must install a printer driver, which translates data from your application into data that the printer understands. - Page 18 All manuals and user guides at all-guides.com Installing the Printer Software Installing the Printer Software from the CD Place the CD in the CD-ROM drive. Installation begins automatically. If the CD-ROM drive does not automatically run: Select Run from the Start menu, and type x:\cdsetup.exe in the Open box (where x is the drive letter for the CD-ROM drive), and click OK.
- Page 19 All manuals and user guides at all-guides.com Installing the Printer Software Click Install the Lexmark Software on your PC. The Welcome window opens. Click Next. The files are copied into the appropriate directory. 2.11 ETTING RINTER...
- Page 20 All manuals and user guides at all-guides.com Installing the Printer Software Click Finish. Software Installation Tips If you have access to another computer with a CD-ROM I do not have a drive, you can use the Make Diskette utility in Windows to CD-ROM drive create the disks you need for the installation.
- Page 21 In Windows, after installation, the Uninstall icon in the Lexmark E210 program group allows you to select and printing software? remove any or all of the Lexmark E210 printing system components. If you are upgrading the printer driver, or if your installation fails, follow these instructions to uninstall the driver.
- Page 22 All manuals and user guides at all-guides.com Installing the Printer Software The Lexmark E210 printer driver and all of its components are removed from your computer. Click Finish. • Exit your software programs. Then, turn off your If you have installing computer and printer.
-
Page 23: Installing Software From Diskette
CD to install the software. Making Installation Diskettes You can make the installation diskettes for the Lexmark E210 printer driver. Make sure that you have several formatted diskettes ready, and then follow these steps: Insert the CD shipped with your printer into the CD-ROM drive. - Page 24 All manuals and user guides at all-guides.com Installing Software from Diskettes Click Make your own Diskette set of software. The Copy to Floppy dialog box appears. Select the floppy disk drive you will use to insert the diskette. Select the floppy drive you will use.
- Page 25 2. Make sure you label each diskette in order as you create it: Lexmark E210 driver, disk 1 of 2, and so If you have more than one disk, insert the next disk and click Yes.
- Page 26 All manuals and user guides at all-guides.com Installing Software from Diskettes Installing Software To install the printer driver from the diskettes, complete the following steps: Insert the first diskette (if the selected software diskettes are more than one). From the Start menu, select Run. Type A:\setup.exe in the Open box and click OK.
-
Page 27: Using The Control Panel
All manuals and user guides at all-guides.com chapter Using the Control Panel This chapter describes how to use the printer control panel. It provides information on the following topics: • Control Panel Buttons • Control Panel Lights... -
Page 28: Control Panel Buttons
All manuals and user guides at all-guides.com Control Panel Buttons The printer has three buttons: (Continue), (Cancel) and (Demo). Printing a demo page Press and hold for 2 seconds until the control panel lights blink slowly to print a demo page. The printer must be in Ready mode. - Page 29 All manuals and user guides at all-guides.com Control Panel Buttons Canceling a job Press and hold until the control panel lights blink to cancel a job the printer is currently printing. The light blinks while the print job is cleared from both the printer and the computer, and then returns to the Ready mode.
-
Page 30: Control Panel Lights
All manuals and user guides at all-guides.com Control Panel Lights The control panel lights indicate the status of your printer. If the light is on, the printer is experiencing an error. See “Troubleshooting Error Messages” on page 7.18. Control Panel Light Message Ready mode light is on and the printer is ready to print. - Page 31 Installing the Printer Software - Windows 98/Me Install To operate your printer with a Windows PC, you must install the Lexmark E210 USB printer driver. Place the Lexmark E210 CD in the CD-ROM drive and follow the instructions USB driver under “Installing the Printer Software from the CD”...
- Page 32 All manuals and user guides at all-guides.com Using Your Printer with a USB Cable Plug the other end into the USB port on the computer. The Add New Hardware Wizard dialog box appears. Click Next. Check Search for the best driver for your device and click Next.
- Page 33 All manuals and user guides at all-guides.com Using Your Printer with a USB Cable Check CD-ROM drive and click Browse, then choose x:\E210\Eng (or the desired language code)\USB (where x is the drive letter for the CD-ROM drive). Click Next. The USB driver will be installed.
- Page 34 Select the Lexmark E210 printer icon in the Printers folder. Select Properties from the File menu. Click the Details tab. Select USB: (E210) in the Print to the following port box. Click OK. The setup is now completed. RIVER AND...
Need help?
Do you have a question about the E210 and is the answer not in the manual?
Questions and answers