Lexmark E210 User Manual
Hide thumbs
Also See for E210:
- User manual (137 pages) ,
- Service manual (74 pages) ,
- Setup manual (34 pages)

Related Manuals for Lexmark E210


Summary of Contents for Lexmark E210
- Page 1 All manuals and user guides at all-guides.com Lexmark E210 User’s Guide May 2001 www.lexmark.com...
- Page 2 Lexington, Kentucky 40550, U.S.A. In the United Kingdom and Eire, send to Lexmark International Ltd., Marketing and Services Department, Westhorpe House, Westhorpe, Marlow Bucks SL7 3RQ. Lexmark may use or distribute any of the information you supply in any way it believes appropriate without incurring any obligation to you. You can purchase additional copies of publications related to this product by calling 1-800-553-9727.
-
Page 3: Table Of Contents
All manuals and user guides at all-guides.com Table of Contents Introducing Your Printer Special Features ......1.2 Printer Components . - Page 4 All manuals and user guides at all-guides.com Using Print Media Choosing Paper and Print Media ....4.2 Selecting the Output Location .....4.6 Printing on Paper .
- Page 5 All manuals and user guides at all-guides.com Troubleshooting Troubleshooting Checklist ......7.2 Solving General Printing Problems ....7.3 Clearing Jams .
-
Page 6: Introducing Your Printer
All manuals and user guides at all-guides.com chapter Introducing Your Printer Congratulations on your purchase of the Lexmark E210 printer! This chapter provides information on the following topics: • Special Features • Printer Components... -
Page 7: Special Features
All manuals and user guides at all-guides.com Special Features Lexmark E210 is a versatile, productive printer equipped with special features that improve print quality, giving you a competitive edge. You can: Print with excellent quality • You can print at 600 dots per inch (dpi). See “Setting Graphic Properties”... - Page 8 All manuals and user guides at all-guides.com Special Features Create professional documents • You can customize your documents by using watermarks such as “Confidential.” See “Printing Watermarks” on page 5.14. • Preprinted forms and letterheads can be printed on plain paper.
-
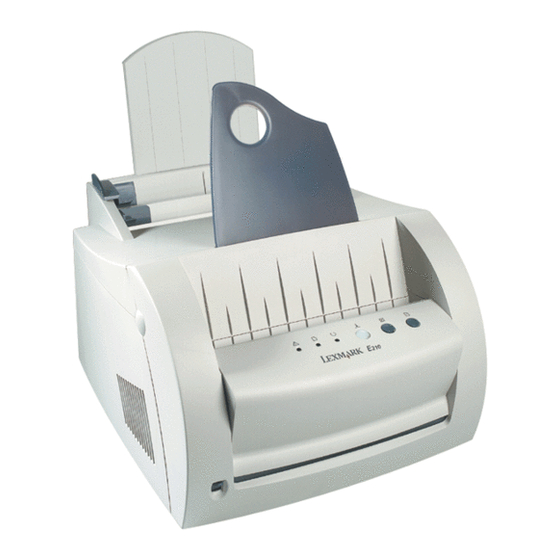
Page 9: Printer Components
All manuals and user guides at all-guides.com Printer Components Paper support Paper output support Automatic input tray Face-down output slot Paper guides Manual input tray Output lever Front cover Face-up output slot Control panel NTRODUCING YOUR PRINTER... - Page 10 All manuals and user guides at all-guides.com Printer Components Print cartridge Front cover Power switch Parallel port Power receptacle USB port NTRODUCING YOUR PRINTER...
-
Page 11: Setting Up Your Printer
All manuals and user guides at all-guides.com chapter Setting Up Your Printer This chapter provides step-by-step information on setting up your printer. Topics included are: Unpacking Your Printer • STEP 1 : Installing the Print Cartridge • STEP 2 : Loading Print Media •... - Page 12 All manuals and user guides at all-guides.com Unpacking Your Printer Remove the printer and all accessories from the packing carton. Make sure that your printer has been Paper output packed with the items shown on the Print cartridge Power cord support right.
- Page 13 All manuals and user guides at all-guides.com Installing the Print Cartridge Pull the cover open. Remove the print cartridge from its bag and remove the paper covering from the print cartridge completely. Gently shake the cartridge from side to side to distribute the toner evenly. Note: If toner gets on your clothing, wipe it off with a dry cloth and wash the clothing in cold water.
- Page 14 All manuals and user guides at all-guides.com Installing the Print Cartridge Locate the cartridge slots, one on each side. Insert the cartridge until it snaps into place. Close the front cover securely. Note: When printing text at 5% coverage, expect a print cartridge life of approximately 2,000 pages (1,000 pages for the print cartridge that is shipped with the printer).
-
Page 15: Step 3 : Loading Print Media
All manuals and user guides at all-guides.com Loading Print Media Pull on the automatic input tray support until it stops. Before loading any print media, flex the sheets back and forth to loosen them, and then fan them. Tap the edges of the stack on a table top to straighten them. - Page 16 All manuals and user guides at all-guides.com Loading Print Media Do not load too much paper. This tray holds 150 sheets. Keep the paper below this height mark. Push the guide gently against the paper stack. Notes: • Do not push the width guide tightly causing the print media to warp. •...
-
Page 17: Step 4 : Connecting To The Computer With A Parallel Cable
All manuals and user guides at all-guides.com Connecting to the Computer with a Parallel Cable Make sure both the printer and the computer are turned off and unplugged. Plug the parallel printer cable into the connector as shown. Push the metal clips down to fit inside the notches on the cable plug. -
Page 18: Step 5 : Turning On The Printer
All manuals and user guides at all-guides.com Turning on the Printer Plug the power cord in as shown. Plug the other end into a properly grounded AC outlet. Turn on the power. To AC outlet Printing a Demo Page! As the printer powers up, all the printer control panel lights turn on briefly. -
Page 19: Step 7 : Installing The Printer Software
All manuals and user guides at all-guides.com Installing the Printer Software Included with your printer is a CD containing the printer driver for some of the most popular Windows-based software applications. To operate your printer, you must install a printer driver, which translates data from your application into data that the printer understands. - Page 20 All manuals and user guides at all-guides.com Installing the Printer Software Installing the Printer Software from the CD Place the CD in the CD-ROM drive. Installation begins automatically. If the CD-ROM drive does not automatically run: Select Run from the Start menu, and type x:\cdsetup.exe in the Open box (where x is the drive letter for the CD-ROM drive), and click OK.
- Page 21 All manuals and user guides at all-guides.com Installing the Printer Software Click Install the Lexmark Software on your PC. The Welcome window opens. Click Next. The files are copied into the appropriate directory. 2.11 ETTING RINTER...
- Page 22 All manuals and user guides at all-guides.com Installing the Printer Software Click Finish. Software Installation Tips If you have access to another computer with a CD-ROM I do not have a drive, you can use the Make Diskette utility in Windows to CD-ROM drive create the disks you need for the installation.
- Page 23 In Windows, after installation, the Uninstall icon in the Lexmark E210 program group allows you to select and printing software? remove any or all of the Lexmark E210 printing system components. If you are upgrading the printer driver, or if your installation fails, follow these instructions to uninstall the driver.
- Page 24 All manuals and user guides at all-guides.com Installing the Printer Software The Lexmark E210 printer driver and all of its components are removed from your computer. Click Finish. • Exit your software programs. Then, turn off your If you have installing computer and printer.
-
Page 25: Installing Software From Diskette
CD to install the software. Making Installation Diskettes You can make the installation diskettes for the Lexmark E210 printer driver. Make sure that you have several formatted diskettes ready, and then follow these steps: Insert the CD shipped with your printer into the CD-ROM drive. - Page 26 All manuals and user guides at all-guides.com Installing Software from Diskettes Click Make your own Diskette set of software. The Copy to Floppy dialog box appears. Select the floppy disk drive you will use to insert the diskette. Select the floppy drive you will use.
- Page 27 2. Make sure you label each diskette in order as you create it: Lexmark E210 driver, disk 1 of 2, and so If you have more than one disk, insert the next disk and click Yes.
- Page 28 All manuals and user guides at all-guides.com Installing Software from Diskettes Installing Software To install the printer driver from the diskettes, complete the following steps: Insert the first diskette (if the selected software diskettes are more than one). From the Start menu, select Run. Type A:\setup.exe in the Open box and click OK.
-
Page 29: Using The Control Panel
All manuals and user guides at all-guides.com chapter Using the Control Panel This chapter describes how to use the printer control panel. It provides information on the following topics: • Control Panel Buttons • Control Panel Lights... -
Page 30: Control Panel Buttons
All manuals and user guides at all-guides.com Control Panel Buttons The printer has three buttons: (Continue), (Cancel) and (Demo). Printing a demo page Press and hold for 2 seconds until the control panel lights blink slowly to print a demo page. The printer must be in Ready mode. - Page 31 All manuals and user guides at all-guides.com Control Panel Buttons Canceling a job Press and hold until the control panel lights blink to cancel a job the printer is currently printing. The light blinks while the print job is cleared from both the printer and the computer, and then returns to the Ready mode.
-
Page 32: Control Panel Lights
All manuals and user guides at all-guides.com Control Panel Lights The control panel lights indicate the status of your printer. If the light is on, the printer is experiencing an error. See “Troubleshooting Error Messages” on page 7.18. Control Panel Light Message Ready mode light is on and the printer is ready to print. -
Page 33: Using Print Media
All manuals and user guides at all-guides.com chapter Using Print Media This chapter explains the kinds of print media you can use with the Lexmark E210 printer and how to properly load the different input trays for the best print quality. Topics included are: •... -
Page 34: Choosing Paper And Print Media
All manuals and user guides at all-guides.com Choosing Paper and Print Media You can print on a variety of print media, such as plain paper, envelopes, labels, transparencies, card stocks, and so on. See “Print Media Specifications” on page A.3. To get the best possible print quality, use only high-quality copier-grade paper. - Page 35 All manuals and user guides at all-guides.com Choosing Paper and Print Media Print Media Sizes and Capacities Input Source/Capacity* Media Size Automatic Input Tray Manual Input Tray Plain Paper Letter 216 x 279 mm (8.5 x 11 in.) Legal 216 x 356 mm (8.5 x 14 in.) Executive 184 x 267 mm (7.25 x 10.5 in.) A4 210 x 297 mm (8.27 x 11.7 in.) A5 148 x 210 mm (5.83 x 8.27 in.)
- Page 36 All manuals and user guides at all-guides.com Choosing Paper and Print Media Print Media Guidelines When selecting or loading paper, envelopes, or other special print media, follow these guidelines: • Attempting to print on damp, curled, wrinkled, or torn print media can cause jams and poor print quality.
- Page 37 All manuals and user guides at all-guides.com Choosing Paper and Print Media • Preprinted forms must be printed with nonflammable, heat- resistant inks that do not melt, vaporize, or release hazardous emissions when subject to the printer fusing temperature of approximately 400°F (205°C) for 0.1 second.
-
Page 38: Selecting The Output Location
All manuals and user guides at all-guides.com Selecting the Output Location The printer has two output locations: the face-up output slot and the face-down output slot. You can select the output location by changing the position of the output lever on the front of the printer. - Page 39 All manuals and user guides at all-guides.com Selecting the Output Location Printing to the Face-Up Output Slot The printer prints to the face-up output slot if the slot is open. Push the output lever down to open the slot. Paper comes out of the printer face-up.
-
Page 40: Printing On Paper
All manuals and user guides at all-guides.com Printing on Paper Proper paper loading helps prevent jams and ensure trouble-free printing. Do not remove paper from any tray while a job is printing. Doing so may cause a jam. Using the Automatic Input Tray The automatic input tray holds 150 sheets of 20 lb paper or five sheets of special media. - Page 41 All manuals and user guides at all-guides.com Printing on Paper Place a sheet of paper in the manual input tray with the print side up. Push the paper guide gently against the paper. Push the output lever down to open the face-up output slot.
- Page 42 All manuals and user guides at all-guides.com Printing on Paper Print the document. Note: If you are printing multiple pages, load the next sheet after the first page prints. Press to start feeding. 4.10 SING RINT EDIA...
-
Page 43: Printing On Envelopes
All manuals and user guides at all-guides.com Printing on Envelopes Guidelines • Only use envelopes recommended for laser printers. • Before you load envelopes in the input tray, make sure that they are undamaged and are not stuck together. • Do not feed stamped envelopes. •... - Page 44 All manuals and user guides at all-guides.com Printing on Envelopes Push the guide to the edge of the envelope stack. Push the output lever down. When you print on envelopes, configure the source, type and size properly in the software application. For details, see page 5.4.
- Page 45 All manuals and user guides at all-guides.com Printing on Envelopes Print the document. After printing, push the output lever 4.13 SING RINT EDIA...
-
Page 46: Printing On Heavy Paper
All manuals and user guides at all-guides.com Printing on Heavy Paper Guidelines • Heavy paper is any paper heavier than 24 lb (90 g/m ). For cotton papers, you can use 24 lb paper. The maximum paper weight available for your printer is 43 lb (163 •... - Page 47 All manuals and user guides at all-guides.com Printing on Heavy Paper Push the output lever down. When you print on heavy paper, select Bond in the Paper Type section, and then configure the paper source and size in the software application.
-
Page 48: Printing On Labels
All manuals and user guides at all-guides.com Printing on Labels Guidelines • Only use paper labels recommended for laser printers. • Verify that the label adhesive material can tolerate fusing temperature of 200°C (392°F) for 0.1 second. • Make sure that there is no exposed adhesive material between the labels. Exposed areas can cause labels to peel off during printing, which can cause paper jams. - Page 49 All manuals and user guides at all-guides.com Printing on Labels Push the output lever down. When you print on labels, configure the source, type and size in the software application. For details, see page 5.4. Print the document. Note: To prevent labels from sticking together, do not let the printed label sheets stack up as they are printed out.
-
Page 50: Printing On Transparencies
All manuals and user guides at all-guides.com Printing on Transparencies Guidelines • Only use transparencies recommended for use in laser printers. • Make sure that the transparencies are not wrinkled or curled, and that they do not have any torn edge. •... - Page 51 All manuals and user guides at all-guides.com Printing on Transparencies Push the output lever down. When you print on transparencies, configure the source, type and size in the software application. For details, see page 5.4. Print the document. Notes: • To prevent transparencies from sticking together, do not let the printed sheets stack up as they are printed out.
-
Page 52: Printing On Preprinted Paper
All manuals and user guides at all-guides.com Printing on Preprinted Paper Preprinted paper is a form with some type of printing on it before it is sent through the printer, such as a letterhead sheet having a preprinted logo or text located at the top of the page. -
Page 53: Printing On Card Stock
All manuals and user guides at all-guides.com Printing on Card Stock Postcards and 3 by 5 in. (index) cards can be printed with your printer. Guidelines • Always insert the short-edge first into the input tray. If you want to print in landscape mode, make this selection through your software. - Page 54 All manuals and user guides at all-guides.com Printing on Card Stock Configure the source, size and type in the software application. For details, see page 5.4. Print the document. 4.22 SING RINT EDIA...
-
Page 55: Printing Tasks
All manuals and user guides at all-guides.com chapter Printing Tasks This chapter explains your printing options and some common printing tasks. Topics included are: • Printing a Document • Printing Multiple Pages on One Sheet of Paper (N-Up Printing) • Fitting Your Document to a Selected Paper Size •... -
Page 56: Printing A Document
All manuals and user guides at all-guides.com Printing a Document The following procedure describes the steps required for printing from various Windows-based applications. The exact steps for printing a document may vary depending on the software application program. Refer to your software application documentation for the exact printing procedure. - Page 57 If you see Setup, Printer, or Options, click that button instead. Then, click Properties in the next screen. The Lexmark E210 Properties dialog box lets you access and change printer settings. If necessary, click the Paper tab to display the settings shown as follows.
- Page 58 All manuals and user guides at all-guides.com Printing a Document Select Auto Select from the Paper Source options box unless you are printing with special print media. To print with special print media, select Manual and feed one sheet at a time into the printer. See page 4.8. Select Plain Paper from the Paper Type options box unless you want to use a different kind of print media.
- Page 59 All manuals and user guides at all-guides.com Printing a Document Click the other tabs on the top of the Properties dialog box to access other features, if needed. When you complete the print settings, click OK until the Print dialog box displays. Click OK to start printing.
- Page 60 All manuals and user guides at all-guides.com Printing a Document Select the Lexmark E210 printer icon. Right-click the mouse button and select Properties to open the properties window. Canceling a Print Job There are two ways to cancel a print job.
- Page 61 ? from the upper right corner, and then click on any setting. These help screens give detailed information about the printer features provided by the Lexmark E210 printer driver. To restore the default printer properties setting when you change the print settings, click Default in the Lexmark E210 Properties dialog box.
-
Page 62: Printing Multiple Pages On One Sheet Of Paper
All manuals and user guides at all-guides.com rinting Multiple Pages on One Sheet of Paper (N-Up Printing) You can select the number of pages you want to print on a single sheet of paper. If you choose to print more than one page per sheet, the pages appear decreased in size and arranged on the sheet. -
Page 63: Fitting Your Document To A Selected Paper Size
All manuals and user guides at all-guides.com Fitting Your Document to a Selected Paper Size This printer feature lets you scale your print job to any selected print media size regardless of the digital document size. This can be useful when you want to check fine details on a small document. -
Page 64: Printing Posters
All manuals and user guides at all-guides.com Printing Posters This feature lets you print a single-page document on 4, 9 or 16 sheets of paper, which can be pasted together to form one poster-size document. To change the print settings from your software application, access the printer properties. - Page 65 All manuals and user guides at all-guides.com Printing Posters To determine the scaling factor, select the Style: 2x2, 3x3, 4x4, 5x5 or 6x6. For example, if you select 2x2, the output is automatically stretched to cover 4 physical pages. 2 x 2 3 x 3 You may specify an overlap in pixel to make it easier to reconstruct the resulting poster.
-
Page 66: Setting Graphic Properties
All manuals and user guides at all-guides.com Setting Graphic Properties Use the following options to adjust the print quality for your specific printing needs when you access the printer properties. See page for more information on accessing printer properties. If necessary, click the Graphic tab to display the settings shown below. - Page 67 All manuals and user guides at all-guides.com Setting Graphic Properties You can select the printing resolution by choosing either Resolution 300 dpi or 600 dpi. The higher the setting, the sharper the clarity of printed characters and graphics. Higher settings may increase the time it takes to print a document.
-
Page 68: Printing Watermarks
All manuals and user guides at all-guides.com Printing Watermarks The Watermark option lets you print text over an existing document. For example, you may want to have large gray letters reading “Draft” or “Confidential” printed diagonally across the first page or all pages of a document. There are several predefined watermarks that come with the printer, and they can be modified or you can add new ones to the list. - Page 69 All manuals and user guides at all-guides.com Printing Watermarks To create or To change the print settings from your software application, access the printer properties. See page edit a to access the printer properties. watermark Click the Watermark tab, and enter the text message in the Text field.
- Page 70 All manuals and user guides at all-guides.com Printing Watermarks If you created a new watermark or edited an existing one, the Add and Update buttons are enabled. To add a new watermark to the list, click Add. If you want to edit a watermark, select the watermark you want from the list, edit and then click Update.
- Page 71 You need only tell the printer to print the letterhead overlay on your document. Regards Lexmark Creating a New To use a page overlay, you must create a new page overlay containing your logo or image.
- Page 72 All manuals and user guides at all-guides.com Using Page Overlay Click the Overlays tab, and click Create Overlay. In the Create Overlay dialog box, type a name of up to eight characters in the File name box. Select the destination path if necessary. (The default is C:\FORMOVER).
- Page 73 All manuals and user guides at all-guides.com Using Page Overlay Printing an After an overlay has been created, it is ready to be printed with your document. To print an overlay with a document: Overlay in Your Document Create or open the document you want to print. To change the print settings from your software application, access the printer properties.
- Page 74 All manuals and user guides at all-guides.com Using Page Overlay After you select the file, click OK. The file is now shown in the Overlay List box and is available for printing. Select the overlay from the Overlay List box. If necessary, click Query Page Overlay.
- Page 75 All manuals and user guides at all-guides.com Using Page Overlay Click OK or Yes until the printing starts. The selected overlay is downloaded with your print job and printed on your document. Deleting a Page You can delete page overlays that are no longer used. Overlay In the Printer Properties dialog box, click the Overlays tab.
-
Page 76: Printing On A Network Environment
Windows 9x, Me, NT 4.0 or 2000 network printer connection. Note: You need to install the Lexmark E210 printer driver on each computer connected to the printer. Setting Up the Host Computer Start Windows. - Page 77 All manuals and user guides at all-guides.com Printing on a Network Environment Setting Up the Client PC Right-click Start, and select Explore. Open your network folder in the left column. Right-click the shared name, and select Capture Printer Port. Select the port you want, check the Reconnect at log on box, and then click OK.
-
Page 78: Maintaining Your Printer
All manuals and user guides at all-guides.com chapter Maintaining Your Printer This chapter provides suggestions for high-quality and economical printing, and information for maintaining the print cartridge and the printer. Topics included are: • Maintaining the Print Cartridge • Cleaning the Printer... -
Page 79: Maintaining The Print Cartridge
Canada, call 1-800-438-2468 for information about Lexmark cartridge Authorized Supplies Dealers in your area, or visit the Lexmark Web site at www.lexmark.com. In other countries, contact the place where you bought your printer. Print cartridge To get the most from the print cartridge, follow these... - Page 80 All manuals and user guides at all-guides.com Maintaining the Print Cartridge Redistributing Toner When toner is low, faded or light areas may appear on a printed page. You may be able to temporarily improve print quality by redistributing the toner. The following procedures may let you finish the current print job before replacing the print cartridge.
- Page 81 All manuals and user guides at all-guides.com Maintaining the Print Cartridge Gently shake the print cartridge from side to side 5 or 6 times to redistribute the toner. Note: If the toner gets on your clothing, wipe it off with a dry cloth and wash the clothing in cold water.
- Page 82 All manuals and user guides at all-guides.com Maintaining the Print Cartridge Firmly close the cover. Notes: • If the print remains light, remove the used catridge and install a new print cartridge. See "Installing the Print Cartridge" on page 2.3. AINTAINING RINTER...
-
Page 83: Cleaning The Printer
All manuals and user guides at all-guides.com Cleaning the Printer To maintain print quality, complete the cleaning procedures as follows every time the print cartridge is replaced or whenever print quality problems occur. As much as possible, keep the printer free from dust and debris. Warning! •... - Page 84 All manuals and user guides at all-guides.com Cleaning the Printer With a dry, lint-free cloth, wipe away any dust and spilled toner from the print cartridge area and the print cartridge cavity. Warning! To prevent damage to the print cartridge, do not expose it to light for more than a few minutes.
- Page 85 All manuals and user guides at all-guides.com Cleaning the Printer Printing a Printing a cleaning sheet cleans the drum inside the print cartridge. Use this process if you are experiencing blurred, cleaning sheet faded or smeared printouts. This process produces a page with toner debris.
-
Page 86: Troubleshooting
All manuals and user guides at all-guides.com chapter Troubleshooting This chapter gives helpful information on what to do if you encounter a printer error. It provides information on the following topics: • Troubleshooting Checklist • Solving General Printing Problems • Clearing Jams •... -
Page 87: Troubleshooting Checklist
All manuals and user guides at all-guides.com Troubleshooting Checklist If the printer is not working properly, complete the following checklist in order. If the printer does not pass a step, follow the corresponding troubleshooting suggestions. Check Solution Make sure that the light on •... -
Page 88: Solving General Printing Problems
Check the power print. switch and the power source. Your printer is not selected Select Lexmark E210 as your default as the default printer. printer. Check the printer for the • The printer cover is not closed. - Page 89 From the Start menu, choose Settings Spooling Setting may be and Printers. Right-click the Lexmark set incorrectly. E210 printer icon, choose Properties, click the Details tab, and then choose the Spool Settings button. Select the spool setting you want from the available choices.
- Page 90 All manuals and user guides at all-guides.com Solving General Printing Problems Solution Possible Cause Problem Simplify the page layout and remove The page layout is too Half of the page is any unnecessary graphics from the complex. blank. document, if possible. Change the page orientation in your The page orientation application.
- Page 91 Note: If printing is light or faded after approximately 50,000 pages, the transfer roller has reached its life expectancy and must be replaced. In the United States and Canada, call Lexmark Service at 1-800-Lexmark (1-800-539- 6275). For other countries, refer to the numbers listed on the drivers CD.
-
Page 92: Clearing Jams
All manuals and user guides at all-guides.com Clearing Jams Occasionally, print media can jam during a print job. Some of the causes include: • The tray is loaded improperly or overfilled. • The tray has been removed during a print job. •... - Page 93 All manuals and user guides at all-guides.com Clearing Jams If print media is jammed in the face-up output slot, carefully remove the print media as shown. Open and close the front cover. Resume printing. Note: If the and the lights do not turn off, there is still jammed print media inside the printer.
- Page 94 All manuals and user guides at all-guides.com Clearing Jams Open and close the front cover to resume printing. Inside the Printer Note: Print media jams in this area may result in loose toner on the page. If you get any toner on your clothes, wash them in cold water because hot water sets the toner into the fabric.
- Page 95 All manuals and user guides at all-guides.com Clearing Jams Remove the print cartridge by pulling up and towards the front of the printer. Warning! To prevent damage to the print cartridge, do not expose it to light for more than a few minutes.
- Page 96 All manuals and user guides at all-guides.com Clearing Jams Tips for Avoiding Jams By selecting correct print media types and loading them properly, you should be able to avoid most jams. If jams occur, follow the steps outlined in “Clearing Jams” on page 7.7.
-
Page 97: Solving Print Quality Problems
All manuals and user guides at all-guides.com Solving Print Quality Problems Print Quality Checklist General print quality problems can be solved by using the following checklist. • Redistribute the toner in the print cartridge (see “Redistributing Toner” on page 6.3). •... - Page 98 All manuals and user guides at all-guides.com Solving Print Quality Problems Solution Problem • The print media may not meet specifications (for example, if Toner specks the print media is too moist or too rough). See “Print Media Specifications” on page A.3. AaBbCc AaBbCc AaBbCc...
- Page 99 All manuals and user guides at all-guides.com Solving Print Quality Problems AaBbCc AaBbCc AaBbCc AaBbCc AaBbCc AaBbCc AaBbCc AaBbCc AaBbCc AaBbCc Solution Problem If the amount of background toner shading becomes Gray background unacceptable, the following procedures may clear the condition: AaBbCc AaBbCc...
- Page 100 All manuals and user guides at all-guides.com Solving Print Quality Problems AaBbCc AaBbCc AaBbCc AaBbCc AaBbCc Solution Problem Background scatter results from bits of toner distributed on the Background scatter printed page. AaBbCc AaBbCc • The print media may be too damp. Try printing with a AaBbCc different batch of print media.
- Page 101 AaBbCc All manuals and user guides at all-guides.com AaBbCc Solving Print Quality Problems AaBbCc AaBbCc AaBbCc AaBbCc Solution Problem AaBbCc AaBbCc AaBbCc AaBbCc AaBbCc AaBbCc • Check the type and quality. Both high temperature and Curl or wave AaBbCc AaBbCc AaBbCc humidity will cause curl.
- Page 102 AaBbCc All manuals and user guides at all-guides.com AaBbCc AaBbCc Solving Print Quality Problems AaBbCc Solution Problem • Clean the inside of the printer. See “Cleaning the Inside” on Loose toner page 6.6. AaBbCc • Check the type and quality of print media. See “Print Media AaBbCc Specifications”...
-
Page 103: Troubleshooting Error Messages
All manuals and user guides at all-guides.com Troubleshooting Error Messages When the printer experiences an error, the control panel indicates error messages by the indicator lights. The following printer light patterns give the solutions to clear the print errors. Printer Light Patterns Light status legend symbol for “light off”... - Page 104 All manuals and user guides at all-guides.com Troubleshooting Error Messages Waiting for the Continue button to be pressed While printing in the manual feed mode, the printer is waiting for the button to be pressed. • Press the button on the control panel to start printing. You must press the button to print each page after loading print media into the manual input tray.
-
Page 105: Solving Common Windows Problems
• From the Start menu, select Settings, and then Printers. Right-click on the Lexmark E210 printer icon and select Properties. From the Details tab, click on Port Settings. Remove check from Check Port State before Printing box and click OK. -
Page 106: Appendix A: Driver And Printer Specifications
All manuals and user guides at all-guides.com Appendix A: Driver and Printer Specifications This appendix provides information on the following topics: • Printer Specifications • Print Media Specifications • Using Your Printer with a USB cable • Linux Driver Installation... -
Page 107: Printer Specifications
All manuals and user guides at all-guides.com Printer Specifications Specification and Description Item Speed 12 ppm Resolution 600 dpi First Printing Time Less than 13 seconds Warmup Time 30 seconds Power Rating AC 100 ~ 127 V (USA, Canada) / 220 ~ 240 V (Others), 50 / 60 Hz Power Consumption 250 W average during operation / Less than 10 W in sleep mode Acoustic Noise... -
Page 108: Print Media Specifications
This might be the result of improper handling, unacceptable temperature and humidity levels or other variables over which Lexmark has no control. • Before purchasing large quantities of print media, make sure the paper meets the requirements specified in this manual. - Page 109 All manuals and user guides at all-guides.com Print Media Specifications Supported Sizes of Print Media Print Media Dimensions Weight Capacity Letter 8.5 x 11 in. (216 x 279 mm) • 150 sheets of 20 lb bond (75 g/m 210 x 297 mm (8.3 x 11.7 in.) paper for the 16 to 24 lb Executive...
- Page 110 All manuals and user guides at all-guides.com Print Media Specifications Guidelines for Using Paper For best results, use conventional 75 g/m (20 lb) paper. Make sure the paper is of good quality, and free of cuts, nicks, tears, spots, loose particles, dust, wrinkles, voids and curled or bent edges.
- Page 111 All manuals and user guides at all-guides.com Print Media Specifications Paper Specifications Category Specifications Acid Content 5.5 - 8.0 pH Caliper .094 - .18 mm (3.0 - 7.0 mils) Curl in Ream Flat within 5 mm (.02 in.) Cut Edge Conditions Cut with sharp blades with no visible fray.
- Page 112 All manuals and user guides at all-guides.com Print Media Specifications Printer and Print Media Storage Environment Ideally, the printer and print media storage environment should be at or near room temperature, and not too dry or humid. Remember that print media, such as paper, envelopes or card stock, is hygroscopic;...
- Page 113 All manuals and user guides at all-guides.com Print Media Specifications Guidelines for Using Envelopes Envelope construction is critical. Envelope fold lines can vary considerably, not only between manufacturers, but also within a box from the same manufacturer. Successful printing on envelopes depends upon the quality of the envelopes.
- Page 114 All manuals and user guides at all-guides.com Print Media Specifications Envelopes with Double side-seams construction has vertical seams at both ends of the envelope rather than diagonal seams. This style Double Side may be more likely to wrinkle. Be sure the seam extends all Seams the way to the corner of the envelope as illustrated below.
- Page 115 All manuals and user guides at all-guides.com Print Media Specifications Guidelines for Using Labels Warning! • To avoid damaging the printer, use only labels recommended for laser printers. • To prevent serious jams, always use the face-up output slot. • Never print on the same sheet of labels more than once or print on a partial sheet of labels.
-
Page 116: Using Your Printer With A Usb Cable
Installing the Printer Software - Windows 98/ME Install To operate your printer with a Windows PC, you must install the Lexmark E210 USB printer driver. Place the Lexmark E210 CD in the CD-ROM drive and follow the instructions USB driver under “Installing the Printer Software from the CD”... - Page 117 All manuals and user guides at all-guides.com Using Your Printer with a USB Cable Plug the other end into the USB port on the computer. The Add New Hardware Wizard dialog box appears. Click Next. Check Search for the best driver for your device and click Next.
- Page 118 All manuals and user guides at all-guides.com Using Your Printer with a USB Cable Check CD-ROM drive and click Browse, then choose x:\USB (where x is the drive letter for the CD-ROM drive). Click Next. The USB driver will be installed. Follow the instructions on the screen to complete the installation.
- Page 119 Select the Lexmark E210 printer icon in the Printers folder. Select Properties from the File menu. Click the Details tab. Select USB: (E210) in the Print to the following port box. Click OK. The setup is now completed. A.14...
- Page 120 All manuals and user guides at all-guides.com Using Your Printer with a USB Cable Frequently Asked Questions About USB What is USB? Universal Serial Bus (USB) makes it easy to connect devices to your computer without having to open your PC. USB uses a standard port and plug combination for connecting devices like printers, modems, scanners and digital cameras.
- Page 121 All manuals and user guides at all-guides.com Using Your Printer with a USB Cable Can other users on my USB chain print to my Lexmark E210 printer on the USB chain? Yes. Windows 98 allows you to “share” your printer using software settings on your computer.
-
Page 122: Linux Driver Installation
CD-ROM drive, ask a system administrator. To mount the CD-ROM drive: Insert the Lexmark E210 CD into the CD-ROM drive. Mount the CD-ROM drive under a directory, such as /mnt, in order to access the files on the CD-ROM: >mount -t iso9660 /dev/cdrom /mnt/cdrom... - Page 123 All manuals and user guides at all-guides.com Linux Driver Installation Install the Note: Ghostscript may already be installed in your Linux machine. To support the Lexmark printer Ghostscript. GDI, you must update the ghostscript. If you are not sure whether the ghostscript is already installed in your machine, use the command: >rpm -q ghostscript (you can see the version of...
- Page 124 Device option. Click the Select button in the Input Filter to access filter setup. Select Lexmark Printer GDI Compatible for the Printer Type item. Then select the default resolution and paper size. To save the setting, press the OK button.
-
Page 125: Appendix B: Safety
All manuals and user guides at all-guides.com Appendix B: Safety... - Page 126 • This product is designed, tested, and approved to meet strict global safety standards with the use of specific Lexmark components. The safety features of some parts may not always be obvious. Lexmark is not responsible for the use of other replacement parts. • Your product uses a laser.
- Page 127 All manuals and user guides at all-guides.com Appendix C: Notices...
- Page 128 All manuals and user guides at all-guides.com Notices Laser Notice The Lexmark E210 printer is certified in the U.S. to conform to the requirements of DHHS 21 CFR Subchapter J for Class I (1) laser products, and elsewhere is certified as a Class I laser product conforming to the requirements of IEC 825.
- Page 129 All manuals and user guides at all-guides.com Appendix D: Warranty This appendix provides information on your printer warranty.
- Page 130 Lexmark E210 This Statement of Limited Warranty applies to this product if it was originally purchased for your use, and not for resale, from Lexmark or a Lexmark remarketer, referred to in this statement as “Remarketer.” Warranty Lexmark warrants that this product: •...
- Page 131 To obtain warranty service you may be required to present proof of original purchase. Warranty service will be provided at your location at a Remarketer or a Lexmark designated location. You may be required to deliver your product to the Remarketer or Lexmark, or ship it prepaid and suitably packaged to a Lexmark designated location.
- Page 132 • Failure to have installed a maintenance kit as specified (if applicable) • Use of printing media outside of Lexmark specifications • Use of other than Lexmark supplies (such as print cartridges, inkjet cartridges, and ribbons) • Use of other than Lexmark product or component...
- Page 133 Lexmark is legally liable. In no event will Lexmark be liable for any lost profits, lost savings, incidental damage, or other economic consequential damages. This is true even if you advise Lexmark or a Remarketer of the possibility of such damages.
- Page 134 All manuals and user guides at all-guides.com Index automatic input tray face-down output bin 4.6 loading paper 4.8 face-up output slot 4.7 paper source setting 5.4 features 1.2 fitting to a selected paper size 5.9 cancel, print job 5.6 Cancel button 3.3 graphic properties 5.12 card stock, print 4.21 cleaning, printer 6.6...
- Page 135 All manuals and user guides at all-guides.com Index loading print media paper out, indication 3.4, 7.18 in the automatic input tray 2.5, 4.8 paper source, setting 5.4 in the manual input tray 4.8 parallel connection 2.7 posters, printing 5.10 print cartridge cleaning 6.5 installing 2.3 life expectancy 6.2...
- Page 136 All manuals and user guides at all-guides.com Index printer driver see driver specifications printer software, installing 2.9 printer printer setup 2.2 print media A.3 printing system error 7.19 cancel 5.6 cleaning sheet 6.8 demo page 2.8 fitting to a selected paper size 5.9 general problems, solving 7.3 help 5.7 transparencies, printing 4.18...
- Page 137 All manuals and user guides at all-guides.com P/N: 10S0152 E.C.: Lexmark and Lexmark with diamond design are trademarks of Lexmark International, Inc., registered in the United States and/or other countries. © 2001 Lexmark International, Inc. 740 West New Circle Road Lexington, Kentucky 40550 www.lexmark.com...
Need help?
Do you have a question about the E210 and is the answer not in the manual?
Questions and answers