
Related Manuals for GILANI ENGINEERING GED09


Summary of Contents for GILANI ENGINEERING GED09
- Page 1 All manuals and user guides at all-guides.com Inst ructio on M Manua Electric Wheelc hair GLE HD GED09 Mode...
- Page 2 All manuals and user guides at all-guides.com...
- Page 3 All manuals and user guides at all-guides.com GED09 Gilani Engineering JBH EAGLE HD This manual electric wheelchair model referred as GE09. Before using the product please read this instruction Manual carefully for the purpose of correct operation, specially where is market Star.
-
Page 4: Table Of Contents
All manuals and user guides at all-guides.com Content Guidance for Use……………………………………………………………………………… 01 To Users……………………………………………………………………………………… 02 Safety Sign…………………………………………………………………………………………………………………………… 03 Product Construction…………………………………………………………………………………………………………… 04 Technical Parameter…………………………………………………………………………………………………………… 06 Electromagnetic Interference ……………………………………………………………………………………………… 09 Guide for Safe Use …………………………………… ………………………………………. 10 User…………………………………………………………………………………………10 Caregiver……………………………………………………………………………………11 Precautions for control panel use ………………………………………………………… 12 Precautions for static wheelchair …………………………………………………………... - Page 5 All manuals and user guides at all-guides.com Mounting control panel…………………………………………………………………… 22 Operation Guide………………………………………………………………………………...25 Press power on/off button………………………………………………………………… 25 Use joystick to control the wheelchair………………………………………………………25 Use the horn … …………………………………………………………………………… 27 Braking………………………………………………………………………………………… 27 Battery Use…………………………………………………………………………………… 28 Install / Remove battery……………………………………………………………………30 Charge battery………………………………………………………………………………31 Over discharge protector……………………………………………………………………32 Over current protector………………………………………………………………………32 Battery socket cleaning ……………………………………………………………………...
-
Page 6: Guidance For Use
All manuals and user guides at all-guides.com uidanc ce for GED09 The EA AGLE HD Elec ctric Wheelch hair is Class A A. It is suitab ble for indoo or and outdo oor uses. It is transport too ol for single person use. - Page 7 All manuals and user guides at all-guides.com please contact the manufacturer or distributor to obtain professional technical guidance and help; otherwise danger or injury may occur as a result of misleading the users.
-
Page 8: To Users
Nanjing Jin Bai He Medical Apparatus Co., Ltd. www.gilaniengineering.com.au Appendix: The Exclusive Australian Seller: Gilani Engineering Regional Distributors ( if any, the following information will be provided Email: sales@gilaniengineering.com.au Name: Discover Your Mobility Inc. - Page 9 All manuals and user guides at all-guides.com Tel: (866) 868 9694 Fax: (586) 232 4394 Emall: Info@globalada.com Manufacturer Nanjing Jin Bai He Medical Apparatus Co., Ltd. Qinhuai Rd. 61, Jiangning Economic and Technological Development Zone, Nanjing, Jiangsu, China...
- Page 10 All manuals and user guides at all-guides.com...
-
Page 11: Safety Sign
All manuals and user guides at all-guides.com Safety Sign GED09 The following signs will help you identify a n d understand EAGLE HD’s important cautious operation, imperative operation and prohibitive operation. These signs are extremely important, please go through them carefully. - Page 12 All manuals and user guides at all-guides.com Corrosive substance contained in the battery. Danger of explosion Do not use batteries of different models & capacities, do not use old and new batteries together (replace the battery completely). When using tools and other metal objects, keep away from the negative and positive poles of the battery;...
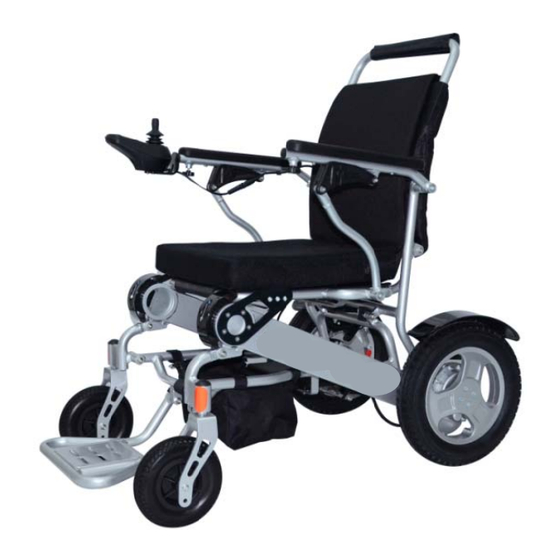
- Page 13 All manuals and user guides at all-guides.com Prod d uct C Constru u ction n...
- Page 14 All manuals and user guides at all-guides.com...
-
Page 15: Technical Parameter
All manuals and user guides at all-guides.com Technical Parameters Model EAGLE HD Folded Size 580*325*780 mm (L*W*H) Unfold Size 960*580*930 mm (L*W*H) Max weight Capacity 160 kg Motor Type Brushless DC Motor Rated Power 250 W*2pcs Input Power DC 24V Brake System Intelligent Electromagnetic Brake Battery... - Page 16 All manuals and user guides at all-guides.com Max Speed 6 km/h (3.75 mph) Turning Radius 835 mm Highest Obstacle Capability 40 mm (1.57") Full overall length 975mm Overall width 610mm Stowage length 690mm Stowage width 425mm Stowage height 890mm Rising / mm Total mass 31.7kg...
- Page 17 All manuals and user guides at all-guides.com Seat plane angle Effective seat depth 420mm Effective seat width 480mm Seat surface height at front edge 480mm Backrest angle Backrest height 400mm Footrest to seat distance 360mm Leg to seat surface angle Armrest to seat distance 250mm Front location of armrest...
- Page 18 ARNING Under specific con nditions, ele ectromagnet tic interferen nce can caus se accident to the elect tric GED09 wheelchair . Therefore, it is import tant for EAG GLE HD user rs to adequa ately unders stand releva instructions s, which can...
-
Page 19: Guide For Safe Use
All manuals and user guides at all-guides.com WARNIN GED09 ough EAGLE HD has pas ssed 30 V / M electrom magnetic inte erference te st at factory and has a c certain degr ee of immu nity to some e common e... -
Page 20: User
2. Before us GED09, sing EAGLE H HD, user mu st read and adequately understand this Manual 3. Escort is required wh hen practicin... -
Page 21: Caregiver
2. To move GED09 EAGLE HD m manually, th he electroma agnetic brake e must be po owered off t to allow the wheelchair... - Page 22 6.5 Do n not try to cro oss over obst tacles beyon nd EAGLE HD GED09 D crossing ov ver capability Precautio ons for co ontrol pan nel use ARNING 1.The lockin...
-
Page 23: Operating Environment
Precautio ons for st atic whee elchair WARNIN 1. When yo ou stop usin ng your EAG GED09 GLE HD wh eelchair, even for a s short durati on, make s ure you tur rn off its power. This c can prevent •... - Page 24 1. Malfunction may occur if the device is in contact with water or in environment of too much moisture; in addition, since the frame, motor and other parts of the wheelchair are not fully GED09 waterproof, environment of moisture may result in rusting or corrosion inside EAGLE HD.
-
Page 25: Applicable Road
All manuals and user guides at all-guides.com • You u must make e sure that y ou are oper ating in a sa fe environm ment. • If o one or two drive whee els lose trac ction, stop o operating im mmediately t to prevent th... -
Page 26: The Motorized Vehicle Safety
The moto orized veh hicle safe ARNING 1. Do no GED09 ot use EAGL E HD when t taking bus, m metro, train, plane or sh ip if possible... -
Page 27: Balance Of Driving
All manuals and user guides at all-guides.com 2. If you GED09 u have to us e EAGLE HD D when takin ng such vehic cles. you mu ust tie the sa afety belt in place, a nd try to fin... - Page 28 All manuals and user guides at all-guides.com ay need to be adjusted prior to use e. After mod difying the w wheelchair, b be cautious while perating unt til you are fa miliar with t the wheelch hair’s new ba alance and c center of gra avity...
- Page 29 All manuals and user guides at all-guides.com 3. Be ca areful of the e pedal. Fold d it up as fa ar as possibl e (as shown n in figure D2 • Never stand on th he foot plate , this will da amage the w wheelchair.
- Page 30 All manuals and user guides at all-guides.com WARNIN Stretc ching or tilt ing your bo ody will aff fect the ce nter of gra avity a n d balance of electric whe eelchair. Wi th imprope r technique es, falling o r tipping ov ver can occ cur, resultin...
- Page 31 All manuals and user guides at all-guides.com stable 3. Turn o off the powe er supply of t the wheelch hair when it’s s not in use. Attention ns when d dress in t the whee lchair WARNI Attention: Dressing wh hile sitting in the wheelch hair affects t...
- Page 32 Never put p pressure on the pedal w hile dressing hrough th he obstac cles WARN NING GED09 You need to overcome s ome obstac les during yo our daily use es of your EA AGLE HD ele ectric wheelc...
-
Page 33: Reverse Driving
Reverse d driving RNING When n you drive t the EAGLE H GED09 HD electric w wheelchair in n reverse, yo ou need to b be more care eful. f the rear w wheel hits an... - Page 34 All manuals and user guides at all-guides.com electric wheelchair will change. Attention: “slope” may be a ramp or hillside. Operate only if you are sure it is safe to do so, have someone help you while you are operating on a slope. Attentions: 1.
-
Page 35: Load Capacity
All manuals and user guides at all-guides.com Load Cap acity ARNING GED09 is 180 kg. 1. The e maximum load capac city of EAGL LE HD is 12 20 kg. The to otal weight of the user all car rriage should... -
Page 36: Mounting Safety Belt
All manuals and user guides at all-guides.com This el ectric wheel lchair is not suitable for traveling up p and down t the stairs, or r on the escalat tor. Pay atte ntion to the e following ca autions whe en using the elevator. - Page 37 All manuals and user guides at all-guides.com The safety belt is for fixing user's body only and prevent the user from failing off the chair. Where an accident occurs, it cannot provide adequate protection for you. The safety belt can be adjusted per the user’s needs.
- Page 38 All manuals and user guides at all-guides.com Adjust the safety belt until user feels comfortable. After sitting down, insert the plastic card into the plastic shell, until you hear a clicking sound. Adjust the plastic safety belt to its appropriate length, never over tighten the safe belt as this may cause discomfort.
-
Page 39: Mounting Control Panel
All manuals and user guides at all-guides.com Unlock th he safety b belt: ress the butt ton of the p lastic shell a aside, and pu ull out the pl lastic card. Caut tion Before e ach use, m ake sure th he safety be elt is fixed o onto the el... - Page 40 All manuals and user guides at all-guides.com...
- Page 41 All manuals and user guides at all-guides.com The control panel controls the EAGLE HD electric wheelchair. It consists of the following sections:...
- Page 42 2. Power off button: Press this button to power off the wheelchair. 3. Battery Level Indicator: Indicating battery power status. GED09 4. Speed Display and Diagnostic Indicator: When the light is on, EAGLE HD is working, specific indication of the lights five lights totally; Where one LED is on ,it’s at the lowest speed, whereas all five are on, it’s at the highest speed.
-
Page 43: Press Power On/Off Button
All manuals and user guides at all-guides.com Press power on/off button 1.Press the power on button to power on the wheelchair. 2.Press the power off button to power off the wheelchair. Use the Joystick to Control the Wheelchair WARNING While operating at high speed, do not attempt sharp turns or stop suddenly, doing so may cause the wheelchair to tilt or tip over, resulting in injuries to the user and/or damage to the wheelchair. - Page 44 All manuals and user guides at all-guides.com smoothly, and is very easy to operate. While not operating, the spring in the joystick allows it to return to the center of the initial state, making the wheelchair brake automatically. Push the joystick to the direction you wish the wheelchair to move to, Joystick has proportional control ability.
- Page 45 All manuals and user guides at all-guides.com Backward Move the joystick backward Right Move the joystick to the right Left Move the joystick to the left...
-
Page 46: Use The Horn
All manuals and user guides at all-guides.com Use the horn Press the horn button on the control panel to sound when passing through crowds. Braking Caution After any adjustment, repair or maintenance, please make sure all accessory parts are installed tightly before operating this wheelchair, otherwise it may cause injuries to the user and/or damage to the wheelchair. - Page 47 All manuals and user guides at all-guides.com manual/free wheel mode as shown on the picture to the right wrench is Manual Mode Electro- magnetic brake switch Power Mode Electromagnetic brake states: This wheelchair has two status: LOCK and UNLOCK , which are switched through turning the brake lever.
-
Page 48: Battery Use
All manuals and user guides at all-guides.com make sure the wheelchair will not move and can even stop or start on slope. UNLOCK state indicates that the internal clutch of the electromagnetic brake is disengaged and the electromagnetic brake is closed without braking. In this state, the motor wheel can rotate even when the power is off Purpose: allow to move the wheelchair manually. - Page 49 All manuals and user guides at all-guides.com Do not short circuit batteries or throw battery into the fire to avoid explosion. Dispose the batteries through legal recycling center. Caution 1. Do not use pliers, cable wire or any metal chew on it. item to connect the ends of battery directly.
-
Page 50: Install / Remove Battery
All manuals and user guides at all-guides.com 4-6Hrs 1. Charging the battery continuously for a battery is 8 12 hrs. long time before the first use can reduce 5. Whenever the wheelchair is used, the the battery’s service life (charge the battery shall be recharged until the power battery for the first time only when the last LED on the charger turns green. - Page 51 All manuals and user guides at all-guides.com Please make sure you power off the wheelchair before installing or removing the batteries. Removing the battery: Press the lock button (As shown in figure H1), then pull the battery handle (As shown in figure H2).
-
Page 52: Charge Battery
All manuals and user guides at all-guides.com Installing the battery Hold the battery handle, insert the other side of the battery into the right side opening of the battery tube until the battery is all the way inside, then insert the red power plug into the bottom opening of the battery tube. - Page 53 All manuals and user guides at all-guides.com 5.After the charger indicator’s light changes from red to green, keep charging the batteries for 30 minutes to ensure they are full charged. Unplug the external wall plug first, then unplug the cable from the control panel.
- Page 54 All manuals and user guides at all-guides.com Over Current Protection Device The electric wheelchair is also equipped with an over-current protection device. If the current provided to the motor is excessive, the electronic fuse will close the current. If there is any malfunctioning when operating the wheelchair, the over-current protection device will be activated, the driving wheels will stop rotating.
-
Page 55: Folding And Unfolding
The weight of the EAGLE HD wheelchair (with batteries) is 26.5 KG, do not attempt to GED09 lift the wheelchair while the user is sitting on it. Grip the edge of the seat frame, never hold the handrail or back of chair to lift. - Page 56 All manuals and user guides at all-guides.com...
- Page 57 All manuals and user guides at all-guides.com Unfolding...
- Page 58 3. Put the seat cushion on the wheelchair 4. Pull down the footrest. 4. Pull down the footrests. 5. Install the controller joystick (Refer to the joystick installation instruction section) GED09 6. The EAGLE HD wheelchair is now completely unfolded and ready to operate.
-
Page 59: Maintenance
All manuals and user guides at all-guides.com Maintenance Regular maintenance will both increase the lifespan and improve the performance of your EAGLE HD wheelchair. GED09 wheelchair. Cleaning 1. Clean your wheelchair often, wipe off any dust or dirt especially on or around motors and wheels. -
Page 60: Troubleshooting
All manuals and user guides at all-guides.com Troubleshooting Diagnostic System The speed display on the joystick also functions as a diagnostic indicator for your power chair. When the light is green, the power chair is functioning correctly, and if it starts flickering, then there’s an issue. - Page 61 All manuals and user guides at all-guides.com trigger the diagnostic indicator to flicker. 3. There will be a pause after the initial flickering, follow the flickering pattern to find out which part is causing the problem from the diagnostic chart. Diagnostic Chart Flicker Pattern...
-
Page 62: Warranty
All manuals and user guides at all-guides.com Flickers four times Over current of left Release the rocker can eliminate the malfunction quickly motor Flickers five times quickly Over current of right Release the rocker can eliminate the malfunction motor Warranty The Warranty Scope The warranty instruction: Warranty parts... - Page 63 All manuals and user guides at all-guides.com...
- Page 64 All manuals and user guides at all-guides.com Malfunction caused by improper use and handling. Modifying the Joystick One year wheelchair without dealer or manufacturer’s authorization. The Scope of the No Guarantee 1. No Warranty: a) Back cushion, seat cushion, armrest foam cotton, backrest foam cotton, decorating parts are damaged after use.
-
Page 65: Warranty Card
All manuals and user guides at all-guides.com Warranty Card The warranty card must be handed over to the customer support department of the manufacturer in 15 days after the purchase. The user name ID number Address Contact number Model Product number Purchasing date Month Year... - Page 66 All manuals and user guides at all-guides.com 1. The warranty statement: The dealer should confirm the problems of the wheelchair first. Under the condition of using incorrectly, if it is the quality problem, the dealer needs to fix or change the parts. 2.
Need help?
Do you have a question about the GED09 and is the answer not in the manual?
Questions and answers