Table of Contents
Advertisement
Available languages
Available languages
Advertisement
Chapters
Table of Contents

Related Manuals for auna Silver Star Mini


Summary of Contents for auna Silver Star Mini
- Page 2 ICH BIN EIN BERLINER * John F. Kennedy on June 26, 1963 in his speech in Berlin, on the occasion of the 15th anniversary of the Berlin Airlift.
-
Page 3: Table Of Contents
Dear customer, Congratulations on your purchase. Please read the following instructions carefully for the connection and use of this product. It is important to carefully follow these instructions to prevent serious personal injury or damage to the product. We assume no liability for damage caused by disregarding the instructions in this manual or otherwise for improper use of this product. -
Page 4: Technical Data
TECHNICAL DATA Item number US-10032791 US- 10032792 US-10038350 Input: 100-240 V ~ 50/60 Hz , 0.6 A Power adaptor Output: 12 V / 1 A USB, AUX IN (3.5 mm), Connections Headphone jack (3.5 mm) FM radio Frequency range 87.5 MHz - 108 MHz 802.11b/g/n WLAN Encryption: WEP, WPA, WPA 2(PSK), WPS... -
Page 5: Warning
WARNING CAUTION RISK OF ELECTRIC SHOCK DO NOT OPEN CAUTION: TO REDUCE THE RISK OF ELECTRIC SHOCK AND SERIOUS PERSONAL INJURY, DO NOT REMOVE ANY COVER. NO USER-SERVICEABLE PARTS INSIDE. REFER SERVICING TO QUALIFIED SERVICE PERSONNEL ONLY. WARNING. TO REDUCE THE RISK OF FIRE OR ELECTRICAL SHOCK, DO NOT EXPOSE THIS PRODUCT TO WATER, RAIN OR MOISTURE. - Page 6 FCC Warning: This equipment may generate or use radio frequency energy. Changes or modifications to this equipment may cause harmful interference unless the modifications are expressly approved in the instruction manual. The user could lose the authority to operate this equipment if an unauthorized change or modification is made. This device has been tested and found to comply with Part 15 of FCC rules. Operation is subject to the following two conditions: (1) the device may not cause harmful interference and (2) the device must accept any interference received,...
-
Page 7: Warranty
Product to the Company or register online at www.auna-multimedia.com/warranty within ninety (90) days of the days of the original purchase. This Warranty does not apply to any product or part thereof which, in the opinion of the Company, has suffered or been damaged through alteration, ... -
Page 8: Safety Instructions
SAFETY INSTRUCTIONS FAILURE TO CAREFULLY FOLLOW THESE INSTRUCTIONS MAY LEAD TO SERIOUS PERSONAL INJURY AND DAMAGE TO YOUR PRODUCT. General Instructions • DANGER. NOT FOR USE BY CHILDREN UNDER THE AGE OF 18. • For home and personal use only. Any other usage shall be construed as a misuse as set forth herein. - Page 9 Special Instructions • This manual is intended to familiarize you with the operation of this product. Keep this manual in a safe place for future reference. • ONLY USE PRODUCT FOR ITS INTENDED PURPOSE. Any other usage shall be construed as a misuse as set forth herein. •...
-
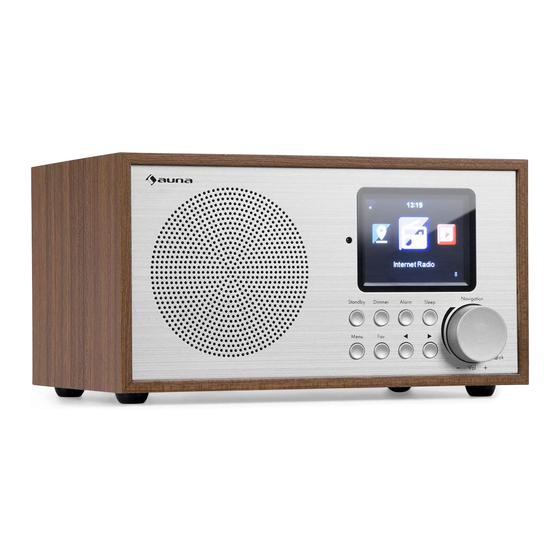
Page 10: Product Description
PRODUCT DESCRIPTION Front Display Fav button Next button Standby button Alarm button 10 Vol+/Vol-/ok knob Menu button Previous button Dimmer button Sleep button Rear... - Page 11 Rear ON/OFF switch button 12 DC IN socket 13 Headphone jack (3.5mm) 14 AUX IN socket(3.5mm) 15 USB port Bottom 16 Bass reflex tube...
-
Page 12: Remote Control
REMOTE CONTROL Standby button button 20 Input letters and Mute button 12 Home button numbers button EQ set tone 13 Up cursor button 21 Calling up stations Dimmer button 14 Left cursor button 22 Save stations Sleep button 15 Right cursor Alarm button button Previous button... -
Page 13: Initial Use
INITIAL USE • Before operation, please make sure that the VOLTAGE mentioned on the power supply is same as the voltage of your local area. • Use the supplied mains adaptor to connect the device to a household mains socket. •... - Page 14 Note: Below characters are available for the radio: Numbers (from 0-9) English letters (from A to Z and from a to z) Other charcters ( DEL,@,Blank,!,”,#,$,%,&,*,’,+ and (,) WPS PBC network configuration Select “Yes WPS” when you would like set up with Wireless Network (WPS PBC) feature: If you are using a router with WPS button, you may set up the network connection simple via WPS function.
- Page 15 Note: Below characters are available for the radio: Numbers (from 0-9) English letters (from A to Z and from a to z) Other charcters ( DEL,@,Blank,!,”,#,$,%,&,*,’,+ and (,) WPS PBC network configuration Select “Yes WPS” when you would like set up with Wireless Network (WPS PBC) feature: If you are using a router with WPS button, you may set up the network connection simple via WPS function.
-
Page 16: Basic Operation
BASIC OPERATION Main Interface FM Radio Rotate button and press OK to access a menu item. Internet Radio Information Center Configuration Media Center Configuration Time Display Analog Digital To go back to the last menu level press LEFT. Manage my mediaU Wireless Network Configuration Network Wireless Network(WPS PBC) - Page 17 Configuration Alarm Alarm 1 Turn on Turn off Alarm 2 Turn on Turn off NAP Alarm 1 (turn off) Timer Alarm Volume Language Dimmer Power Saving Turn On Display Color Monochrome Power Management Sleep Timer Buffer Set Location Weather Temperature Unit Show on Standy...
- Page 18 Configuration Manual Setup (Country) Local Radio Setup Manual Setup (City) Auto Detect Playback Setup Repeat all Repeat one Shuffle DLNA Setup Rename (AirMusic) AirMusic Control App Equaliser Resume When Power On Software Update Reset to Default...
- Page 19 Internet Radio My Favorite Radio Station/Music Local Radio History Service Search Radio Station Add New Radio Station Media Center UPnP My Playlist Clear My Playlist Information Center Weather Information Financial Information System Information FM Radio...
-
Page 20: Internet Radio
INTERNET RADIO Press “Standby” to go to working mode and rotate Navigate to scroll through the main menu. Press OK (to enter sub menus or confirm settings) Press < to return to the previous menu. After connection of any station successful, station information will be shown and information content can be changed with < or > button. My Favorites List of my favorite preset stations. -
Page 21: Media Center
Service Search radio station-Enter your keyword to search radio station from the list. Add new radio by adding IP address, the added stations will be stored in My Favorite. Note that the maximum character of the station name is 250. MEDIA CENTER Select the USB/UPnP mode or playlist mode with Navigate/OK or with the Mode button. -
Page 22: Information Center
Clear My Playlist Please select this option for clearing the playlist .Please confirm the questions. My media U Display and playback your own mediaU station list on the mediaU server. Set your account first. To activate your own station list, follow the steps below: Access http://www.mediayou.net/. Join my mediaU membership. Login to the website; Enter the wireless MAC address of Radio to the mediaU website. This information can be obtained in information Center>System information>Wireless Info;... -
Page 23: Configuration
CONFIGURATION Analog/digital Time Display When it is enabled, my mediaU will exist on the main MyMediaU menu.If various mediaU accounts exist in the Radio, select the default login account in here. Wireless Network Configuration: Enable/disable WiFi Netzwerk network. When you enable the WiFi network, the system will automatically select the required AP. - Page 24 There are three independent alarms-2 alarms of absolute Alarm time setting (Alarm 1 and Alarm 2) and 1 alarm for relative time setting (Alarm NAP).Press Alarm on the remote control to enter this menu directly. Note that the alarm source is from the preset Internet radio if Alarm Sound is set to be Internet Radio.
- Page 25 Weather Activate/deactivate the weather forecast for the standby display. Choose your preferred temperature unit (°C or °F) and then proceed entering your location. When activated, the weather forecast is shown in turns with the clock display on the standby screen (each 10 secs). Local Radio There is a shortcut Local Radio under Internet Radio so Setup...
-
Page 26: Dnla / Upnp
DNLA / UPNP You may change the default DLNA name as you like. The information below is the introduction of how to setup media streaming from PC or other media server. Study the own instruction of the software or apps you use to enjoy music streaming if necessary. Make sure the music files are in the format of ... - Page 27 Please note: When using DLNA music streaming function on the Internet Radio, you can only control the volume and standby via the unit. It is restricted to control the other functions. Stop DLNA on PC, mobile or tablet before you resume Internet radio’s own control.
-
Page 28: Aux (Line Input)
AUX (LINE INPUT) AUX IN mode plays audio from an external source such as an MP3 player. To play audio with AUX IN mode Turn the volume low on both the Radio and if adjustable, the audio source device. Connect the external audio source to the AUX IN 3.5mm stereo socket. Either press MODE until the display shows AUX IN or selects AUX in under Main menu. -
Page 29: Troubleshooting
TROUBLESHOOTING Problem Cause / Solution Confirm that a Wi-Fi or Ethernet Wired connected PC can access the internet (i.e. can browse the web) using the same network. Check that a DHCP server is available, or that you have configured a static IP address on the radio. Check that you firewall is not blocking any outgoing ports. Some access points may be set so that only equipment with registered MAC addresses can connect to them. - Page 30 The station is not broadcasting at this time of the day (remember it may be located in a different time zone). The station has too many people trying to attach to the radio station server and the server capacity is not large enough. The station has reached the maximum allowed number of simultaneous listeners.
- Page 31 When the internet radio is scanning the content of the folders on a PC, it is possible that a scan error may occur if the windows file sharing application times out. This is most likely to occur if both the PC with the media Scan-Error content and the Internet Radio are connected wirelessly. Try re-connecting the PC with the media content into the network via cable.
- Page 33 Estimado cliente: Le felicitamos por la adquisición de este apara- to. Lea atentamente el siguiente manual de ins- talación y uso del producto. Es importante que siga cuidadosamente las instrucciones con el fin de evitar posibles lesiones personales graves o daños al equipo. La empresa no se responsabi- liza de los daños ocasionados por un uso inde- bido del producto o por haber desatendido las instrucciones de este manual.
-
Page 34: Datos Técnicos
DATOS TÉCNICOS Número de artículo US-10032791 US-10032792 US-10038350 Entrada: 100-240 V ~ 50/60 Hz , 0,6 A Suministro eléctrico del Salida: 12 V - 1 A aparato USB, entrada aux (3,5 mm), Conexiones Toma de auriculares (3,5 mm) Radio FM Rango de frecuencia 87,5 MHz - 108 MHz 802.11b/g/n... -
Page 35: Advertencia
ADVERTENCIA ATENCIÓN RIESGO DE DESCARGAS ELÉCTRICAS NO ABRIR ATENCIÓN: PARA REDUCIR EL RIESGO DE DESCARGAS ELÉCTRICAS, NO RETIRE LAS TAPAS. EL APARATO NO CONTIENE EN SU INTERIOR PIEZAS QUE EL USUARIO PUEDA REPARAR. TODA REPARACIÓN DEBE SER RALIZADA POR PERSONAL TÉCNICO CUALIFICADO. - Page 36 Advertencia FCC: este equipo puede generar o utilizar energía de radiofrecuencia. Los cambios o modificaciones en este equipo pueden causar una interferencia negativa, salvo que las modificaciones fueran expresamente aprobadas en el manual de instrucciones. El usuario puede perder la autoridad de operar este equipo si efectúa cambios o modificaciones no autorizadas. Las pruebas realizadas con este equipo ponen de manifiesto su adecuación a la Parte 15 de las ...
-
Page 37: Garantía
Producto a la Compañía o registrarlo en línea en www.auna-multimedia.com/warranty en un plazo de noventa (90) días tras la compra original. Esta Garantía no se aplica a ningún producto o pieza de este que, en opinión de la Compañía, haya sufrido daños por alteración, mala instalación, mal manejo, uso... -
Page 38: Instrucciones De Seguridad
INSTRUCCIONES DE SEGURIDAD EL INCUMPLIMIENTO DE ESTAS INSTRUCCIONES PUEDE PROVOCAR LESIONES PERSONALES GRAVES Y DAÑO AL PRODUCTO. Instrucciones generales • PELIGRO. NO PERMITA QUE NIÑOS MENORES DE 18 AÑOS UTILICEN EL PRODUCTO. • Concebido para uso doméstico y personal. Cualquier otro uso se interpretará... - Page 39 Instrucciones especiales • Este manual de instrucciones tiene como objetivo familiarizarle con el funcionamiento del aparato. Consérvelo para futuras consultas. • SOLAMENTE UTILICE EL PRODUCTO DE ACUERDO CON SU USO PREVISTO. Cualquier uso distinto será interpretado como uso indebido, tal y como se establece en el presente documento. •...
-
Page 40: Visión General Del Aparato
VISIÓN GENERAL DEL APARATO Parte delantera Display Emisoras Modo noche Standby guardadas Adelante Menú Alarma 10 Volumen+/ Atenuador Atrás volumen- Parte trasera... - Page 41 Parte trasera Botón on/off 12 CC IN 12V: Toma para conectar la fuente de alimentación 13 Toma de auriculares (3,5 mm) 14 AUX IN: Entrada estéreo de audio (3,5 mm) 15 Conexión USB Parte inferior 16 Tubo bass reflex...
-
Page 42: Mando A Distancia
MANDO A DISTANCIA Standby Modo y letras Silencio 12 Menú principal 21 Acceder a las Ecualizador 13 Cursor arriba emisoras Atenuador 14 Cursor a la 22 Guardar emisora Función de izquierda repetición 15 Cursor a la Alarma derecha Pista anterior 16 Cursor abajo Pista siguiente 17 OK: Confirmar... -
Page 43: Puesta En Fucionamiento
PUESTA EN FUCIONAMIENTO • Compruebe en la placa técnica la tensión y asegúrese de que sea compatible con la del suministro eléctrico de su hogar antes de poner en marcha el aparato. • Utilice la fuente de alimentación incluida para conectarlo a una toma de corriente doméstica. - Page 44 Están disponibles los siguientes caracteres para el aparato: Números (0-9) Letras latinas (A-Z, a-z) Otros caracteres: ( DEL, @, espacio,!,”,#,$,%,&,*,’,+ y (,) 1. Configuración de red WPS PBC Seleccione "Sí WPS" si desea realizar la instalación con una red inalámbrica (WPS PBC). Si utiliza un router con botón WPS, puede realizar fácilmente la configuración con la función WPS. Vaya a la ...
-
Page 45: Estructura Del Menú
ESTRUCTURA DEL MENÚ Menú principal Radio FM Radio de Centro Centro de información Ajustes internet multimedia Ajustes Analógico Reloj Digital Gestionar My mediaU Configuración de la red inalámbrica Red inalámbrica (WPS PBC) Configuración manual Comprobar red al encender el aparato Fecha y hora Configurar la fecha y hora Configurar el formato de hora Configurar el formato de fecha... - Page 46 Ajustes Despertador Alarma 1 Encender Apagar Alarma 2 Encender Apagar Alarma de repetición Temporizador Volumen de la alarma Idioma Modo ahorro de energía Réglage de la luminosité Encender Pantalla A color Monocromática Ajustes de energía Temporizador de apagado Memoria intermedia Información Ajustes locales meteorológica...
- Page 47 Configuración Automático (país) Configuración de radio local Manual (ciudad) Reconocimiento automático Desactivar Configuración de reproducción Repetir todo Repetir pista actual Aleatorio Cambiar de nombre Aparato (AirMusic) AirMusic Control App Ecualizador Activar Continuar con la reproducción Desactivar Actualización de software Restablecer configuración predeterminada...
- Page 48 Radio de internet Mis favoritos Emisoras de radio/ Música Radio local Última emisora escuchada Servicio Buscar emisoras de radio Añadir emisoras de radio Centro multimedia UPnP Mi lista de reproducción Eliminar Mi lista de reproducción Radio FM Centro de información Información de tiempo Información de finanzas...
-
Page 49: Radio Internet
RADIO INTERNET Pulse STANDBY para acceder al modo de funcionamiento. Gire la rueda de navegación para navegar por el menú principal. Pulse OK para acceder a los submenús o para confirmar los ajustes. Acceder con < al menú anterior. Mis favoritos (lista de emisoras guardadas Soporta hasta 250 entradas con emisoras y carpetas. Si en el display aparece la reproducción de la emisora, mantenga pulsado el botón FAV en el mando a distancia para guardarla. -
Page 50: Centro De Medios
Servicio Con una palabra clave, busque las emisoras de la lista. Añada una nueva radio introduciendo la dirección IP. Las emisoras añadidas se guardan en la lista "MyFavorite". Recuerde que el número mayor de caracteres para el nombre de la emisora es de 250. CENTRO DE MEDIOS Seleccione el modo USB/UPnP o el modo Playlist con el regulador de navegación. -
Page 51: Centro De Información
My mediaU Vaya a la página de internet http://www.mediayou.net/. Cree una cuenta mediaU. Inicie sesión en la página web. Introduzca la dirección MAC de la radio de internet en la página de internet. Obtendrá esta información en el "Centro de información > Información del sistema > información de red inalámbrica. -
Page 52: Ajustes
AJUSTES analógica, digital Visualización de la hora Cuando está activada MyMediaU, aparece en el menú MyMediaU principal una entrada. Si se han creado distintas cuentas en la radio de internet, seleccione la cuenta estándar. Configuración de la red Activar o desactivar WLAN: Si selecciona WLAN, el sistema escoge automáticamente el punto de acceso necesario. - Page 53 Hay 3 alarmas independientes: 2 alarmas para una hora Despertador fija configurada (Alarma 1, Alarma 2) y una alarma de (Alarma) repetición. Pulse ALARM en el mando a distancia para acceder directamente al menú de configuración. Cuando se configura la fuente para el tono de alarma de la radio de internet, se utiliza la emisora predeterminada. Para la Alarma 1 y la Alarma 2 solo se puede seleccionar la misma emisora.
- Page 54 Configuración En el menú de la radio de internet aparece la entrada "radio local". Puede establecer manualmente la de emisoras ubicación en este menú o dejar que el sistema detecte locales automáticamente la ubicación mediante la IP. Seleccione el modo de reproducción del centro de Configuración medios: de reproduc-...
-
Page 55: Dnla / Upnp
DNLA / UPNP Puede modificar los nombres DLNA como desee. La información más abajo es una introducción de la transmisión de medios desde el PC o de otros servidores de medios. Lea las instrucciones del software o la app que utilice para la reproducción de medios. Los archivos de música deben estar en los formatos MP3, WHA, WAV o AAC. - Page 56 Control app a través de Air Music Control Puede controlar la radio de internet a través de su smartphone o tablet. Para ello, descargue la app "Air Music Control" de la "Google Play Store" o de la "Apple AppStore". Los dispositivos deben estar conectados a la misma red.
-
Page 57: Entrada
ENTRADA En funcionamiento Aux, se reproducen fuentes de audio externas, como el reproductor MP3.t Reproducir a través de la entrada AUX Para reproducir a través de la entrada AUX, reduzca el volumen de ambos dispositivos (en caso de que esté disponible en el dispositivo externo). Conecte la fuente de audio externa al AUX IN (conector RCA de 3,5 mm). - Page 58 Acceder a las emisoras Acceda a la emisora guardada pulsando el botón FAV y girando el regulador de navegación en la lista de emisoras.
-
Page 59: Resolución De Problemas
RESOLUCIÓN DE PROBLEMAS Problema Procedimiento/causa Asegúrese de que la radio y un ordenador conectado a la red (que tenga una conexión a internet funcional) estén registrados en la misma red. ¿Hay un servidor DHCP disponible o ha introducido una dirección IP estática? ¿Se ha configurado un cortafuegos que haya ... - Page 60 Es posible que se produzca un error cuando la radio de internet busca carpetas en un Pc, por ejemplo, porque la aplicación de compartición de archivos de Error de búsqueda Windows no esté disponible. Conecte el ordenador a la red por cable para aumentar notablemente la velocidad de la búsqueda.
Need help?
Do you have a question about the Silver Star Mini and is the answer not in the manual?
Questions and answers