Table of Contents
Advertisement
Available languages
Available languages
Advertisement
Chapters
Table of Contents

Related Manuals for auna Silver Star Mini


Summary of Contents for auna Silver Star Mini
-
Page 3: Table Of Contents
Sehr geehrter Kunde, wir gratulieren Ihnen zum Erwerb Ihres Geräts. Lesen Sie die folgenden Hinweise sorgfältig durch und befolgen Sie diese, um möglichen Schäden vorzubeugen. Für Schäden, die durch Missachtung der Hinweise und unsachgemäßen Gebrauch entstehen, übernehmen wir keine Haf- tung. -
Page 4: Technische Daten
TECHNISCHE DATEN Artikelnummer 10032791 10032792 Eingang: 100-240 V ~ 50/60 Hz , 0,6 A Stromversorgung Netzgerät Ausgang: 12 V / 1 A USB, Aux-Eingang (3,5 mm), Line-out (3,5 mm) Anschlüsse UKW-Radio Frequenzbereich 87,5 MHz - 108 MHz Frequenzbereich 174-240 MHz 802.11b/g/n WLAN Verschlüsselung: WEP, WPA, WPA 2(PSK), WPS... -
Page 5: Sicherheitshinweise
SICHERHEITSHINWEISE Lesen Sie vor der Verwendung des Geräts die Bedienungsanleitung vollständig durch. Befolgen Sie alle Sicherheitshinweise, um Schäden durch unsachgemäßen Gebrauch vorzubeugen. • Bewahren Sie die Bedienunganleitung zum Nachschlagen auf. Wenn Sie das Gerät einer dritten Person geben, muss diese Bedienungsanleitung auch weiter gegeben werden. - Page 6 knicken oder es über scharfe Kanten ziehen. Halten Sie das Netzkabel von heißen Flächen und offenen Flammen fern. • Halten Sie immer am Netzstecker fest und nicht am Netzkabel, wenn Sie das Gerät von der Stromversorgung trennen. • Schließen Sie das Gerät an einer leicht erreichbaren Steckdose an, so dass Sie es in einem Notfall zügig herausziehen können.
-
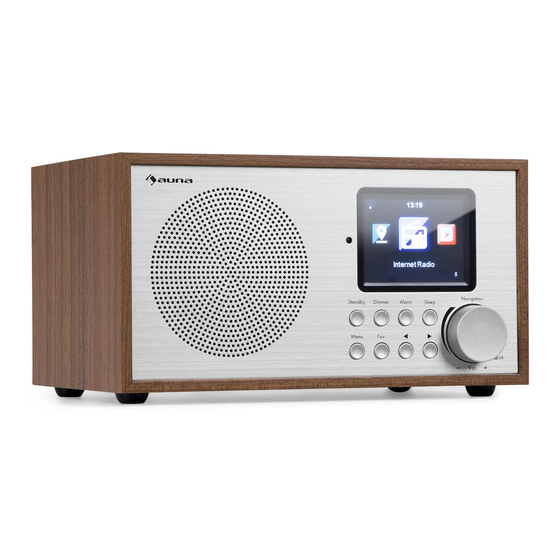
Page 7: Geräteübersicht
GERÄTEÜBERSICHT Vorderseite Display Gespeicherte Schlaf Sender Standby Alarm Menü 10 Lautstärke+/ Zurück Lautstärke – Dimmer Rückseite... - Page 8 Rückseite Ein/Aus-Taste 12 DC IN 12 V: Buchse zum Anschluss des Netzteils 13 LINE OUT: Stereo-Audioausgang (3,5 mm) 14 AUX IN: Stereo-Audioeingang (3,5 mm) 15 USB-Anschluss Unterseite 16 Bassreflexrohr...
-
Page 9: Fernbedienung
FERNBEDIENUNG Standby Stopp 17 OK: Bestätigen Stumm 10 Wiedergabe/ 18 Lautstärke – Pause Equalizer 19 Lautstärke + Modus Dimmer 20 Eingabe von 12 Hauptmenü Zahlen und Schlummer Buchstaben 13 Cursor hoch Alarm 21 Sender aufrufen 14 Cursor links voriger Titel 22 Sender speichern 15 Cursor rechts nächster Titel... -
Page 10: Inbetriebnahme
INBETRIEBNAHME • Achten Sie vor der Inbetriebnahme darauf, dass die auf den Typenschild angegebene Spannung mit der Spannung in Ihrem Haushalt übereinstimmt. • Verwenden Sie das mitgelieferte Netzgerät, um es an eine Steckdose im Haushalt anzuschließen. • Schalten Sie das Gerät mit dem Ein/Aus-Schalter auf der Rückseite ein. •... - Page 11 Folgende Zeichen sind für das Gerät verfügbar: Ziffern (0-9) Lateinische Buchstaben (A-Z, a-z) Weitere Zeichen: ( DEL,@,Blank,!,”,#,$,%,&,*,’,+ and (,) 2. WPS PBC Netzwerkkonfiguration Wählen Sie „Ja WPS“, wenn Sie die Einrichtung mit einem drahtlosen Netzwerk (WPS PBC) vornehmen möchten. Wenn Sie einen Router mit WPS-Taste verwenden, können Sie können Sie die Einrichtung ganz einfach über die WPS-Funktion vornehmen.
-
Page 12: Menüstruktur
MENÜSTRUKTUR Drehknopf drehen und Hauptmenü FM-Radio drücken um etwas DAB+ Radio auszuwählen. Internetradio Einstellungen Media-Center Informations-Center Einstellungen Um einen Zeitanzeige Analog Menüpunkt zurückzugehen LEFT drücken. Digital My mediaU verwalten Netzwerk Funknetz-Einstellung Funknetz (WPS PBC) Manuelle Konfiguration Netzwerk prüfen beim Anschalten Datum &... - Page 13 Einstellungen Wecker Wecker 1 Wecker 2 Schlummer-Wecker Timer Wecker-Lautstärke Sprache Dimmer Energiesparmodus Einschalten Anzeige Farbe Monochrom Energieeinstellungen Sleep Timer Zwischenspeicher Wetter Lokale Einstellungen Temperatureinheit Anzeigen bei Standby...
- Page 14 Einstellungen Automatisch (Land) Lokale Stationseinstellung Manuell (Stadt) Automatische Erkennung Wiedergabe-Einstellung Alle wiederholen Eins wiederholen zufällig Gerät Umbennen (AirMusic) AirMusic Control App Equalizer Fortsetzen der Wiedergabe Softwareupdate Auf Werkeinstellungen zurückksetzen...
- Page 15 Internet-Radio Meine Favoriten Radiosender/Musik Lokale Station Zuletzt gehörte Sender Service Radiosender suchen Radiosender hinzufügen Media -Center UPnP Meine Wiedergabeliste Meine Wiedergabeliste löschen Informations-Center Wetter-Information Finanz-Information Systeminformation FM-Radio DAB-Radio...
-
Page 16: Internetradio
INTERNETRADIO Drücken Sie STANDBY, um in den Betriebsmodus zu gehen. Drehen Sie das Navigationsrad, um durch das Hauptmenü zu blättern. OK drücken, um in die Untermenüs zu gelangen oder die Einstellungen zu bestätigen. Mit < ins vorherige Menü gehen. Meine Favoriten (Liste der gespeicherten Sender) Bis zu 250 Einträge mit Sendern und Ordner werden unterstützt. -
Page 17: Media-Center
Schlaf-Radio Wählen Sie Vögel, Klavier, Regen, Mineralbad, Weltraum und Welle als Einschlaffunktion. Zuletzt gehörte Sender Wählen Sie die 10 zuletzt gehörten Sender. Service Suchen Sie mit einem Suchwort nach Sendern aus der Liste. Fügen Sie durch die Eingabe der IP-Adresse ein neues Radio hinzu. Die hinzugefügten Sender werden in der „MyFavorite“-Liste gespeichert. -
Page 18: Informationscenter
Meine Wiedergabeliste Sie können eine Wiedergabeliste mit Favoriten von UPnP erstellen. Wenn Sie Musik abspielen, halten Sie OK gedrückt, um sie in Ihrer Wiedergabeliste abzuspeichern. Meine Wiedergabeliste leeren Wählen Sie diesen Punkt, um Ihre Wiedergabeliste zu leeren. My media U Gehen Sie auf die Internetseite http://www.mediayou.net/. -
Page 19: Einstellungen
EINSTELLUNGEN analog, digital Zeitanzeige Wenn MyMediaU aktiviert ist, erscheint im Hauptmenü MyMediaU ein Eintrag . Wenn im Internetradio verschiedene Konten angelegt wurde, wählen Sie hier das Standardkonto. Netzwerk Konfiguration des Netzwerks WLAN aktivieren oder deaktivieren: Wenn Sie WLAN aktivieren, wählt das System automatisch den benötigten Zugangspunkt. - Page 20 Es gibt 3 unabhängige Wecker: 2 Wecker zur einer Wecker fest eingestellten Uhrzeit (Alarm 1 , Alarm2) und einen (Alarm) Schlummerwecker. Drücken Sie auf der Fernbedienung ALARM, um direkt ins Einstellungsmenü zu gelangen. Wenn als Quelle für den Weckton das Internetradio eingestellt ist, wird der voreingestellte Sender verwendet.
- Page 21 Der Modus (Stereo/Mono) und die Empfindlichkeit des FM-Radios sind leicht einstellbar. Einstellung Im Menü von Internetradio gibt es einen Eintrag Lokale "Lokalradio". Sie können in diesem Menü den Ort Sender-ein- manuell festlegen oder das System den Ort automatisch stellung über die IP erkennen lassen. Wählen Sie den Wiedergabemodus des Mediacenters: Wiederga- AUS (keine Wiederholung oder Zufallswiedergabe),...
-
Page 22: Dnla / Upnp
DNLA / UPNP Sie können den DLNA-Namen nach Belieben ändern. Die Informationen unten sind eine Einführung in die Einrichtung des Medienstreaming vom PC oder anderen Medienservern. Lesen Sie die Anleitungen der Software oder Apps, die Sie für die Medienwiedergabe verwenden. Die Musikdateien müssen in den Formaten MP3, WHA, WAV oder AAC vorliegen. - Page 23 den iPod immer noch verwenden, um den Stream von anderen Servern zu steuern. Bitte beachten: Wenn Sie die DLNA-Streaming-Funktion am Internetradio verwenden, können Sie am Gerät nur die Lautstärke und Standby steuern. Die weiteren Steuerungsfunktionen sind beschränkt. Beenden Sie DLNA am PC oder Mobilgerät, bevor Sie die Steuerung am Gerät wieder übernehmen.
-
Page 24: Aux-Eingang
Entweder drücken Sie MODE, bis im Display BT erscheint, oder Sie wählen BT im Hauptmenü. Der BT-Suchton erklingt. Suchen Sie in den BT- Einstellungen des externen Geräts mit dem Namen „Silver Star Mini“. Zum Koppeln anklicken. Der Kopplungston erklingt. Sie können nun Musik über BT abspielen. -
Page 25: Dab+ Radio
Wählen Sie durch Drücken des Navigationsrades einen Speicherplatz (1-99) aus. Sender aufrufen Rufen Sie die gespeicherten Sender auf, indem Sie die Taste FAV drücken und durch drehen des Navigationsrads durch die Senderliste blättern. DAB+ RADIO Wählen Sie im Hauptmenü DAB/DAB+ aus (Navigationsrad drehen und drücken). -
Page 26: Fehlerbehebung
FEHLERBEHEBUNG Problem Vorgehen / Ursachen Stellen Sie sicher, dass das Radio und ein mit dem Netzwerk verbundener Rechner (der eine funktionierende Internetverbindung hat), im selben Netzwerk angemeldet sind. Ist ein DHCP-Server verfügbar oder haben Sie eine statische IP-Adresse eingegeben? Ist eventuell eine Firewall so eingestellt, dass ausgehende Ports blockiert sind? Manche Access Points / Repeater / Router könnten so eingestellt sein, dass nur Geräte... - Page 27 Sie können keinen Ordner für UPnP freigeben, weil Aktivieren Sie Filesharing. die Funktion gar nicht verfügbar ist (grau). Es ist möglich, dass Fehler auftreten, wenn das Internetradio Ordner auf einem PC scannt, zum Beispiel weil die Windows File Sharing Scan-Error Applikation abläuft.
-
Page 28: Hinweise Zur Entsorgung
HINWEISE ZUR ENTSORGUNG Befindet sich die linke Abbildung (durchgestrichene Mülltonne auf Rädern) auf dem Produkt, gilt die Europäische Richtlinie 2012/19/EU. Diese Produkte dürfen nicht mit dem normalen Hausmüll entsorgt werden. Informieren Sie sich über die örtlichen Regelungen zur getrennten Sammlung elektrischer und elektronischer Gerätschaften. - Page 29 Dear Customer, Congratulations on purchasing this equipment. Please read this manual carefully and take care of the following hints to avoid damages. Any failure caused by ignoring the items and cau- tions mentioned in the instruction manual are not covered by our warranty and any liability. Scan the QR code to get access to the latest user manual and other information about the product.
-
Page 30: Technical Data
TECHNICAL DATA Item number 10032791 10032792 Input: 100-240 V ~ 50/60 Hz , 0.6 A Power adaptor Output: 12 V / 1 A USB, AUX IN (3.5 mm), Line-out (3.5 mm) Connections FM radio Frequency range 87.5 MHz - 108 MHz Frequency range 174-240 MHz 802.11b/g/n... -
Page 31: Safety Instructions
SAFETY INSTRUCTIONS Please read this instruction manual thoroughly before using this appliance! Follow all the safety instructions to avoid damage cause by improper use. Keep the instruction manual for future reference. • Keep the instruction manual for future reference .Should this appliance be given to a third party ,then this instruction manual must also be handed over. - Page 32 Unplug the appliance from the power socket to switch it off completely. Use the mains plug as a disconnecting appliance. • If the appliance malfunctions due to electrostatic discharge or short- term overvoltage, disconnect it from the power supply and connect it once again.
-
Page 33: Product Description
PRODUCT DESCRIPTION Front Display Fav button Next button Standby button Alarm button 10 Vol+/Vol-/ok knob Menu button Previous button Dimmer button Sleep button Rear... - Page 34 Rear ON/OFF switch button 12 DC IN socket 13 Line out socket(3.5mm) 14 AUX IN socket(3.5mm) 15 USB port Bottom 16 Bass reflex tube...
-
Page 35: Remote Control
REMOTE CONTROL Standby button Stop button 16 Down cursor button Mute button 10 Play/ Pause button 17 OK button EQ set tone Mode selection button 18 Vol- button Dimmer button 12 Home button 19 Vol+ button Sleep button 13 Up cursor button 20 Input letters and Alarm button numbers button... -
Page 36: Initial Use
INITIAL USE • Before operation, please make sure that the VOLTAGE mentioned on the power supply is same as the voltage of your local area. • Use the supplied mains adaptor to connect the device to a household mains socket. •... - Page 37 press” Navigate/OK” button to confirm. Note: Below characters are available for the radio: Numbers (from 0-9) English letters (from A to Z and from a to z) Other charcters ( DEL,@,Blank, ,!,”,#,$,%,&,*,’,+ and (,) 2. WPS PBC network configuration Select “Yes WPS” when you would like set up with Wireless Network (WPS PBC) feature: If you are using a router with WPS button, you may set up the network connection simple via WPS function.
-
Page 38: Basic Operation
BASIC OPERATION Main Interface FM Radio Rotate button and press OK DAB+ Radio to access a menu item. Internet Radio Configuration Media Center Information Center Configuration Time Display Analog Digital To go back to the last menu level press LEFT. Manage my mediaU Wireless Network Configuration Network... - Page 39 Configuration Alarm Alarm 1 Turn on Turn off Alarm 2 Turn on Turn off NAP Alarm 1 (turn off) Timer Alarm Volume Language Dimmer Power Saving Turn On Display Color Monochrome Power Management Sleep Timer Buffer Weather Set Location Temperature Unit Show on Standy...
- Page 40 Configuration Manual Setup (Country) Local Radio Setup Manual Setup (City) Auto Detect Playback Setup Repeat all Repeat one Shuffle DLNA Setup Rename (AirMusic) AirMusic Control App Equaliser Resume When Power On Software Update Reset to Default...
- Page 41 DAB-Radio Internet Radio My Favorite Radio Station/Music Local Radio History Service Search Radio Station Add New Radio Station Media Center UPnP My Playlist Clear My Playlist Information Center Weather Information Financial Information System Information FM Radio DAB+ Radio...
-
Page 42: Internet Radio
INTERNET RADIO Press “Standby” to go to working mode and rotate Navigate to scroll through the main menu. Press OK (to enter sub menus or confirm settings) Press < to return to the previous menu. After connection of any station successful, station information will be shown and information content can be changed with <... -
Page 43: Media Center
Search radio station-Enter your keyword to search radio station from the list. Add new radio by adding IP address, the added stations will be stored in My Favorite. Note that the maximum character of the station name is 250. MEDIA CENTER Select the USB/UPnP mode or playlist mode with Navigate/OK or with the Mode button. -
Page 44: Information Center
Clear My Playlist Please select this option for clearing the playlist .Please confirm the questions. My media U Display and playback your own mediaU station list on the mediaU server. Set your account first. To activate your own station list, follow the steps below: Access http://www.mediayou.net/. -
Page 45: Configuration
CONFIGURATION Analog/digital Time Display When it is enabled, my mediaU will exist on the main MyMediaU menu.If various mediaU accounts exist in the Radio, Select the default login account in here. Wireless Network Configuration: Enable/disable WiFi Netzwerk network. When you enable the WiFi network, the system will automatically select the required AP. - Page 46 Date & Time Setup the date and time Set time format display as 12 Hour or 24 Hour. Set date format (YYYY/MM/DD; DD/ MM/YYYY; MM/ DD/YYYY) (Y=Jahr, M= Monat, D= Tag) Daylight Saving Time : “ON:, the time will be one hour More than the actual time.
- Page 47 Power Mgmt Configure to go to standby mode automatically during in the menu or/ and without Wifi signal. Choose the power management timer ( 5/15/30mins) to set the duration of the radio to switch standby mode automatically when you are not controlling it. Choose Turn off to ignore the power management function.
- Page 48 Software Update software. If there is an updated software version Update on the server, the system will notify you .Before starting a software upgrade, ensure that the unit is plugged into a stable mains power connection. Disconnected power during a software update may permanently damage the unit.
-
Page 49: Dnla / Upnp
DNLA / UPNP You may change the default DLNA name as you like. The information below is the introduction of how to setup media streaming from PC or other media server. Study the own instruction of the software or apps you use to enjoy music streaming if necessary. - Page 50 Please note: When using DLNA music streaming function on the Internet Radio, you can only control the volume and standby via the unit. It is restricted to control the other functions. Stop DLNA on PC, mobile or tablet before you resume Internet radio’s own control. Control via Air Music Control You can operate the internet radio via you smartphone or tablet.
-
Page 51: Aux (Line Input)
AUX (LINE INPUT) Aux in mode plays audio from an external source such as an MP3 player. To play audio with Aux in mode Turn the volume low on both the Radio and if adjustable, the audio source device. Connect the external audio source to the AUX IN 3.5mm stereo socket. Either press MODE until the display shows AUX IN or selects AUX in under Main menu. -
Page 52: Dab+ Operation
DAB+ OPERATION Select ‘DAB/DAB+’ on the main display screen by turning the knob and pressing the navigation knob or with the remote navigation buttons. On first use of the DAB on your radio, your radio will begin scanning for DAB stations and will show’ Scanning’ on the display screen. It will display how many stations have been found as the search continues. -
Page 53: Troubleshooting
TROUBLESHOOTING Problem Cause / Solution Confirm that a Wi-Fi or Ethernet Wired connected PC can access the internet (i.e. can browse the web) using the same network. Check that a DHCP server is available, or that you have configured a static IP address on the radio. Check that you firewall is not blocking any outgoing ports. - Page 54 The station is not broadcasting at this time of the day (remember it may be located in a different time zone). The station has too many people trying to attach to the radio station server and the server capacity is not large enough.
- Page 55 When the internet radio is scanning the content of the folders on a PC, it is possible that a scan error may occur if the windows file sharing application times out. This is most likely to occur if both the PC with the media Scan-Error content and the Internet Radio are connected wirelessly.
-
Page 56: Disposal Considerations
DISPOSAL CONSIDERATIONS According to the European waste regulation 2012/19/EU this symbol on the product or on its packaging indicates that this product may not be treated as household waste. Instead it should be taken to the appropriate collection point for the recycling of electrical and electronic equipment. - Page 57 Chère cliente, cher client, Toutes nos félicitations pour l’acquisition de ce nouvel appareil. Veuillez lire attentivement et re- specter les instructions de ce mode d’emploi afin d’éviter d’éventuels dommages. Nous ne saurions être tenus pour responsables des dommages dus au non-respect des consignes et à la mauvaise utilisation de l’appareil.
-
Page 58: Fiche Technique
FICHE TECHNIQUE 10032791 10032792 Numéro d'article Entrée : 100-240 V ~ 50/60 Hz , 0,6 A Alimentation de l'adaptateur Sortie: 12 V / 1 A secteur USB, entrée Aux (3,5 mm), Line-out (3,5 mm) Connectivité Radio FM Plage de fréquences 87,5 MHz - 108 MHz Plage de fréquences 174-240 MHz... -
Page 59: Consignes De Sécurte
CONSIGNES DE SÉCURTE Lisez entièrement les instructions d'utilisation avant d'utiliser l'appareil. Suivez toutes les instructions de sécurité pour éviter les dommages causés par une mauvaise utilisation. • Conservez le mode d'emploi pour vous y référer ultérieurement. Si vous transmettez l'appareil à une tierce personne, ce manuel doit également être transmis. - Page 60 • Tenez toujours la fiche d'alimentation et non le câble pour débrancher l'appareil. • Connectez l'appareil à une prise de courant facilement accessible pour pouvoir l débrancher rapidement en cas d'urgence. Pour désactiver complètement l'appareil et le débrancher de l'alimentation électrique, débranchez la fiche.
-
Page 61: Aperçu De L'appareil
APERÇU DE L'APPAREIL Face avant Ecran Stations Nuit mémorisées Veille Avance Alarme Menu 10 Volume +/ Retour Volume – Dimmer Dos de l'appareil... - Page 62 Dos de l'appareil Bouton de marche / arrêt 12 DC IN 12 V: prise de l'adaptateur secteur 13 LINE OUT: sortie audio stéréo (3,5 mm) 14 AUX IN: entrée audio stéréo (3,5 mm) 15 Port USB Dessous de l'appareil 16 Tube bassreflex...
-
Page 63: Télécommande
TÉLÉCOMMANDE Veille Stop 17 OK: confirmer Muet 10 Lecture / Pause 18 Volume – Égaliseur Mode 19 Volume + immer 12 Menu principal 20 Saisie de chiffres et lettres Répétition de 13 Curseur haut l'alarme 21 Appeler une 14 Curseur gauche station Alarme 15 Curseur droite... -
Page 64: Mise En Marche
MISE EN MARCHE • Avant de démarrer, assurez-vous que la tension indiquée sur la plaque signalétique correspond à celle de votre secteur. • Utilisez l'adaptateur secteur fourni pour le brancher à une prise électrique domestique. • Allumez l'appareil avec l'interrupteur marche / arrêt situé à l'arrière. •... - Page 65 Les caractères suivants sont disponibles sur l'appareil : Chiffres (0-9) Lettres latines (A-Z, a-z) Autres caractères : ( DEL,@,Blank,!,”,#,$,%,&,*,’,+ and (,) 2. Configuration réseau WPS PBC Sélectionnez "Oui WPS" si vous souhaitez configurer un réseau sans fil (WPS PBC). Si vous utilisez un routeur avec un bouton WPS, vous pouvez facilement le configurer à...
-
Page 66: Structure Du Menu
STRUCTURE DU MENU Tournez le bouton Menu principal FM-Radio rotatif et appuyez pour DAB-Radio sélectionner. Internet-Radio Paramètres Media-Center Centre d'informations Paramètres Pour revenir Analogique Affichage de en arrière d'un l'heure élément de menu, appuyez Numérique sur GAUCHE. Gestion de My mediaU Réseau Paramètres de réseau sans fil... - Page 67 Paramètres Alarme Alarme 1 Marche Arrêt Alarme 2 Marche Arrêt Alarme snooze Minuterie Volume de l'alarme Langue Mode d'économie Réglage d'énergie de la luminosité Allumer Ecran Couleur Monochrome Paramètres d'énergie Arrêt programmable Mémoire tampon Météo Paramètres locaux Unité de température Affichages en mode veille...
- Page 68 Paramètre Automatique (pays) Paramètres de stations locales Manuel (ville) Détection automatique Désactivé Paramètres de lecture Répéter tous Répéter un titre Ordre aléatoire Appareil Renommer (AirMusic) Application AirMusic Control Egaliseur Activé Poursuite de le lecture Désactivé Mise à jour logicielle Retour aux paramètres d'usine...
- Page 69 Radio Internet Mes favoris Station de radio / musique Station locale Dernière station écoutée Service Recherche de station radio Ajouter une station radio Media -Center UPnP Ma liste de lecture Effacer ma liste de lecture FM-Radio DAB-Radio Centre d'informations Informations météo Informations financières Informations système Radio FM...
-
Page 70: Radio Internet
RADIO INTERNET Appuyez sur STANDBY pour accéder au mode de fonctionnement. Tournez la molette de navigation pour faire défiler le menu principal. Appuyez sur OK pour entrer dans les sous-menus ou pour confirmer les réglages. Retournez au menu précédent avec <. Mes favoris (Liste des stations mémorisées) L'appareil prend en charge jusqu'à... -
Page 71: Media-Center
Fonction arrêt automatique Choisissez oiseaux, piano, pluie, bain minéral, espace et onde comme arrêt programmé. Dernières stations écoutées Choisissez parmi les 10 dernières stations écoutées. Service Utilisez un mot-clé pour rechercher des stations dans la liste. Ajoutez une nouvelle radio en entrant l'adresse IP. Les stations ajoutées sont stockées dans la liste MyFavorite. -
Page 72: Information Center
Meine Wiedergabeliste Sie können eine Wiedergabeliste mit Favoriten von UPnP erstellen. Wenn Sie Musik abspielen, halten Sie OK gedrückt, um sie in Ihrer Wiedergabeliste abzuspeichern. Meine Wiedergabeliste leeren Wählen Sie diesen Punkt, um Ihre Wiedergabeliste zu leeren. My media U Allez sur le site http://www.mediayou.net/. -
Page 73: Paramètres
PARAMÈTRES analog, digital Affichage de l'heure Si MyMediaU est activé, une entrée apparaît dans le MyMediaU menu principal. Si différents comptes ont été créés sur la radio Internet, sélectionnez ici le compte par défaut. Configuration du réseau Réseau Activer ou désactiver le WiFi : lorsque vous activez le WiFi, le système sélectionne automatiquement le point d'accès requis. - Page 74 3 réveils indépendants sont disponibles : 2 réveils à Réveil heure fixe (Alarme 1, Alarme 2) et un (Alarm) Rappel d'alarme. Appuyez sur ALARM sur la télécommande pour accéder directement au menu des paramètres. Si la source de l'alarme est la radio Internet, la station préréglée sera utilisée.
- Page 75 Réglages FM Vous pouvez facilement régler le mode (stéréo/mono) et al sensibilité de la radio FM. Dans le menu de la radio internet se trouve une entrée Réglage "Radio locale". Vous pouvez définir manuellement des radios l'emplacement à partir de ce menu ou laisser le système locales détecter automatiquement l'emplacement via l'adresse Sélectionnez le mode de lecture du Mediacenter : OFF...
-
Page 76: Dnla / Upnp
DNLA / UPNP nformations ci-dessous constituent une introduction à la configuration du streaming multimédia à partir du PC ou d'autres serveurs multimédias. Lisez les instructions du logiciel ou des applications que vous utilisez pour la lecture multimédia. Les fichiers musicaux doivent être au format MP3, WHA, WAV ou AAC. - Page 77 Vous pouvez tout de même utiliser l'iPhone ou l'iPod pour contrôler le flux d'autres serveurs. Remarque : Si vous utilisez la fonction de diffusion en continu DLNA sur la radio Internet, vous ne pouvez contrôler que le volume et la veille sur l'appareil.
-
Page 78: Entrée Aux
ENTRÉE AUX En mode Aux, vous pouvez lire les sources audio externes telles que les lecteurs MP3. Lecture sur l'entrée AUX Pour lire l'entrée AUX, baissez le volume sur les deux appareils (si disponible sur l'appareil externe). Connectez la source audio externe à AUX IN (prise jack 3,5 mm). Appuyez sur MODE jusqu'à... -
Page 79: Dab+ Radio
apparaît sur l'affichage. Utilisez la molette de navigation pour faire défiler les emplacements de mémoire. Sélectionnez un emplacement de mémoire (1 à 99) en appuyant sur la molette de navigation. Appeler une station Rappeler les stations mémorisées en appuyant sur le bouton FAV et en faisant défiler la liste des stations en tournant la molette de navigation. -
Page 80: Résolution Des Problèmes
RÉSOLUTION DES PROBLÈMES Problème Procédure / causes Stellen Sie sicher, dass das Radio und ein mit dem Netzwerk verbundener Rechner (der eine funktionierende Internetverbindung hat), im selben Netzwerk angemeldet sind. Ist ein DHCP-Server verfügbar oder haben Sie eine statische IP-Adresse eingegeben? Ist eventuell eine Firewall so eingestellt, dass ausgehende Ports blockiert sind? Manche Access Points / Repeater / Router... - Page 81 Vous ne pouvez pas partager un dossier avec Aktivieren Sie Filesharing. UPnP car la fonctionnalité n'est pas disponible (gris). Es ist möglich, dass Fehler auftreten, wenn das Internetradio Ordner auf einem PC scannt, zum Beispiel weil die Windows File Sharing Erreur de scan Applikation abläuft.
-
Page 82: Informations Sur Le Recyclage
INFORMATIONS SUR LE RECYCLAGE Vous trouverez sur le produit l’image ci-contre (une poubelle sur roues, barrée d‘une croix), ce qui indique que le produit se trouve soumis à la directive européenne 2012/19/UE. Renseignez-vous sur les dispositions en vigueur dans votre région concernant la collecte séparée des appareils électriques et électroniques. - Page 83 Gentile Cliente, La ringraziamo per aver acquistato il dispositivo. La preghiamo di leggere attentamente le seguenti istruzioni per l’uso e di seguirle per evitare possibili danni tecnici. Non ci assumiamo alcuna responsabilità per danni scaturiti da una mancata osservazione delle avvertenze di sicurezza e da un uso improprio del dispositivo.
-
Page 84: Dati Tecnici
DATI TECNICI 10032791 10032792 Numero articolo Ingresso : 100-240 V ~ 50/60 Hz , 0,6 A Ingresso alimentazione Uscita: 12 V / 1 A USB, entrée Aux (3,5 mm), Line-out (3,5 mm) Connessioni Radio FM Intervallo di frequenza 87,5 MHz - 108 MHz Intervallo di frequenza 174-240 MHz 802.11b/g/n... -
Page 85: Indicazioni Di Sicurezza
INDICAZIONI DI SICUREZZA Leggere completamente il manuale dell'utente prima di utilizzare il dispositivo. Seguire tutte le istruzioni di sicurezza per evitare danni da uso improprio. • Conservare le istruzioni operative come riferimento. Qualora il dispositivo venga consegnato a una terza persona, questo manuale utente deve essere altrettanto allegato. - Page 86 • Collegare il dispositivo a una presa di corrente facilmente accessibile, in modo da tirarlo fuori rapidamente in caso di emergenza. Per disattivare completamente il dispositivo o per scollegarlo dall´alimentazione, tirare il cavo di alimentazione. • Se il dispositivo non funziona per causa di cariche elettrostatiche o di breve picco di tensione, scollegare il dispositivo dall´alimentatore e collegarlo di nuovo.
-
Page 87: Prospetto Del Dispositivo
PROSPETTO DEL DISPOSITIVO Parte anteriore Display Emittenti salvate Avanti Standby Sveglia 10 Volume+/Volume- Menu Indietro Dimmer Sonno Dos de l'appareil... - Page 88 Retro On/Off 12 DC IN 12 V: connessione del trasformatore 13 LINE OUT: uscita audio Stereo (3,5 mm) 14 AUX IN: ingresso audio Stereo (3,5 mm) 15 Connessione USB Dessous de l'appareil 16 Tubo Bassreflex...
-
Page 89: Telecomando
TELECOMANDO Standby Stop basso Muto 10 Play/Pausa 17 OK: confermare Equalizzatore Modalità 18 Volume- Dimmer 12 Menu principale 19 Volume+ Snooze 13 Cursore verso 20 Inserire numeri e l’alto lettere Sveglia 14 Cursore a sinistra 21 Aprire emittente Titolo precedente 15 Cursore a destra 22 Salvare emittente Titolo successivo... -
Page 90: Attivazione
ATTIVAZIONE • Prima dell´attivazione faccia attenzione che la tensione indicata nella targhetta coincida con la tensione di casa vostra. • Utilizzare l'adattatore CA, incluso nella consegna, per collegarlo ad una spina a casa vostra. • Collegare il dispositivo con l'interruttore on/off sul retro. •... - Page 91 I seguenti caratteri sono disponibili per il dispositivo: Cifre (0-9) Lettere latine (AZ, az) Altri caratteri :! (DEL, @, Spazio vuoto,", #, $,%, &, *, '+ e (,) 2. Configurazione di rete WPS PBC Selezionare "Sì WPS" quando si vuole impostare con una rete wireless (WPS PBC).
-
Page 92: Struttura Del Menu
STRUTTURA DEL MENU Ruotare la manopola e Menu principale Radio FM premerla per selezionare Radio DAB qualcosa. Impostazioni Centro informazioni Web radio Media-Center Impostazioni Per tornare Analagico Orario indietro di un punto del menu, Digitale premere LEFT (SINISTRA). Gestire My mediaU Rete Impostazione rete radio Rete radio (WPS PBC) - Page 93 Impostazioni Sveglia Sveglia 1 Sveglia 2 Snooze Timer Volume sveglia Lingua Modalità di risparmio energetico Volume sveglia Accendere Display Colori Monocromatico Impostazioni energetiche Timer di autospegnimento Memoria cache Meteo Impostazioni locali Unità della temperatura Indicazione in standby...
- Page 94 Impostazioni Automatica (Paese) Impostazione stazioni locali Manuale (Città) Rilevamento automatico Impostazione riproduzione Ripetere tutti Ripetere uno solo Casuale Rinominare (AirMusic) Dispositivo App di controllo AirMusic Equalizzatore Proseguire con la riproduzione Aggiornamento software Tornare alle impostazioni di fabbrica...
- Page 95 Web radio I miei preferiti Emittente radio/ Musica Stazione locale Emittente ascoltata più di recente Service Cercare emittente Inserire emittente Centro multimedia UPnP Il mio elenco di riproduzione Cancellare il mio elenco di riproduzione Radio FM Radio DAB Centro informazioni Informazioni meteo Informazioni finanziarie Informazioni di...
-
Page 96: Web Radio
WEB RADIO Premere STANDBY per passare in modalità operativa e ruotare la manopola di navigazione per scorrere all’interno del menu principale. Premere OK per accedere ai sottomenu o per confermare le impostazioni. Premere < per tornare al menu precedente. I miei preferiti (lista delle emittenti salvate) La lista supporta 250 preferiti tra emittenti e cartelle. -
Page 97: Media-Center
Service Cercare emittenti radio nella lista con una parola chiave. Inserire l’indirizzo IP di una nuova emittente radio. Le emittenti aggiunte vengono salvate ne “i Miei preferiti”. Attenzione, il numero massimo di caratteri per il nome dell’emittente è di 250. MEDIA-CENTER Selezionare con la rotella la modalitá... -
Page 98: Centro Di Informazioni
Svuotare la mia Playlist Selezionare questo punto per svuotare la vostra lista di riproduzione. My media U Andare sull´indirizzo internet http://www.mediayou.net/. Creare un account MediaU. Accedi al sito Web. Inserisci l'indirizzo MAC della radio Internet nel sito. Queste informazioni le ottiene tramite “Centro di Informazioni – informazioni di sistema>... -
Page 99: Paramètres
PARAMÈTRES Analogico, digitale Indicatore dell´ora Quando MyMediaU è attivato, appare nel menu MyMediaU principale. Se sono stati attivati in internet radio diversi account, selezionare in questo caso il conto standard. Networking Configurazione del networking Attivare o disattivare WLAN: Se attivi WLAN, il sistema seleziona automaticamente il punto di accesso necessario. - Page 100 Ci sono 3 sveglie indipendenti: 2 sveglie per un tempo Sveglia fisso (Allarme 1, Allarme 2) e una sveglia- sonno. Premere (Allarme) sul telecomando ALARM, per andare direttamente al menu delle impostazioni. Se è impostato come tono di sveglia la, è utilizzata la stazione preimpostata in precedenza.
- Page 101 La modalità (stereo / mono) e la sensibilità della radio Impostazio- FM sono facilmente regolabili. ne FM Nel menu di Internet Radio c´è una voce “radio locale”. Imposta- Puoi selezionare manualmente il luogo oppure puoi far zione del riconoscere automaticamente il luogo al sistema tramite trasmettito- l´IP.
-
Page 102: Dnla / Upnp
DNLA / UPNP Puoi cambiare il nome DLNA a piacere. Le informazioni qui di seguito sono un'introduzione alla creazione di mezzi di comunicazione in streaming dal PC o da altri media server. Leggere le istruzioni del software o delle applicazioni che si utilizzano per la riproduzione multimediale. I file musicali devono essere nei formati MP3, WHA, WAV o AAC. - Page 103 ulteriori funzioni di controllo sono limitate. Terminare la funzione DLNA sul PC o sul dispositivo mobile, prima di riprendere il controllo sul dispositivo. Controllo applicazioni su Air Music Control Puoi controllare Internet Radio tramite smartphone o tablet. Scarica l´applicazione “Air Music Control” da “Google Play Store” oppure da “Apple AppStore”.
-
Page 104: Ingresso Aux
INGRESSO AUX Nell´operazione Aux vengono riprodotte esterne fonti audio come lettori MP3. Riproduzione tramite ingresso-AUX Per la riproduzione tramite ingresso AUX, accendere i volumi su entrambi i dispositivi (se disponibile sul dispositivo esterno). Collegare la fonte audio esterna ad AUX IN (jack da 3,5 mm). Premere MODE fino a quando appare sul display AUX IN. -
Page 105: Dab+ Radio
Richiamare la stazione Chiami i canali memorizzati premendo il tasto FAV e ruotando la rotella di navigazione dalla lista dei canali. DAB+ RADIO Selezionare nel menu principale DAB/DAB + (ruotare la rotellina di navigazione e premere). In alternativa, è possibile utilizzare i pulsanti di navigazione sul telecomando. -
Page 106: Risoluzione Dei Preblemi
RISOLUZIONE DEI PREBLEMI Problema Procedura/Cause Assicurati che la radio e un computer sinao connessi alla rete (quello ha una connessione Internet funzionante), siano connessi alla stessa rete sono. È disponibile un server DHCP o hai inserito un indirizzo IP statico? È... - Page 107 È possibile che si verifichino errori quando la cartella della radio internet scansiona su un PC, ad esempio perché l´applicazione Windows File Errore scansione Sharing scade. Collega il PC collegato alla rete per la scansione. La velocità aumenta in modo significativo.
-
Page 108: Indicazioni Sullo Smaltimento
INDICAZIONI SULLO SMALTIMENTO Se si trova l´immagine a sinistra (cassonetto barrato su ruote) sul prodotto, si applica la direttiva europea 2012/19/EU. Questi prodotti non possono essere smaltiti con i rifiuti domestici. Informati sui regolamenti locali della raccolta separata di dispositivi elettrici ed elettronici. - Page 109 Estimado cliente: Le felicitamos por la adquisición de este producto. Lea atentamente el siguiente manual y siga cuida- dosamente las instrucciones de uso con el fin de evi- tar posibles daños. La empresa no se responsabiliza de los daños ocasionados por un uso indebido del producto o por haber desatendido las indicaciones de seguridad.
-
Page 110: Datos Técnicos
DATOS TÉCNICOS 10032791 10032792 Número de artículo Entrada: 100-240 V ~ 50/60 Hz , 0,6 A Suministro eléctrico del aparato Salida: 12 V - 1 A USB, entrada aux (3,5 mm), line-out (3,5 mm) Conexiones Radio FM Rango de frecuencia 87,5 MHz - 108 MHz Rango de frecuencia 174-240 MHz... -
Page 111: Indaciones De Seguridad
INDACIONES DE SEGURIDAD Antes de utilizar el aparato, lea el manual de instrucciones. Siga todas las indicaciones de seguridad para evitar daños provocados por un uso inadecuado. • Conserve este manual de instrucciones para consultas posteriores. Si entrega el aparato a una tercera persona, debe incluir también este manual de instrucciones. - Page 112 • Conecte el aparato a una toma de corriente de fácil acceso para que, en caso de emergencia, se pueda desconectar inmediatamente. Desconecte el enchufe de la toma de corriente para que el aparato deje de recibir energía. • Si el aparato no funciona con motivo de una carga electroestática o un pico de tensión breve, desconecte el aparato del suministro eléctrico y vuelva a conectarlo de nuevo.
-
Page 113: Visión General Del Aparato
VISIÓN GENERAL DEL APARATO Parte delantera Display Emisoras Modo noche guardadas Standby Adelante Alarma Menú 10 Volumen+/ Atrás volumen- Atenuador Parte trasera... - Page 114 Parte trasera Botón on/off 12 CC IN 12V: Toma para conectar la fuente de alimentación 13 LINE OUT: Salida estéreo de audio (3,5 mm) 14 AUX IN: Entrada estéreo de audio (3,5 mm) 15 Conexión USB Parte inferior 16 Tubo bass reflex...
-
Page 115: Mando A Distancia
MANDO A DISTANCIA Standby 10 Reproducción/ 17 OK: Confirmar pausa Silencio 18 Volumen - Modo Ecualizador 19 Volumen + 12 Menú principal Atenuador 20 Introducir números 13 Cursor arriba y letras Función de repetición 14 Cursor a la 21 Acceder a las izquierda emisoras Alarma... -
Page 116: Puesta En Fucionamiento
PUESTA EN FUCIONAMIENTO • Compruebe en la placa técnica la tensión y asegúrese de que sea compatible con la del suministro eléctrico de su hogar antes de poner en marcha el aparato. • Utilice la fuente de alimentación incluida para conectarlo a una toma de corriente doméstica. - Page 117 Están disponibles los siguientes caracteres para el aparato:Números (0-9) Letras latinas (A-Z, a-z) Otros caracteres: ( DEL, @, espacio,!,”,#,$,%,&,*,’,+ y (,) 2. Configuración de red WPS PBC Seleccione "Sí WPS" si desea realizar la instalación con una red inalámbrica (WPS PBC). Si utiliza un router con botón WPS, puede realizar fácilmente la configuración con la función WPS.
-
Page 118: Estructura Del Menú
ESTRUCTURA DEL MENÚ Gire la perilla y púlsela para Menú principal Radio FM seleccionar. Radio DAB Centro multim Ajustes Centro de información Radio de internet edia Ajustes Pulse Analógico Reloj IZQUIERDA para volver. Digital Gestionar My mediaU Configuración de la red inalámbrica Red inalámbrica (WPS PBC) Configuración manual Comprobar red al encender el... - Page 119 Ajustes Despertador Alarma 1 Encender Apagar Alarma 2 Encender Apagar Alarma de repetición Temporizador Volumen de la alarma Idioma Modo ahorro de energía Réglage de la luminosité Encender Pantalla A color Monocromática Ajustes de energía Temporizador de apagado Memoria intermedia Información Ajustes locales meteorológica...
- Page 120 Configuración Automático (país) Configuración de radio local Manual (ciudad) Reconocimiento automático Desactivar Configuración de reproducción Repetir todo Repetir pista actual Aleatorio Cambiar de nombre Aparato (AirMusic) AirMusic Control App Ecualizador Activar Continuar con la reproducción Desactivar Actualización de software Restablecer configuración predeterminada...
- Page 121 Radio de internet Mis favoritos Emisoras de radio/ Música Radio local Última emisora escuchada Servicio Buscar emisoras de radio Añadir emisoras de radio Centro multimedia UPnP Mi lista de reproducción Eliminar Mi lista de reproducción Radio FM Radio DAB Centro de información Información de tiempo Información de finanzas...
-
Page 122: Radio Internet
RADIO INTERNET Pulse STANDBY para acceder al modo de funcionamiento. Gire la rueda de navegación para navegar por el menú principal. Pulse OK para acceder a los submenús o para confirmar los ajustes. Acceder con < al menú anterior. Mis favoritos (lista de emisoras guardadas Soporta hasta 250 entradas con emisoras y carpetas. -
Page 123: Centro De Medios
Servicio Con una palabra clave, busque las emisoras de la lista. Añada una nueva radio introduciendo la dirección IP. Las emisoras añadidas se guardan en la lista "MyFavorite". Recuerde que el número mayor de caracteres para el nombre de la emisora es de 250. CENTRO DE MEDIOS Seleccione el modo USB/UPnP o el modo Playlist con el regulador de navegación. -
Page 124: Centro De Información
My mediaU Vaya a la página de internet http://www.mediayou.net/. Cree una cuenta mediaU. Inicie sesión en la página web. Introduzca la dirección MAC de la radio de internet en la página de internet. Obtendrá esta información en el "Centro de información > Información del sistema > información de red inalámbrica. -
Page 125: Ajustes
AJUSTES analógica, digital Visualización de la hora Cuando está activada MyMediaU, aparece en el menú MyMediaU principal una entrada. Si se han creado distintas cuentas en la radio de internet, seleccione la cuenta estándar. Configuración de la red Activar o desactivar WLAN: Si selecciona WLAN, el sistema escoge automáticamente el punto de acceso necesario. - Page 126 Hay 3 alarmas independientes: 2 alarmas para una hora Despertador fija configurada (Alarma 1, Alarma 2) y una alarma de (Alarma) repetición. Pulse ALARM en el mando a distancia para acceder directamente al menú de configuración. Cuando se configura la fuente para el tono de alarma de la radio de internet, se utiliza la emisora predeterminada.
- Page 127 El modo (estéreo/mono) y la sensibilidad de la radio FM Sintonización se pueden regular fácilmente. En el menú de la radio de internet aparece la entrada Configuración "radio local". Puede establecer manualmente la de emisoras ubicación en este menú o dejar que el sistema detecte locales automáticamente la ubicación mediante la IP.
-
Page 128: Dnla / Upnp
DNLA / UPNP Puede modificar los nombres DLNA como desee. La información más abajo es una introducción de la transmisión de medios desde el PC o de otros servidores de medios. Lea las instrucciones del software o la app que utilice para la reproducción de medios. - Page 129 de nuevo. Control app a través de Air Music Control Puede controlar la radio de internet a través de su smartphone o tablet. Para ello, descargue la app "Air Music Control" de la "Google Play Store" o de la "Apple AppStore". Los dispositivos deben estar conectados a la misma red..
-
Page 130: Entrada
ENTRADA En funcionamiento Aux, se reproducen fuentes de audio externas, como el reproductor MP3.t Reproducir a través de la entrada AUX Para reproducir a través de la entrada AUX, reduzca el volumen de ambos dispositivos (en caso de que esté disponible en el dispositivo externo). Conecte la fuente de audio externa al AUX IN (conector RCA de 3,5 mm). -
Page 131: Radio Dab
de memoria (1-99). Acceder a las emisoras Acceda a la emisora guardada pulsando el botón FAV y girando el regulador de navegación en la lista de emisoras. RADIO DAB+ Seleccione en el menú principal DAB/DAB+ (girar y presionar regulador de navegación). -
Page 132: Resolución De Problemas
RESOLUCIÓN DE PROBLEMAS Problema Procedimiento/causa Asegúrese de que la radio y un ordenador conectado a la red (que tenga una conexión a internet funcional) estén registrados en la misma red. ¿Hay un servidor DHCP disponible o ha introducido una dirección IP estática? ¿Se ha configurado un cortafuegos que haya bloqueado puertos de entrada? Muchos puntos de acceso/ repetidores/ router pueden configurarse de... - Page 133 Es posible que se produzca un error cuando la radio de internet busca carpetas en un Pc, por ejemplo, porque la aplicación de compartición Error de búsqueda de archivos de Windows no esté disponible. Conecte el ordenador a la red por cable para aumentar notablemente la velocidad de la búsqueda.
-
Page 134: Retirada Del Aparato
RETIRADA DEL APARATO Si el aparato lleva adherida la ilustración de la izquierda (el contenedor de basura tachado), entonces rige la directiva europea 2012/19/UE. Este producto no debe arrojarse a un contenedor de basura común. Infórmese sobre las leyes territoriales que regulan la recogida separada de aparatos eléctricos y electrónicos.
Need help?
Do you have a question about the Silver Star Mini and is the answer not in the manual?
Questions and answers