Table of Contents
Advertisement
Quick Links
Advertisement
Table of Contents

Related Manuals for Qeedji SMT210


Summary of Contents for Qeedji SMT210
- Page 1 User manual SMT210 4.13.13 0 0 2G...
- Page 2 Product information Product design and specifications are subject to change at any time and `Qeedji` reserves the right to modify them without notice. This includes the hardware, the embedded software and this manual, which should be considered as a general guide to the product. The accessories supplied with the product may differ slightly from those described in this manual, depending on the developments of the various suppliers.
-
Page 3: Table Of Contents
Table of contents Part I : Description and installation Introduction Getting started with the device Device fixture 1.2.1 Device dimensions 1.2.2 Labelling 1.2.3 Device start-up step 1.2.4 Test card 1.2.5 LEDs behaviour Connectors Part II : Applicative user interface Applicative user interface Part III : Administration console user interface Administration console user interface Configuration >... -
Page 4: Part I : Description And Installation
Description and installation Part I... -
Page 5: Introduction
1.1 Introduction This manual explains how to install and configure your SMT210 device. Recommendations and warnings This device is designed to be used indoor. This device is intended to work with the power supply unit. This power supply unit must be connected to a mains socket conforming to standard NF C 15-100. -
Page 6: Getting Started With The Device
1.2 G etting started with the device Front face and side face RFID tag sensor, Left side LED, Right side LED, Built-in speaker, Touch screen. Bottom face Power supply connector, Power supply red LED, Status green LED, J ack 3.5 mm GPIO connector, RJ 45 LAN PoE connector, Phoenix GPIO connector, SD card connector,... -
Page 7: Device Fixture
1.2.1 Device fix ture... -
Page 8: Device Dimensions
1.2.2 Device dimensions... -
Page 9: Labelling
1.2.3 Labelling Product label The model of the device, the power supply characteristics, the serial number (PSN) and the MAC address are written on a label stuck on the case. Packingbox label This is the label stuck also on the packingbox. It is showing information on: the device model, the serial number (PSN). -
Page 10: Device Start-Up Step
1.2.4 Device start-up step Step 1 (T0 = 0 s) Step 2 (T ~ 21 s) Step 3 (T ~ 1 min) Device start-up initialisation Device start-up finalisation Nominal mode This phase duration is depending on During this step, the device has to some variable values ( like NTP) , play the App content. -
Page 11: Test Card
1.2.5 Test card At the factory, the device content set by default is the . The chart displays important information to assist in the device configuration: Test Card ☛ The star pictogram is showing the chosen identification method in the device. It can be . -
Page 12: Leds Behaviour
1.3 LEDs behaviour LED POWER behaviour (power on device) State Information OK: Power supplied Error: Power supply issue ¹ LED LAN behaviour (power on device) State Information There is no network traffic on the Ethernet connector. Blinking The blinking frequency is indicating the data rate on Ethernet connector. LED STATUS behaviour depending on device start-up steps •... - Page 13 ¹ If the problem persists in despite of an appropriate power-supply, contact support@ qeedji.tech. ² If the problem persists, it is recommended to find out the media not supported yet by the system and remove it from content. ³ If the problem persists after a partition repairing, contact support@ qeedji.tech.
-
Page 14: Connectors
1.4 Connectors Power supply connector (12 V DC - 1.2 A) LAN connector Ethernet RJ -45. 10/100 BaseT. It is recommended to use schielded calbe. J ack 3.5 mm connector (G PIO4) N° Name Write/ Read Control Voltage reference 3.3 V GPIO4 IN ou OUT CPU/GPIO4... - Page 15 Two wires configuration for GPIO4: Output configuration for GPIO4: J ack 3.5 mm G PIO4 configuration The GPIO configuration des GPIOs can be realized by editing some user preferences in the user interface or thanks to a Administration console configuration script. H ow to configure the J ack 3.5 mm connector: / / Set J ack 3.5 mm mode infrared if ( aDirection == "...
- Page 16 The Phoenix connector has 2 functions: the capability to drive with the GPIO1 an internal relay, allowing for example to open or close an electric door, the capability to drive a peripheral or get the state of another peripheral thank to the GPIO2 and GPIO3. PIN N°...
- Page 17 Application when using a strike In case the device SMT210 has to drive a strike for an electric door, it is highly recommended to check, before any use, that an additional freewhell diode is really installed with the strike. Please refer to the strike User manual. If no frewheel diode is mounted on the electrical system of the strike when using for the first time, the user acts to deliberatly degrade the SMT210 device which is not warrantied in this case.
- Page 18 Set Phoenix direction: input or output if ( aDirection == " out" ) Services.prefs.setBoolPref( " innes.app-profile.gpio-input.phoenix-gpio_ 1.phoenix_ 1." + aPort + " .authoriz ed" , false) ; Services.prefs.setBoolPref( " innes.app-profile.gpio-output.phoenix-gpio_ 1.phoenix_ 1." + aPort + " .authoriz ed" , true) ; Services.prefs.setBoolPref( "...
-
Page 19: Part Ii : Applicative User Interface
Applicative user interface Part II... -
Page 20: Applicative User Interface
2.1 Applicative user interface The SMT210 device has a Web user interface that can be accessed with a Web browser. The supported Web browsers are: Google Chrome Moz illa Firefox MS-Edge ( Chromium) It is available from the URL: http:/ / <device_ IP_ addr>/... -
Page 21: Part Iii : Administration Console User Interface
Administration console user interface Part III... -
Page 22: Administration Console User Interface
3.1 Administration console user interface The SMT210 device has a Web user interface that can be accessed with a Web browser. The supported Web browsers are: Google Chrome Moz illa Firefox MS-Edge MS-Edge ( Chromium) It is available from the URL: http:/ / <device_ IP_ addr>/... -
Page 23: Configuration > Administrator
☛ The same login credentials are used to access to the WebDAV server. ☛ It is recommended that you enter one unique value for each device. In case several SMT210 devices are located in different buildings H ostname or geographical locations, we recommend that you enter hostname values with information about the building and the location ( e.g. -
Page 24: Configuration > Lan
Qeedji devices for all the 802.1X authentication methods are the LAN MAC address value of the SMT210 device, any new Qeedji device entry must be registered in your RADIUS server with these specific values with the format... -
Page 25: Configuration > Wlan
Qeedji devices for all the 802.1X authentication methods are the LAN MAC address value of the SMT210 device, any new Qeedji device entry must be registered in your RADIUS server with these specific values with the format... -
Page 26: Configuration > Output
3.1.4 Configuration > Output pane, select the Output menu to configure the audio output of the device, among other things. From the Configuration : 1024 x600 60Hz AM1024 600LTMQW-00H. Screen resolution Overscan : horizontal origin of the viewport in pixel, : vertical origin of the viewport in pixel, : width of the viewport in pixel, Width : height of the viewport in pixel. -
Page 27: Configuration > App
SDK -G4 API ( PDF example) . For further information, contact support@ qeedji.tech. : Configure the device to receive an App coming from any WebDAV client or from any compatible software suite. Once the App is Push WebDAV loaded, it starts immediately. - Page 28 ☛ To find out which software suites are capable of publishing an App on devices, contact support@ qeedji.tech. Qeedji : allows to configure the device so that it can regularly load or update an App from a remote WebDAV server. Once the App is loaded, Pull WebDAV it starts immediately.
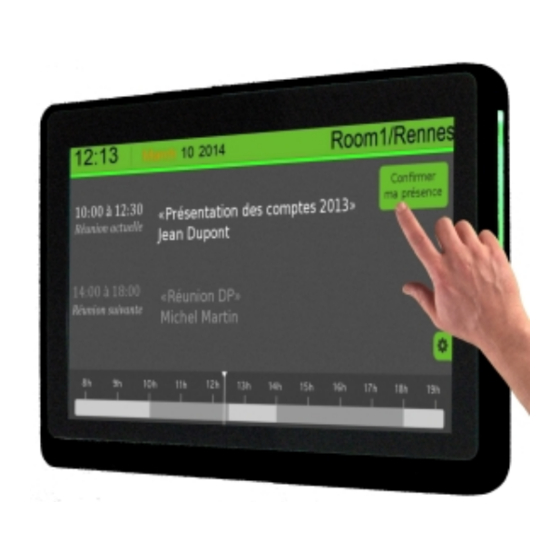
- Page 29 The device can support for example Room booking App. With this App, the SMT210 device can book, validate or delete meeting room reservations. Connected to an LDAP server, the user has to first authenticate itself with an NFC badge. For further information, contact support@ qeedji.tech.
-
Page 30: Configuration > Servers
3.1.6 Configuration > Servers pane, select the Servers menu to define the configuration of the servers peripheral to your device. In the Configuration status, software installation and configuration servers. Status server : URL of the remote server' s WebDAV frontend for the broadcast of the device status file. - Page 31 Proxy server ¹ If your device does not have access to the Internet, it is possible to turn an MS-Windows computer into a NTP server. For further information, contact your IT department.
-
Page 32: Configuration > License
3.1.7 Configuration > License pane, select the License menu to view your device license number. In the Configuration This license number is registered at the factory when the device is ordered. It is then sent to you by e-mail. If it has disappeared due to a handling error or after formatting your device, an error message indicating that the license is invalid will appear on your screen. -
Page 33: Configuration > Date And Time
3.1.8 Configuration > Date and time pane, select the Date and Time menu to check the time configuration: From the Configuration timezone, system date of your device (day and time). To update the date and time of your device, click on the value and then click on the button. -
Page 34: Configuration > Regionality
3.1.9 Configuration > Regionality pane, select the Regionality menu to choose the language in which information messages or error messages related to the From the Configuration device need be displayed. The supported languages are: English, Spanish, German, French. -
Page 35: Configuration > Tasks
3.1.10 Configuration > Tasks pane, select the Tasks menu to: From the Configuration program a device reboot task, program an energy management task for the appliance to reduce its energy consumption. Device restart tasks To create a restart task, click on the button and then the button. - Page 36 Example value (ICAL format): BEGIN:VCALENDAR VERSION:1.0 BEGIN:VEVENT SUMMARY:Standby Task 1 X-POWER-MANAGER-LEVEL:MIN DTSTART:20190805T090000 DTEND:20190805T120000 RRULE:FREQ=WEEKLY;BYDAY=MO,TU,WE,TH,FR,SA,SU;UNTIL=20200416T0000 END:VENT END:VCALENDAR ☛ The Power Manager task scheduled at the device Web user interface has no effect when another sleep task is scheduled within the App. In this version, here is the state of the device when the power manager is in the V ery highly optimiz ed state: Function Associated User Preferences...
- Page 37 ☛ The values of these user preferences are all modifiable.
-
Page 38: Configuration > Variables
3.1.11 Configuration > V ariables pane, select the V ariables menu to set variable (or TAG) values for this device. From the Configuration The variable names are: field1 field2 field3 field4 field5 These variable values can then be used in Apps to perform specific processing for certain devices only. ☛... -
Page 39: Maintenance > Test Card
3.1.12 Maintenance > Test card pane, select the Test card menu to enable or disable the test pattern. The test pattern is often enabled during: From the Maintenance installing devices on the network, the development of the output resolution and overscan. ☛... -
Page 40: Maintenance > Middleware
Maintenance ☛ Corrective and evolutive maintenance software versions are regularly made available on the Qeedji Web site. It is therefore advised to regularly update the device firmware. From this website, download the latest version available for your device model. Unz ip the archive .zip... -
Page 41: Maintenance > Logs
3.1.14 Maintenance > Logs pane, select the Logs menu to activate logs. From the Maintenance The log levels are: : activation of level logs: ERROR + WARN + DEBUG, DEBUG : activation of level logs: ERROR + WARN, WARN : activation of level logs: ERROR, ERROR : disabling logs. -
Page 42: Maintenance > Preferences
3.1.15 Maintenance > Preferences pane, select the Preferences menu to view all the preferences. In the Maintenance The filter allows to display only the preferences whose name contains the string entered in the filter. All the preferences have optimal default values. Double click on a preference to change its value. -
Page 43: Maintenance > Tools
App. If the problem persists, and the Format button is available, clicking on the button will format the content. It is then necessary to publish again the App. Format ☛ If the problem persists after formatting the SD card, contact your support. Qeedji... -
Page 44: Information > Device
3.1.17 Information > Device pane, select the Device menu to view system information about the device. In the Information : label and version of the embedded middleware, Middleware : model of the device, Model Qeedj i : name of the device on the network, Hostname : MAC address (value used in particular to generate the license key of the device), : Universal Unique IDentifier,... -
Page 45: Information > Network
3.1.18 Information > Network pane, select the Network menu to view a summary of the device' s network configuration. In the Information... -
Page 46: Part Iv : Configuration By Script
Configuration by script Part IV... -
Page 47: Configuration By Script
4.1 Configuration by script The SMT210 device can auto-configure with a configuration script. The configuration script can be either: hosted on a remote WebDAV server or broadcasted by your DH CP server (code 66) or injected through an USB storage device or dropped in the device WebDAV directory with a WebDAV client. -
Page 48: Part V : Technical Information
Technical information Part V... -
Page 49: Built-In Rfid Reader
5.1 Built-in RFID reader The device SMT210 has a RFID tag reader allowing to recognize the badges supporting the NFC technology. Modulation Data rate Tested Type Brand (Manufacturer) Applicable standard Supported freq uency (kbps) configuration Mifare Classic 1K /4K EV1 & mini ¹... -
Page 50: Technical Specifications
5.2 Technical specifications Model Manufacturer SMT210 Qeedji Processor DM3730 1 GH z Peripherals 2x USB 2.0 H ost (Low/Full/H igh Speed) 1x USB client 1x GPIO for the internal relay driving 3x GPIO bidirectional 2x side LEDs Storage Internal flash memory: 2 GB... - Page 51 Operating humidity Storage humidity < 80 % < 85 % Display duration per per day for the touch screen On: 16 hours (max.) Standby: 8 hours Weight Dimensions (W x H x D) With WIFI: 0,897 K g (1,97 lb) 258 x 176 x 35 (10,15"...
-
Page 52: Conformities
5.3 Conformities In conformity with the following European directives: LVD 2014/ 35/ EU EMC 2014/ 30/ EU... - Page 53 Contacts Part V I...
-
Page 54: Contacts
6.1 Contacts For further information, please contact us: Technical support: support@ qeedji.tech, Sales department: sales@ qeedji.tech. Refer to the Web site for FAQ, application notes, and software downloads: https://www.qeedji.tech/ Qeedj i Qeedj i FRANCE INNES SA 5A rue Pierre J oseph Colin... - Page 55 Appendix Part V II...
-
Page 56: Appendix: Device Status (Status.xml)
7.1 Appendix : Device status (status.x ml) The SMT210 device is updating regularly its device status stored in its WebDAV directory: / .status http:/ / <device-ip-addr>/ .status/ This file can be periodically sent to a remote WebDAV server for monitoring purpose.
Need help?
Do you have a question about the SMT210 and is the answer not in the manual?
Questions and answers