Table of Contents
Advertisement
Quick Links
Advertisement
Table of Contents

Related Manuals for Qeedji SMT210


Summary of Contents for Qeedji SMT210
- Page 1 User manual 001A SMT210 4.13.13...
- Page 2 Product informa on Product design and specifica ons are subject to change at any me and `Qeedji` reserves the right to modify them without no ce. This includes the hardware, the embedded so ware and this manual, which should be considered as a general guide to the product. The accessories supplied with the product may differ slightly from those described in this manual, depending on the developments of the various suppliers.
-
Page 3: Table Of Contents
Table of contents 1 - Descrip on and installa on Introduc on Ge ng started with the device Device fixture 1.2.1 Device dimensions 1.2.2 Labelling 1.2.3 Device start-up step 1.2.4 Testcard 1.2.5 LEDs behaviour Connectors 2 - Configura on Configura on Web interface Configura on >... -
Page 4: Introduc On
This device is intended to work with the power supply unit. This power supply unit must be connected to a mains socket conforming to standard NF C 15-100. If the AC power cable is damaged, it must be replaced. It is possible to order a power supply unit replacement by sending a request to the email address sales@qeedji.tech. -
Page 5: Ge Ng Started With The Device
Ge ng started with the device Front face and side face RFID tag sensor, Le side LED, Right side LED, Built-in speaker, Touch screen. Bo om face SD CARD DC IN USB2 USB1 CLIENT Power supply connector, Power supply red LED, Status green LED, Jack 3.5 mm GPIO connector, RJ45 LAN PoE connector,... -
Page 6: Device Fixture
Device fixture 1.2.1 200 mm 258 mm 6 mm ≤ Ø ≤ 8 mm Ø ≤ 4 mm... -
Page 7: Device Dimensions
Device dimensions 1.2.2 258 mm 35 mm... -
Page 8: Labelling
The model of the device, the power supply characteris cs, the serial number (PSN) and the MAC address are wri en on labels which are stuck on the case. www.qeedji.tech 5A rue Pierre Joseph Colin 35000 RENNES FRANCE Model: SMT210 Input: 12V DC 830mA MAC: 00:1C:E6:02:01:A9 PSN00434-01043 CD9 This is the label stuck also on the cardbox. -
Page 9: Device Start-Up Step
Device start-up step 1.2.4 Step 1 (T0=0s) Step 2 (T~21s) Step 3 (T~1min) Device start-up ini alisa on Device start-up finalisa on Nominal mode This phase dura on is depending on some variable values During this step, the device has to play the App content. (like NTP), some network access dura on or some data When firmware upgrade process occured, in case checking (check-disk) -
Page 10: Testcard
Testcard 1.2.5 At the factory, the device content set by default is the . The chart displays important informa on to assist in the device configura on: Test Card Disable the by using the WebUI. Test Card... -
Page 11: Leds Behaviour
LEDs behaviour LED POWER behaviour (power on device) State Informa on OK: Power supplied Off Error: Power supply issue ¹ LED LAN behaviour (power on device) State Informa on Off There is no network traffic on the Ethernet connector Blinking The blinking frequency is indica ng the data rate on Ethernet connector LED STATUS behaviour depending on device start-up steps •... - Page 12 Error. ¹ Off ¹ If the problem persists in despite of an appropriate power-supply, contact support@qeedji.tech. ² If the problem persists, it is recommended to find out the media not supported yet by the system and remove it from content.
-
Page 13: Connectors
During board (re)star ng, the defaut level for GPIO4 is 3.3V The GPIO4 has: one 4.7 KOhms pull-up to 3.3V, one 182 KOhms pull-down to 0V. Principle schema cs of several use case Three wires input configura on for GPIO4: PERIPHERAL SMT210 3.3V 1 (Jack) 3 (Jack) Input Switch CPU/GPIO4 2 (Jack) Two wires configura on for GPIO4:... - Page 14 SMT210 PERIPHERAL 3 (Jack) Input CPU/GPIO4 Switch or dry loop 2 (Jack) Output configura on for GPIO4: Power supply SMT210 PERIPHERAL 3 (Jack) CPU/GPIO4 Output 2 (Jack) Logic gate, transistor or opto-coupler Jack 3.5 mm GPIO4 configura on The GPIO configura on des GPIOs can be realized by edi ng some user preferences in the device configura on Web interface or thanks to a configura on script.
- Page 15 Applica on when using a strike In case the device SMT210 has to drive a strike for an electric door, it is highly recommended to check, before any use, that a addi onnal freewhell diode is really installed with the strike.
- Page 16 Freewheel diode Strike It is recommended to plug the freewheel diode very close to the strike. Phoenix connector GPIOs configura on The GPIOs configura on can be done by edi ng the user preferences in the device configura on Web interface or with a configura on script. The part related to the GPIO configura on is explained below: // Set Phoenix direction: input or output if (aDirection == "out")
-
Page 17: Configura On Web Interface
Configura on Web interface The SMT210 device has a Web-based configura on interface that can be accessed with a Web browser. The supported browsers are: Google Chrome Mozilla Firefox MS-Edge MS-Edge (Chromium) It is accessible from the URL: http://<device_IP_addr>/ By default, the login creden als for the configura on Web interface and the Web server are:... -
Page 18: Configura On > Administrator
For security reasons, it may be useful to change the login creden als for the device's configura on Web interface. Please keep these login creden als in a safe place a erwards. It is recommended that you enter a unique value for each device. In case several SMT210 devices are located in different buildings or geographical loca ons, we Hostname recommend that you enter hostname values with informa on about the building and the loca on (e.g. -
Page 19: Configura On > Lan
Configura on > LAN 2.1.2 In the pane, select the LAN menu to set up the network configura on of the interface of your device: Configuration If your device is not located in a secure network, select: security: None. If your device is located and properly declared in a secure network, select , then select an authen ca on method supported by your RADIUS server: 802.1X... -
Page 20: Configura On > Wlan
Configura on > WLAN 2.1.3 From the pane, select the WLAN menu to set up the network configura on of the interface on your device. Configuration WLAN ☛ The menu is only displayed when the op on is supported by your device. WLAN WLAN Connection mode... -
Page 21: Configura On > Output
To alleviate this problem, use the overscan on your device to slightly reduce Qeedji the width and height of your container. While doing so, it is recommended to display the test pa ern of the device. -
Page 22: Configura On > App
*tar.gz, *.zip, *.tar, *.tgz For more informa on, contact support@qeedji.tech. : Configure the device to receive a published App from any WebDAV client or compa ble so ware suite. Once the App is received, its content is immediately Push WebDAV played. - Page 23 (status.xml). ☛ To find out which so ware suites are able to publish on a remote server, an App suppor ng devices, contact support@qeedji.tech. Qeedji : allows you to configure the device so that it can regularly retrieve XPF content from a remote WebDAV server and transform it into an Pull WebDAV - XPF Compatibility App.
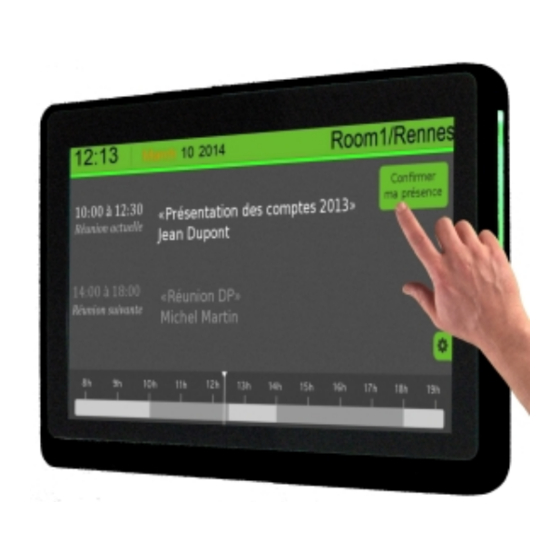
- Page 24 App for resources reserva on display and control (Push WebDAV) By regularly connec ng to your calendar system, HTML Apps managing the display and control of mee ngs in the rooms of your building are available to work with media players. Using its touch screen, the SMT210 can, with this App, connect to an LDAP server to authen cate itself with an NFC badge and book, validate or delete mee ng room reserva ons.
-
Page 25: Configura On > Servers
Configura on > Servers 2.1.6 In the pane, select the Servers menu to define the configura on of the servers peripheral to your device. Configuration status, so ware installa on and configura on servers. Status server : URL of the remote server's WebDAV frontend for the broadcast of the device status file. -
Page 26: Configura On > License
Configura on > License 2.1.7 In the pane, select the License menu to view your device license number. Configuration This license number is registered at the factory when the device is ordered. It is then sent to you by e-mail. If it has disappeared due to a handling error or a er forma ng your device, an error message indica ng that the license is invalid will appear on your monitor. -
Page 27: Configura On > Date And Me
Configura on > Date and me 2.1.8 From the pane, select the Date and Time menu to check the system date and me of your device. Configuration To update the date and me of your device, click on the value and then click the bu on. -
Page 28: Configura On > Regionality
Configura on > Regionality 2.1.9 From the pane, select the Regionality menu to choose the language in which informa on or error messages from the device should be displayed. Configuration The supported languages are: English, Spanish, German, French. -
Page 29: Configura On > Tasks
Configura on > Tasks 2.1.10 From the pane, select the Tasks menu to: Configuration program a device reboot task, program an energy management task for the appliance to reduce its energy consump on. Device restart tasks To create a restart task, click on the bu on and then the bu on. - Page 30 Func on Associated User Preferences Sound: inac vated = true innes.power-manager.level.min.<>.mute Screen: off innes.power-manager.level.min.<>.power-mode Volume: 0% innes.power-manager.level.min.<>.volume Opacity: 100% = 100 innes.power-manager.level.min.<>.opacity Brightness: 0% innes.power-manager.level.min.<>.brightness Backlight: 0% innes.power-manager.level.min.<>.backlight In this version, here is the state of the device when the power manager is in the Highly op mized state: Func on Associated User Preferences Sound: ac vated...
-
Page 31: Configura On > Variables
Configura on > Variables 2.1.11 From the pane, select the Variables menu to set variable (or TAG) values for this device. Configuration The variable names are: - `field1', - `field2`, - `field3`, - `field4`, - `field5`. Variable values can only contain characters from the ASCII-7bits table. These variable values can then be used in Apps to perform specific processing for certain devices only. -
Page 32: Maintenance > Testcard
Maintenance > Testcard 2.1.12 From the pane, select the Testcard menu to enable or disable the test pa ern. The test pa ern is o en enabled during: Maintenance installing devices on the network, the development of the output resolu on and overscan. ☛... -
Page 33: Maintenance > Middleware
☛ Correc ve and evolu ve maintenance so ware versions are regularly made available in the support tab of the official website p://www.qeedji.tech. It is Qeedji therefore advisable to regularly update your device. From this website, download the latest version available for your device model. Unzip the archive and get the .zip... -
Page 34: Maintenance > Logs
☛ These logs can only be interpreted by so ware developers who are familiar with the so ware bricks that have been developed. Ac va ng the logs with a level other than should only be done a er a request from support. Qeedji Enabling traces with a level can significantly disrupt the opera on of the device. -
Page 35: Maintenance > Preferences
Before changing any value of a preference, please consult your support. ◬ Qeedji Double click on a preference to change its value. bu on resets a subset of preferences allowing the device to reprogram its factory preferences. Restore factory preferences Here are some user preferences that may be useful. -
Page 36: Maintenance > Tools
Correct Correct Format clicking the bu on will format the contents. It is then necessary to republish an App. Format ☛ If the problem persists a er forma ng the SD card, contact your support. Qeedji... -
Page 37: Informa On > Device
: label and version of the embedded middleware, Middleware : model of the device, Model Qeedji : name of the device on the network, Hostname : MAC address (value used in par cular to generate the license key of the device), : Universal Unique IDen fier, UUID : Product Serial Number. -
Page 38: Informa On > Network
Informa on > Network 2.1.18 In the pane, select the Network menu to view a summary of the device's network configura on. Information... -
Page 39: Configura On By Script
Configura on by script The smt210 can auto-configure when it can load a configura on script. The configura on-by-script can be either hosted on remote WebDAV server, or broadcasted by your DHCP server (code 66) or injected with a USB storage device. For further informa on, refer to the configura on-by-script... -
Page 40: Appendix
Appendix Device status (status.xml) The SMT210 device is upda ng regularly its device status stored in its WebDAV directory: /.status http://<device-ip-addr>/.status/ This file can be periodically sent to a remote WebDAV server for monitoring purpose. Status.xml example: <device-status xmlns="ns.innes.device-status"> <device>... -
Page 41: Built-In Rfid Reader
Built-in RFID reader The device smt210 has a RFID tag reader allowing to recognize the badges suppor ng the NFC technology. Modula on Data rate Tested Type Brand (Manufacturer) Applicable standard Supported frequency (kbps) configura on 13.56 MHz Mifare Classic 1K/4K EV1 & mini ¹ (NXP) -
Page 42: Technical Specifica Ons
Technical specifica ons Model Manufacturer SMT210 Qeedji Processor DM3730 1 GHz Peripherals 2x USB 2.0 Host (Low/Full/High Speed) 1x USB client 1x GPIO for the internal relay driving 3x GPIO bidirec onal 2x side LEDs Storage Internal flash memory: 2 GB... - Page 43 Opera ng humidity Storage humidity < 80% < 85% Display dura on per per day for the touch screen On: 16 hours (max.) Standby: 8 hours Weight Dimensions (L x l x h) 1,0 Kg 258 x 176 x 35 mm Warranty 3 years...
-
Page 44: Conformi Es
Conformi es In conformity with the following European direc ves: LVD 2014/35/EU EMC 2014/30/EU... -
Page 45: Contacts
For further informa on, please do not hesitate to contact us: by phone at +33 (0)2 23 20 01 62, by e-mail: Technical support: support@qeedji.tech, Sales department: sales@qeedji.tech. Refer to the Web site for FAQ, applica on notes, and so ware downloads: Qeedji h p://www.qeedji.tech/...
Need help?
Do you have a question about the SMT210 and is the answer not in the manual?
Questions and answers