Table of Contents
Advertisement
Advertisement
Table of Contents

Related Manuals for Blaupunkt BOLOGNA Bologna C51


Summary of Contents for Blaupunkt BOLOGNA Bologna C51
- Page 1 Radio / Cassette Operating and installation instructions...
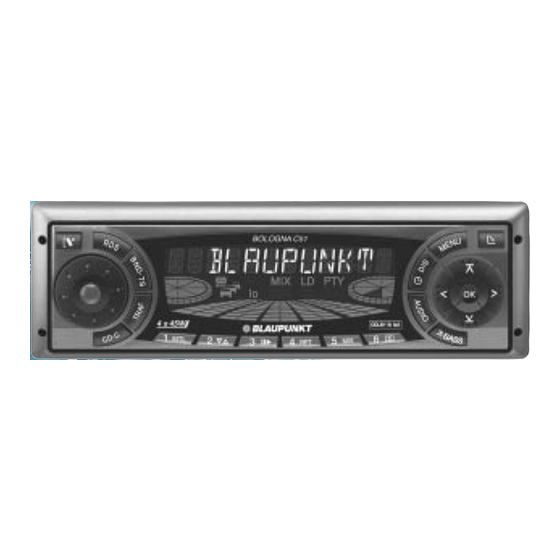
- Page 3 button - unlatches the flip/ release panel Volume control Button - switches the radio and mute function on/off RDS button - switches RDS con- venience function on/off (radio data system). Selects variable radio texts. BND button (band), source se- lection for radio mode, selection of FM memory levels and the wavebands MW and LW (MW and LW are not available...
-
Page 4: Table Of Contents
Notes and accessories ... 29 Road safety ... 29 Installation ... 29 Accessories ... 29 International telephone information ... 29 Flip/release panel ... 30 Switching on/off ... 31 Volume adjustment ... 32 Setting the switch-on volume ... 32 Mute setting ... 32 Telephone Audio/Navigation Audio ... -
Page 5: Notes And Accessories
Thank you for deciding in favour of a Blaupunkt product. We wish you a great deal of pleasure with your new car ra- dio. Before using your car radio, please read these instructions carefully. The Blau- punkt editors are constantly working to make our instruction manuals as clear and easy to understand as possible. -
Page 6: Flip/Release Panel
Your car radio is fitted with a flip/release panel to guard against theft. Without this panel, the unit is worthless to the thief. Protect your unit from theft by taking the flip/release panel with you every time you leave the car. Do not leave the panel behind in the car, even if it is out of sight. -
Page 7: Switching On/Off
There are various ways of switching the car radio on and off, as described be- low. If the car radio is correctly connected to the ignition and has not been switched off using the button 3, it is switched on/off simultaneously with the ignition. You can also switch on your car radio when the vehicle ignition is off. -
Page 8: Volume Adjustment
. Y our Blaupunkt dealer can tell you whi h navigation systems can be used wi h your car radi . If a tr a ffic announcement is receiv... -
Page 9: Setting The Volume For The Confirmation Tone
ffic announcement is not reproduced until the call or the speech output has finished. If a call is received or if the navigation system begins speaking during a traffic announcement, the announcement is reproduced. The telephone call or speech output can be heard when the traffic announcement has finished. -
Page 10: Radio Mode
This unit is equipped with an RDS radio receiver. Many of the receivable FM sta- tions transmit a signal that not only car- ries the programme but also additional information such as the station name and programme type (PTY). The station name appears on the dis- play as soon as it is received. -
Page 11: Tuning Into A Station
In order to switch between memory levels or wavebands, briefly press the BND/TS button 5. There are various methods available for tuning into a station. button :. Press the The unit tunes into the next receivable station. You can also tune into stations manual- Press either the Note: You can only tune into stations... -
Page 12: Storing Stations Automatically (Travelstore)
You can store the six stations with the strongest reception in the region auto- matically (only FM). The stations are stored in the FMT memory. Note: Stations that were previously stored in this memory are deleted in the process. Hold down the BND / TS button 5 for more than two seconds. - Page 13 When the programme type has been selected and the search started, the car radio switches from the current station to a station featuring the selected pro- gramme type. Note: If no station with the selected pro- gramme type is located, a beep sounds and “NO PTY”...
-
Page 14: Optimising Radio Reception
The HiCut function improves the sound during poor radio reception (only FM). If interference occurs, the treble is au- tomatically reduced and thus also the interference level. Press the MENU button 8. button : Press the repeatedly until “HICUT” appears on the display. -
Page 15: Traffic Information
Your car radio is equipped with an RDS- EON reception system. EON stands for Enhanced Other Network. When a traffic announcement (TA) is broadcast, your unit will automatically switch, within a broadcasting network, from a station which does not transmit traffic information to one that does. -
Page 16: Cassette Operation
If there is no cassette in the device button 9. Press the The flip-release panel opens. Insert the cassette into the cassette slot with the open side to the right. Close the control unit. The cassette starts playing with the side that is facing upwards. -
Page 17: Cassette (Scan)
Hold down the OK button ; for longer than two seconds. “CAS SCAN” appears in the display. Samples from all the tracks on the tape are played in ascending order. To halt the scan Press the OK button ; a second time. -
Page 18: Skipping Blank Tape
You can automatically skip sections of blank tape that last longer than 10 sec- onds. This requires the blank skip func- tion to be activated. Note: The blank skip can only be set if a cassette is being played. Press the MENU button 8. button : until Press the “BLANK SKIP”... -
Page 19: Cd Changer Mode
Note: Information on handling CDs, in- serting CDs and operating the CD changer can be found in the oper- ating instructions accompanying your CD changer. Press the CD•C button @ repeat- edly until “CHANGER” appears on the display. Playback begins with the first CD the CD changer recognises. -
Page 20: Random Play (Mix)
To play the tracks on the current CD in random order, press the but- ton 5 MIX >. “MIX CD” appears briefly on the display and MIX lights up. To play the tracks of all the inserted CDs in random order, press the button 5 MIX >... -
Page 21: Clock - Time
/ DIS 7 button briefly Press the to display the time. To set the time manually, press the MENU button 8. button : repeat- Press the edly until “CLOCKSET” appears on the display. button :. Press the The time appears on the display. The minutes flash and can now be set. -
Page 22: Tone And Volume Balance
You can adjust the tone and volume balance separately for every audio source (radio, Cassette, CD changer, AUX and traffic announcements). Note: Adjustments to tone and volume balance for traffic announcements can only be made during a traffic announcement. Press the AUDIO = button. “BASS”... -
Page 23: X-Bass
X-Bass means increased bass at low volumes. Note: X-BASS can be adjusted separate- ly for each audio source (radio, Cassette, CD-changer and AUX). The X-BASS boost can be increased in steps from 1 to 3. “X-BASS-OFF” means the function is switched off. -
Page 24: External Audio Sources
To connect up an external audio source, you will need an adapter cable (Blau- punkt no.: 7 607 897 093), obtainable from any authorised Blaupunkt dealer. Press the MENU button 8. “MENU” appears on the display. button : repeat- Press the edly until “AUX-IN-1 OFF”... -
Page 25: Guarantee
Not covered by such guarantee are damage caused by wear and tear, improper use or commercial use. In order to claim the Blaupunkt manu- facturer's guarantee, please send in the defective unit along with proof of pur- chase to the central Blaupunkt after- sales department in your country.
Need help?
Do you have a question about the BOLOGNA Bologna C51 and is the answer not in the manual?
Questions and answers