Table of Contents

Related Manuals for Bissell 82G71


Summary of Contents for Bissell 82G71
- Page 1 Momentum B A G L E S S V A C U U M U S E R ’ S G U I D E 8 2 G 7 S E R I E S Safety Instructions Product View Assembly Operation 10-16 Maintenance and Care...
- Page 2 Your BISSELL vacuum is well made, and we back it with a limited one year warranty. We also stand behind it with a knowledgeable, dedicated Consumer Services Department, so, should you ever have a problem, you’ll...
-
Page 3: Important Safety Instructions
MPORTANT SAFETY INSTRUCTIONS When using an electrical appliance, basic precautions should be observed, including the following: READ ALL INSTRUCTIONS BEFORE USING YOUR UPRIGHT VACUUM. Always connect to a polarized outlet (left slot is wider than right). Unplug from outlet when not in use and before conducting maintenance. -
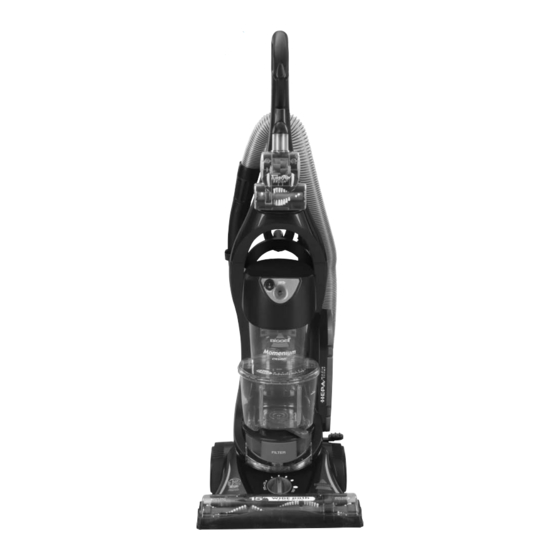
Page 4: Product View
roduct view Handle TurboBrush ® Power Switch Upper Tank Easy Empty ™ Dirt Container Washable Pre-Motor Filter Headlight Foot Window Wide Cleaning Foot w w w . b i s s e l l . c o m Hose and Cord Clip Dusting Brush/ Upholstery Tool Power Cord... -
Page 5: Attach Handle To Vacuum
ssembly The only tool you’ll need to assemble your vacuum cleaner is a Phillips screwdriver. Attach handle to vacuum Locate the handle and cord wrap. Remove the screw packet taped to the handle. Stand the vacuum upright and from the rear of the unit, slide the base, of the handle firmly into the grooves at the top of the vacuum body. -
Page 6: Operation
ssembly Attach vacuum hose and tools Line up the tabs on the base of the Twist ‘n Snap hose with the corresponding notches on the hose collar as shown. Turn the Twist ‘n Snap hose to the left to lock the hose into place. Connect the curved hose wand to the hose. -
Page 7: Handle Positions
peration Handle positions Press the handle release pedal, located on the lower left side of the vacuum, with your foot to place your vacuum into one of three cleaning positions. Upright – For storage and above floor cleaning with tools. Normal Cleaning –... -
Page 8: Special On-Board Tools
peration Clean filter indicator Select Models Only The clean filter indicator tells you when the air flow in your vacuum is reduced due to dirty filters or a clog in the hose. The clean filter indicator will remain green while the unit is running until the airflow is reduced by a clog or dirty filter. -
Page 9: Power Cord Usage
peration Crevice Tool: Use in tight narrow spaces. Extension Wand: Use with desired attachment for a longer reach. Curved Hose Wand: Use with desired attachment for a longer reach or for cleaning hard to reach places. ® TurboBrush : Use rotating brush action for small areas such as stairs and upholstery. -
Page 10: Maintenance And Care
aintenance and care To maximize your cleaning performance and extend the life of your vacuum, it is very important that you empty your dirt container and check and clean your filters frequently. Perform the following maintenance steps: Empty the dirt container when the dirt reaches the “Full”... - Page 11 aintenance and care Cleaning the pre-motor and replacing the post-motor HEPA media filter Unplug the vacuum from electrical outlet. The pre-motor filter protects the motor from dirt particles. It is located in the slide out tray underneath the dirt container. If the filter becomes dirty, pull out the tray, lift out the foam filter pad and clean it.
- Page 12 aintenance and care Check rotating floor brush and drive belt You should check your vacuum cleaner’s rotating floor brush and drive belt regularly for wear or damage. You should also clean the brush and brush ends of strings, hair and carpet fibers. This type of debris can wrap around the brush and hamper its ability to effectively clean your carpet.
- Page 13 NOTE: It is important that you use only genuine BISSELL replacement belts. Generic belts may not meet the exact specifications required to keep your vacuum operating at its peak performance.
- Page 14 aintenance and care Maintaining TurboBrush The TurboBrush should be checked regularly for clogs or debris wrapping around the brush. Unplug the vacuum from electrical outlet. If a clog is present or debris is visible, unscrew the two screws on the back of the TurboBrush to remove the faceplate and clear any obstructions.
-
Page 15: Clearing Clogs
aintenance and care Clearing clogs Low suction or poor pickup may be due to a clog in the vacuum cleaner. If you notice a change in the sound of the motor, check for clogs. Unplug the vacuum from electrical outlet. Empty dirt container. - Page 16 aintenance and care Cleaning the upper tank Unplug the vacuum from electrical outlet. Remove the dirt container as instructed in "Empty Dirt Container" on page 10. Flip separator plate down. Remove debris barrier by pulling straight down. Remove any dirt or debris on the debris barrier itself.
-
Page 17: Troubleshooting
roubleshooting Vacuum cleaner won’t turn on Possible causes 1. Power cord not plugged in 2. Blown fuse/tripped breaker in home Vacuum cleaner and tools won’t pick up dirt Possible causes 1. Incorrect height adjustment 2. Hose not attached to suction opening 3. -
Page 18: Please Do Not Return This Product To The Store
If you should happen to need assistance during assembly or operation, call 1-800-237-7691. Please do not return this product to the store. For any questions or concerns, BISSELL is happy to be of service. Contact us directly at 1-800-237-7691. ISSELL Consumer Services... - Page 19 - BISSELL Vacuum You may purchase parts from your retailer, by calling BISSELL Consumer Services or by visiting our website. Below is a list of common replacement parts. While not all of these parts may have come with your specific model, they are available for purchase if desired.
- Page 20 This warranty gives you specific legal rights, and you may also have other rights which may vary from state to state. If you need additional instruction regarding this warranty or have questions regarding what it may cover, please contact BISSELL Consumer Services by E-mail, telephone, or regular mail as described below. Limited One Year Warranty Subject to the *EXCEPTIONS AND EXCLUSIONS identified below, upon receipt of the product BISSELL Homecare, Inc.
Need help?
Do you have a question about the 82G71 and is the answer not in the manual?
Questions and answers
how to fill the cleaning fluid tank to add water