
Related Manuals for Hoshizaki DL-1HTF


Summary of Contents for Hoshizaki DL-1HTF
- Page 1 LIQUID DISPENSER DL-1HTF INSTRUCTION MANUAL FOR END USER 3-16 Minamiyakata, Sakae, Toyoake, Aichi 470-1194 Japan L1W031102 (070116)
-
Page 2: Table Of Contents
NOTES TO USERS * Thank you for purchasing HOSHIZAKI’s dispenser. * Before operating this dispenser, you should first thoroughly read this manual. * Please keep this manual for later reference. CONTENTS PAGE 1. CONSTRUCTION ------------------------------------------------------------------------------------------ 1 [a] GENERAL ----------------------------------------------------------------------------------------------- 1... - Page 3 6. CHECKS AND ADJUSTMENTS -----------------------------------------------------------------------14 [a] JOINT TAP ---------------------------------------------------------------------------------------------14 [b] HANGER -----------------------------------------------------------------------------------------------14 [c] PREMIX PACKAGE ----------------------------------------------------------------------------------15 [d] ADJUSTMENTS --------------------------------------------------------------------------------------16 7. TROUBLE SHOOTING ----------------------------------------------------------------------------------18 [a] TROUBLES WITH ERROR CODE INDICATION --------------------------------------------18 [b] TROUBLES WITHOUT ERROR CODE INDICATION --------------------------------------19 [c] PERIODIC REPLACEMENT ----------------------------------------------------------------------20 8.
-
Page 4: Construction
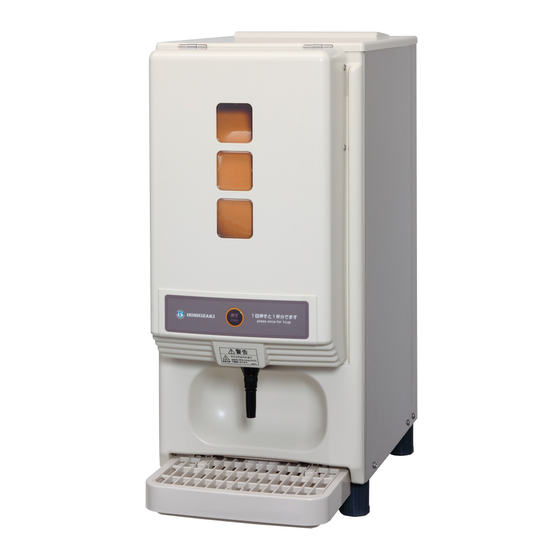
1. CONSTRUCTION [a] GENERAL [12] [13] [10] [14] [11] [15] [1] Screen The remaining premix level can be checked. [2] Dispense Button See “[b] DISPENSE BUTTON”. [3] Dispensing Nozzle Dilutes premix with hot water and dispenses product. -
Page 5: [B] Dispense Button
[4] Drip Pan Receives spilled product. * Clean up spills as soon as possible. [5] Exhaust Opening Exhausts hot air to control interior temperature. [6] Front Cover [7] Front Panel [8] Power Cord [9] Accessories Include impellers, multi tube, reducer, joint and extra O-rings. [10] Temperature Display/Setting Panel See “[c] TEMPERATURE DISPLAY/SETTING PANEL”. -
Page 6: [C] Temperature Display/Setting Panel
[c] TEMPERATURE DISPLAY/SETTING PANEL [1] Water Level Display Indicates the hot water tank level in five scales F (full) > H > C > L > E (empty). [2] Temperature Display Indicates the hot water tank temperature. [3] Up/Down Button Increases or decreases the set point. -
Page 7: Installation
2. INSTALLATION WARNING To prevent possible water leak, electric shock or fire, the installation must be carried out by qualified personnel. [a] CHECKS AFTER INSTALLATION * In the presence of the installer, check for proper installation according to the installation manual provided. -
Page 8: Checks Before Operation
1. To prevent electric shock, do not touch the attachment plug, power switch, or other electrical parts with damp hands. 2. If the earth leakage circuit breaker turns off, contact an authorized Hoshizaki service company. To prevent electric shock or fire, do not turn it back on. - Page 9 3. In case of trouble, turn off the power switch and unplug the unit or disconnect the main power supply, and immediately contact an authorized Hoshizaki service company. To prevent possible electric shock or fire, do not keep the unit in operation.
-
Page 10: [A] Start Up
[a] START UP 1) Open the front cover, and turn on the power switch on the front panel. Water starts to be supplied into the hot water tank. 2) When the hot water tank fills up and water boils, the ready lamp and dispense lamp light up to indicate that product can be dispensed. -
Page 11: Maintenance And Inspection
3. In case of trouble, turn off the power switch and unplug the unit or disconnect the main power supply, and immediately contact an authorized Hoshizaki service company. To prevent possible electric shock or fire, do not keep the unit in operation. -
Page 12: [A] Dispensing Nozzle
IMPORTANT 1. After closing time, be sure to carry out maintenance and inspection. 2. Follow the instructions in “5. MAINTENANCE AND INSPECTION” whenever required. 3. In cleaning operations, be careful not to lose any parts. The unit will leak water or fail to dispense properly. 4. -
Page 13: [D] Suction Pump
2) Rinse thoroughly with clean water and wipe dry with a soft cloth. 3) Attach the grille back on the drip pan and fit them into the unit. [d] SUCTION PUMP (WEEKLY) IMPORTANT 1. The impeller must be replaced once a year. But the life cycle depends on the running rate. - Page 14 7) Remove the inner casing and reducer from the Impeller casing. The reducer can be removed by turning and pulling down. Casing 8) Remove the impeller from the casing by putting a finger between the blades, turning in the arrow direction and pulling towards you.
-
Page 15: [E] Label, Front Cover, Side Panel
1) Press the test button. 2) Check if the power switch turns off. 3) If the power switch does not turn off, unplug the unit and contact an authorized Hoshizaki service company. Test Button [g] WIRES Check the wires for damage or deformation once or twice a year. In case of any problem, contact an authorized Hoshizaki service company. -
Page 16: [I] Attachment Plug
* The attachment plug is plugged into a separate receptacle. * The attachment plug and power cord are not overheated, damaged, weighed down or caught in. In case of any trouble, immediately contact an authorized Hoshizaki service company and ask for a repair. -
Page 17: Checks And Adjustments
6) When the unit will not be in use for more than a week, shut down the unit according to “4. [d] SHUT DOWN” and unplug the unit. IMPORTANT If the warranty period is expired, ask an authorized Hoshizaki service company for the following inspections to ensure safety and prevent troubles caused by electric leak or overheating (charged). -
Page 18: [C] Premix Package
* Set the joint tap correctly, or premix cannot be dispensed properly. Correct the joint tap if necessary. IMPORTANT 1. Always use the premix specified by Hoshizaki. 2. To prevent changes in color or smell to reduce marketability, do not use a premix package for more than three consecutive days. -
Page 19: [D] Adjustments
3) Open the joint tap. 4) Turn the joint tap nut and remove it from the empty premix Tap Handle package. Wash the joint tap if necessary. (open) 5) Attach the joint tap to a new premix package so that the tap handle is in a proper position when the package is hooked with the joint tap open. - Page 20 4. Check the dispensing time settings by dispensing product more than five times. 5. After a long interval, the initial dispensed amount may be less than the set amount. The unit will dispense the proper amount from the second dispensing action.
-
Page 21: Trouble Shooting
Close the drain lever and reset the error code. Thermistor (2) The drain lever is closed. Immediately contact an authorized Hoshizaki service company. (1) The drain lever is left open. Close the drain lever and reset the error code. (2) The water supply line shut-off valve is closed. -
Page 22: [B] Troubles Without Error Code Indication
2) While pressing the set, up and down buttons together, turn on the power switch. 3) The error code is reset when the display shows a temperature. If the error code appears again, turn off the power switch and immediately contact an authorized Hoshizaki service company. -
Page 23: [C] Periodic Replacement
8. LONG STORAGE, RELOCATION, DISPOSAL, TRANSFER WARNING 1. When restarting the unit after a long storage, contact an authorized Hoshizaki service company. To prevent electric shock, do not restart the unit by yourself. 2. In case of relocation, contact an authorized Hoshizaki service company.
Need help?
Do you have a question about the DL-1HTF and is the answer not in the manual?
Questions and answers